What car enthusiasts don’t do to make their car more convenient and unusual. Some car owners spend a lot of money on professional dashboard tuning. And some craftsmen prefer to do it themselves. This kind of tuning is quite easy to do. In order to replace conventional light bulbs with light-emitting diodes (LEDs), you do not need to have special knowledge or skills. We’ll tell you how to make LED backlighting for the instrument panel in a car with your own hands.
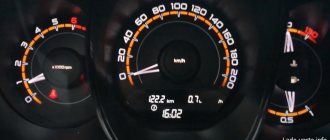
A well-lit dashboard is not only more informative at night, but also has a better view
Disassembling the console
Initially, you need to disassemble the dashboard: remove the protective glass, then the arrows, but keep in mind that they are very fragile, and in order not to damage them, it is better to slip thick paper under the screwdriver; it does not require much effort.
And to remove the dashboard backing you will need a knife, with its help you need to cut through the layer of sealant around the entire perimeter.
After removing the “cover”, use a knife to carefully scratch the filter; it is a special paint. Then degrease this area with acetone or alcohol.
Installation should be carried out in a bright room
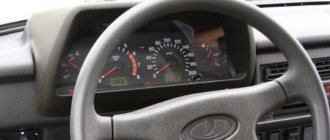
To remove the panel, you need to lower the steering wheel to the “down” position, unscrew two self-tapping screws holding the decorative insert, which is then removed. After unscrewing the 3 panel screws, it is also disconnected after disconnecting the two cables. Now the instructions will be described step by step:
- The protective panel, secured with latches, is removable.
- After removing the decorative panel, the arrows must be taken beyond the limiters. This is done before the stopper of the internal motors. Then the position of the arrows is noted - and you can begin to remove them.
- The arrows are removed with tweezers, applying force to lift them up.
- The graphics are removed with smooth pulling movements from both angles. To avoid damaging it, remove it carefully and slowly.
- After lifting the display, the light-guide plastic underneath will be exposed. It is necessary to remove the sputtering, the clamping light guides themselves, and the temporary pimps. The pimps must be pulled out by pulling them towards you and keeping the spring connecting them.
- The following circuit board has two easy-to-open clamps. Below it is the desired object of the entire work.
- Sprayed graphing must be carefully cleaned with a knife, as it is not washed off with thinners.
- Now it’s time to mark the base for the LEDs and drill holes in the transparent light guide glass.
Please remember the polarity of “+” and “-”. The fact is that a resistance of 270 Ohms is perfectly suitable for 3 diodes - this is how the panel is assembled and soldered.
Preparing the LEDs and the dismantled dashboard
- Now you should solder the negative wire, and transfer the positive wire through the potentiometer, respectively, welding it to “+”.
- In order not to separately solder diodes to the caps of turning and fog lights, you can purchase diodes and mark them in the right places. The issue with the air conditioner is solved in a similar way, but only after preliminary drilling the plastic and immersing the resistor and diode into it.
How to make dashboard arrows backlit
The color of the speedometer and tachometer needles is important. If they are white, then you can leave them as they are. But if not, then you need to remove the old paint with a knife and treat them with alcohol, then paint them with white varnish or regular paint.
The color of the arrow should be white, because only it conveys the entire gamut of LEDs.
You can try and highlight the arrows separately. This requires LEDs with a diameter of 3 mm at 12 V.
Important! In the car network, the voltage is 12 V; if the LEDs are designed for a lower value, then they cannot be connected directly. They should be connected through a stabilizer.
If the diameter of the LEDs is larger, you will have to make additional holes for them.
It is recommended to place LEDs either along the entire scale or opposite those values near which the arrow is most often located.
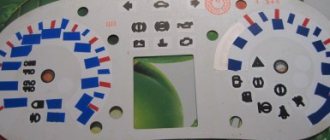
Film instead of LEDs
The more transparent the film, the brighter the instrument illumination will be; depending on the color of the film, the instrument illumination will be. The principle is designed in such a way that light from a standard backlight passes through the film, thereby changing color and illuminating the devices.
Here, as they say, the colors will be limited by your imagination; you can make numbers of one color, arrows of another, and lines of a third. Some amateurs use sandpaper and a scratch pad to clean the base of the instruments on the back side (from the backlight side) so that the numbers and indicators appear brighter. The film can be used as a special film, also sold in car dealerships, or you can find it yourself from scrap materials. A big plus is that no changes will be made to the electronics, which means there can be no short circuit.
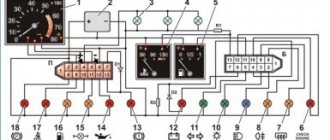
Schemes for smooth switching on of the backlight
To smoothly turn on the backlight of the scale and arrows, you need to spend a little effort, and more specifically, re-solder the circuit.
Below are two diagrams, in the first case - the dashboard, and then - the arrows. The circuits can be implemented on small pieces of a circuit board, which are sold in radio parts stores.
Consider one important factor: if the LEDs differ in power, they will not light up at the same time, some ahead of time, others late, but in general the backlight will turn on smoothly. This also applies to the LEDs on the scale.
Recommendations
- As a rule, when replacing instrument backlight bulbs, many owners want to obtain high clarity and brightness. Please note that if the lights on the dashboard are too bright, this brightness is sufficient on a sunny day. However, at night the panel may glow too brightly, making it uncomfortable to look at the instruments. The result is high eye fatigue and difficulty reading information in the dark.
- To get maximum comfort, it is better to immediately install an additional brightness control in parallel with the diode lamps. This will make it possible to adjust the brightness of the instrument panel illumination. To change the brightness, you need to connect the backlight through a variable rheostat. This solution will allow you to adjust the intensity of the glow taking into account different conditions. Typically, such regulators are on sale in the same place where the diode backlight bulbs themselves are sold. It is important to determine in advance where these regulators will be installed.
Let us also add that if it is necessary to replace the lighting of other elements (for example, on the center console, in the climate control area, etc.), the procedure for replacing lamps is practically no different. The main thing is to disassemble the panels and gain access to the old lamps to dismantle and replace them.We also recommend reading the article on how to make car soundproofing yourself. From this article you will learn which “Shumka” is better to choose for a car, how to apply sound insulation, etc.
- The price of diode light bulbs today is quite low, and the choice is quite large. The same can be said about diode strip. At the same time, you should not save much; it is better to opt for medium or more expensive options from well-known manufacturers. As a rule, the service life and operating efficiency of high-quality products are much higher than their cheap counterparts.
We collect
When everything is ready, we begin to slowly assemble the console. First of all, we install the substrate. Apply sealant to the back side and glue it to the panel.
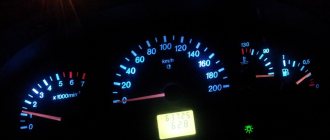
Then we put the arrows and protective glass in place. After modernization, the instrument panel looks bright and unusual.
LED lighting not only looks unusual and bright, but is also a good addition to the car in terms of economy, which helps save battery power, since LEDs consume 80% less energy than a regular light bulb.
Choosing a belt for the machine
I will try not to pour water, but will briefly look at what to look for when choosing an LED strip.
LED Matrix Type
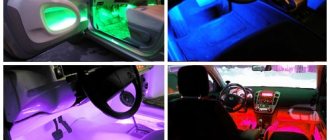
LED interior lighting . To illuminate the car interior, including the trunk, choose SMD 3528 60pcs/m (the size of one LED crystal is 3.5x2.8mm). Why she?
Firstly, we get an average power of 4.4-4.8 W per linear meter with a luminous flux of about 250-300 Lm. With such power, LEDs do not require heat dissipation and the LED strip can be easily mounted on plastic elements. And the luminous flux is sufficient to fully illuminate any interior elements.
If you don’t have enough brightness, take 120 pcs/m.
Secondly, this is the most common tape on sale, we buy it in the first store we come across.
Options like SMD 5050, 5630, 5730 are not suitable due to their high power. Unpleasantly high brightness and the need to mount a heat sink make them not the best choice for LED car interior lighting.
Exterior car lighting . Here we turn on the head. If there is LED lighting under the bottom of the car, you can choose more powerful LEDs - SMD 5050 30/60 pcs/m. The aluminum profile will be our heat sink (more about installation later). For LED illumination of license plates or (God forbid) headlights, this is a bad choice. Such LED lighting will be a bait for traffic police inspectors (read about installation rules and fines at the end of the article).
Regular LEDs or RGB - there is no difference. RGB is a little more expensive, it is more difficult to connect and requires an additional control controller (read more about connecting an RGB strip). But it allows you to change the backlight color.
Protection class
There are mainly three protection classes on sale - IP20, IP65, IP68.
- IP20 – open tape without protective coatings, suitable for use indoors in dry rooms. Afraid of moisture, dust, and any mechanical influences.
- IP65 – with a protective silicone layer that can protect against condensation.
- IP68 - sealed, waterproof LEDs that can be placed on the bottom of the car.
LED class IP68
For LED illumination of the glove compartment or the bottom of the dashboard, IP20 is also suitable if no one pulls it or pours water on it.
For illumination of other elements, IP class 65-68 is desirable.