The instrument panel on the Lada Vesta turned out to be functional and attractive in terms of design. It was developed virtually from scratch and is significantly different from previous AvtoVAZ production cars. In 2016, an updated version of the panel was released - the first one turned out to be somewhat unfinished, and the developers decided to fix everything along with the restyling of Vesta. Owners of cars purchased before the upgrade can use the firmware to update the dashboard.
Functions and features of the Vesta panel device
The instrument cluster on the Lada Vesta is completely different from those used on the Priora, Grant and Kalina. It is now a completely redesigned multifunctional device.
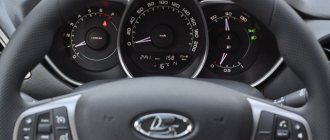
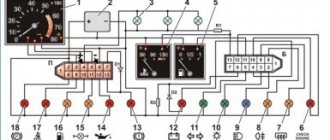
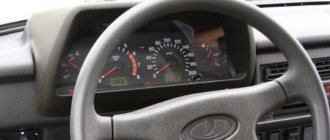
The speedometer is located in the central well - this is the main element of any “tidy” in a production car. The scale implies acceleration to 200 km/h, although in fact the stated maximum speed of Vesta with the current engine is no more than 185 km/h. Next to the speedometer there is a small on-board computer display, on which the driver can see all the necessary information about the operation of the engine and other vehicle systems.
Inside the speedometer scale there are various indicators that inform the driver about different parameters: the hazard warning lights are on and the direction indicators are on, the brake pads are critically worn, the engine is malfunctioning and the engine oil level is low. On the left is the tachometer well, the scale of which is marked from 1 to 7 (1000-7000 rpm). The engine allows you to “spin” up to 5500 rpm - this way there is no harm to the motor. After this mark there is a red zone; prolonged operation of the power unit at such high speeds is not recommended. The tachometer also contains information indicators.
On the right side there is a well in which there are two indicators. One of them informs about the engine temperature, and the second – about the fuel level in the tank. In Grant, the temperature indicator was removed to reduce the cost of the car, but in the climatic conditions of Russia and the CIS countries, it is extremely important for the driver to know the current temperature of the engine oil in order to prevent possible overheating due to various malfunctions.
The fuel tank indicator shows a scale of “full tank”, “half tank” and “empty”. You can see an arrow near the gas pump icon; it is needed to indicate to the driver which side the fuel filler neck is located (the indicator points to the right). There are also warning lights in the right well.
In general, the instrument panel has an attractive design; the scales are backlit in green and orange with white numbers. The only drawback is the poor design of the arrow indicators. The intermediate divisions of the scales are not informative, and you need to get used to them. With a quick glance while moving, it will not be easy to read the readings.
Features of the updated panel
In favor of AvtoVAZ, we can say that the manufacturer constantly modernizes all its cars, even new ones. Increasingly, engineers are listening to ordinary car enthusiasts (surveys on social networks, meetings with representatives, communication on forums). At the request of customers, the dashboard of the Lada Vesta has been modified. The changes include:
- the numbers have become noticeably larger, reading readings while moving has become much easier;
- the backlight is used regardless of whether the lighting is on or not, the backlight is on on all scales at any time;
- instead of white backlight, red is used;
- a voice alert now warns of an unfastened seat belt; the audio also includes a GPS connection and much more;
- the volume of sound notification and voice guidance has increased (information and warning signals);
- the time on the display is now synchronized automatically by satellites of the ERA-GLONASS navigation system;
- The warning indicators have been changed (low tire pressure and unfastened seat belts front and rear).
Export models supplied to Germany and Hungary were the first to be equipped with the updated dashboard. Since 2022, the “tidy” has become available for the domestic market. A function such as adjusting the backlight level has not yet been implemented.
Lada Vesta dashboard malfunctions
If the instrument panel is faulty, it is immediately noticeable; the following signs may indicate a problem:
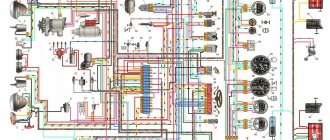
- The contact of the instrument panel with the on-board electrical network is broken. The reason may be a broken wiring or damaged connectors or contacts.
- Sensor malfunction. The dashboard displays incorrect information if the crankshaft position sensor, speed sensor, or fuel level have failed.
- Mechanical damage, for example, exposure to constant vibrations or a strong impact in an accident.
- Faults related to the electronic microcircuit.
- Burnt-out indicator lights - in this case, the backlight disappears.
These malfunctions are obvious, but there are also those whose causes are not easy to understand.
Arrow indicators do not work
If the arrows on the instruments do not work, this may indicate a failure of the sensors responsible for these readings:
- The tachometer does not work. If the tachometer needle does not move, the cause of the malfunction is the device itself. If the crankshaft position sensor or electronic control unit fails, the engine cannot be started.
- The speedometer does not work. If the device is working but does not indicate speed, the cause is a faulty speed sensor. This will also be indicated by the ABS warning light.
- There is no antifreeze temperature reading. The temperature sensor is faulty and transmits incorrect readings to the control unit, which are displayed on the instrument panel.
- No fuel level readings. The unit with the fuel pump is faulty, the ECU does not receive a signal.
You can remove the instrument panel to check the functionality of the elements only after testing all sensors for malfunctions.
Burnt out warning lights
Often the reason for the lack of readings of one or another indicator is burnt-out backlight bulbs. There is a special test to check their performance. When you turn the ignition key, the ECU should start all the instruments and light up all the warning lights in test mode. At this time, you should make sure that the red lamps are working properly (they indicate major problems in the operation of the systems):
- signal indicator of the hand brake and the serviceability of the brake system;
- power steering failure indicator;
- lack of battery charge;
- low oil pressure indicator;
- indicator of security system problems.
Ignoring failure of the listed sensors leads to serious consequences, including failure of the engine and some vital systems for the car.
Exterior
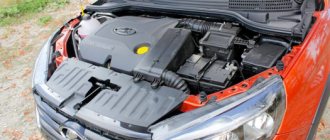
The front of the car is quite reminiscent of the Mitsubishi Lancer X, with “squinted” headlights and a protruding plastic radiator grille.
The rear of the car is reminiscent of the latest AUDI series, but the shape of the trunk and rear wings make the resemblance less expressive. The back is more unique and the whole thing looks quite interesting.
More details about Lada “Vesta” cars
Removing the instrument panel
If the malfunction of the devices is definitely related to the failure of the “tidy” elements, you can begin to dismantle it. To work, you will need a screwdriver (curly and flat), as well as a hex wrench. The procedure looks like this:
- Open the hood and disconnect the terminals from the battery. This will de-energize the on-board network and prevent a short circuit in the dashboard.
- Using a screwdriver, unscrew the two screws securing the tidy.
- Pull the top part towards you until it clicks. The instrument panel assembly can then be removed.
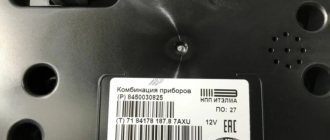
Now you can begin to disassemble the instrument cluster. The same tools are needed for this. There are fastening screws on the left and right - unscrew them. Now, without touching the wires, you should pull the combination towards you and disconnect the wire block in the upper right part. When installing, do not confuse the pinout. Now the instrument panel has been completely removed, you can inspect it for burnt parts.
Signal indicators are checked with a multimeter.
To reinstall the panel, you need to repeat all the steps in reverse order. Removal can be done with your own hands, without the help of specialists. But in the absence of appropriate skills, it is better to entrust the diagnosis to professionals; the approximate cost of such a service will be 1000-2000 rubles. During dismantling, you can glue the dashboard so that the panel does not creak.
Review of SMD diode manufacturer prices
| Name | Price , rub.) |
| Instrument cluster Gamma GF 616 | From 11500 |
| GF 625 | From 8100 |
| Range GF 851 | From 2100 |
| GF 819 Black | From 12000 |
| GF619 | From 9000 |
| Gamma 821 | From 12000 |
| Instrument cluster Sport Ferrum | From 3800 |
| GF822 | From 3000 |
*prices are current as of November 14, 2018.
Dashboard firmware
After the not entirely successful first “tidy” of Vesta, an updated one was released, with the defects corrected. The question arises - what should the owners of the first generation Lada Vesta do? In order for the backlight to work in the daytime without turning on the headlights, you can reflash the “tidy”. If the car is equipped with cruise control not at the factory, but by the owner, the corresponding indication on the old panel without firmware will not light up.
Without the skills and knowledge, installing software yourself can do more harm than good. The tailoring must be used strictly for the specific dashboard. It is not allowed to install updated software from a new device to an old one and vice versa.
The long-awaited road tests of Lada Vesta
The new product of the LADA concern called Vesta kept fans in suspense for quite a long time with scant information. The long wait is over and the first photos of the real car appeared online when the car went on road tests. It became obvious to everyone that the design corresponds to the current fashion trend. Rounded shapes with regular bends and transitions represent a complete picture.
Do-it-yourself firmware
You need to be aware that all actions are performed at your own peril and risk. No one can guarantee that after installing the firmware yourself, the device will work correctly. To prevent this outcome, it is recommended to update the panel either at an authorized dealer or at specialized service stations.
There is no need to confuse the panel firmware with the multimedia firmware - these are different devices.
The cost of such a service varies from 1,500 to 2,500 thousand rubles. This is much cheaper than buying a new shield to replace a damaged one yourself. For dismantling and reflashing, the warranty may be revoked if the procedure is not carried out by an authorized dealer. If you decide to update the software yourself, you will need to make a backup copy of the standard firmware, then prepare the necessary tools:
- A device for flashing Usbdm OSBDM V4.95 - can be ordered on AliExpress, the cost is approximately 600-700 rubles.
- Install drivers and software for Windows from the disk included with the programmer.
- Dismantle the instrument panel, peel off the factory seal, and remove the cover from the back.
- Open the programmer and move the checkbox to the 3.3V position - at this voltage you will not need an external power source.
- Connect to the dashboard and PC.
- On a computer or laptop, open the HCS12 Programmer program, select and click on the “Detected” item.
- Go to the “Target” item and select the folder with the location of the firmware, check the box next to the “Auto Reload” item, then click on “Detect Chip”. The programmer will determine the chip type automatically.
- Go to the “Security” tab and check the “Unsecure” box.
- In the “Advanced” tab, check the “Enable” box.
- In the “Device Operations” section on the “Target” tab, select the “Erase Selective” item - only the firmware will be replaced, the immobilizer data and mileage will be saved.
Now you can click on the “Program Flash” button - the firmware process will start. This will last a few seconds. After completion, when prompted by the program to connect the dashboard, click “No”. The flashing device can be turned off and the instrument panel replaced.
CMGAISD
Early June 2022
CMGAISD announced that they have begun work on creating an electronic dashboard for Vesta. Brief specification: 1920x720px screen the size of a standard 1 in 1 device, certified data reception via CAN bus.
The development or stop of this project depends only on the availability of demand. You can pre-order now at a reduced price of 25,000 rubles. It is noted that after release the electronic panel will cost more. It is also planned to release a dashboard with a 3D accelerator for 35,000 rubles.
Refinement of the instrument panel
Tuning the instrument panel on the Lada Vesta is no different from upgrading it on other VAZ models, although technologically it is a completely different panel. The main idea is to improve the backlight by replacing standard SMD LEDs with alternative ones. Decorative overlays and lighting modifications without firmware are also used.
Replacing backlight LEDs
Before you begin, you should take into account that you will have to work with a soldering iron; without knowledge of soldering technology, you can lose the backlight at best. At worst, the instrument panel will fail completely. To work, you will also need to purchase LEDs with a brightness of 3 to 15 lumens, depending on the level of desired brightness. During the tuning procedure, you need to follow some recommendations:
- be careful and careful not to damage the traces of the microcircuits;
- When soldering, observe the correct polarity of the LEDs;
- Do not hold the soldering iron tip for too long - the LEDs will fail due to overheating.
To make sure the LEDs are working properly, you will need a multimeter. The tester probes are connected to the “legs” of the diodes - a working diode will indicate the integrity of the circuit (a sound signal).
If you are satisfied with the brightness level of the backlight, but would like to change the color, it is not at all necessary to solder the LEDs, you can purchase a special overlay for the instrument cluster or make it yourself - the drawings are freely available. Color film may be used. Before assembling the instrument panel, you can additionally paint the wells.
Connecting the backlight to work with DRLs during the day
This can be done using firmware or a jumper directly on the electronic board. Any tampering with the electrical system will void the vehicle's warranty. In the absence of skills and experience, such actions can lead to failure of the instrument cluster.
The main task of the procedure is to solder a jumper from the contact of the LEDs responsible for illuminating the panel to the contacts of the LEDs responsible for illuminating the display of the on-board computer (lights up when the ignition key is turned). Any suitable piece of wire can be used as a jumper. At first glance it may seem complicated, but for experienced VAZ car owners such modifications are standard practice. Rarely do such requests come to specialized centers. The replacement of LEDs is not carried out by an official dealer, nor is the installation of all kinds of overlays.
Reviews
| № | Positive |
| 1. | Gennady: after buying the car I decided to upgrade it a little, starting with the instrument panel. The standard backlight is not enough, and some colors are too bright at night. The replacements were carried out by StoVesta, the guys were smart, they did it quickly and efficiently. |
| 2. | Vasily: my positive review of the AvtoSTOLITSA car service center. Installed new diodes on the shield. I am satisfied with the quality and efficiency, no comments. |
| 3. | Dmitry: I recommend Auto Service on Lithuanian, I recently installed new wiring. They got it done quickly, the price was affordable, and the craftsmen knew their stuff. |
| 4. | Vladlen: my comrades advised me to get service at 6+, service station. Initially I doubted it, but now I’m happy with the advice. Masters are what you need. Feel free to take your car in for repairs, you won’t regret it. |
| 5. | Kirill: a month ago I underwent another maintenance, and at the same time I tuned the dashboard. I am satisfied with the quality of the work of the “STO Autopride-SPB” craftsmen, I recommend it to others. Modern equipment, special premises, qualified personnel. |
| 6. | Victor: my positive review of the service station “Station No. 1”. They always work by appointment, there are no queues and delays like other service stations. My recommendations, keep it up. |
| 7. | Gennady: I visited the StoVesta service station for the first time on the advice of my friends. The guys are great, they know their job. We replaced the dashboard diodes in half an hour, and at the same time carried out a comprehensive diagnostic of the entire car. |
| Negative | |
| 1. | Vladlen: I visited Auto Service on Lithuanian twice, I didn’t like it. The staff is small, the mechanics are periodically distracted, we can talk about the quality of work. |
| 2. | Kirill: I was serviced at “6+, service station” for six months, now I’m moving on to others. There are no spare parts available, they are inclined to pre-order, the cost of services has increased. |
| 3. | Konstantin: after buying Vesta, I was serviced at AvtoSTOlitsa, but now I decided to change the workshop, since the quality of the work has deteriorated, while the prices remained the same. |