Distribution of braking forces VAZ
This device, which is popularly called a “sorcerer,” is one of the important elements in the braking system of any car.
The main function of the brake force regulator is to prevent the car from skidding. In more modern domestic and foreign car models, the traditional mechanical regulator no longer exists. Electronic assistants took its place. In particular, the functions of the “sorcerer” are performed by the EBD system. But in basic configurations, manufacturers save on everything, so sometimes mechanical regulators are found even in new foreign cars.
Let's look at what this element is, why it is needed in a car, and how to configure it.
Functions and purpose
The brake force regulator is used to automatically change the fluid pressure in the rear brake cylinders of a vehicle. In this case, adjustment is carried out according to the loads acting on the machine when the speed decreases. Such regulators are used in systems with pneumatic or hydraulic drive. It is necessary to change the cylinder pressure in order to prevent the rear wheels from completely locking. If they are blocked, the car will skid and the driver may lose control.
In some car models, in order to maintain controllability and stability, similar mechanisms-regulators are additionally used on the brake drives of the front wheels.
In addition, a brake force regulator is used to improve the efficiency of stopping an empty vehicle. When a car is not loaded, its grip on the road will be different from that of a loaded car. Therefore, it is very important to be sure to change the braking force on different axles. In passenger cars, static devices are used as regulators. Automatic solutions are installed in trucks.
In cars created for sports, another type of “sorcerer” is used. This is a screw regulator. What it is? It is located in the cabin, and with its help you can adjust the balance of the braking system directly during the race. Settings depend on the weather, track conditions, and tire conditions.
How does the mechanism work?
It should be noted that the brake force regulator is not installed on cars with ABS, although the “sorcerer” is the ancestor of this system. It also helps protect the wheels from locking during braking.
In passenger cars, the “sorcerer” has a fairly simple device. It consists of three elements - the body, pistons, and valves.
The device body is internally divided into two cavities. The first cavity of the regulator is connected to the master cylinder (MC). The second is connected to the rear brake mechanisms. When emergency braking is necessary, the front of the car will tilt. With the help of pistons and valves, due to this tilt, the access of the working fluid to the brake cylinder will be blocked.
Thus, the VAZ brake force regulator automatically controls and distributes forces on the wheels of the rear axle. The car does not skid in the event of an emergency press on the pedal.
Where is the regulator located?
The “sorcerer” can be found on a passenger car mainly in the rear of the body. It can be located either on the left or on the right on the bottom.
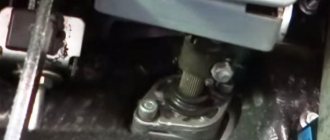
The regulator is connected to the rear axle or beam by means of a rod and a special torsion lever. It is this lever that acts on the piston inside the regulator. The incoming part of the brake force regulator is connected to the GTZ, and the output part is connected to the working brake cylinders of the rear mechanisms.
Operating principle
When the driver presses the pedal sharply, the car will definitely “peck” at the front of the body. This will cause the rear end to rise slightly. At this moment, the “sorcerer” is starting to work.
If the rear pair of wheels brakes together with the front ones, then in this case the likelihood of the car skidding increases significantly. If the wheels on the rear axle stop later than the front ones, then in this case the risks that the car will skid are minimal.
When the braking process is carried out, the distance between the bottom and the rear axle of the car increases. Due to this, the piston of the VAZ-2110 brake force regulator is released. As a result, the line with the liquid inside is blocked. The wheels will not be blocked, but will continue to rotate.
How to check the regulator?
This device is called a “sorcerer” for a reason. Although many beginners do not really know how it works. Let's see how to check the operation of the regulator to see if it is working properly.
FakeHeader
Comments 18
I've already adjusted it three times. I unscrew the bolt so that there is enough clearance. I insert a 2mm drill bit (with a tip) into the gap and tighten the bolt until it touches lightly. For a while everything is fine. And after a month or two it shows miracles again. During normal braking, everything is fine, but when you brake a little sharper, the rear one or the other grabs first. And at low speeds you can especially feel the brakes grabbing quite sharply. In general, it’s already starting to “steam.” Need to do something. I'll wait until spring and think about it.
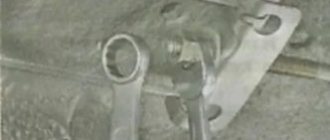
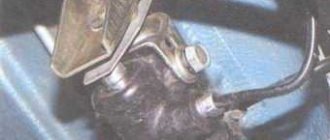
Did they regulate exactly the same sorcerer? Where exactly was the drill inserted based on this photo?
Between the end of the bolt and the plate.
I've already adjusted it three times. I unscrew the bolt so that there is enough clearance. I insert a 2mm drill bit (with a tip) into the gap and tighten the bolt until it touches lightly. For a while everything is fine. And after a month or two it shows miracles again. During normal braking, everything is fine, but when you brake a little sharper, the rear one or the other grabs first. And at low speeds you can especially feel the brakes grabbing quite sharply. In general, it’s already starting to “steam.” Need to do something. I'll wait until spring and think about it.
And if you make a gap of not 2, but let’s say 2.5 - 3 mm? Will the problem be solved? Or is the design itself far from perfect? Just the other day I lifted the rear and stopped braking the front wheels, it grabs the rear and then the front if you press hard on the brake.
Who knows, you have to try. ideally on a stand. tightened the sorcerer, checked the braking forces. and so on in a circle until the braking forces return to normal. According to the textbook, the gap should be 2mm. Did you lift your butt too much? In theory, if there is a gap of at least 0.5 mm, then there should be no increase in braking forces on the rear wheels. And when loading the car, first the gap is selected, and then the rod begins to be recessed by the plate, and this is where the forces on the rear wheels should increase.
Setting up the brake force regulator: “The Sorcerer” carries the hero
Many people have heard that there is a “sorcerer” in the braking systems of VAZ cars, but not everyone knows about the importance of this device. We evaluate its impact on braking efficiency.
“The sorcerer”, or, according to the catalogue, the pressure regulator in the brake drive, it was not for nothing that people received such an apt nickname: no one really knows how it works, but, they say, being faulty, it can present an unpleasant surprise - make the car dance in an emergency. braking.
This is where the insidiousness of the “sorcerer” lies: during normal operation, without braking to the floor, its work or inaction is practically not felt, but when its help is especially needed, it may not come.
The pistons have soured, the rod or drive lever has broken off, or you installed a new one instead of a faulty regulator, but for the time being you don’t know that the unit is defective or out of adjustment... How dangerous is this?
Let’s check in our experiment how “witchcraft” affects the effectiveness of the brakes at partial and full load of the Chevrolet Niva and Kalina and what the owner should be wary of if he does not monitor the condition of the regulator. We can simulate a malfunction, from excessive activity to complete inaction, with adjustments.
Let us remind you that the regulator’s task is to reduce the braking force on the rear axle, reducing the likelihood of skidding when braking to skid.
The regulator, mounted on the body and connected by an elastic lever to the axle beam, limits the pressure in the rear brake mechanisms depending on the position of the rear of the body relative to the road, that is, on the vehicle load.
“Sorcerer” is the predecessor of ABS, which helps to some extent prevent the rear wheels from locking when braking and thereby reduce the likelihood of skidding.
“Sorcerer” is the predecessor of ABS, which helps to some extent prevent the rear wheels from locking when braking and thereby reduce the likelihood of skidding.
By the way, before testing tires on cars without ABS, each time we slightly adjust the regulator taking into account the road condition (snow, ice, asphalt), ensuring that the rear wheels lock a little later than the front ones. Let's not break tradition. Our Shniva found the gap between the cheeks of the regulator to be 16 mm, which was adjusted using a stop screw.
Several brakings, and the braking distance from 80 km/h for a car with a partial load is determined: 34.4 m. With a full load... 33.6! Almost a meter shorter! At the same time, the driver noted a heavier pedal and rapid heating of the brakes, which required cooling before each measurement. Let’s remember these parameters and make adjustments to the “sorcerer” adjustment. First, let's reduce the gap to 8 mm. Now the regulator significantly limits the pressure in the rear brakes, transferring almost all the hard work to the front ones.
Braking has become more difficult, keeping the front wheels from skidding is not so easy - they lock very sharply and the car, naturally, loses control. However, the result, to our surprise, is the same as in the basic version: 34.4 m. At full load, you have to press the pedal much harder, the front brakes begin to overheat. The result is 37.8 m. This is 4.2 m more than with the basic adjustment (33.6 m).
Main function of the regulator
The sorcerer is the name given to the brake pressure regulator on the VAZ 2107, through which the braking efficiency of the vehicle is increased. This mechanism distributes the load on the rear wheels when braking, depending on the load on the car. The pressure regulator was called the “sorcerer” because of its unclear operating principle. Many motorists remove this device from their cars. We will find out later whether this is necessary, but for now let’s look at the principle of operation and the functions it performs.
The main function that the sorcerer performs is that during sudden braking, blocking all four wheels at the same time can lead to a skid of the car. To prevent the car from skidding during sudden braking, the sorcerer is activated. The principle of its operation is as follows:
- When braking sharply, the front of the car “nods”, while the rear rises up.
- This braking helps to increase the distance between the rear axle and the underbody.
- The lever from the bridge, which is connected to the sorcerer piston, helps lower it.
- Thus, lowering the piston helps to cut off the supply of brake fluid to the rear wheels.
At the same time, the wheels rotate further and are not blocked, which eliminates the possibility of the rear of the car skidding. With this method of braking, the braking distance increases by several meters, but the likelihood of the car skidding and skidding on the road is completely eliminated, which can be even more dangerous.
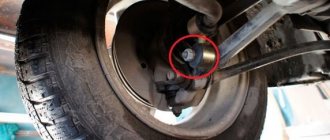
It is important to know! On a VAZ 2107 car, this regulator is located under the bottom, so the negative impact of dirt, dust and water leads to the fact that after some time, this unit stops functioning. It is not recommended to operate a car with a faulty regulator, as the likelihood of emergency situations increases.
Setting the brake pressure regulator on a classic VAZ 2107
To ensure normal braking of the car, it is important to adjust the regulator correctly. Such devices very often jam, which leads to the absence of brakes on the rear wheels. If this happens, then after replacing the sorcerer, it is important to adjust it correctly. Otherwise, it is better not to use this mechanism than to use it in a faulty state.
If the sorcerer fails, then this mechanism cannot be repaired. The malfunction of the regulator can be determined when braking. If, during sharp braking, the rear of the car skids, this indicates that the sorcerer is not working as it should. First, let's look at how to adjust the regulator when loosening the bolts. The device is configured as follows:
- First of all, you should drive the car into the inspection hole and load a load weighing about 150-200 kg into the trunk.
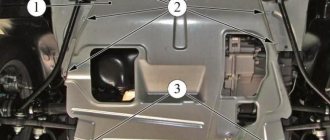
- After this, you should loosen the fastening of bolts 1 and 2 so that you can easily rotate the mounting bracket.
- The next step is to disconnect lever number 4 from rod 7.
- At the end of the lever, attach the device number 3, as shown in the photo above. The rod of such a device should be directed upward until it touches the car body.
- Thus, a distance of 140 mm is adjusted between the end of the lever and the body side member.
- Next, lift the protective cap and turn the regulator until the lever connects to the piston.
- Now you need to tighten the fastening bolts and put the rubber cap in place.
- At the final stage, device number 3 is dismantled, after which the end of the lever is connected to the rod.
Removing the pressure regulator in the rear wheel brakes and adjusting its drive
We replace the pressure regulator when the braking efficiency of the rear wheels cannot be adjusted (early or late blocking in relation to the front wheels), due to jamming of the piston in the cylinder or leakage of brake fluid through the cylinder seals. We carry out the work on an inspection ditch or overpass. We clean all threaded connections of the regulator with a wire brush and treat them with a penetrating fluid such as WD‑40. To remove the regulator...
...use a screwdriver to pry up the tendon of the bracket, covering the elastic lever of the regulator... ...and turn the bracket, releasing the lever.
Use a screwdriver to pry up the elastic lever...
...and, removing the lever from the earring hole, remove the bracket.
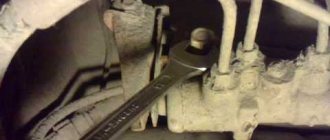
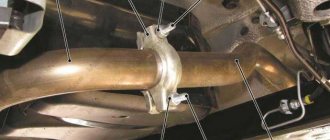
Using a special “10” wrench for brake pipes, unscrew the fittings of the four brake pipes...
...and remove the tips of the two tubes from the holes of the regulator. The spar prevents the tips of the other two tubes from being removed from the regulator.
Using a 13mm socket, unscrew the two nuts securing the regulator bracket to the body bracket...
...and remove the regulator along with the bracket and elastic lever... ...by removing the tube tips from the regulator holes.
Using a 13mm socket, unscrew the regulator mounting bolt on one side...
...and on the other side of the regulator.
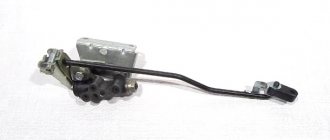
We disconnect the regulator, regulator drive and brackets. To disassemble the drive...
...take out the axle, remove the spring and pressure lever.
The earring 1 is secured to the rear suspension beam with a lock washer 3, under which a flat washer 2 is installed. We assemble the regulator drive in the reverse order. To assemble the regulator with the drive and brackets, install the drive in a vice...
...and, squeezing the drive spring with a vice, install the brackets with the regulator and tighten the regulator mounting bolts. Install the pressure regulator in reverse order. To properly connect the brake lines...
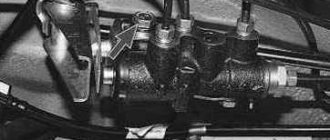
...there are arrows on the regulator body. To the holes marked with arrows coming out of the regulator, we connect the pipes from the brake mechanisms of the rear wheels, and to the holes marked with arrows going into the regulator, pipes from the master brake cylinder. After installing the pressure regulator, use pliers to compress the elastic lever bracket and bleed the brake system (see “Bleeding the hydraulic brakes”). After pumping, we adjust the pressure regulator drive. To do this, we place the car without a load on a flat surface and press the rear part of the car from top to bottom with a force of 40–50 kgf 2–3 times so that the rear suspension takes its middle position.
Use a 10mm wrench to loosen the locknut and turn the adjusting bolt with another 10mm wrench...
...set the gap between the drive levers to about 14 mm. Tighten the locknut of the adjusting bolt. After the adjustment, we carry out a kind of road test, in which an observer outside the car must detect the locking of the rear wheels, which should occur somewhat later than the front ones, during sharp braking from a speed of 30–40 km/h. If the locking is too late, we reduce the gap, if it is early (advancing the locking of the front wheels), we increase it, with a mandatory subsequent check in the same way.
Brake system "Lada Kalina": diagram, mechanism and system design
One of the disadvantages of the ABS of this car, like many others, is the possible failure of the electrical part of the control unit. Bad roads and shaking may destroy the soldering (or the soldering from the factory was initially of poor quality), and the ABS will fail. If liquid gets into the block, a short circuit occurs, oxidation and subsequent rotting of the components. The main thing is not to hesitate and immediately take it to a service center or manually clean the board and solder the questionable elements. ABS repairs are carried out by automotive electricians.
Lada Kalina, Granta and Priora became cars of a new generation, replacing the Sputniks and Samaras. Let's figure out whether the Kalina's braking system is different from these old cars, and how it works.
How does the Kalina brake system work?
The Kalina's braking system is designed similarly to many budget cars. In case of brake failure, engineers placed two independent circuits located diagonally. Each will be able to brake if the other one fails. The front contour includes the right front and left rear wheels, and the second contour includes the rear right and left front. The system is designed in the same way for cars with manual and automatic transmission.
Luxury and sports versions have an anti-lock wheel system (ABS), which greatly reduces the braking distance of an unprepared driver. These same modifications boast rear disc brakes. In the poor and regular trim levels, there are ventilated discs in sizes 13 and 14 at the front, and conventional drum brakes at the rear. On the dashboard there is a series of indicators indicating what is happening in the system.
Overview of individual elements
Diagram of the Kalina brake system:
Brake system diagram
| 1, 5, 13, 16 | Brake mechanism of the Kalina front wheel, including pads, caliper, disc, cylinder |
| 13, 16 | Brake mechanism of the Kalina rear wheel - pads, drum, cylinder |
| 2, 6, 12, 17 | Hoses going to the cylinders |
| 3, 7, 11, 18 | Tubes |
| 4 | Brake Master Cylinder (Brake Master Cylinder) |
| 8 | GTZ tank |
| 9 | Vacuum brake booster (VUT) |
| 10 | Brake pedal |
| 14 | Fluid pressure regulator in the TC of the rear wheels |
| 15 | Regulator knob |
Brake regulator for Lada Granta
Removing and installing the Lada Granta brake pressure regulator
One of the reasons for the car skidding or pulling to the side when braking may be a malfunction of the pressure regulator.
It is recommended to replace a faulty pressure regulator as an assembly.
You will need: a flat-blade screwdriver, a 8- or 13-size wrench, a 13-size socket wrench (head), a special 10-size wrench for loosening the brake pipe nuts.
Using a screwdriver, remove the lock washer of the elastic arm of the regulator drive and the flat washer installed under it.
Disconnect the elastic arm with the shackle from the rear suspension beam.
To avoid having to adjust the pressure regulator drive during installation, mark the position of the drive lever relative to the bracket.
Place a container under the junction of the pipes with the regulator, since liquid will flow out from there, and use a special “10” wrench to unscrew the four nuts securing the brake pipes.
Disconnect the tubes from the regulator.
Plug the pipe openings, for example, with protective caps for the wheel cylinder bleeder valves.
Label the tubes so as not to mix them up when installing the regulator later.
Using a 13mm wrench, remove the front bolt securing the regulator to the bracket
Using a 13mm wrench, remove the rear regulator mounting bolt.
Remove the regulator with drive from the car
If it is necessary to replace drive parts, use a screwdriver to pry the earring bracket away from the elastic lever
Remove the bracket along with the earring from the lever.
Using a 8" wrench, unscrew the bolt securing the lever clamp.
Remove the lever retainer and disconnect the drive lever from the elastic lever
When connecting the drive lever to the elastic lever, the clamp fork must fit into the groove on the elastic lever
Install the regulator in the reverse order of removal.
Please note that the front mounting bolt is longer than the rear.
After installing the regulator, crimp the earring bracket with pliers.
Then bleed the brake system and, if necessary, adjust the pressure regulator drive.
How does a sorcerer work?
The regulator itself consists of a cylinder, valve, spring and rod. The latter is connected to the rear beam, which ensures the operation of the VAZ-2109 sorcerer. Also, brake fluid circuits pass through the rear brake pressure regulator. For their mounting on the device there are 4 threaded entries. » alt=»»> How does the sorcerer regulator work on a VAZ? During emergency braking, the front of the car is pressed to the ground, and the rear is raised. This causes the regulator rod to move, which blocks the flow of fluid to the rear cylinders. A spring located under the valve prevents it from closing completely. Therefore, the rear mechanisms still work, but later and weaker than the front ones.
Adjusting the pressure regulator drive
Incorrect adjustment of the pressure regulator drive can cause the vehicle to skid or pull to the side when braking, reducing braking efficiency.
You will need: a “13” key, wire with a diameter of 2.0–2.1 mm.
Place the car on the inspection ditch and press the rear of the car several times with a force of about 40–50 kgf to set the rear suspension to the middle position.
Loosen the front bolt securing the regulator to the bracket.
Using the wire as a feeler gauge, adjust the bracket so that the gap between the drive lever and the lever spring is 2.0–2.1 mm.
To do this, move the drive lever behind the protrusion.
In this position, tighten the bolt.
If the pressure regulator is adjusted correctly, when braking from a speed of about 40 km/h on a level section of paved road, the front wheels should lock slightly earlier than the rear wheels (this can be determined by an observer outside the vehicle).
Otherwise, increase the gap (if the rear wheels lock earlier than the front ones) or decrease it (if the rear wheels lock much later than the front ones).
After this, check the adjustment again by braking and repeat if necessary.
Checking and bleeding brakes
To check the brakes on the Lada Granta, you will need a jack. With its help, the rear of the car is raised. Then remove the wheels. The next step involves dismantling the drum. If the guide pins are unscrewed, you will need to loosen the handbrake cable and remove the cotter pin that holds the shoe in place. Then the lever, springs and brake pads are dismantled.
When carrying out the last processes, you need to ensure that the brake fluid does not leak. To do this, auto mechanics recommend disconnecting the special tube designed to supply this substance to the cylinder. Thus, the access of the brake mixture to the outside will be blocked. Then remove the corresponding cylinder. Installation of the dismantled parts is carried out in the reverse order. In this case, you will need to lubricate each unit with a special graphite lubricant.
The brake system of any vehicle needs bleeding. This process is carried out after each brake repair. It should be noted that it is difficult to do such work alone. Therefore, auto mechanics advise hiring an assistant to bleed the brakes. Someone must be in the vehicle pressing the appropriate pedal 5 times until it bottoms out. The second participant in the process uses a wrench to loosen the screw located near the brake disc. This unit is designed for draining liquid. When unscrewing the screw, press the brake pedal. If it rises, the screw tightens. A similar operation is performed several times.
If liquid appears at the outlet instead of air, the pumping process has been completed correctly. The main thing is that the substance comes out without air bubbles. The final stage is installing the wheels in their original places. To check operation, you will need to spin each wheel by pressing the brake pedal several times. If the drum clings slightly to the pads, it means the procedure was completed successfully. The front brakes of the Lada are adjusted using a similar scheme.
Checking and bleeding brakes
In order for the system to work properly, it is recommended to check the condition of the brake pads at least once a month. The brakes in the Lada Granta car can be operated using a manual mechanism. It starts blocking the rear wheels by spreading the pads in their drums.
To ensure that driving safety is at the required level, you should check and bleed the brakes.
The check is performed after the car has been jacked up. After this, the wheels are dismantled. Then remove the drum. If the pins are unscrewed, it is necessary to loosen the handbrake cable. After inspecting the braking device, lubricate and reassemble in the reverse order.
After repairs in any of the components of the braking device of a Lada Granta car, bleeding should be carried out. Two people need to do this work. When bleeding the brakes, one person is in the car, and the second person presses the brake pedal up to five times. At this time, an assistant should loosen the screw that is located next to the disk. This allows fluid to drain into the braking device. This procedure is done several times. The front brakes are adjusted in the same way.