Payment for goods and downloading of the book in electronic form (PDF format) is made on the website.
To do this, you need to find the book you are interested in and click on the “Buy” button. The price of the book is indicated on the button.
For convenience, the price on the website for residents of Russia, Belarus and Kazakhstan is presented in rubles.
For residents of Ukraine in hryvnias, and for all other countries - dollars.
After clicking on the “BUY” button, a payment window will open where you can select a payment system with which you can pay for the selected book using any bank card (Visa, MasterCard, MIR, etc.)
When you click on the “Pay by bank card” button, the Portmone payment system will open, which is the easiest way to make a payment.
In addition, the website offers four payment systems for payment:
- Yandex (payment from any bank cards, Yandex Money account, QIWI Wallet, terminals, etc.);
- Portmone (payment from any bank cards, Portmone account);
- PayPal (payment from any bank cards, PayPal account);
- WebMoney (payment from any bank cards, payment from WebMoney wallets).
Payment via Yandex Cashier
After selecting payment via Yandex, the Yandex Cashier payment system will launch, where you need to select a convenient payment method (bank card, QIWI, Yandex Money account, etc.)
After specifying payment details and confirming payment, payment for the goods will occur.
If you have a bank card in a currency other than the ruble, then the money will be debited from the card at the rate of the Central Bank of Russia at the time of the purchase.
This payment method is optimal for residents of Russia, Kazakhstan and Belarus.
Official website of the Yandex Kassa payment system https://kassa.yandex.ru
Delivery by transport company
Delivery by one of the transport companies with a representative office in your city. Delivery time: 2-10 days depending on the distance of your locality from Togliatti. The most convenient and fastest way to deliver orders of different sizes. Delivery cost from 250 rub. depending on weight and delivery distance.
Orders are sent by transport companies based on 100% payment for the order. Dispatch by transport companies PEK, KIT, Baikal-Service is carried out on Wednesday, Thursday and Friday.
Payment via Portmone
After selecting payment through Portmone, the payment system will launch, where you need to select the payment method: bank card or Portmone account.
The price in the Portmone payment system is converted into dollars at the exchange rate of the Central Bank of the country where you are located.
If you have a bank card in a currency other than the dollar, then the money will be debited from the card at the rate of the Central Bank of your country at the time of the purchase.
After specifying payment details and confirming payment, payment for the goods will occur.
Official website of the Portmone payment system https://www.portmone.com
How to adjust your wheel alignment yourself
In most cases, wheel alignment is adjusted on special stands with computer calculation of these angles. However, it is possible to perform a wheel alignment in a garage, but to do this you will need to know how to perform the installation correctly, as well as have the equipment to perform this procedure. To adjust the angles you will need:
- A set of keys;
- Special measuring ruler;
- Chalk;
- Cord with weight;
- Ruler (regular):
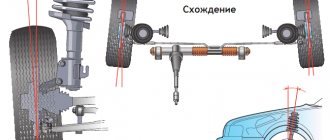
Wheel camber adjustment
When adjusting wheel alignment with your own hands, the first thing to do is measure the camber of the wheels. Although this angle is measured in degrees, it can be converted into a millimeter value. The sequence of actions for calculating camber is as follows:
- The car is placed on a flat surface. It is advisable to carry out the test in a garage with an inspection hole. In this case, there must be space to move the car, which will be needed during measurements.
- After installing the car on the site, you need to align the wheels so that they “look” straight. After aligning the wheels, you need to put small marks on the wheel with chalk. Marks are placed at the top and bottom of the wheel.
- Next, take a cord with a weight. It must be attached to the fender of the car so that the cord has a strictly parallel position relative to the applied marks. For convenience, the cord can be glued to the wing with tape.
- A regular ruler with millimeter divisions measures the distance from the wheel to the cord at the top and bottom. To avoid error, this distance is measured not from the tire, but from the wheel rim.
- Afterwards, the car needs to be rolled forward so that the applied marks rotate 90 degrees. Two more marks are applied to the wheel again at the top and bottom parallel to the cord and the distance between the cord and the rim in its upper and lower parts is again measured.
- Then the car is rolled again, but this time so that the wheels turn 180 degrees. That is, the last two marks should change location. The top one will move down, and the bottom one will move up and measurements are taken again.
- The difference in the three measurements should not be significantly different. Also, with a normal camber angle, the difference between the distances in the upper and lower parts of the wheel for all three measurements should be 1 mm for a car with front-wheel drive, and 1-3 mm for a rear-wheel drive model.
- If the indicators differ, adjustments need to be made. To do this, the car is jacked up and the wheel is removed.
- After removing the wheel, you will need to disconnect the strut bracket from the steering knuckle. To do this, you will need to use a prepared set of keys.
- By turning the eccentric bolt on the steering knuckle, it moves in one direction or another, thereby making adjustments. Early measurements will tell you how much you need to move the steering knuckle.
- After this, the strut bracket is connected to the fist and the car wheel is put in place. After installing the wheel camber, you will need to take measurements again to make sure the adjustment is correct.
Adjusting the wheel toe angle
Having finished with the camber, you can move on to checking and adjusting the second angle - toe.
The sequence of checking and adjusting this angle is as follows:
- The car is placed on the platform, the wheels are aligned.
- Two marks are applied on the inside of the wheels in the front part; they need to be applied closer to the rim.
- A telescopic ruler for measuring toe-in is prepared by creating a preload on it. The ends of the ruler need to rest against the existing marks. The moving scale of the ruler must be moved so that it coincides with the fixed pointer.
- After installing the ruler, the car needs to be rolled forward so that the ruler is at the rear of the wheel. When rolling, it is important to make sure that the ruler does not catch on anything.
- Next you need to see if there is a deviation on the scale and by how much. For front-wheel drive cars, the toe value should be “0/+-1”. If the ruler readings are like this, then no adjustment is needed.
- If the readings are greater, then the toe-in is adjusted. This operation is performed by changing the length of the steering rods. You need to loosen the lock nut on the rod and, depending on whether you need to lengthen it or shorten it, you need to either unscrew it a little or screw it in. Then tighten the locknut again.
- Having finished with the adjustment, you need to take measurements again.
Payment via PayPal
After selecting payment via PayPal, the PayPal payment system will launch, where you need to select the payment method: bank card or PayPal account.
If you already have a PayPal account, then you need to log into it and make a payment.
If you do not have a PayPal account and you want to pay using a bank card via PayPal, you need to click on the “Create an Account” button - shown with an arrow in the picture.
PayPal will then prompt you to select your country and provide your credit card information.
After specifying the information required to make the payment, you must click on the “Pay Now” button.
Official website of the PayPal payment system https://www.paypal.com
Removing the shock strut assembly with the steering knuckle
We carry out the work on a lift or inspection ditch.
Loosen the front wheel mounting bolts.
We remove the hub cap, unscrew the hub mounting nut with a 30mm socket and remove the washer.
Remove the front wheel.
We unscrew the nine screws and two bolts securing the engine mudguard and remove the middle engine mudguard.
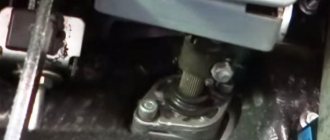
Using pliers, undo the cotter pin and use a 19mm wrench to unscrew the nut 3 (Figure 2) securing the ball pin of the outer tie rod end 1.
We press the ball pin out of the swing arm 2 of the front suspension strut.
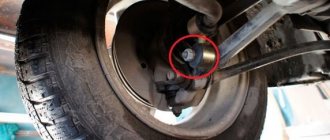
Using a 19mm socket, unscrew nut 3, Figure 3, securing the ball pin to the lower arm of the front suspension and press ball pin 2 out of lever 4 (article - Repair, removal of the ball joint).
Using a TORX E8 socket, unscrew the bolt securing the speed sensor (if the car has ABS) to the bracket on the steering knuckle and remove the sensor from the bracket.
We remove the sensor harness from the guide bracket on the front suspension strut.
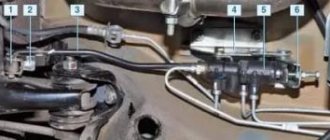
Unscrew and remove the pad guide with the caliper and cylinder assembly.
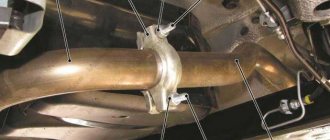
We tie the bracket to the brake hose bracket (Figure 4).
We remove the outer CV joint from the wheel hub and fix it in a suspended state using a wire or a technological hook.
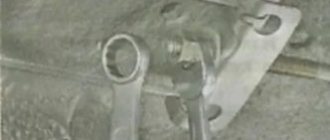
If after removing the shock strut you need to disassemble it, then use a 22mm spanner to loosen the tightening of the rod nut (Fig. 5), holding the rod from turning with a 6mm hexagon.
Using a 13 socket, unscrew the three nuts 2, Figure 5, securing the upper support of the telescopic strut 1 to the mudguard 3 of the body and remove the washers.
Remove the strut assembly with the steering knuckle and ball pin.
Remove the lower support from the upper support 1, Figure 6.
Installing the shock strut assembly with the steering knuckle
Install the speed sensor bracket onto the steering knuckle and secure it with a bolt. Bolt tightening torque 7 – 15 Nm.
We install the lower support on the upper support of the rack.
When installing the lower support, the direction of the arrow on it must coincide with the arrow on the upper support. On the left support to the right of the hole, on the right - to the left.
When installing the rack into the car body, the arrow on the support should be oriented in the direction of travel of the car.
We install the strut assembly with the steering knuckle, brake and ball pin into the car body, install the washers and tighten the three nuts securing the strut to the body mudguard. Nut tightening torque 20…24 Nm (2.0…2.4 kgf.m)
We insert the splined part of the outer drive joint into the wheel hub, put on the washer and tighten, without tightening, the new wheel hub nut.
We press the ball pin into the suspension arm and tighten the nut securing the ball pin. The tightening torque of the nut is 67…82 Nm (6.7…8.2 kgf.m).
We thread the front wheel speed sensor harness into the guide bracket of the front suspension strut, install the sensor in the sensor bracket and secure it with a bolt. The bolt tightening torque is 6…9 Nm (0.6…0.9 kgf.m).
Before installing the speed sensor, apply lubricant (LSTs-15 lubricant) to the surface of the mating hole.
We press the ball pin of the tie rod end into the swing arm of the front suspension strut and tighten the nut securing the ball pin. The tightening torque of the nut is 28…34 Nm (2.8…3.4 kgf.m).
We tighten the nut. If the cutout of the nut does not coincide with the hole in the ball pin, retighten the nut to an angle of no more than 60˚ to ensure cotter pinning.
Install the wheel and tighten it without tightening the front wheel mounting bolts.
We lower the car, tighten and lock the front wheel hub fastening nut, deforming the locking belt of the nut into the grooves of the shank of the outer drive joint housing. We install wheel caps. The tightening torque of the nut is 230 - 250 Nm (23 - 25 kgf.m).
Tighten the front wheel mounting bolts. The tightening torque of the bolts is 76 – 92 Nm. Install the engine splash guard.
Payment via WebMoney
After selecting payment via WebMoney, the payment system will launch, where you need to select the payment method: bank card or WebMoney wallet.
If you already have a WebMoney wallet, then you need to log into it and make a payment.
If you do not have a WebMoney wallet and you want to pay in another way, you need to select any of the methods that WebMoney offers and make the payment
After specifying payment details and confirming payment, payment for the goods will occur.
Official website of the WebMoney payment system https://www.webmoney.ru/
A little history
The first cars were rear-wheel drive. This is due to the fact that for primitive (from a modern point of view) cars with which production began, rear-wheel drive was cheaper to implement, more reliable in use, more economical in terms of fuel consumption and more unpretentious in various driving conditions.
One of the first front-wheel drive cars, the Cord L29, manufactured in 1929 in the States by Auburn Automobile, is also inscribed in the history of the automotive industry. But even with all its fame, won mainly thanks to its elegant design, at that time this car was still inferior in popularity to rear-wheel drive cars.
Gradually the design was refined and improved.
Today, cars with driven front wheels are produced by almost any major automotive manufacturer. Moreover, in the modern automotive industry, front-wheel drive cars are more common than cars of other types of transmission design.
Downloading a book
After successfully completing the payment (by any method) and returning to the KrutilVertel store from the payment system website, you will be taken to the successful payment page:
On this page you need to indicate your e-mail, where access to download the book will be sent.
If you are already registered on our website, then simply follow the link to your personal account.
The book you purchased will be in your personal account, from where you can always download it.
Please note that after making the payment, you need to return back from the payment system website to the KrutilVertel website.
If for some reason you did not return back to the site and closed the payment system tab with a message about the successful completion of the payment, please let us know - we will send you a letter indicating access to download the book.
Lada Granta right drive length
- To the beginning of the forum
- Forum Rules
- Old design
- FAQ
- Search
- Users
measure the length of the shaft; shafts viburnum, ten, chisel have different lengths 2108 - 660mm 2110 - 680mm 1118 - 730mm
Tomorrow I’ll try to remove it from the fence on a jack. I can’t go anywhere, the box is empty, I’d like to know how long the right shaft on the 21102 should be - maybe on an eight-valve engine - not like the 16kL. Thank you - I’ve been following the links for an hour and couldn’t find these parameters .
measure the length of the shaft; shafts viburnum, ten, chisel have different lengths 2108 - 660mm 2110 - 680mm 1118 - 730mm
Here is the answer after my request from VAZ specialists for design drawings of the exact dimensions of the right long drive shaft. 2110 may be useful to someone: 06/25/10 “Good afternoon, K.S. I. It is quite possible that your car has a model 2108 drive. It is 7 mm shorter than the “tenth”. According to the drawing, the length of the drive shaft of model 2110 should be 669.4 mm ('eighth' - 662.4 mm) including tips. What is 'wide diameter distance - 450 ml.' It’s not entirely clear, it’s not regulated.” Department of inspection of service and sales network enterprises. Head Office. A V.
Problems when paying with bank cards
Sometimes difficulties may arise when paying with Visa/MasterCard bank cards. The most common of them:
- There is a restriction on the card for paying for online purchases
- A plastic card is not intended for making payments online.
- The plastic card is not activated for making payments online.
- There are not enough funds on the plastic card.
In order to solve these problems, you need to call or write to the technical support of the bank where you are served. Bank specialists will help you resolve them and make payments.
That's basically it. The entire process of paying for a book in PDF format on car repair on our website takes 1-2 minutes.
If you still have any questions, you can ask them using the feedback form, or write us an email at [email protected]
Lada Granta right drive length
The shaft spline is threaded . This is due to the technology of production of shafts from steel used in the manufacture of VAL-RACING shafts.
An original technology of hardening and subsequent straightening of the shaft using the “blunt striker” technology was used, which allows straightening without damage or microcracks.
The shafts are made of certified, structural, alloyed steel of a special grade with the following characteristics:
| σв— temporary tensile strength (tensile strength), MPa = 1980 (at a tempering temperature of 200 degrees) |
This steel is used for the manufacture of torsion shafts and other loaded transmission parts operating under torsional, variable and high dynamic loads. Related to torsion steels.
(On the auto parts market, drive shafts made of 30KhGSA steel are available.
| σв—temporary tensile strength (tensile strength), MPa = 1700 (at a tempering temperature of 200 degrees) |
In the production of these shafts VAL-RACING for Lada 4x4. this steel is not used.)
Regular tests are carried out on a special control and measuring stand of a manufacturer of popular cars in Russia, which allows smooth loading of the test object with torque until it breaks down.
Test result: Drive shaft of the left wheel of a LADA car, manufactured by VAL-RACING
The static strength limit is 404 kgf m, the elastic limit is 260 kgf m, the twist angle is up to 120 degrees.
(photo of shaft L400 mm) the breakdowns correspond.
(Test result: The shaft fracture occurred along the groove for the thrust ring, the nature of the fracture was a ductile fracture at a right angle to the axis, an even cut.
Note: According to the design documentation, the strength limit for the front wheel drives of VAZ vehicles is Mpr = 250 kgf m, not lower.
| Guarantee: | 12 months from date of sale |
| Price for: | 1 PC |
| Weight: | 2.2kg |
| Dimensions: | 69cm |
Applicability (manual transmission):
- Lada Kalina station wagon (VAZ 1117)
- Lada Kalina sedan (VAZ 1118)
- Lada Kalina hatchback (VAZ 1119)
- Lada Kalina sport (VAZ 1119)
- Lada Kalina 2 hatchback (VAZ 2192)
- Lada Kalina 2 station wagon (VAZ 2194)
- Lada Kalina 2 sport (VAZ 2192)
- Lada Granta sedan (2190)
- Lada Granta sport (2190)
- Lada Granta liftback (2191)
- Lada Granta FL liftback (after 18)
- Lada Granta FL sedan (after 18)
- Datsun mi-DO
- Datsun on-DO