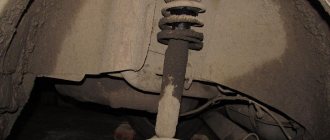
Lada Kalina gas tank mount
Hi all! I went to the garage to install the rear video camera, but then I saw something sagging under the car. I took a closer look at the gas tank mounting clamps and bought two new ones (120 rubles each). And then it all began! I have one burst, the second one is on the way. YOU CAN ONLY CHANGE THEM WITH THE TANK REMOVED!
In principle, everything went smoothly for me! I was guided from here. First I removed the middle part of the muffler, the tank rests on it.
I disconnected all the pipes, disconnected all the hot hoses, there are three of them!
To complete the work you will need an assistant, as well as:
— inspection ditch or overpass;
— hose for pumping fuel.
You can do without an assistant. In this case, a height-adjustable stop or stand is required. If possible, use as much fuel as possible from the tank before performing work.
Removal
1. We prepare the car for work.
2. Relieve fuel pressure.
After the pressure is released, a small amount of fuel remains in the fuel line.
3. Using a Phillips screwdriver, loosen the clamp securing the fuel tank hose to the filler pipe and disconnect the hose from the pipe.
4. We pump out the maximum possible amount of fuel from the tank through the hose.
5. By pressing the spring lock, disconnect the tip of the tank ventilation hose from the nozzle.
6. Squeezing the spring clamps, disconnect the tip of the separator tube from the adsorber tube.
7. 10 mm socket wrench , unscrew the three nuts securing the fuel tank protective screen.
8. remove the protective screen.
9. 10 mm socket wrench , unscrew the three nuts securing the protective casing of the fuel system pipes.
10. By squeezing the clamp, we disconnect the fuel line tubes and the adsorber purge tube.
11. We install an adjustable stop under the tank (or an assistant holds the tank from below).
12. 13 mm socket wrench , unscrew the two bolts of the fuel tank mounting clamps.
13. Remove the fuel tank assembly with adsorber and fuel filter.
Installation
Install the fuel tank in reverse order.
If you are unable to start the engine after two or three attempts, try bleeding air from the fuel rail through the diagnostic fitting valve.
Suitable for replacing standard clamps.
Installed on cars: Lada Granta (VAZ 2190, 2191); Kalina (VAZ 1117, 1118, 1119, 2192, 2194) Installation: standard, without modifications or changes Kit includes: 2 pcs
Delivery is possible by Russian Post and TC. Before shipping, each product undergoes a thorough quality check for defects.
- Phone Phone Viber: +7 Viber E-mail:
We value our customers and therefore decided to pay you for reviews.
500 rubles to your phone account or bank card!
To do this you need:
- Make a purchase in the amount of 3,000 rubles
- After receiving the order, take 3 photos, one photo of you with the product is required.
- Photos must be of good quality
- Write a few words about the product, delivery, and service
- Send photo and text by email
- Your review will be published on our website
By sending a review, you consent to the processing of personal data in accordance with Law No. 152-FZ “On Personal Data”
Useful tips
Anticipating cold weather, it is better to take care in advance to prevent the problem of freezing of elements, leading to the impossibility of opening the hatch. Treating the hinges and locking mechanism with silicone grease will help prevent condensation from affecting the parts. It is better to treat rubber seals after each car wash; seasonality does not matter. In emergency cases, silicone grease will be replaced by a few drops of motor oil, which forms a protective film on the surfaces.
What should not be done when the hatch does not give in is to use brute force on the fragile structure, since this can quickly increase the scale of the disaster.
There are car models in which the gas tank flap does not open when the engine is started and the key is in the ignition. Under such circumstances, you need to turn off the engine and remove the key to open the lid.
In any case, it is initially necessary to figure out what exactly is the matter, what elements interfere with the correct operation of the mechanism and, already knowing the culprit in person, take appropriate measures to eliminate the problem of opening the hatch.
To watch online, click on the video ⤵
Replacing the clamp (fastening, tape, bracket, hinge) of the gas tank for Lada Kalina VAZ 1117, 1118, 1119 Read more
Replacing the fuel tank mount. For some reason the mount didn't fit. More details
VAZ2109, gas tank came off, reverse sensor, ASP 16 Read more
Replacing the fuel pump mesh for Lada Kalina, Priora, Grant, VAZ 2110. 15 Read more
Viburnum mount on the gas tank fastening tape Read more
Replacing the fuel pump for Lada Kalina 1118 1.4 LADA Kalina 2010 Read more
How to dismantle the fuel pump
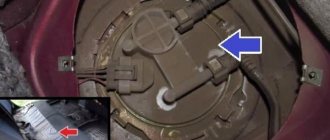
There is a gas tank under the rear seat of Kalina-2. Fold the seat cushion up and then remove the split sections of the carpet located above the hatch. To make the issue easier to understand, here is a drawing:
Screenshot of the VAZ-2192/94 parts catalog
The part marked “3” is a hatch that protects the pump. First, the hatch needs to be dismantled, for which four screws “1” are unscrewed. The unit itself, referred to as the “fuel pump module,” is attached to the tank with a clamping ring “5”:
Parts catalog VAZ-2192/94, fuel tank
The steps to dismantle module “6” are illustrated in the photo:
Drain algorithm
On the “classic”, gasoline was always drained through the neck of the tank; for Kalina (as well as for other front-wheel drive), this method is very difficult, especially if there is little gasoline in the tank.
The old-fashioned method involves draining gasoline through the neck . However, this number will not work with the first generation Kalina due to the curvature of the neck. The same applies to second-generation cars, in which the low location of the fuel tank is added to the above factor.
You can find a long silicone (transparent) hose and try to “stick” it into the neck as far as possible. If it's not cold outside, you may be able to reach the tank with a hose.
Parsing method
- There is a nipple at the end of the injector frame. We find and unscrew it.
There is a plastic cap on the ramp - there is a nipple underneath it.
We unscrew the nipple from the wheel.
- We put a hose for draining fuel onto the ramp.
If the hose is slightly larger than the diameter, fix it with a clamp.
- We lower the free end of the hose into the bucket.
- You need to insert a jumper into the fuel pump relay, and then turn on the ignition.
Removing the fuel filter
The method is similar to the previous one, only we will drain gasoline from the fuel filter. The fuel filter is located at the bottom of the car. We remove the supply fitting, close the relay and drain the gasoline.
The arrow indicates the fuel filter.
It is necessary to turn off the fuel pump as quickly as possible, as soon as gasoline stops coming out, otherwise the fuel pump may burn out!
Removing the fuel pump
It is necessary to drain the gasoline by removing the fuel pump.
- Raise the rear sofa. We lift the carpet.
Raise the rear sofa.
Find this place.
Unscrew it, there is a fuel pump inside.
- Remove the bolts securing the fuel pump cover.
- Disconnect the connectors and power cord.
- We get the fuel pump.
After dismantling the fuel pump, we gain free access to the contents of the fuel tank.
- Next, use a hose to pump out the gasoline. It is better to use a special hose with a bulb to avoid poisoning.
Read more in the material: “Replacing the fuel filter on a Lada Kalina.”
In addition to Kalina, these methods can also be used for Grants, since these models have the same fuel system.
Features of the electrical circuit
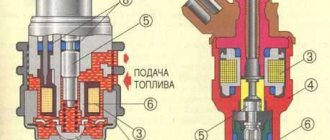
The circuit in which the pump motor is connected contains one fuse (F21) and one relay (K12). Both parts are installed in a single mounting block. We discussed in detail how to access them earlier. In a Lada Kalina car, the fuel pump relay is 4-pin. Two contacts go to the winding, two more are closed when triggered.
Mounting block VAZ-2192/94
The above parts can be dismantled using a special tool, which is secured under the unit cover. If the fuel pump is faulty, the pressure in the fuel rail is equal to atmospheric pressure. The same pressure can be reduced forcibly: by turning off fuse F21, you need to start the engine and wait a few minutes. When the gasoline pressure decreases, the engine will stall.
The fastening of components related to the fuel system should not be loosened without ensuring that the pressure in the rail is reduced to a minimum. The way to achieve this has just been discussed.
Fuel tank flap under protection in Lada Kalina 2
The idea of creating and using such devices to protect your car is by no means new. On the Internet you can find many articles on this topic, although all the schemes used are similar. Before purchasing the Lada Kalina 2, the author had a VAZ 321074 car, where he had already installed a similar security system and it worked well. In order to create the same thing on a new car, he had to seek advice from more experienced potassium growers.
Materials:
- reed switch - magnet - rubber gasket - wire - connector from the computer power supply - electrical tape
Changing the mesh with your own hands
So, the mesh located in the fuel pump is forced to constantly come into contact with dust and dirt, because the pump itself is located between the seats, and dust constantly settles on its body.
That is why experienced motorists are not lazy to wipe the pump body with a damp cloth from time to time to avoid untimely clogging of the system.
To replace the mesh you need to go through several steps:
- The very first thing we do is buy a new filter.
- Raise the rear seats to provide access to the pump.
The first part of the work is completed. Let's proceed to the most important part, disassembling the pump:
- There is a sensor and wires attached to the pump; you need to disconnect them.
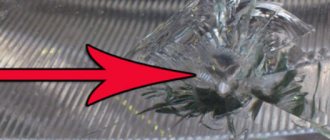
- Next, we remove the intake tube and bend the clamps (there are 4 of them) in order to be able to remove the glass.
Causes of gasoline pump malfunction
If Kalina’s fuel pump does not pump, then the reasons will be in the equipment itself or in other parts of the system. First, you should make sure that there is fuel in the tank, a spark in the spark plugs, the battery is charged, and the starter is working. If everything is in order, then you need to continue checking. If the cause of the malfunction is identified, for questions regarding the purchase of auto parts to eliminate it, you can contact the specialized online store automechanika38.rf.
Electromechanical equipment may not function correctly or stop working due to a malfunction in either the mechanical or electrical components of the system.
- The fuel pump fuse has blown - you should remove the element from the fuse box (located in the engine compartment). If the contact has visible damage, the part needs to be replaced.
- The equipment relay is faulty - check the electrical wiring, contacts between the unit and the diagnostic block, as well as the relay. Using a test lamp or multimeter, check the presence of voltage at the pump chip. A correctly operating relay makes clicks when the ignition is turned on, after the required pressure has been reached in the fuel line.
- There is no contact of the equipment with “ground” - it is necessary to apply ground to the part chip. The wire is located under the instrument panel and runs through the interior of the car. It is worth checking it, cleaning the contacts, and fixing them securely on the pump.
- The electronic control unit is faulty - the ECU needs to be repaired or replaced.
- A breakdown in the car alarm, poor installation of the security system - electrical wires may be mixed up, errors may have been made when connecting the alarm.
- Insufficient pressure in the fuel line may be the result of contamination of the gasoline filter or the filter mesh of the pump itself.
Many car owners prefer to drive with a half-empty fuel tank. However, the fuel pump in this case often overheats, which will ultimately lead to equipment malfunction. The reasons why the fuel pump on Kalina does not turn on may be the breakdown of individual parts of the unit. To determine the problem, it is necessary to remove the equipment and diagnose it.
Other section materials
| Lada Kalina with 1.4 engines |
| Description of design |
| VEHICLE SPECIFICATIONS |
| CAR DETAILS |
| SAFETY DURING MAINTENANCE AND REPAIR |
| KEYS TO THE CAR |
| FRONT AND REAR DOORS |
| HOOD |
| TRUNK LID |
| FUEL FILLER PLUG |
| SEATS |
| SEAT BELTS |
| REAR VIEW MIRRORS |
| INTERIOR LIGHTING LIGHT |
| LOCATION OF CONTROLS AND INSTRUMENTS |
| IGNITION SWITCH (LOCK) |
| INSTRUMENT CLUSTER |
| STEERING WHEEL ADJUSTMENT KNOB |
| STEERING SWITCHES |
| HEADLAMP CONTROL UNIT |
| VENTILATION AND HEATING SYSTEM CONTROL UNIT |
| LOCATION OF THE MAIN VEHICLE UNITS |
| CHECKING THE CAR BEFORE DEPARTURE |
| MAINTENANCE REGULATIONS |
| CHECKING THE CONDITION OF WHEELS AND TIRES, REPLACING THE WHEEL |
| ADDING FLUID INTO THE WINDSCREEN WASHER RESERVOIR |
| REPLACING THE WINDSCREEN WIPER BLADES |
| CHECKING THE OIL LEVEL IN THE ENGINE PAN |
| CHANGING ENGINE OIL AND OIL FILTER |
| CHECKING COOLANT LEVEL AND REPLACING COOLANT |
| CHECKING THE LEVEL AND CHANGING THE OIL IN THE TRANSMISSION |
| CHECKING THE BRAKE HYDRAULIC FLUID LEVEL |
| BLEEDING THE HYDRAULIC BRAKE DRIVE |
| ADJUSTING THERMAL CLEARANCES IN THE ENGINE VALVE MECHANISM |
| CHECKING THE CONDITION AND REPLACING THE GENERATOR DRIVE BELT |
| CHECKING THE CONDITION AND REPLACING THE TIMING BELT |
| CHECKING THE CONDITION AND REPLACING SPARK PLUGS |
| REPLACING THE FUEL FILTER |
| REPLACING THE AIR FILTER ELEMENT |
| REPLACING THE FILTER ELEMENT OF THE VENTILATION AND HEATING SYSTEM |
| Kalina. Increased oil consumption (more than 500 g per 1000 km) |
| Checking the condition of the brake system |
| Battery faults |
| The low battery indicator light is on |
| The vehicle's on-board voltage is higher than 15.1 V |
| The low battery indicator does not light up |
| Headlights and headlights do not light up |
| The wiper motor does not work |
| The wiper motor does not operate intermittently |
| The brushes stop in any position |
Where is the Kalina fuel filter located?
The fuel filter is located at the bottom of the car next to the gas tank on the right. To replace the car, you need to drive it into a viewing hole or lift it on a lift. If necessary, you can crawl under the car by placing the car on a level area. However, in this case it is inconvenient to work.
To perform the work efficiently, it is recommended that, at a minimum, raise the rear left side on a jack, and then place a wheel or a wooden block under the car as insurance. After this, you can proceed to replacement.
If the lid does not close
There is also the opposite problem, when the gas tank flap does not close, dangles, or simply does not fit tightly. To find out the reason, you need to inspect the cover and its fastenings. The hatch is supported by guides that can bend or break, making it impossible to close the door. For repairs, you need to remove the cover, this must be done carefully so that the latch tabs come out of the seat. Depending on whether the fasteners are broken, the spring has flown out (lost or simply moved out of the correct position), the nut has become loose, etc., you need to take the necessary measures. It may be enough to simply position the hatch correctly after removal or tighten the nut, but it may also be necessary to replace the spring or drive cable. To do this, you will have to lift the trim in the cabin from the side of the tank to clarify the situation and, if necessary, replace the element.
Replacement of the fuel tank and its filling pipe.
If a fuel leak is detected from the tank, replace the tank. If the fuel pump screen frequently becomes clogged, remove and wash the tank.
If a leak is detected along the junction of the upper and lower parts of the tank, these places can be soldered (this is recommended to be done in specialized workshops). To do this, pour out the remaining gasoline, thoroughly rinse and dry the tank. Then seal the leak with soft solder.
It is more convenient to remove an empty tank while working on a lift, overpass or inspection ditch.
You will need: keys “10”, “13”, screwdrivers with flat and Phillips blades.
2. Disconnect the wire from the negative terminal of the battery.
3. Disconnect the fuel lines from the fuel pump (see “Removing and installing the fuel pump”).
4. Place the vehicle on a lift or inspection pit.
5. Loosen the clamp securing the air outlet hose...
6. ...and disconnect it from the air outlet tube of the filler pipe.
7. Squeeze the fasteners of the quick-release fitting...
8. ...and remove the fuel drain pipe from the separator.
Manual opening on new cars
Open the gas tank and unscrew the screw (there may be several of them). Then unscrew the bottom cap of the gas tank. Then you need to hold the inside of the gas tank and the outer cap, disconnect the rubber from the neck of the gas tank, and carefully pull it towards you.
As you can see from the instructions, this process will not take much effort and time. Despite the fact that all the main methods have been given, there may be additional options for removing gas tank caps for modern car models, 2016-2017 model year. Removing their covers should also not differ in complexity from its predecessors.
Diagnostics of the canister purge valve
A failed adsorber valve is dangerous because the gas tank begins to be poorly and poorly ventilated. This leads to deformation and damage to the fuel pump. A desiccant layer that is not well ventilated can cause fuel to accumulate in the intake manifold, causing poor engine performance.
A faulty canister purge valve is to blame for dips at idle. The Kalina engine has weak thrust. When the motor is running, the characteristic chirping sound will not be heard if the valve is faulty.
When unscrewing the gas tank cap, you need to listen carefully. If a characteristic hissing sound appears, this means there is a vacuum in the tank, that is, the ventilation system is faulty. If any signs of failure appear, the adsorber valve should be replaced with a new one. A faulty Kalina valve will affect the filtration and purge system. It will poorly collect and accumulate fuel vapors, and they will leak out. This situation will be indicated by the unpleasant smell of gasoline in the cabin and near the car.
Of course, it is worth checking other components of the fuel system. For example, a vapor leak may occur due to a loose tank lid or a hole in it. But if after checking the entire system the cause is not identified, then the purge valve is faulty.
Most common problems
Depending on the reason why the gas tank flap does not open, there are different methods to solve the problem. You can cope with the task on your own; no special skills are required for this, but it is important to know what caused the trouble in order to, based on this, determine what actions should be taken.
The hatch opening mechanism is frozen
In winter, at sub-zero temperatures, freezing of the gas tank cap, or rather the unlocking mechanism, is not uncommon. This is due to the fault of condensation formed due to the temperature difference in the cabin and outside, and subsequently freezing as the temperature drops.
Every motorist should know how to safely open the gas tank cap, since some barbaric methods can cause damage to the hatch hinges or bodywork. In this case, you cannot use force; local heating will help to defrost the hatch unlocking mechanism effectively and without unpleasant consequences. Taking the car to a warm garage or service station, which will solve the problem in a matter of minutes, is not always possible, so this method is not suitable for anyone. If you have a hair dryer and a power source at hand, you can use the device to warm up the hatch. You must act with caution, since the power of the hair dryer is quite high and there is a risk of damaging the paintwork. Another method involves using exhaust gases for good, which requires a hose that is directed from the pipe to the hatch. To defrost the mechanism under such conditions, up to five minutes is enough.
Car owners often use the universal WD-40 fluid (almost every driver has it and can use it for business purposes or not), and they treat the plastic pin of the mechanism with it using a syringe squeezed through an elastic band. After thawing, the lid is opened and closed several times. There are also specialized products designed for defrosting; they are abundant on the auto chemical market, so in harsh climates it is better to get a liquid and carry it in the car.
How to remove the gas tank flap? We consider methods for popular cars
Very often people wonder how to remove the gas tank flap. This work is most often required when selecting paint for painting individual body elements. This particular part is simply ideal for such a task. You can simply remove it and take it with you to the store. Also, on some models, removing the hatch may be necessary when dismantling the fuel system. Sometimes the hatch may become damaged and need to be replaced. Do not forget that gasoline is quite chemically active, and if it gets on the paintwork, it can corrode it. In this case, to paint the hatch, it is much easier to remove it than to provide protection to nearby parts. On all models, the work required to remove this body element varies slightly. How to remove the gas tank flap? The answer will be different for each model. But overall this work is relatively simple. Ford Focus 2. On this model, the hatch is attached to the hinge using a special clamp. To remove the hatch panel, you need to press out the clamp tongue using a screwdriver. After which, the panel is shifted to the side and removed from the hook. The easiest way is to use a short screwdriver and press the tab from the end, this way there is less chance of breaking it. Reinstallation is even easier. There are slides on the back of the hatch. Simply slide the panel onto the guides and slide it until it makes contact with the clamp. Lada KalinaRemoving the hatch from the gas tank on this model is quite problematic. It is fixed quite cleverly:
- First, unscrew the nut securing the tank lid leash. To do this you will need a key for 7;
- Next, the lid itself is pulled out;
- Using a Phillips screwdriver, unscrew a pair of screws securing the hinge platform;
- The platform is sealed. Before removing it, you will have to cut off the excess. After this, use a screwdriver to tear off the loop from the sealant. To avoid damaging the paint, wrap the screwdriver blade with electrical tape;
- The next step is to raise the hatch slightly;
- Before removal, you need to cover the end of the hatch and the body around it with masking tape. This will prevent damage to the paintwork. To remove it, you need to position the hatch at an angle of 30-40° and move the structure towards the rear bumper. This way, you can remove the hatch without any problems.
The hatch on the Priora and Grant BMW e34 is removed in the same way. On this model, the hatch is secured with a hinge. The fastener is made in the form of a plastic frame with reed fasteners. In this case, 2 fastenings are located at the top and 1 at the bottom. First, use a screwdriver to press out the upper fasteners. After which the loop is removed from the car along with the hatch. Skoda Octavia. On this car, the hatch can be removed extremely easily. First, unscrew the tank cap. To prevent any objects from getting into it, the filler neck is plugged with something. Next, use a screwdriver to press the seal away from the neck. Having freed it from the seal, simply pull out the entire hatch structure. Installation is performed in reverse order. Kia Spectra. To carry out the work you will need a minimum number of tools, only 2 screwdrivers. One is spline and the other is cross. First, use a slotted screwdriver to remove the plug cable clamp. After that, use a Phillips screwdriver to unscrew the loop; it is secured with 2 screws. Daewoo Lanos. On this model, the hatch is secured with two screws. There shouldn't be any problems dismantling it. When reinstalling, the most difficult thing is to tighten the first screw. Selecting paint Most often, the hatch is removed to select paint. This is the most optimal method if local body painting is necessary. Many people try to select a color for their car based on the number indicated on the nameplate. But it should be borne in mind that different cars produced at the same factory and painted the same color may have different shades. As a result, your repair will be visible to the naked eye. That is why experienced car enthusiasts recommend removing the hatch and using it to select paint. There are 2 methods of searching for paint:
- If you want to choose the paint yourself, the easiest way is to do it from a catalog. To do this, you need to take the hatch and visually compare it with similar samples. Select the most suitable color sample. This method is not very reliable. The risk of error is quite high. Therefore, before painting, apply color to any metal plate, and after drying, compare how suitable the chosen color is;
- Increasingly, specialized computer equipment is being used to select colors. To do this, it is best to contact specialized centers. The process involves scanning the coating and selecting a color based on the base.
Article on the topic “How to find out the paint number of a car by VIN code.” Conclusion. The gas tank flap can be removed in a very tricky way, but at the same time, there is very little information about this work. Therefore, the question of how to remove the gas tank flap is not uncommon. It must be remembered that this procedure differs for almost all car models. AutoFlit.ru
Secrets of opening the lid without a key or code
Keyed cap models have become quite common these days. Most modern foreign cars are equipped with them. In addition to its basic functions, such a cover prevents unscrupulous neighbors from stealing gasoline from the fuel tank. But if the key is lost or broken, the owner himself will not be able to open the tank.
Fuel tank cap with key protects against theft
The design of such covers implies the presence of two parts: external (movable) and internal (fixed). They rotate relative to each other, preventing the lid from opening. The key acts as a lock for one of the parts; accordingly, by inserting it inside the cylinder, you can open the hatch.
Required Tools
Here's what you need to prepare for quick and fruitful work:
Repairman actions
All work is carried out carefully and consistently:
Drill the cover in this place
Unscrew the cover after screwing in the screw
The cap can now be unscrewed and screwed in without using a key. You can leave this matter like this and wait a while before replacing it. The cover with a self-tapping screw will perform its functions for a long time, but without a key.
Opening the code cover
There are also code covers. The principle of operation in them is similar to caps with a key. One part is movable with numbers, the second is fixed. The car owner, who knows the code, fixes the moving part of the cover in one position, for example, as in the photo - 5 and 11, and opens it.
Code cover installed on 5 and 11
In terms of reliability, such covers leave much to be desired. Especially those covers that are installed on VAZ cars. Imported models are made little better. Their disadvantage is that in a few minutes of painstaking selection you can open the lid by typing the code.
The cover code can be changed at any convenient time. To do this, you just need to consistently perform a series of elementary actions:
Remove the retaining ring from the back of the cover
Part of the code cap that screws onto the tank neck
The code cover matrices are also removable
These same matrices are the details that create the code. In order for the lid to open, these two crescent-shaped notches must come together.
The half-moon notches should line up