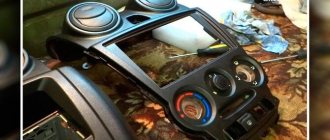
| To install modules in the headlights or paint the mask (backing), you will need to remove the headlight glass. This procedure is not simple and requires preparation. Do you know how to disassemble the headlights of a VAZ 2190 with your own hands? |
You will need : hair dryer, flat screwdriver, utility knife.
Removing the glass from Granta's headlight will not be easy. The process begins by removing the four staples. Then you should remove the edge along the contour of the headlight.
The main thing is to take your time and be patient. If you accidentally break the headlight glass, then at the moment you can only buy it assembled with a headlight unit (the price of which is 5000 rubles). Did you manage to remove the headlight glass? Let's move on to tuning Grant's optics.
Lada Granta is a budget front-wheel drive car that was developed by the Volzhsky Automobile Plant in 2011. The optics of the vehicle have changed significantly compared to previous models of this brand. This applies to both the types of devices used and their design, as well as adjustment methods. It is important for the owners of this car to learn about all the nuances of the headlights so that the operation of the Lada Granta is long-lasting and correct.
How to disassemble the headlight on Lada Granta, Kalina 2 (replace glass, mask)
Granta and Kalina headlights are considered non-separable.
If a crack appears on the glass, the headlight unit is replaced as an assembly. However, with a strong desire, it is still possible to disassemble it. Let's look at how to remove the glass and headlight mask with your own hands. The process is shown using the example of a Lada Granta headlight. On the Lada Kalina 2 headlight, all actions are performed in the same way. Required
: remove the headlight, prepare a Dremel (disc diameter 20 mm), sharp knife.
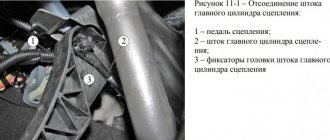
Headlight glass mounting diagram:
The sealant that holds the original headlight glass in place is heat resistant. That is, you won’t be able to loosen its “grip” by heating it with a hairdryer or in the oven. In addition, there are four fastening brackets on the edge:
How to replace headlight glass
:
- Seal the glass with masking tape to prevent damage during work.
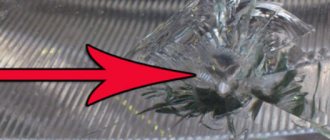
- We cut off about 7 mm of the U-shaped fastening (using a Dremel), and then remove the remaining sealant (photo No. 1).
- We cut off about 2 mm of the sealant between the glass and the plastic using a Dremel (photo No. 2, color green).
- We remove the remaining sealant using an L-shaped blade (you can bend an ordinary knife after heating), photo No. 3.
When reassembling, we use a transparent glass sealant (for example, ABRO).
What it looks like in practice:
The process is also shown in the video:
How to remove a mask from a headlight
:
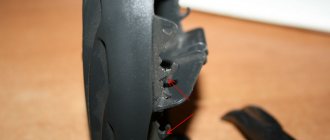
- The inner mask is attached using a spring mechanism, which is connected to a hydraulic corrector.
- The outer mask is held in place by 4 Torx screws.
Attention!
You can remove the headlight sealant using a special product, sold on AliExpress (see selection of products from Ali). Instructions using Vesta headlights as an example.
Now it becomes possible to install powerful LED or flexible DRLs. Have you ever had to disassemble the headlights on a Grant or Kalina yourself? How did you manage to do this?
Types of materials for gluing
To glue the headlight, glue is most often used. The following basic substances are used to glue car headlights:
- Terostat - 8600 2K;
- Terostat - 8599, 8597, 8596
- Terodicht - Black;
- Terodicht - Elastik;
- Permatex;
- Abro;
- Body.
Adhesive sealant for glasses and headlights PERMATEX 65 AR Silicone Glass Sealer
The second way to glue cracks in car headlights is with butyl tape. According to the manufacturers, it has enough advantages:
- ensures durability and reliability of fasteners;
- resistant to significant temperature changes;
- quickly sets to the surface;
- seals glass.
Butyl tape for gluing car optics
Sealed adhesive for repairing car headlights is made in the form of pastes or liquid mass. After that, it is packaged in jars, tubes or other containers. The tubes are equipped with dispensers, which helps to accurately direct the substance to hard-to-reach places.
There are 2 types of sealed glue:
Headlights for Kalina - design, adjustment, replacement
- The procedure for dismantling the lights
- Disassembling lanterns
The headlight is a source of directional lighting on the Lada 1118. It is installed in front of the car, illuminating the road surface and the surrounding area. Due to the huge range of lighting systems to choose from, the elements of which can be installed on the Kalina, lights are often the subject of replacement or modification. To replace the Kalina headlight unit, it is worth first considering its structure. On this model, the car manufacturer installs 2 headlights equipped with 3 sections:
- low beam;
- side and main beam;
- turn signals.
Block headlight of Lada Kalina
When you turn on the low beam, only the low beam lights come on, and when you turn on the high beam on the 1118 model, the low and high beam complex with a power of 55 W each starts to burn. The sections of the front indicators have transparent light diffusers. The 21 W turning lights have an orange glow.
To be able to adjust the headlights on the Lada 1118, the package includes a headlight leveler with an electromechanical drive. The adjustment system has a device that is installed on the dashboard, as well as a connection wire and electric drives pre-installed in the lights.
The plant where Kalina is produced provides for installed lights from two manufacturers:
Lighting system design
Optics for Kalina are manufactured at two factories:
Both types of optics have excellent characteristics and provide high-quality illumination of the road. You can recognize Bosch products by the missing cap on the lamp in the near module, as well as by the AL code on the glass.
The headlight design of the Lada Kalina is no different from most cars. The flashlight has low and high beam modules, blocks with turn signals and side lights. In the new Kalina body, the dimensions also play the role of running lights.
New Lada: Disassembling and cleaning the central locking remote control (key) - Lada Kalina Blog
The following lamps are used in Kalina optics:
- low – H7, 55W;
- long range – H1, 55W;
- direction indicators – PY21W, 21W;
- Dimensions – W5W, 5W.
Light elements from the dimensions fit into the license plate lighting module on the trunk lid. Since 2022, modernized optics have been installed in Kalina, where part W21/5W is responsible for the clearance and daytime light. The fog lamps are equipped with H11 lamps with a power of 55W.
How to disassemble a headlight on Kalina
| Before tuning the car headlights (painting headlight masks, installing lenses, etc.), you must first disassemble the Kalina headlight. This procedure requires preparation, time and patience. In addition, the complexity of the operation depends on the manufacturer of the optics. |
Analysis of Kalina Bosch headlights (Bosch)
You will need : hair dryer, utility knife, flat-head screwdriver.
It is believed that disassembling Bosch headlights is not so difficult, because sealant that holds the glass softer. First, remove the headlight glass mounting brackets. Then we heat the sealant with a hairdryer, but without fanaticism (no need to blow on one place for a long time). We extend the knife blade further and cut off the softened sealant. Then carefully remove the glass with a screwdriver, step by step.
Disassembling the headlights of Lada Kalina (Kirzhach)
You will need : hair dryer, utility knife, flat-head screwdriver.
Removing the glass of these headlights without breaking it is not an easy task, requiring time (sometimes up to 6 hours) and patience. The difficulty of disassembly is that the sealant in this case is more “difficult”. Often, heating it with a hairdryer causes the plastic of the headlight housing to melt faster, so many people resort to other disassembly methods. For example, heat the entire headlamp unit in a cardboard box using a technical hair dryer to a certain temperature. After this, the sealant will easily give in under a little pressure from a screwdriver.
If you don’t have a hairdryer at hand, then a regular oven may come in handy. Turn it on at 150-160C and wait 5 minutes. Then put the headlight in the oven on a wooden board and bake it for about 15 minutes. Then, wearing gloves, we pull out the headlight with a slightly softened sealant, and using slotted screwdrivers of different sizes, we pry the glass around the entire perimeter of the headlight. The black plastic that runs along the perimeter will change its original shape, you should not be afraid of this, since it will then level out. After about 10 minutes, the sealant will begin to harden, so we work quickly. Did not have time ? Not then we take the headlight into the oven again (this procedure can continue up to 10 times).
We remove the mask (backing) of the headlight by unscrewing all the adjusting bolts (asterisk) from the outside. After disassembly, you can begin tuning Kalina's headlights.How to disassemble a headlight on Kalina
Your VAZ: how to disassemble the headlight
Removing the headlight during its next repair is quite difficult. Especially for a driver who does not have relevant experience. However, you may need to do this at any time, since no car is immune from breakdowns.
If a certain element of a car light fails, you need to know exactly how to properly disassemble the device. These acts can be applied to various brands and models of cars (Vortex Tingo, VAZ 2110 and other cars).
Without proper experience, disassembling headlights is unacceptable!
How to disassemble spotlight: cooking tools
It is worth noting that the process of disassembling a car flashlight requires certain skills. In order to perform all the necessary manipulations, you must first prepare the following description:
- a set of matching screwdrivers;
- a fairly powerful household hair dryer (it heats up the sealant);
- sockets and keys;
- mounting knife (this tool is used to remove sealant from the headlight housing);
- sealing composition.
It is also important to properly prepare the conditions under which the headlight will be disassembled. The workplace must be thoroughly cleaned of possible contamination and other undesirable elements. In addition, it is necessary to ensure high-quality lighting of the workplace.
The process of disassembling the front and rear lights has some differences.
Parsing headlight Kalina 1
How it all started: I decided one month ago, namely on June 26, to reseal the housings and, at the same time, paint the headlight masks - the reason for which was the constantly fogging up left glass.
Well, actually, I quickly took everything off, I thought I’d take it apart right away, paint it and assemble it the next day. (Yeah, yeah)
Turning the headlight in my hands, I saw the screws on the body, unscrewing which, I thought that the glass would come off (naive little guy), the screws turned out to be difficult, but torx, so I bought a screwdriver with a set of bits to disassemble the headlight.
After 3 screws on each headlight were removed, to my regret, the glass did not want to give up, after reading the Kalino forums, I made sure that, in my case, the headlight was not removable (Kirzhach with polycarbonate glass). After listening to a lot of advice about how the headlight should be “ bake" in the oven - it was sent there for 10 minutes at 180 degrees.
From that moment on, the most interesting thing began... I regretted 10 times that I took on this idea.
After the headlight had warmed up, I pulled it out and, I thought, well, that’s it, now I’ll work with a screwdriver for 5 minutes and the glass will separate... Here I was very wrong. Having started this work at 10 pm, I disassembled the headlight only at 4 am... I heated it in the oven once 10, as a result, the entire rim is deformed, because the sealant did not soften, only the plastic (I pricked the glass with great effort until the plastic hardened and went back into the oven), but even worse, the headlight mount melted... well, what can you do.
On this note, I went to bed at dawn and the next weekend I was disassembling the second headlight, I decided to just pry it off with a screwdriver first, without resorting to the oven. To my great surprise, the sealant was not pressed against the headlight body at all, naturally the glass snapped off instantly - it was the left headlight, which I disassembled in 5 minutes, unlike the first one (I spent 6 hours fiddling with it).
What conclusions did I draw at this stage?
: 1.
Never, ever undertake to disassemble a Kirzhach headlight on a viburnum (it’s easier to throw it away and buy new ones) , but since you are as desperate as I am, then God help you. 2. The reason for the fogging of the left headlight is a defect from the factory (the sealant was not pressed in)
, and the car was like that for four years with a whiny little eye... 3.
Heating the headlight in the oven is a very bad idea - the sealant on this headlight, like rubber, does not respond to temperature at all
(it is necessary solder or saw the outer edge to separate the glass, and then build it up again)
The next stage was painting the headlight masks, well, there’s nothing to tell here, just appreciate the abundance for creativity (by the way, there is material here not only for the headlights - keep an eye on the bulletin board) I painted it with heat-resistant KUDO in two layers, without primer, having previously removed the chrome using Pemolux and brushes and degreasing the surface.
Then I bought a hot air gun, I thought I would assemble the headlights (I first straightened the edges on the deformed headlight with it), because it was no longer possible to ride such a tramp for more than a week
BUT, remembering how hard it took me to disassemble the headlights
,HERE I WENT PSYCHANIC!
This idea actually delayed the assembly time for another 3 weeks.
I just didn’t expect that the viburnum headlight was so tight... This lens is universal (it is screwed with a nut through the adapter into the reflector) and fits even into the 2113 headlight without any modifications.
The headlight is a source of directional lighting on the Lada 1118. It is installed in front of the car, illuminating the road surface and the surrounding area. Due to the huge range of lighting systems to choose from, the elements of which can be installed on the Kalina, lights are often the subject of replacement or modification. To replace the Kalina headlight unit, it is worth first considering its structure. On this model, the car manufacturer installs 2 headlights equipped with 3 sections:
- low beam;
- side and main beam;
- turn signals.
Block headlight of Lada Kalina
When you turn on the low beam, only the low beam lights come on, and when you turn on the high beam on the 1118 model, the low and high beam complex with a power of 55 W each starts to burn. The sections of the front indicators have transparent light diffusers. The 21 W turning lights have an orange glow.
To be able to adjust the headlights on the Lada 1118, the package includes a headlight leveler with an electromechanical drive. The adjustment system has a device that is installed on the dashboard, as well as a connection wire and electric drives pre-installed in the lights.
The plant where Kalina is produced provides for installed lights from two manufacturers:
- Bosch;
- Avtosvet CJSC (Kirzhach).
Which optics is better to choose
While using the machine, the lights are subject to sudden temperature changes, impacts from stones and small grains of sand. These factors negatively affect glass, reducing its transparency, worsening light characteristics.
High-quality headlights that meet safety requirements are installed from the factory. Unofficial replacements are equipped with xenon lenses, “angel eyes” and modified reflector geometry. These lights look beautiful, but wear out faster due to poor quality materials and can fog up in humid weather.
When choosing new optics, it is better to trust the official
When purchasing, it is important to clarify the modification of the body and the year of manufacture of Kalina. Depending on the configuration, there are darkened masks or improved lighting characteristics
Low and high beam optics
Depending on the body type, Kalina has different parts installed:
- sedan, hatchback – standard optics;
- sport, station wagon - are equipped with a more elongated reflector with an increased area to increase the lighting area by 20%.
To connect improved optics to Kalina, you do not need to lay additional wires or change contact connectors. The optics are no different in mounting points and shape.
When purchasing flashlights, you should pay attention to original parts with improved performance. This will improve the characteristics of the beam without interfering with the wiring or altering the standard fasteners
Fog lights
When buying new PTFs, it is better to choose from original parts. Standard lights are equipped with durable glass and a high-quality reflector that directs the beam in accordance with GOST.
Fog lights for Kalina are produced by:
- Bosch;
- "Kirzhach".
The models differ in the shape of the glass, but there is no difference in quality. The headlights are connected to the standard wiring and installed in the mounts on the bumper. There are no fog lights in the basic trim levels. To connect them, you will have to additionally purchase a button for the interior, a PTF relay, and remove the bumper plugs.
In stores you can find modernized flashlights with lenses for gas-discharge lamps or LED modules. Such products are not certified for use in Kalina because they do not meet transport safety requirements. For such parts you can receive a fine and an order to eliminate the malfunction within 10 working days.