Hi all! Well, I finally found the time and cleaned the injectors myself last weekend. I was going to do this before last winter, but there was no time.
Actually, there were no prerequisites for cleaning the injectors, although I have had the car for almost 4 years - during this time no one has gotten to the injectors. The only problem I'm trying to eliminate is the long start-up in winter at temperatures below -15 degrees.
And injectors were one of the suspected variants of this problem. So, in fact, I decided to remove and clean the injectors for preventive purposes, and at the same time see how the car will behave in winter when starting. There are plenty of articles on the Internet on how to clean injectors. Here is one of them: Cleaning VAZ 2110 injectors.
In general, I purchased everything I needed in advance, drove into the garage and got to work - first I need to disassemble everything to gain access to the fuel rail and injectors, before starting work I relieved the pressure in the fuel system.
- For convenience, I decided to remove the air filter, then disconnected all the necessary connectors and pipes and removed the receiver along with the throttle valve.
Damage diagnostics
How to understand that an injector needs to be replaced, checked or repaired? Even without sensors, you can understand that repair of fuel system elements is required if there are 1 of 2 main signs in models 2107, 21074:
- Unstable engine operation. Sometimes it may stall or have difficulty starting.
- A much less obvious sign is loss of power. This effect is noticeable if you mostly drive at medium speeds, but at high speeds it is very noticeable.
- The last sign is recorded only by sensors - the pressure inside the system increases.
The cause of such failures is clogged injectors; even diagnostics are not needed. Cleaning helps restore the engine to its original performance. If the problem has not been resolved after cleaning, it is worth checking the tubes and injectors for damage or breakdowns. In such cases, it is better not to start repairs, but simply replace the damaged parts with new ones.
Sometimes it is impossible to determine on your own where the damage is, and only then will diagnostics at service centers come in handy. A blockage can cause quite serious damage to the VAZ 2107 injector, as well as rupture of channels. The pressure that arises inside the system can easily destroy the most fragile parts. Here you won’t be able to fix the situation with your own hands, even if you have a complete diagram of the car at hand. There is only one conclusion - you need to devote a lot of time and attention to cleaning injectors and do it regularly.
Verification method
Any repair work requires the possibility of checking the final result. Checking injectors can be visual or bench.
Visual inspection
diesel engine injectors is akin to a similar procedure carried out with spark plugs in carburetor engines. The injector, like the spark plug, is unscrewed and the starter makes several engine revolutions, having previously attached it to the engine body with a thread.
In this case, the spark plug should spark and the injector should produce the correct cone of burning fuel. The method is barbaric, but visual and effective. But it’s better to go to a service station and check everything at the stand.
Source autoflit.ru
The injector is an electromechanical valve that acts as an electric magnet. When voltage is applied to the injector winding, an electromagnetic field arises that can retract the core and needle of the shut-off device, while allowing a flow of fuel to the engine combustion chamber. An additional fuel filter is mounted on the input channel of the devices.
The injector is the final element of the fuel system, into which fuel enters under high pressure. The entire operation of an internal combustion engine directly depends on the performance of this component. When the pressure level drops when opening the injector, it opens earlier, which causes black smoke to form. If the pressure at the moment of opening increases, then it opens later and white smoke appears.
INJECTORS
The injectors on the VAZ 2114 are an electromagnetic device in which, when there is a pulse in the electrical component, the valve opens and atomized fuel is injected under pressure into the internal combustion engine cylinder. Depending on the magnitude of the pulse, the valve opens to a greater or lesser extent, thereby dosing the flow.
Model 2114 can be equipped with fuel injectors from different manufacturers, and accordingly, the cost of the injectors may also differ. Manufacturers and cost (price range in the Russian Federation):
- GM (1300 – 1400 rub.),
- BOSCH (1000 – 1200 rub.),
- SIEMENS (800 – 1400 rubles).
Article on the topic: The stove on the VAZ 2114 does not heat well: we find out the reasons and fix the problem
The VAZ 2114 (2115) is equipped with engines of 1.5 and 1.6 liters (8 and 16 valves), therefore the performance of the injectors must be selected depending on the type of engine. If you make the wrong choice, fuel consumption may increase or the internal combustion engine may lose power. Which injectors are better to install on a VAZ 2114? Here you should focus on the part markings. For example, BOSCH 0 280 158 502 is only suitable for a 1.5 l 8-valve engine. It’s hard to say anything about the manufacturer; the quality of all products is approximately the same.
SIGNS OF PROBLEM
There are certain signs of clogged injector nozzles:
- Difficulties in engine operation, jerking;
- High gas consumption;
- Unstable engine operation at idle speed.
And, if the injectors are leaking, the internal combustion engine may not start at all. To improve engine operation, you should clean the injectors on the VAZ 2114.
REMOVAL
Let's look at how to remove injectors on a VAZ 2114 (of course, everything is done with the engine not running, and it won’t hurt to disconnect the battery terminals). To do this we need a set of combination wrenches, a hexagon, screwdrivers and pliers:
- Relieve the pressure in the system. On the rear of the ramp there is a valve under the cap. We unscrew the cap and press the valve with a thin screwdriver or rod.
- Remove the air filter pipe;
- Disconnect the fuel lines (supply and return);
- Disconnect the electrical connectors from the injectors. The connectors are snap-on and easy to remove;
- We unscrew the two ramp mounting bolts (or a 10mm wrench or a hexagon):
- We dismantle the fuel rail.
We move the latch and take out the nozzle. The injector is removed from the ramp very simply - you need to move the locking washer to the side and pull out the nozzle using a little force.
REPLACEMENT
Replacing injectors with the fuel rail removed is done simply - remove the old part, install the new one and secure it with a springy split washer. Then we install the fuel rail in place. Changing the nozzle is very simple.
EXAMINATION
Before cleaning, it won’t hurt to check the injectors on the VAZ 2114; it’s a good idea to first make sure they are not working. The check is carried out on a removed fuel rail; there is a special stand for this; many modern car repair shops are equipped with such stands.
Article on the topic: Hand (parking) brake system on the VAZ 2110
You can check each individually removed injector by applying power to it and connecting a fuel tank to the inlet. When voltage is applied, the valve should operate and gasoline should spray out of the nozzle. But the test here is conditional; performance is almost impossible to determine.
Even more dubious is the idea with measuring cups, which is often described on resources on the Internet. Let's say all glasses are filled with the same amount of gasoline. How then did you determine the performance when simply cranking with the starter? After all, the engine operates at different speeds, and a faulty injector usually overflows gasoline depending on the voltage supplied to it. What if the electrical part is faulty?
conclusions
In any case, it is up to you to decide whether to replace or clean the injectors. Because in some cases it is much easier to replace a part than to bother with cleaning it.
Now we will talk about self-cleaning of injectors on VAZ cars (2109, 2110, 2115, Kalina, Granta with 8-valve engines). How often should this be done? There is no clear answer to this question. It all depends on the quality of the fuel. But on average, it is recommended to clean injectors every 20-25 thousand kilometers.
You can clean the injectors without removing them from the engine by pouring a special liquid into the gas tank. But this method is not always effective. And, besides, we will not be able to personally see the result. Therefore, the second method is predominantly used - washing the injectors with removal.
There are two methods here - ultrasonic cleaning and cleaning with special liquids. The latter does not require particularly complex additional equipment, so it is better to use it yourself.
Causes and symptoms of malfunctions of VAZ 2107 injector injectors
During operation, injectors come into contact with aggressive media more often than other components of the fuel system. Therefore, the issue of durability and functionality of fuel injectors is relevant for owners of injection “classics”.
Signs of malfunctioning fuel injectors on the “2107” are as follows:
- Unstable operation of the internal combustion engine at idle;
- The car stalls when starting off;
- Noticeable drop in power;
- Extraneous noise and vibrations in the operation of the motor;
- Jerks and dips during movement;
- Excessive amount of exhaust gases emitted;
- Change in fuel consumption.
The reason for the deterioration in the functional state of the VAZ 2107 injector nozzles is their clogging. Due to low-quality fuel, hard deposits form on the walls of the injectors, which reduce the throughput of the injection holes. A clogged injector is usually caused by an abundance of dirt in the fuel lines, gas tank, or fuel filter.
Operating principle and structure of the injector
VAZ 2110 how to clean the injector yourself
Below are the operating principles:
- There is a channel inside the injector that is filled with gasoline;
- the shut-off needle regulates the injector channel and thus controls the supply of gasoline;
- the locking needle is pressed by a spring so that it fits tightly to the injector channel;
- when the needle is raised, a wide stream of fuel is formed, which drips onto the engine cylinders, having previously been well mixed with air;
- the outlet (from where the fuel comes) closes when the needle is lowered, thus stopping the fuel supply;
- The injector contains an electromagnetic coil that regulates the position of the needle: when current is supplied, the needle rises, when there is no current, it lowers.
Note. If possible, the landing spring inside the injector should be made of high-quality metal, which should conduct current well and be resistant to corrosion. If it is not financially possible to purchase one, then it is necessary to regularly treat the landing spring with an anti-corrosion coating.
Diagnostics of the functioning of the injector and obvious signs of a malfunction
Objective signs of injector clogging, when you need to immediately flush the injector on a VAZ 2110:
- as the temperature outside dropped, the engine cooled down and began to start with great difficulty;
- at idle the engine is extremely unstable;
- when you press the gas pedal, you can objectively feel its complete or partial failure;
- reduction in acceleration speed and overall engine power;
- increase in gasoline consumption;
- increased toxicity of engine gases (emissions);
- since the fuel mixture receives an insufficient amount of oxygen, the temperature in the internal combustion chamber rises, which in turn entails a significant increase in engine detonation;
VAZ 2110 injector cleaning
- Popping noises can be objectively heard directly in the exhaust system itself with constant frequency;
- failure of various sensors, including the catalytic converter, and prematurely.
Note. In practice, it is not necessary that all of the above symptoms will be observed when the injector is clogged; the manifestation of at least one is sufficient. Flushing the injector is a simple procedure, however, it must be done on time. Since late flushing of the injector may be ineffective and most likely it will need to be completely replaced.
Types and symptoms of regulator malfunction
The types of RTD malfunctions are as follows. The valve does not hold - fuel begins to circulate freely throughout the fuel system, the pressure in which decreases because of this. As a result, the engine does not have enough fuel when the speed increases, and its power decreases; The pressure in the system should not change after stopping the engine, but since the valve is not able to hold it, when starting the engine, you have to work with the starter for a long time to create the required pressure.
A completely inoperative valve means fuel is not discharged into the tank, and because of this, the pressure in the system increases. As a result, the amount of fuel supplied to the combustion chambers through the injectors increases - there is overconsumption and incomplete combustion of gasoline.
Signs of a faulty RTD are the following engine operation:
- unstable;
- stalls at idle;
- insufficient pickup;
- cannot develop full power;
- the crankshaft rotates at idle speed with a reduced or increased frequency;
- dips and jerks while the machine is moving;
- difficult starting - not always;
- the content of CO and CH in the exhaust gases significantly exceeds the permissible standards;
- excessive consumption of gasoline.
To check the operation of the RTD, you will need a 24mm wrench, a 5mm hexagon and a pressure gauge (for example, a tire gauge):
- We unscrew the plug of the pressure control fitting on the end surface of the injector ramp.
- Using the metal tire valve cap, unscrew the spool valve from the fitting.
- We connect the pressure gauge to the fitting through a hose, the ends of which are secured with clamps, and start the engine.
- We check the pressure - disconnect the vacuum hose from the RTD.
Replacing the regulator: relieve pressure in the fuel line; unscrew the nut securing the fuel return pipe to the RTD; unscrew the 2 bolts securing the RTD to the injector ramp; carefully remove the RTD fitting from the ramp hole; Having disconnected the fuel pipe from the RTD, remove it; We install the new RTD in the reverse order, first moistening the rubber sealing cuffs with gasoline (we replace inelastic and torn rings).
- tsa-auto.ru
- www.drive2.ru
- vaz-2110.ru
- carnovato.ru
VAZ 2110 sensors
In this section I will provide an overview of the electrical sensors that are installed on injection engines. As well as their location and the cause of failure.
Mass air flow sensor (MAF)
The air flow sensor is one of the most vital organs. It is located in a visible place, right behind the air filter.
Measures the amount of air entering the cylinders. And transmits readings to calculate the required amount of gasoline. Quite reliable and rarely fails, but over the years it can begin to produce information that is not entirely correct. In this case, the engine begins to run unsteadily, but the check engine indicator does not light up. Since the part works and the signal is received, the car may behave differently:
- Difficulty starting;
- Floating idle speed;
- Jerks and dips when starting and moving;
- Increased consumption;
- Decrease in dynamics.
Crankshaft position sensor (CPS)
DPKV is also vital. Installed at the bottom of the engine on the oil filter side. On the generator drive gear.
Reads the crankshaft torque and provides information to the unit. He, in turn, sees that the shaft rotates and regulates the fuel supply. It is quite reliable and rarely fails, but due to its location it often gets clogged with dirt. That is, it stops responding to movements. But it is very easy to treat; we dismantle it and clean it of dirt. Signs of malfunction:
- The engine stalls during operation;
- The engine does not start at all.
Oxygen sensor (OS)
DC or as it is also called “lambda probe”. Installed in the exhaust manifold. That is, it serves to measure the level of exhaust gases. Thanks to it, the ECU controls the dosage of gasoline and air. In other words, without increasing gas pollution. Since it sometimes becomes covered with soot, it may give incorrect readings. In this case, it is necessary to dismantle and clean with phosphoric acid. Signs of malfunction:
- Decrease in dynamics;
- Increased consumption;
- Black smoke from the exhaust pipe;
- Floating speed when warming up.
Idle speed sensor (IAC)
The DXH is mounted on the rear of the throttle body. Consequently, it regulates the air supply at idle speed. That is, when you press the accelerator pedal, the DHW is turned off. It also has the ability to become clogged and fail. I've heard from many people that it can be cleaned, but I've never done it myself. Since its price is not very high. It seems easier to me to replace it with a new one. Signs of malfunction:
- Floating idle speed;
- Difficulty starting;
- The engine stalls when idling.
Throttle Position Sensor (TPS)
The TPS is installed on the rear of the throttle valve, next to the DHX. It transmits information about the position of the throttle valve, as it is directly connected to the accelerator pedal. That is, pressing the accelerator pedal opens the air supply. Meanwhile, the ECU sends a signal to supply fuel. Unfortunately, the TPS very often fails and requires replacement with a new one. Because it cannot be repaired. Signs of malfunction:
- The speed increases randomly;
- Difficulty starting;
- Increased consumption.
Coolant temperature sensor (DTOZH)
The DTOZH is installed on the thermostat in the area of the air filter, under the mass air flow sensor. Firstly, it is responsible for cold starts. That is, it sends a signal about the state of heating of the coolant to the ECU, which in turn regulates the fuel supply. Secondly, it controls the temperature, preventing the motor from overheating. Because the signal turns on the cooling fan. Signs of malfunction:
- Increased consumption;
- Difficulty starting;
- Floating speed when warming up.
Speed sensor (DS)
The DS is installed on the rear side of the engine in the throttle valve area, at the bottom, at the gearbox. It is responsible for speed, that is, it sends a signal to the instrument panel. Signs of malfunction:
Speedometer malfunction.
Phase sensor (PF)
The DF is installed in the front part of the engine, in the timing belt area above the generator. Since it is responsible for the camshaft speed. That is, if the timing belt breaks, the fuel supply is stopped by the DF signal. If it fails, the system goes into emergency mode. Signs of malfunction:
- Increased consumption;
- Decrease in dynamics;
- Floating idle speed.
Knock sensor (DS)
The DD is installed in the front part of the engine on the block, between the second and third cylinders. Designed to control detonation. That is, the ECU receives a signal and doses the combustible mixture, thereby reducing detonation. Signs of malfunction:
- Decrease in dynamics;
- Floating idle speed;
- Jerks and dips when starting and moving.
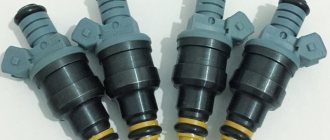
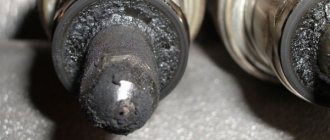
Fuel rail can be removed
- This is how it looked:
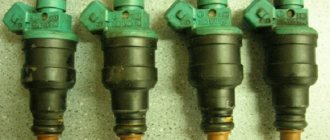
- I removed the injectors and wiped them of dirt:
- Soaked them in carburetor cleaner:
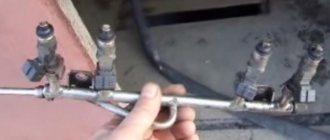
- While the injectors were soaking, I put together a diagram for cleaning them:
The light bulb in the circuit was 10 W, a simple halogen. I brought the button without locking and the wire from work. I didn’t use anything to supply the cleaner to the nozzle - I just put the nozzle on the can and it fits quite tightly.
ready-made cleaning scheme
- The injector is connected as follows: the left contact is positive, and the right contact is negative.
Then I cleaned each nozzle in two passes of 10-15 sprays. I didn’t take a video or photo of the spray torch - it was inconvenient to take pictures, because... he did everything alone. In principle, the nozzles were not dirty - the spray pattern did not change much, and from the very first presses it sprayed normally. Then I checked the winding resistance of all injectors. Values in the region of 11.9-12.2 Ohms are within the norm.
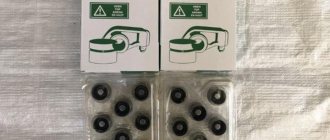
You can start assembling, but before that you replaced the O-rings on the injectors - replaced 4 out of 8, because half of the rings were in excellent condition (at the injector-ramp transition). I removed the ones to replace:
- Assembling the ramp with injectors:
At the same time I cleaned the cylinder head cover
- Before installing the receiver with the throttle valve, I also cleaned the valve; since the last cleaning it has become quite dirty:
- Also, when removing the receiver, two pillows to which it is attached fell apart - I had to go get new ones:
- We collect everything, check it and start it.
Started with half a kick. Since in general the injectors were not dirty, I didn’t expect much of an effect, but here I was pleasantly surprised. According to the first sensations, the engine began to run more softly, and responded somehow better to the gas pedal. Let's check whether this procedure helped during a cold start in the cold winter. But the most unexpected effect was a decrease in average consumption by almost a liter.
If before this my average consumption recently was consistently 9.2-9.4 liters per 100 km, then after five days of commuting to work the average consumption is already 8.6 liters per 100 km. And at XX it used to be 0.8-0.9 l/hour, but now it’s 0.7-0.8 l/hour. So it was not in vain that I climbed into the injectors and spent several hours.
Cleaning the nozzle without removing it
In this case, cleaning can be carried out using several methods:
- Using special cleaning additives that are added to the fuel. They contain special cleaning agents that gently clean the injector openings.
- Cleaning using pressure. To do this, you need to accelerate the car to a speed of 110.130 km/h, and drive for 10.15 km (about 5.6 minutes) at high engine speeds. Due to the high load, natural cleaning will occur in the nozzles.
- Idling. This method is similar to the previous one. It is necessary to start the engine while the car is stationary and maintain the speed at 4.5 thousand for 3.4 minutes. This will also clean the injectors. However, the previous cleaning method is better because the load under its conditions is higher.
conclusions
Problems with the operation of the injectors are not a critical failure, but if they occur, we recommend that you do not delay checking and eliminating the malfunction. In most cases, repair work can be carried out independently using the methods described above. Timely checking and diagnostics of injectors will allow you to avoid problems with the operation of the machine. Prevention will cost you less than repair work on injectors or other engine components. We recommend that you clean the injectors every 30.35 thousand kilometers of your car, regardless of their condition.
A faulty injector (nozzle) has a negative impact on the operation of the vehicle engine. The sooner the car owner finds out the cause of the malfunction, the sooner he will eliminate it, saving a significant amount of time, nerves and money. Listed below are signs of an injector malfunction that indicate the need for repair and maintenance work.
Main symptoms
Lack of fuel mixture in the injector. Often, the presence of this symptom does not indicate a malfunction of the injector itself, but a failure of the fuel pump, or its incorrect installation after repair work. In some cases, the reason may be a clogged fuel mixture inlet into the fuel pump.
The fuel pump has failed
Significant increase in fuel consumption. A fairly common phenomenon that indicates a clogged injector. Due to the small diameter of the injector nozzle, even slight contamination can significantly disrupt the mixture formation process, reducing the percentage of engine efficiency. This is explained by the fact that a clogged nozzle no longer forms a cone-shaped cloud of gasoline, which means that a significant amount of fuel begins to burn out in the exhaust manifold. The consequence of these processes is a deterioration in the dynamic characteristics of the vehicle and an increasing load on various electronic equipment of the car: coil, spark plugs, wiring, etc.
Removing the fuel pressure regulator
The fuel pressure regulator is attached to the rail with two Allen-head bolts. They are not visible from above, but the key can be found by touch. It is better to use a torx wrench, as the heads are often clogged with dirt. In this case, the torx bit is easier to insert. The return pipe is screwed to the RDT using a fitting with a 24 mm edge. If you can’t unscrew it in place, you can remove the regulator along with the fuel pipe, and then unscrew it in a vice.
The photo shows a new fuel pressure regulator code 2112-1160010-01 and a removed tube.
Now we put the new fuel pressure regulator in place and screw the fuel pipe. Before the first start, you need to pump up the pressure in the fuel rail and fill it with gasoline, otherwise the engine may not start for a long time.
To do this, turn on the ignition three times, and each time wait until the pump stops humming. Of course, don’t forget to replace the fuel pump fuse before doing this. Then we start the engine.
How to get rid of excess fuel
To relieve the existing fuel pressure, you need to turn off the fuel pump and exhaust the remaining gasoline:
- Fold down the cushion from the back row of seats.
- Below it is the fuel tank hatch.
- Unscrew the screws securing the hatch.
- Disconnect the wiring harness from the pump housing (the wires supply power).
After this, start the engine and wait until it stalls. It is recommended to turn the ignition on several times to ensure that there is no gasoline left in the system. Next, you can begin to remove the injectors. It is recommended to prepare the necessary tools in advance:
- open-end wrench 17;
- a flat screwdriver with a narrow blade;
- Phillips screwdriver;
- hex key 6;
- rags.
All elements of the repair kit are usually at hand for any driver.
The process of cleaning injectors on a VAZ-2110
Before cleaning, it is necessary to realize that the motorist knows the design and operating principle of the unit, as well as the degree of responsibility for all operations performed and their consequences. If you are not so sure, it is recommended to contact a car service.
Bosch injectors for VAZ-2110.
To begin with, it is necessary to dismantle the elements from the fuel line and completely remove them from the car. This was done for the convenience of transactions. So, let's start disassembling the unit and dismantling it:
- The engine has cooled down and operations can begin. De-energize the fuel pump. This can be done by turning off the fuse or removing the wire blocks from the power connector.
- We reduce the pressure in the fuel line.
Disconnect power from the fuel pump and relieve pressure.
Remove the battery terminal to remove the fuel rail.
Once everything is disconnected, you can remove the fuel rail from the engine.
Having disconnected the fuel hose, we dismantle the fuel rail.
We remove the fastening brackets and dismantle the injectors from the ramp.
The injector seats must be covered to prevent foreign objects from getting into the manifold and cylinders, which could damage engine components.
After the injectors are removed from the car, you can proceed directly to the cleaning process:
- We remove the rubber seal from the nozzle itself.
- Using a special nozzle cleaner, we wash the funnel-shaped surfaces and nozzles.
- Next, we clean the fuel supply channel.
- When manual cleaning is done, it is worth moving on to a more effective method.
Do-it-yourself procedure for connecting and cleaning injectors.
Cleaning methods
In practice, there are several types of injector cleaning. The most famous and used three methods:
- The first method involves the use of automotive chemicals. A very effective, but significantly expensive method. To everything else, we can add that automotive chemicals are not safe to use for the human body, and therefore you should be extremely careful. When using chemicals, the nozzles do not need to be removed!
- Car service. Of course, this is the safest and most reliable way to clean injectors using a special stand. The obvious disadvantages include the cost of performing such work, since the price is often too high.
- Do-it-yourself injector cleaning. The most profitable and economical method of repair and restoration work on the fuel system. In this case, the car owner needs knowledge of the structure and operation of the elements, so as not to screw up anything, and also not to increase the cost of repairs.
Symptoms of a problem
If you clean and maintain the injector assembly in a timely manner, they can last quite a long time. But when to clean the elements is difficult to determine, so there are a number of signs of malfunction.
- Starting the engine with difficulties or not the first time.
- Loss of power and traction.
- Troubling is a clear sign of uneven fuel supply.
- Increased consumption.
- Jerking of the vehicle in the winter season.
If the above symptoms occur, it is necessary to urgently clean the injectors. After the procedure, the performance of the car engine should return to normal. If this does not happen, then you should look for reasons in another place, such as the fuel pump, fuel filter or cylinders.
Cleaning VAZ-2110 injectors is quite simple with your own hands. If you have the necessary tools and basic knowledge of car design, any owner can easily troubleshoot problems.
Dismantling
Before replacing or cleaning the injectors, they will need to be removed from the fuel rail. To achieve this, the following activities are carried out:
- Make sure the engine has cooled down properly. It is not safe to work on a hot engine;
- Disconnect the power wires from the fuel pump to de-energize the device;
- Try to reduce the pressure in the engine power system as much as possible. To do this, the engine starts, and then you need to wait until it stalls at idle speed;
- Repeat this procedure several times until the car simply stops responding to turns of the ignition key;
- That's it, now our goal is the fuel rail. To remove it, you must first remove the terminals from the battery, turn off the power to the ramp itself, disconnect the fuel supply hoses, and also disconnect all electrical appliances going to it. These are pressure, idle, throttle position sensors;
- If you have an 8-valve engine, then you do not need to remove the receiver. This step is relevant for engines with 16 valves;
- Experts do not recommend removing the intake manifold without dismantling the throttle valve and the hose going to it. It is better to unscrew and disconnect everything at once, which will allow you to continue working more conveniently;
- Cover the exhaust manifold openings with something to protect them from foreign objects;
- Using a hex wrench, you can unscrew a couple of bolts and remove the fuel rail along with the injectors;
- Make sure that there are no distortions when removing the ramp, otherwise problems may arise with the dismantling processes;
- We remove the injectors. To do this, remove the mounting brackets that hold the electrical connector. You also need to remove the bracket that holds the injector in its seat.
After dismantling the elements, be sure to close the seats to prevent debris and other objects from getting in, and place the nozzles themselves on a table or floor, after laying down a dry rag.
Here you can decide whether to change or clean the elements of the fuel system. If replacement is required, install new injectors in place of the old ones and follow the assembly procedure.
Cleaning
Here proceed as follows.
- Remove the rubber rings from the injectors, and when cleaning is finished, replace them with new seals.
- The cleaning process should begin with the nozzles, on which various deposits form as the car is used.
- Be sure to thoroughly clean the funnel-shaped surfaces where tar deposits accumulate.
- The next step is the fuel mixture supply channels.
- To open the solenoid valve to supply fuel, you will have to trick the device with a 5-7 V power supply.
- Some use stabilized voltage sources, phone chargers, or even a car battery. If using a battery, the voltage should be supplied through the light bulb. It will play the role of a current damper. Otherwise you risk burning the winding.
- Electricity is supplied through two wires, in the gap of one of which a button is installed. It will close and open the network. This creates an imitation of the operation of an injector in an engine due to the influence of a pulsed electric charge.
- You can supply the cleaning liquid to clean the injectors through a can of carburetor cleaner. Inexpensive and effective, even better than specialized chemicals.
- Be sure to tightly connect the cylinder and nozzle with a rubber tube, clamps and any other means.
- All is ready? You can then apply electricity to open the injector. At the same time, press the button on the cleaning agent canister.
- Soon the torch of the liquid jet, which will exit through the fuel atomizer of the injector, will change its “clumsy” direction and will begin to uniformly exit the nozzle. This indicates that you have removed all carbon deposits.
Homemade cleaning deviceBefore putting the cleaned nozzle back in place, check its actual condition.
Examination
To check you need:
- Measure the injector resistance using a multimeter. If the readings are within 10-15 ohms, the injector is working;
- If you deviate from these limits, cleaning is pointless. You only need to change the injectors;
- Check devices for leaks;
- To do this, when cleaning, do not turn on the electrical pulse so that the nozzle does not open;
- Under pressure, a device with a broken seal will begin to show signs of leakage. Therefore, the element must be replaced.
Injectors cannot be repaired or disassembled into parts to restore functionality. If the resistance and tightness are broken, the devices must be replaced with new ones.
Troubleshooting
Before removing the injectors on the VAZ 2107, you need to make sure that they are really clogged. There are several ways:
- Hearing test: the old-fashioned method of diagnosis. Applicable only when the holes are significantly dirty. “Experienced” people recommend listening to the audio coming from the cylinder block. If muffled ringing sounds are clearly audible in the sound of the engine, then the fuel nozzles need to be cleaned;
- Assessing the condition of injectors using a multimeter: a much more objective method of analysis compared to the previous one. First you need to know what type of sprayers is installed on the car. As a rule, the “seven” was equipped with high-resistance injectors. For correct diagnostics, it is necessary to disconnect the “high voltage” going to the injector. Now you need to connect the diagnostic wires of the device to the injector terminals. If the voltmeter readings give values in the range of 12-17 Ohms, then everything is in order with the injectors;
- Diagnostics of the mechanical parameters of the sprayer. This diagnostic operation is only available with professional equipment; it is performed only at specialized service stations. The point is that the injectors are dismantled and attached to a stand. Large quantities of fuel are continuously passed through the part. The technician evaluates the parameters of the torch that is formed when fuel passes through the nozzle. If the fuel flows unevenly, then the device is clogged.
Causes
The reasons for the deterioration of the injectors are deposits on them.
The result is incorrect atomization of gasoline, since the injector no longer closes completely. The filter cannot retain the entire volume of harmful substances. Therefore, the injector becomes dirty gradually. And before the driver realizes the complexity of engine failures, cleaning is already necessary. If the engine is difficult to start, and problems are already diagnosed in idle mode, then problems with the injectors are obvious. Additionally, the gas pedal may fail. The engine is not as powerful, and the car accelerates much worse.
The injectors are exposed to high temperatures. As a result, resins are formed that contaminate the injector. It should be borne in mind that any gasoline leads to a similar outcome, since heavy hydrocarbons are contained in all its brands. The only difference is that when using gasoline of poorer quality, flushing will have to be done much earlier.
New Lada: Replacing a “grenade” on a Kalina with your own hands: features, device and recommendations
There are the following stages in injector malfunctions:
- with low contamination of up to 10%, the injector performance deteriorates. And although several liters more fuel is consumed, the engine continues to operate normally.
- With average pollution, the deterioration of indicators increases to 20%. Fuel consumption continues to increase, and interruptions in engine operation are already noticeable. The car is difficult to accelerate, and there is an unpleasant smell coming from the exhaust pipe.
- If the contamination is severe, the injector works half as bad. Several cylinders stop functioning. Popping sounds appear due to problems with the air filter.
Most car enthusiasts prefer to wash their injectors after 100 thousand km. However, a more optimal solution would be to carry out this procedure after 20-30 thousand km. It is especially recommended to do washing on the eve of winter.
Replacement or cleaning?
In order to understand what needs to be done with the nozzle, change it or simply clean it, it is better to diagnose them on a special stand. Under such conditions, you can test it in operation under different pressures, and also visually see how tightly it closes, and whether it is “snotty.”
If any of the injectors needs to be replaced, then you should buy a new one with exactly the same part number as the old one. Also, during installation of cleaned injectors, all O-rings should be replaced (2 pieces on each injector - approx.).
Installation is carried out strictly in the reverse order, similar to the removal procedure.
Step-by-step instructions for removing and installing the VAZ-2109 steering rack
Sequencing:
- First of all, you need to remove the protection. To do this, you will need to unscrew the fastening nuts that are on it at the top and bottom.
- Remove the tread element completely, otherwise it will interfere with your further work.
- To get rid of the tie rods, unscrew a couple of bolts in the center of the rack. Only then will you be able to disconnect without interference.
- The clamps of all rails are secured with nuts on both sides - they also need to be unscrewed. After this, you will be able to move the element to the side.
- To completely remove the part, you will need to get rid of the coupling bolt, which is located on the interior side, at the very bottom of the steering shaft.
- You are unlikely to be able to remove the rack easily - you will have to rip it off the shaft. If that doesn't work, use a pry bar to pry it from the outside.
If the part needs to be repaired, do everything necessary to do so. If replacement is necessary, you will need to buy a new rail. On average, a new steering rack costs from 1,500 to 2,200 rubles. The price depends on the place of purchase and the manufacturer of the mechanism. Installation of a repaired or new element occurs in the reverse order of dismantling work.
Tips for replacing old rack parts
- Damping rings are placed on the new backing plate so that the thin edges of the rubber elements are in the middle of the cutout of the plate. After purchasing a repair kit for the steering rack, you will find in it two rubber bands needed for this purpose.
- The protrusions of the bushing will help you install it correctly in place, after which you need to carefully get rid of the thin rubber bands using a blade.
- The support ring is removed from the gear shaft with special pliers, and then the bearing is dismantled.
- Don't forget to wash the steering gear housing so you can insert a new needle bearing later.
Liquid injector cleaning
- We take out the fuse with the engine running. The fuse is responsible for the operation of the electric fuel pump. This is done in order to relieve pressure in the fuel line.
- We disconnect the terminals from the injectors, the injection and reversing hoses of the fuel line.
- Carefully unscrew the tablet with nozzles.
- Carefully remove the sealing rings from the injectors.
When the solenoid valve is closed, the nozzle should not allow liquid to pass through and vice versa.
You will need liquid for flushing carburetors and a device for blowing liquid through the nozzle. Any device (for example, a plastic bottle) can be used that is connected to the inlet of the nozzle and a container with injected carburetor fluid. You will also need two wires from the battery to the sprayer terminals (preferably with a pressure switch without a latch connected in series).
By opening and closing the circuit, closing and opening the valve, we pass the cleaning liquid under pressure through the sprayer. Car enthusiasts say that if after two to six times of cleaning the required spray of the torch is not present, it must be replaced. Cleaning the injector is carried out in the following order: we pass the liquid through, leave it for a while to soften the hardness, and rinse it again. The target is the six nozzle holes and the valve seat. Having completed the procedure, carefully reassemble everything in the reverse order.
Delaying cleaning may result in excessive contamination of the injector, resulting in the need to replace the injectors. Clean these devices in a timely manner, and then you will be able to avoid many problems.
How to check the RTD of a VAZ 2110?
If you want to check the fuel pressure regulator 2110, you must first unscrew the special plug that closes the fitting for checking the pressure. You should look for the fitting on the ramp block, from the end.
After you have unscrewed the plug, you need to unscrew the spool from the fitting. Use the back of a metal tire cap for this.
After the completed operations, attach a pressure gauge to the fitting using a hose. You can take a regular pressure gauge that you use to measure tire pressure. Secure the ends of the hose with clamps. Now you can start checking - turn on the engine. We continue to check the pressure - it is necessary to disconnect the vacuum hose from the fuel pressure regulator. After removing the hose, the correct pressure gauge readings should be within 0.2 - 0.7 cm. Other data indicate the need to replace the RTD.
How to replace the regulator?
Below you will find step-by-step instructions for replacing the fuel pressure regulator in a VAZ 2110 car. Follow this plan and you will definitely succeed.
Step 1: Relieve pressure in the fuel line, i.e. in the tubes through which fuel is transferred from the gas tank to the carburetor and back. Step 2. Unscrew the nut securing the fuel return tube (injector hose) to the RTD and remove the tube. Step 3. Remove the two bolts securing the RTD. Step 4
Carefully remove the RTD fitting from the ramp hole. Step 5: Disconnect the fuel pipe. Step 6
Remove the regulator. Step 7: Remember to wet the rubber seals with gasoline. If you notice that the rings are inelastic or torn, replace them. Step 8. Install a new regulator. To do this, follow these instructions in reverse order.
Ready!
Any motorist knows that a car can't do without breakdowns.
It is only important to notice their first signs and replace the faulty spare part in time. Also, don’t panic if there is no car service nearby.
Follow the step-by-step instructions and you will succeed. Good luck on the roads!
For an injection engine to operate, a certain pressure must be maintained in the fuel system. This task is performed by the VAZ 2110 pressure regulator. A faulty device will not allow the engine to operate normally and must be replaced.
A fuel pressure regulator (FPR) is needed to maintain gasoline pressure in the fuel system at a constant certain level, regardless of engine operation. It is installed in the injector rail and is a diaphragm valve connected to the fuel supply channel to the injectors, the drain line and the air tube supplied from the intake manifold.
The RTD valve is affected by fuel pressure, on the one hand, and, on the other, by air pressure in the tube and spring force, adjusted to certain operating parameters in the system. When the engine is running, a serviceable RTD maintains the following indicators in the system: 2.9–3.3 kgf/cm2 (284–325 kPa).
Step-by-step work order
- The most important thing is to remove the air filter housing, the mass air flow sensor (MAF - approx.) and the hose.
- Then you need to relieve the pressure in the fuel system. If you have set yourself a goal, so as not to suffer, and to do this work easier, put a rag under the nozzles and loosen the connections. This will quickly release the pressure and allow the remaining gas to flow down the rag.
Using two wrenches, close the fuel line.
Power is off.
How to remove injectors on a VAZ 2112 16 valves.
Remove the removed screws in a safe place.
To remove the ramp, you need to make an effort.
When removing the fuel rail, we carry out dismantling work on a specific injector: