Play and knocking when turning wheels are the first signs of failure of steering rods and ends. Also, this indicates the depletion of the resource of the rack, which is set by the manufacturer in the range of 100 - 150 thousand km. Tips and rods are consumable parts. But repairing the VAZ 2110 steering rack or replacing it is a serious operation. However, if you have plumbing tools and a garage box, you may not need to contact a service station, but rather fix the problem yourself.
On a note! If the unit has not yet been repaired, then the mechanism can be adjusted without removing it. To do this, you need to adjust the lower nut with a wrench for tightening the VAZ 2110 steering rack (17 mm hexagon). We twist it until it stops and loosen it by 20°-25°. The knocking disappears and the unit will serve again.
Replacing the steering rack on a VAZ-2110, 2111, 2112
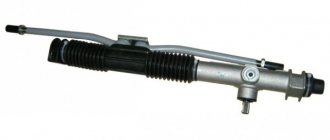
One of the most important systems on which vehicle control directly depends is the steering mechanism. The steering mechanism has a complex structure, the main component of which is the steering rack.
It is she who transmits force from the steering wheel to the wheels and determines the movement of the car. Like the car itself, the steering rack has gone through a long path of development and modernization.
From simple to complex, from elementary to perfect, today this unit is an interconnected chain of levers, rods, tips, the coordinated work of which allows you to achieve ideal, comfortable driving.
But, like any mechanism, the steering rack is subject to wear, this problem especially applies to the tenth VAZ model. We’ll talk further about how to replace the steering rack on a 10 by yourself.
So, the steering rack is the power unit of the control mechanism, which transmits vibrations coming from the steering wheel to the drive wheels. Do not confuse the rack with the gearbox.
The rack includes the following parts:
- stock;
- slider;
- seal;
- tips;
- traction;
- turning levers;
- fasteners.
All elements are interconnected with each other, but if at least one of them goes out of working order, the entire mechanism stops working. It is unacceptable to drive with a faulty steering rack, since it determines the process of driving a car, and loss of control over it invariably leads to an accident. That is why it is important to identify faults in a timely manner and remove them.
Basic faults
- Most often, the rod, seals, and, less often, the slider wear out in the dozen. For this reason, knocking occurs in the suspension, which is transmitted to the steering wheel. Wear on ball joints can also result in knocking noises.
- It also happens that the unit begins to leak, if we talk about hydraulics.
Leaks are indicated by oil stains that invariably remain on the asphalt after a long period of parking. - Another most common malfunction is the so-called tight steering wheel. It also happens that the steering wheel turns only in one direction, this is a symptom of a serious defect in the component parts.
But why does the steering rack fail? As a rule, such problems come to reckless drivers, lovers of high speeds and bad roads.
Sharp braking, contact with holes and potholes, as well as wear on the boots and dirt getting into the system, all this will certainly lead to malfunctions that require serious repairs or complete replacement. These problems can be avoided by treating your car more carefully.
Do not drive it at all speeds and choose more comfortable roads, and, most importantly, under no circumstances leave the car in the cold with the wheels turned out: in this case, the hydraulics instantly fail.
How to choose a steering rack
In the case where a defect in a unit does not allow for easy repairs, it is more advisable to completely replace the unit. But here you will have to shell out a considerable amount: a standard VAZ rack will cost about 3,000 rubles, tuning versions cost much more, up to 15,000 rubles.
That’s why the number one question is the correct choice of reiki, so as not to get into trouble.
- It is better to give preference to original parts rather than copies, as they guarantee not only perfect compatibility, but also good quality. Although today there are a lot of companies and small businesses that sell cheap copies under the brand of the originals. Therefore, you should not purchase components from dubious shops and markets, but from serious and trusted sellers.
- Don't pay attention to parts that are too cheap, as they are unlikely to last long.
- When choosing a rack for a ten, it is necessary that the product number ends with “10”, remember that the steering rack is a purely individual part, there is one for each model, so don’t go wrong.
- Of course, it is necessary to conduct a visual inspection of the product before purchasing to identify defects, damage to anthers and other components.
DIY replacement
To replace the unit, you need the following:
- a bottle of white spirit;
- three clamps measuring 200x4;
- soft cloth;
- Movil aerosol or equivalent;
- any lubricant for processing bearings, Mobile Griz, Feola, or any other good quality will do;
- WD-40 to unscrew rusty parts.
In addition, you will need spare parts, namely:
- tubes;
- - tips;
- silent blocks;
- rack repair kit;
- anther.
The tools you need to stock up on are:
- hammer;
- keys set to “22”, with an internal octagon;
- chisel;
- cardan;
- puller for dismantling tips.
Now let's get to work
- First of all, you need to treat all fasteners and parts with engine oil (WD-40) and leave for an hour and a half.
Afterwards, repeat the treatment with engine oil and it’s better to start working in a day, otherwise it’s simply impossible to unscrew the stuck parts, you’ll either break the threads and damage important components, or you’ll break something for yourself. To avoid such trouble, it is better to do everything in order, without haste. - When the oil saturates the fasteners, you can begin dismantling. We fix the car, put supports under the wheels. Don't forget about the handbrake and lock the steering wheel.
- Disconnect the power and remove the front wheels.
- Unscrew the nuts from the ends;
- Armed with a puller, we knock out the fingers from the rack arms. To prevent the puller from flying away, hold it with a key.
- Remove the clamp fasteners.
- Now we are carrying out dismantling work in the cabin itself: the bolt on the steering shaft is removed, it is located near the floor.
- After all these operations, we pull the rail towards ourselves. It is easier to dismantle if you pull it out with a rotating motion.
- After dismantling the rack, the control mechanism is pulled out through the resulting hole.
- If the rack cannot be repaired, it is replaced with a new one. Installation is carried out in the reverse order to dismantling.
The result of the work
Replacing the steering rack on a VAZ model 10 is one of the simplest jobs that can be mastered by an amateur. The main thing is to remember the disassembly instructions and be careful when dismantling parts.
Having completed this work once, you will no longer have any doubts about whether to take your car to a service center if a similar problem arises, or to solve it yourself.
Of course, when the majority of people in our country are forced to count their hard-earned money, it is better to try to perform simple auto mechanic work yourself, especially since this is an endlessly interesting and fascinating process.
Source: https://mylada.net/remont/zamena-rulevoj-rejki-na-vaz-2110.html
How to remove the steering rack on a VAZ 2110
The VAZ 2110 steering mechanism is dismantled, namely the steering rack is removed to perform repairs or replace it. But before proceeding with dismantling, we suggest that you study the structure of the VAZ 2110 steering mechanism, since first you will need to disconnect the inner tips from the steering rods, and then begin to remove the steering rack itself.
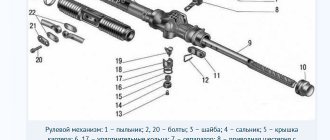
The steering mechanism of the VAZ 2110
- and 12.
inner tie rod ends - steering gear bracket
- steering gear support
- protective case
- steering gear housing
- pinch bolt
- flexible coupling flange
- adjusting rod
- outer tie rod end
- ball joint tip
- swing arm
- bolts securing the inner tie rod ends to the rack
Removing the steering rack of a VAZ 2110
- Before you begin to remove the steering rack of the VAZ 2110, you need to unscrew the bolt of the clutch, which is located under the pedals, using a “13” key.
- After that, in the engine compartment, using the same “13” key, unscrew the nuts securing the steering mechanism to the car body on the right and left sides.
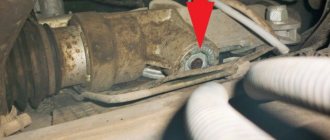
- We push the disconnected mechanism forward until the splined end of the gear comes out, then remove it through the side opening in the wheel arch, as shown in the photo.
Removing the steering rack of a VAZ 2110
remontauto-vaz.ru
Do-it-yourself removal and repair of the VAZ 2110 steering rack
Every car enthusiast in the country who owns the tenth model of a Lada is faced with the issue of a faulty steering rack. When such a defect appears, the car does not “hear” well while driving, especially when moving on an uneven road surface. A strong play appears, radiating to the steering wheel.
In addition, this malfunction affects the performance of the front axle. It creates sound that sound insulation does not protect against. The listed factors indicate that it is necessary to repair the steering rack on the VAZ2110 or replace the mechanical unit.
Structural configuration of the steering rack
Before restoring the functionality of the steering rack or replacing it, it is necessary to study in detail the structure of this mechanical element installed on the “ten”. Manufacturers produce two types of racks - mechanical and with a hydraulic device.
The mechanical type is the most common on cars coming off domestic production lines. This unit is mounted on vehicles with front and rear wheel drive.
The rack serves as an amplifier, facilitating the rotation of the steering wheel due to the gear ratio - the rack teeth change the pitch from the central axis to the edge.
This characteristic allows you to automatically return the steering wheel to its original position after a maneuver. All first VAZ 2110 models were equipped with a mechanical steering rack.
On new cars, the rack is mounted together with a hydraulic power steering. The hydraulic unit allows the driver to easily turn the wheels while moving the car using the steering wheel and make maneuvers without effort. The rack design consists of the following elements and assemblies:
- 1. entrance;
- 2. spool bushing;
- 3. dust cover;
- 4. retaining ring;
- 5. spool seal;
- 6. spool;
- 7. bearing;
- 8. stem seal;
- 9. backplate;
- 10. rod;
- 11. retaining ring;
- 12. back seal;
- 13. piston rod;
- 14. clamping nuts;
- 15. spool nuts;
- 16. blockage of spools;
- 17. spool worm;
- 18. rod bushings;
- 19. bypass tubes;
- 20. exit.
Signs of a faulty steering rack are the following:
- cracking or knocking when the car moves over potholes and other uneven road surfaces;
- clicks when turning the steering wheel in both directions when the car is not moving;
- The steering wheel slows down when turning.
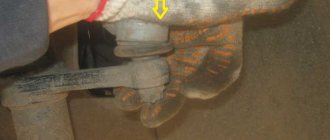
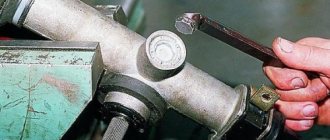
To diagnose this mechanism, you need to grab the shaft where it connects to the rack.
The knot in this place needs to be pulled up and down.
It is important to understand here! A knocking sound during such a check indicates that urgent repair of the steering rack is required, or the needle bearing needs to be filled with lubricant.
The next step in checking the technical condition is checking the shaft for wobble, as well as examining the rigidity of the connection between the rack and the steering wheel gear.
To do this, you need to grab the rods in the space under the hood and try to move the shaft assembly. This checks for insufficient fixation of parts that are tightened during maintenance.
But if the knocking repeats again, you will have to repair the rack or replace it.
The ideal option is to purchase a new control system element. But you can try to repair the rack yourself. In any case, it is impossible to do without removing this unit. The main thing is to follow a certain sequence and rules.
The process of removing the steering rack of a VAZ 2110
Dismantling can be done in two ways - remove the mechanism along with the rods or dismantle it without them. The first option will require knocking out the pins of the rods from the levers of the turning struts.
The second method involves unscrewing the internal steering wheel rod ends from the rack.
To remove the mechanism, you need to unscrew the elastic coupling installed on the steering column inside the car. Then, under the hood, using a key set to “13”, unscrew the nuts that secure the brackets of the steering unit attached to the car body.
Step-by-step disassembly and repairs
The steering rack of a VAZ 2110 car must be disassembled, following a certain sequence of steps.
Step #1:
- fix the crankcase assembly in a yew that does not have hard jaws;
- pull off the stop and spacer ring located on the right side of the crankcase;
- remove the clamps holding the protective casing and remove the protection itself;
- remove the support located on the left side of the crankcase assembly, remove the protection in the form of a cap;
- Using a 17" hex key, unscrew the thrust nut and remove the rack;
- remove the spring and locking ring;
- hit the crankcase assembly against a wooden base and try to knock the thrust element out of the groove;
- remove the engine compartment seal and use a screwdriver to remove the gear boot element;
- use a special octagonal wrench set to “24” to unscrew the bearing fixing nut, not forgetting to remove the lock washer first;
- Using a key set to “14”, resting on a special protrusion, pull the gear out of the crankcase along with the bearing assembly, after which the rack is removed;
- Use a screwdriver to remove the bushing for the stop, turning it so that the protrusions coincide with the grooves of the crankcase.
In order to install a new bushing in the crankcase assembly, you will need to put on damper rings. Here the thin side should be placed opposite the cut. Next, you need to return the support sleeve back to the seat in the crankcase so that the protrusions fit strictly into the groove. Then you need to cut off the rubber ring and remove the excess rubber.
Step #2:
- removing the locking ring from the shaft on which the gear is mounted;
- Removing the bearing using a special puller.
Good to know! When there is no puller, a drill is used to tighten the needle bearing, which makes two holes in the end of the crankcase assembly so that they are directed towards the bearing to be removed. Through them, knocking out of the seat is performed.
A properly functioning steering system will give the driver, in addition to a feeling of comfort, also a guarantee of safety on the highway. It is necessary to constantly monitor the working condition of this mechanism, and at the first sign of a breakdown, take immediate action.
Video on repairing the steering rack on a VAZ 2110
Source: https://autoprivat.ru/remont_avto/kak_snyat_rulevuyu_rejku_na_vaz_2110.html
Replacing the steering rack of a VAZ 2110. Photos, instructions on how to change the steering rack of a VAZ 2110
The steering rack transmits forces from the steering column to the steering wheels and ensures that the car's wheels turn. In addition to the steering rack, to facilitate and strengthen wheel turns, power steering is included in the design of the modified part. On VAZ 2110 cars it comes in two types: electric and hydraulic.
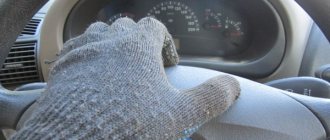
It is best to check the steering rack of a VAZ 2110 not while the car is stationary, but while driving at speed, because the noise will be more clearly audible on a working part.
To do this, you need to find some sharp turn and confidently turn into it.
If you hear an extraneous light knock, you need to stop, open the hood and try to turn the steering wheel sharply, most likely the problem is in the steering and you will immediately hear the sound coming from the knocking rack.
Signs and causes of failure of the VAZ 2110 steering mechanism
- Increased free play of the steering wheel. The reason for this may be an increase in the gap between the rack stop and its nut. Associated reasons may be wear of rubber-metal parts, loosening of the ball rod nuts, and the appearance of a gap in the hinges.
- Noise and knocking in the steering. Very often, in addition to the reasons described in paragraph 1, the source of the problem may be a weakening of the steering mechanism or the bolt securing the lower flange of the elastic coupling to the gear shaft.
- Stiff rotation of the steering wheel. The source of the malfunction may be damage to the bearing of the upper shaft of the steering column, a defect in the support sleeve or in the rack stop. The reason may also be wear of the bearing of the upper support of the suspension strut, failure of parts of ball rods or a telescopic strut.
It is also worth saying that troubleshooting the steering rack is a priority task for auto repair, because... otherwise it can be fatal.
At the initial stages of operation, knocking in the rack is eliminated by tightening the corresponding thrust nut. However, after 200 thousand km. To eliminate the play, you will need to replace the VAZ 2110 steering rack.
What is needed to replace the steering rack of a VAZ 2110
To replace the old rack with a new VAZ 2110 we will need: WD-40 fluid, a vice, a puller for removing the tips or a hammer, an open-end wrench “13”, “22”, “19”, a socket wrench with a head “13” , “17”, “22”, chisel and screwdriver, pry bar, jack, new steering rack.
You should pay attention to the fact that the VAZ 2110 power steering steering rack with the article number (21100340001030) costs much more. When buying a new rack, it is more profitable to take the rack assembled so that there are rod ends, etc., and it is better to choose a new part when you have the old one on hand.
The price of a standard rack for a VAZ 2110 with article number (21100340001200) will be about 2,500 rubles, and an improved version with power steering costs 15,000 rubles.
The cost of spare parts is indicated for spring 2022 in Moscow and the region.
Features of replacement and operation of the VAZ 2110 steering wheel
The control mechanism is connected by detachable bolted connections to the rods, so the structure can be dismantled either as an assembly with the levers or separately, after first unscrewing the two “22” bolts and disconnecting the inner ends of the rods from the rack.
It is worth noting that removing the power steering rack will be more difficult and you will have to tinker a little, because you will have to drain the power steering fluid.
When connecting the steering wheel, be careful; the steering rack has a groove for the clamp bolt, and you need to install it so that the clamp is opposite the groove. This will allow you to install the bolt back without any extra effort.
Try not to drive at high speed on uneven roads and avoid driving over large obstacles (such as curbs); at least, do it carefully to preserve and prolong the operation of the steering rack, and it will serve you for a long time.
If you also replaced the steering rods, do not forget to do the wheel alignment.
Source: https://etlib.ru/report/1350-zamena-rulevoj-rejki-vaz-2110
Ways to solve the problem
Whatever the reasons for the steering wheel beating, it is necessary to carry out high-quality diagnostics and eliminate the problems. This will make it possible to avoid expensive repairs, and most importantly, prevent accidents!
If the steering wheel shakes at low speed, proceed as follows:
- check the cleanliness of the wheel rims;
- check the balancing and fastening of bolts on the wheels;
- test discs for deformation;
- check the quality of rubber;
- diagnose the suspension;
- examine brake discs and drums;
- check the engine mounting;
- try the quality of the drive shaft.
Wheel rims are easier and faster to clean at a car wash. A stream of water will remove accumulated dirt. Hit the disc with some object, reducing the amplitude of vibrations of the steering wheel, in order to safely drive to the car wash or service station.
Have your balancing done at a tire shop. Balance all 4 wheels, especially if the steering wheel shakes at low speeds. At the same time, eliminate the deformation of the wheel rims and give them their initial shape on a straightening machine.
Replace defective tires. It will not be possible to restore it - you will have to buy new tires and mount them according to the canons of proper balancing.
The beating that occurs during braking can be eliminated at a service station. The machine grinds and restores the surface of the brake discs if the degree of wear is low.
It is better not to fix steering wheel wobble at speed yourself. Only car services will accurately determine the cause of the breakdown and eliminate it. Most workshops work with specific brands of cars; they have a better understanding of the specifics of the models, know the characteristic “sores” and are able to quickly recognize them.
Unfortunately, most car owners believe that car vibration and steering wheel wobble necessarily mean that they simply need to balance their car's wheels. But this is not always the case, although improper wheel balancing is one of the most common causes of such vibration on the steering wheel or the entire car.
The problem is that vibration of the steering wheel (as well as the entire car) is not only one of the most common, but also one of the most annoying problems. Moreover, it often creeps up on us gradually and unnoticed - until one fine day we begin to understand that the steering wheel is already hitting quite hard at speed or when braking, and it reverberates throughout the whole car, but we understand that we are already accustomed to it and That’s why we don’t rush to a specialized service or tire shop to fix the problem.
But, most likely, at this time you asked yourself the question, what does it mean if your car vibrates, what are the reasons for the steering wheel beating? And, despite the fact that there are a number of reasons for this, it will most likely be possible to sort out the problem without resorting to large expenditures of money. However, having established the cause of the beating, you may have to spend money on repairs and eliminating the causes of such vibration. We must also understand that in the long term this will give us significant savings due to the failure of certain steering or suspension elements.
To determine the cause, we first need to determine the specific conditions of vibration - drive along the highway (the more deserted it is, the better) at different speeds and feel the beat and measure at what speeds it starts and at what speeds it disappears (most often you will notice , that there are two ranges of occurrence of the beat: first at low or medium speed, then the vibration disappears at a higher speed, and then its reappearance at an even higher speed; however, if the vibration is very weak, then it can only be felt in one range - at high speeds). In addition, determine how the car behaves during acceleration and braking - vibration disappears or increases depending on acceleration at different speeds.
So, let's look at all the reasons why vibration appears throughout the car and the steering wheel hits:
Advice from professionals on replacing the steering rack of a VAZ 2110
The steering mechanism of the “ten”, like any other car, is one of the components and assemblies on which the life and health of road users directly depends. Therefore, the repair of the VAZ 2110 steering rack, as well as other types of work on the steering, cannot be postponed.
A harbinger of an impending breakdown is the appearance of a knock in the steering rack while driving over bumps, which “blows” into the steering wheel and is quite sensitive. Also, problems with the steering system are indicated by the presence of knocking noises when turning, which requires immediate diagnostics of the steering mechanism.
It is premature to say that it is necessary to replace the VAZ 2110 steering rack; a visual inspection of the joint between the steering shaft and the rack is necessary.
To do this, you need to move the steering shaft with your hand up and down at the place where the parts are attached. If knocking sounds are detected, repairs are required.
In most cases, the cause is a needle-type bearing that did not pass the regulations on time and was not lubricated.
Sometimes the cause of knocking is a loose connection between the bushing and the steering gear, and it will be enough to secure the joints more tightly.
After determining the malfunction, the car owner must decide whether to change the steering rack, or make repairs at a service station or independently.
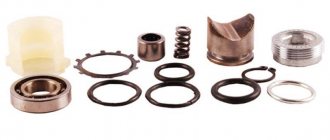
To carry out repair work, you should purchase a repair kit to restore the product.
True, the repair kit for the VAZ 2110 steering rack in combination with all the elements for repair is not cheap, but the configuration of such kits can be very different.
Therefore, you should buy a repair kit that contains the necessary parts to replace the steering rack. In today's automotive specialized stores you can pick up such a necessary repair kit.
So, if you need to tighten the steering rack of a VAZ 2110 without dismantling the product from the car, you need to stock up on a special wrench in the shape of an octagon, measuring 17 mm.
Important: on a VAZ 2110 car, the steering rack is adjusted only when characteristic knocking noises appear when the steering system is running. Such work is carried out on a lift or overpass; you can also use a pit to inspect cars.
Adjustment without dismantling the product:
- remove the motor protection, use a wrench, a screwdriver and a carrying lamp for this;
- on the aft side of the subframe, at the intersection of the steering shaft rack, we find the adjustment nut;
- during initial adjustment, there is a factory-made green plastic plug on the fastener, which stops the movement of the nut;
- use a screwdriver to remove the plug;
- After removing it using a special wrench purchased in advance, screw the nut clockwise 10-15 degrees, after which we test the rack for play and knocks. Continue adjusting in this way until the play and knocking disappear;
- To check the degree of clamping of the fasteners and the rack for operability, you need to sharply turn the rack. If there are no knocks, it will become clear that the fasteners are tightened to the required extent.
Having decided to replace the entire steering rack on the car, we proceed to dismantling the product. In this case, it becomes possible to test the tie rod end and, if necessary, replace it.
Progress:
- We dismantle the reflector (thermal reflector), which interferes with the main task.
- We bend the segments of the plate, which act as a stopper when unscrewing the fasteners.
- We remove the steering rack, separating it from the body mounts.
- To dismantle the steering shaft, you will need a 24mm octahedron.
- We unscrew the fasteners of the steering shaft to the gear and remove the product.
For repair work it is necessary to disassemble the rail. The procedure for disassembling the “ten” steering rack is as follows:
1. To dismantle the retaining ring, you need to free yourself from the gear shaft drive boot. 2. The only difficulty can be caused by repairing the steering rack oil seal. 3. To facilitate the repair process, after dismantling the steering shaft, remove its cardan and place it on the workplace. 4. Disconnect the rubber hose of the reservoir and free it from the liquid.
5. After this, we unscrew all the tubes and, using the pressing method, remove the steering rack oil seal with the bearing. After replacement, we carry out the assembly in the reverse order, not forgetting to lubricate the working surfaces of the steering device components.
The following recommendations must be followed:
- periodically inspect the anthers, their safety and strength;
- sharp angular movements of the car create the preconditions for the formation of defects in the steering system. A calm driving mode and careful driving prevent the occurrence of malfunctions in the steering rack;
- The VAZ 2110 steering rack does not adapt well to low temperature conditions. At this time of year, fuels and lubricants should be used with a higher viscosity than in warm weather. Do not create additional loads on the steering mechanism.
Careful operation and proper maintenance will keep the steering rack in working condition for a long time.
Source: https://avtovx.ru/rulevoe-upravlenie/zamena-rulevoy-reyki-vaz-2110-23/
Removal and installation of the steering mechanism VAZ 2110-2111-2112
Disassembly and assembly of the steering mechanism
Repair of the steering, troubleshooting the mechanism of the VAZ 2110, adjusting the steering of the VAZ 2111, the procedure for removing and installing the tips. Adjusting the steering of Lada 2110, repairing the steering rack of Lada 2111 2112.
We remove the VAZ 2112 module and disassemble it to replace the protective cover and rack parts.
It can be dismantled in two ways - with and without tie rods. In the first case, we press out the pins of the outer tie rod ends from the rotary arms of the VAZ 2111 struts. In the second option, we disconnect the inner tie rod ends from the rack.
In the cabin, unscrew the bolt of the lower flange of the elastic coupling of the VAZ 2110 (see Removing the steering column).
In the engine compartment, using a 13mm wrench, unscrew the nuts securing the steering brackets to the front of the body on the right...
...and the left side.
We move the steering mechanism forward until the splined end of the gear comes out of the hole in the front of the body and remove it through the hole in the mudguard.
We clamp the steering gear housing in a vice with soft jaws.
We dismantle the support and spacer ring on the right side of the VAZ 2110 steering gear housing.
We cut off the clamps securing the protective cover (they are disposable).
Remove the protective cover.
Remove the support and protective cap on the left side of the VAZ 2111 crankcase.
Using a special wrench with a 17-point octagonal head, unscrew the rack stop nut...
...and take it out.
Removing the spring...
...and a retaining ring.
By hitting the crankcase on a wooden stand, we knock the rack stop out of its socket. A rubber sealing ring is installed in the annular groove of the stop.
We remove the seal of the front shield of the engine compartment of the VAZ 2112.
Using a screwdriver, remove the gear boot.
Remove the lock washer.
To unscrew the gear bearing mounting nut, we use a special wrench with a 24-point octagonal head (the diameter of the hole for the gear shaft is at least 18.5 mm).
Unscrew the gear bearing mounting nut...
...and remove it from the shaft.
Grab the flat of the gear with a 14mm wrench and lean it against the mounting blade...
...remove the gear assembly with bearing from the crankcase, ...
...and then the rail.
Using a screwdriver, pry up the support sleeve and remove its protrusions from the crankcase holes...
...and remove the bushing.
Before installing a new support bushing into the crankcase, we put new damping rings on it so that their thin part is opposite the cut of the bushing.
We install the bushing, making sure that its protrusions fit into the crankcase hole.
We cut the rubber rings along the contour of the bushing and remove the cut parts.
Remove the retaining ring from the gear shaft of the VAZ 2112...
...and use a two-legged puller to press out the ball bearing.
To press out the needle bearing we use a special puller. If there is none, use a drill with a diameter of 2 mm to make two holes in the end of the crankcase so that they extend onto the needle bearing ring.
Through the holes we knock the bearing out of the crankcase.
We wash the cavity of the VAZ 2110 steering gear housing.
Using a piece of pipe, press the needle bearing into place. To seal holes, you can use “fast steel” or “cold welding”.
Having generously lubricated the teeth of the rack, drive gear and bearings with FIOL-1 lubricant, we assemble the assembly in the reverse order.
We install the protective cover in place and secure it with clamps.
Having adjusted the rack clearance, we tighten the stop nut by bending the crankcase threads.
Source: https://vazclub.com/vaz/2110-2111-2112/remont/rulevoe-upravlenie/regulirovka/razborka-sborka-rulevog-mehanizm.html
Removal and replacement
So, you have made the right decision - to replace the steering rack on your car with a new one. You will have to go to a car store or market and purchase the rail itself.
The replacement procedure is not too complicated and does not require any specialized skills or professional tools. You need to do the following:
- remove the plastic fender liner from the left front side of the car (it will interfere when dismantling the steering rack);
- open the clutch bolt using a 13 mm wrench (the bolt is located in the car interior above the pedals);
- release the steering linkages by opening them on the left and right sides;
- open the bolts securing the steering rack to the car body (this procedure is carried out in the engine compartment, there are only two fastening bolts);
- hold the rail while opening so as not to damage any other components of the car;
- After this, you need to push the rack forward, make sure that it is not secured with any bolts, and remove it through the left wheel arch.
Next, you should inspect the rail. If the rubber boot is not torn, remove it. To do this, you need to open the tips and cut off the tape clamps holding the boot. If under the boot the rack looks as if it had just come from the factory, it can be restored. You should be careful at this stage - do not secure the rack in a vice with hard plates. This may damage the mechanism body.
If the rail under the boot is dirty or has traces of rust, it just needs to be replaced.
How to Remove the Steering Rack on a VAZ 2110
24 Apr
Replacing the control rack of a VAZ 2110: yourself or in the service?
Car control mechanisms are divided into two types: worm and rack and pinion. With different approaches to implementation, they have the same task: to ensure the connection between the rotation of the control wheel and the rotation of the wheels.
Worm mechanisms are easier to manufacture, but do not provide sufficient steering accuracy, which is essential at high speeds. Therefore, most modern passenger cars are equipped with a control rack.
This unit is more difficult to manufacture and repair, but the connection between the angles of rotation of the steering wheel and the front wheels of the car is more precise. To facilitate steering rotation, a hydraulic or electric power steering is installed to assist the driver.
This makes driving the least painful, but adds hassle when repairing or replacing the control rack, including on the VAZ 2110.
Design and arrangement of the rack on the VAZ 2110
The operating mechanism of the control rail is the following. A gear is installed at the end of the control shaft. It meshes with a rack (hence the name). When the control wheel is turned, the gear moves the rack left and right, turning the wheels. For this purpose, the control levers are connected to the rack by steering rods.
This is what the dismantled mechanism looks like
Rack designers need to strike a compromise between lightness and steering feel. It all depends on the rack-and-pinion ratio.
- If the steering wheel is made light, the control will become blurry, and you will have to make too many turns of the steering wheel to turn. This is unsafe when driving on the highway, where quick reaction is important.
- Sharp steering is more predictable and safer, but also requires the driver to exert considerable effort when maneuvering, especially in parking lots.
- A variable ratio rack partially solves this problem. In the near-zero zone, the steering is sharp, which gives confidence on the highway. It is easier to steer closer to the edges, but you also have to turn the steering wheel more. This is convenient, for example, in a parking lot at low speeds.
To maintain a balance between sharpness and ease of control, amplifiers are installed on the steering mechanism. According to the principle of operation, they are hydraulic (GUR) and electric (EUR).
on the VAZ 2110 : without power steering (with variable gear ratio), with power steering and electric power steering, and you can install the power steering yourself.
Symptoms of a problem
Without proper care, such as lubricating bearings and checking play, the steering rack can quickly fail. Signs of malfunction that indicate that the mechanism should already be changed:
- A noticeable knock when driving over bumps, which is transmitted to the steering wheel. If a knocking noise is heard when turning the steering wheel, it is unsafe to drive such a car; it is necessary to urgently diagnose the mechanism.
- Strong play in the steering wheel indicates loose fasteners or wear of the rack-and-pinion joint.
- The effort when turning the wheels has increased.
- You can hear noise from the hydraulic booster (if equipped).
- The cause of the knocking noise may be an insufficiently lubricated bearing or wear of the gear-rack pair.
If, when rocking the steering shaft, there is noticeable play at the junction with the rack, repair is necessary. If not, just check and tighten the joints between the bushing and the steering shaft gear. A powerful vice is used to fasten the rail
Removing and installing the steering rack on Lada 112
Replacing the steering rack of a VAZ 2110
with your own hands, in a garage. More repairs:...
Replacing the steering rack of a VAZ 2110
Thank you so much for watching my videos, tell your friends, leave comments and subscribe...
Video: How to tighten a loose mechanism
Dismantling, diagnostics and installation of the steering rack
Regardless of whether the rack is being repaired or replaced, it must be properly removed and reinstalled.
List of DIY tools
For dismantling and repair you will need the following tools:
- flat screwdrivers of different sizes;
- pry bar or mounting blade;
- small hammer;
- pliers;
- torque wrench;
- a set of socket and ring wrenches ranging in size from 10 to 27;
- open-end wrenches for 10, 13, 15;
- special key for adjusting the steering rack. Such a key can be purchased at a car dealership or made independently. An example of a key for tightening a steering rack
How to remove a part from a car for inspection
Removal sequence for the rack:
- We unscrew the fastening of the steering cardan to the steering rack shaft in the cabin. Remove all fastening bolts
- Unscrew the fastener and remove the steering gear boot.
- We lift the front part of the car and install it on supports.
- Remove the front wheels and left fender liner.
- The steering rack can be removed with or without rods.
- To remove the rack without rods, you need to unscrew the locking plate and the bolts securing the rods to the rack. Then we move the rods to the side.
- If the mechanism is dismantled with rods, they are first disconnected from the swing arms.
- When pressing out ball pins, a puller is used.
- When unscrewing the steering end from the rod, it is necessary to fix the number of turns of the adjusting bolt. This will make it easier to set the wheel alignment during reassembly.
- Using a pry bar, we move the entire mechanism forward until the steering rack shaft completely exits the hole in the engine shield.
- The entire mechanism is removed through the wheel arch. Remove the dismantled part
The need to replace the steering rack: diagnostics
To restore the performance of the steering rack, it is not always necessary to replace it; often the problem can be solved by carrying out maintenance with the replacement of tips, covers and bushings. Beginners should not service the steering wheel
The design of this mechanism has many springs and pressing washers, and not everyone can disassemble the mechanism, sort through the parts and correctly replace them with new ones. Unprofessional installation of these parts will lead to incorrect functioning of the mechanism. The same applies if you need to loosen the mechanism or tighten it.
It is also necessary to remember that repair work may well be more expensive than replacement, so the choice is sometimes obvious.
Steering rack repair kits of different compositions are produced for VAZ 2110 vehicles. They also differ in the year of manufacture and the presence of an amplifier.
Experienced car owners restore the slats themselves, but this is not always possible
It is necessary to change the part in the following cases:
- a crack in the rack body or the threads for fastening the tips are broken;
- very strong knocking in the rack, increased play in the steering mechanism;
- corrosion of the internal parts of the steering rack caused by rupture of the rubber boot;
- the rack was deformed after the accident.
In the above cases, restoring the removed part does not make sense. Restoration by professional craftsmen will cost a lot of money.
Therefore, it would be more expedient to change the entire rail, which will require less time and financial costs.
It will be much easier to purchase a new one in the store and install it assembled in place of the old one, ensuring excellent operation of the steering mechanism for several years to come.
Installing a new
After diagnosing and repairing the rack, we install it in place:
- We set the rack to the middle position. To do this, unscrew the shaft in any direction until it stops and return it 2.5 turns. The shaft flat should be on the right and located vertically.
- Carefully insert the mechanism through the arch and secure it in the reverse order of dismantling. Tighten the bolts with a torque wrench.
If the steering system malfunctions, you should not immediately call a service station or buy the entire unit. If you have basic plumbing skills, you can repair and adjust the steering rack in your own garage. At the same time, you will be sure that you did not spend extra money and the work was done to a high standard.
Source: https://autoruservis.ru/kak-snjat-rulevuju-rejku-na-vaz-2110/
Checking the condition of the tie rod ends
You will need an assistant to perform this test. Take 2 jacks and lift the front of the car. Secure the machine to support stands. If you have a lift at your disposal, use it. Ask an assistant to grab the wheel and jerk it sharply in a horizontal plane, i.e. pull the rear part of the wheel toward you and the front part away from you. During this, you place your hand on the body of the ball joint of the steering tip and the swing arm and evaluate their mutual movement relative to each other. If you feel the ball joint move freely, replace the tie rod end immediately. In addition, change the steering tip if, during the inspection, you notice that the ball joint boot is torn.