Published: 11/02/2020
- Check the cost of repairs
- How to cook ceviche
- How to tighten the steering rack on a VAZ-2115
- The main faults of the steering rack on the VAZ 2115
- Steering rack repair
- Tightening and adjustment
- Also check out
- How to assemble a VAZ steering rack
- DIY repair
- Let's summarize
- Why should you order from us?
- see also
- Replacing the steering rack on a VAZ 2114
- Signs of insolvency
- Latest articles
- We will answer your questions
- Replacing the steering rack of a VAZ 2114 with your own hands
- Step-by-step instruction
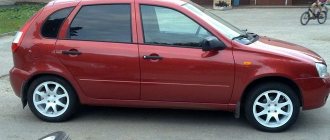
How to tighten the steering rack on a VAZ-2115
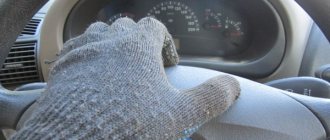
Many car enthusiasts are mistaken in believing that the steering rack on a VAZ is not adjustable and it is impossible to do it yourself. This is a misconception and adjustment of the steering rack on a VAZ car can be carried out by any car enthusiast independently. We will now explain how to tighten the steering rack on a VAZ-2115.
On the website of the official Moscow VAZ dealer, read the description of the entire model range, pay attention to the Lada Largus - what configuration the car is currently offered, with what engines and in what version. For each Lada Largus model, exact prices are indicated
Choose a new car!
Now let's tighten the steering rack:
How to tighten the steering rack on a VAZ-2115
So, if you have a question about how to tighten the steering rack on a VAZ 2115, you will have to purchase a special octagonal wrench, the size of which is 17 mm.
A VAZ 2115 car requires adjustment of the steering rack when a knocking noise occurs when the steering mechanism operates. When you feel a knocking sound from the steering mechanism while driving your car, this is a signal that it needs to be adjusted.
Typically, a slight kickback in the steering wheel of a car occurs when it hits an obstacle or the car wheel gets into a hole.
The steering rack is adjustable only on an overpass or lift, and you can also drive into the inspection hole to do this.
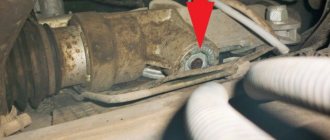
First of all, it is necessary to remove the engine protection and it is almost impossible to do this without an inspection hole or a lift. After removing the protection, you need to take a carrying lamp and a flat-head screwdriver. From the back of the subframe you get to the back of the rack and at the place where the steering shaft and rack intersect, you need to find the adjusting nut on the body.
Many novice car enthusiasts may confuse the adjusting nut with a plug; it is also difficult to find, since it is covered with a layer of dirt. This nut can only be adjusted with a special wrench that you have already purchased.
If no one has touched the steering mechanism before, then there will definitely be a green plastic plug on the nut, which plays the role of a stopper and is installed at the factory. The specified plug must be removed using a screwdriver; although it is quite fragile, you will not be able to turn the adjusting nut until it is removed.
After removing the stopper, using a special wrench, tighten the adjusting nut clockwise. It is not recommended to press it all the way; the level of clamping depends on how hard the steering mechanism was knocking before.
To check the level of tightening of the nut, you need to sharply turn the rack in one direction and the other; if there are no extraneous sounds or noises, then the nut is tightened enough. If you decide to put the stopper back, you can do it, but it won't do any good.
How to tighten the steering rack on a VAZ-2115 - the entire adjustment of the steering mechanism will take you no more than 20-30 minutes if you are doing it for the first time and the main thing is that you will do it all yourself. Many service stations do not want to adjust the steering rack, since this is a cheap operation; it is much easier for them to replace the specified mechanism, but this already costs the car owner.
Thus, having carried out a fairly simple adjustment of the steering rack, spending no more than half an hour on this, the car enthusiast is convinced that the VAZ 2115 car has an adjustable steering mechanism and can do this independently.
We told you how to tighten the steering rack on a VAZ-2115 - try it!
This blog is already read by 4756 people. Read it too!
Signs of faulty tie rod ends
The steering tips need to be replaced if, when driving over uneven surfaces, or when accelerating, you feel the steering wheel beating and vibration reverberating through the gas pedal. It is possible to visually determine the condition of the steering rack tips only when checking the anthers. These parts have a direct impact on wheel alignment, which means they should be replaced on time, since the rubber will begin to wear unevenly.
Replacing steering rack tips is also carried out when the car is on a lift or in a pit. By the way, this procedure is best left to the masters, since the work requires precision and strength in the hands. In total, the entire process of replacing tips takes no more than one hour, so you don’t have to part with your favorite car for a long time.
Remember that if you replace the tips in a timely manner, your car's steering rack will last much longer, and the ride quality will noticeably improve.
There is a special offer on our website. You can get a free consultation with our corporate lawyer by simply submitting your question in the form below.
No one will deny the fact that proper steering in any car guarantees not only the safety of the driver and passengers, but also trouble-free operation in principle. Regardless of the type of steering gear, be it worm gear, power rack or pinion steering, they all require periodic maintenance. VAZ-2114 and all second-generation Samaras received a fairly reliable and easy-to-repair and adjust steering mechanism. It does not have a hydraulic booster, which makes its maintenance and adjustment easier.
Diagnostics of the steering rack and steering mechanism
Before tightening the steering rack on a VAZ-2114, it is worth considering the prerequisites that will tell you that it’s time to repair or tighten it.
Backlash
First of all, this is a backlash.
In principle, AvtoVAZ guarantees a fairly long service life of the steering mechanism, namely ten years
. However, we must understand that we are talking about ideal operating conditions. This assumes smooth asphalt roads, constant availability of high-quality lubrication in the rack housing and a gentle driving style.
Under normal operating conditions, this period is practically unattainable. Poor roads, poor quality of spare parts and often harsh operating conditions of the car
lead to the fact that the mechanism makes itself felt much earlier.
The first symptoms of a faulty steering mechanism on a VAZ-2114
The first symptoms of a rack malfunction or the need for tightening are clear:
The latter can be considered a glaring signal of malfunction and can lead to serious troubles while driving.
In this case, most likely, tightening the situation will not correct the situation, however, it is too early to draw conclusions, you can try to adjust it. This can be done in two ways - both on the car and with the rack removed.
Complete disassembly of the steering rack and replacement of the repair kit
In the second case, the adjustment is already made. We will try to make do with little expense and simply adjust the gap in the gear-rack engagement
, thereby eliminating backlash and knocking.
The main faults of the steering rack on the VAZ 2115
Let's highlight the main symptoms of a malfunction and their possible causes:
- The rotation of the steering wheel is too tight, and unnecessary sounds appear in the form of a whistle. A possible reason is leakage of power steering fluid and its reduction to the minimum level, abrasion of the rotor pair.
- The rotation of the steering wheel is difficult, but after gaining speed the situation returns to normal. At the same time, an unpleasant “itching” noise appears. The main reason is the appearance of scoring on the rotor part and the mating surface.
- It is difficult to turn the steering wheel only to the left or right and when the power steering temperature is low (below 25-30 degrees Celsius). As soon as the liquid warms up to 55-60 degrees, the noise disappears.
- The driver's turn of the steering wheel does not coincide with the actual turning angle of the car's front wheels. When such a problem occurs, the car ceases to be controllable and starts tossing around corners.
- There is strong vibration in the steering wheel when driving on a bad road. If you turn the steering wheel in one direction or the other, the sound may disappear.
- The steering rack is leaking. In this case, power steering fluid appears on the boots. In this case, the leak will be noticeable by a decrease in the level in the power steering reservoir. If you do nothing, the shaft seals may fail, increase wear, or cause rust.
- The steering wheel refuses to return to its original position, or it does, but very tightly. The reason for this problem is the deformation of the rack shaft or housing.
But that is not all
You should pay attention to malfunctions of the power steering itself
Here, signs of steering rack problems may be as follows:
- Increased foaminess of power steering fluid. It's easy to diagnose - just look into the tank;
- excess noise appears when turning the steering wheel and power steering operation;
- At idle speed the power steering does not work at all. As the speed increases, it is easier to turn the steering wheel;
- The effort disappears when turning the steering wheel in both directions. As a rule, the cause of this problem is the destruction of the rubber ring.
Recommendations
As a rule, steering racks without power steering are simple and reliable. However, to preserve the resource and increase the service life, it is necessary to monitor the condition of the boots at the point where the steering rods are attached to the rack.
- If the boots on the rack are damaged, both the steering rod and the rack fail. Water and dirt wash out the lubricant, destroy the swivel and threaded connections, etc.
- Next, active corrosion begins, which also quickly disables the steering mechanism.
Let’s also add that the steering rack quickly breaks when driving over serious bumps at high speed. It is also not recommended to drive onto curbs; you should avoid driving over obstacles with your wheels turned out, etc.
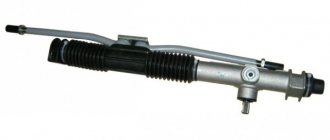
Steering rack repair
The car is secured against unexpected movement by installing stops under the rear wheels. Pull the handbrake and lock the steering wheel.
So:
The front wheels are removed. Using a puller, remove the fingers from the lever struts, having first unscrewed the tip nuts. After installing the puller, tighten the screw until it stops. When the key is in tension, the finger is knocked out of the lever with a hammer. The nuts securing the rack brackets are unscrewed. The bolt on the steering shaft is loosened from inside the passenger compartment. Having completed all preliminary operations carefully so as not to damage the splines, using oscillatory movements, the gear shank is disconnected from the steering shaft. The entire assembly is pulled out through the right hole in the car body.
Steering mechanism with tie rods
Next, the VAZ 2115 steering rack is directly repaired:
- The structure is clamped in a vice. Use a special brush or a cloth soaked in white spirit to clean all surfaces of the product.
- The steering rods are removed. To do this, unscrew the bolts on the bracket securing them, after bending the “antennae” of the locking plate, using a “22” key.
- The locking and connecting rod plates are removed.
- The tie rods are removed.
- On the right side, the support and retaining ring are removed from the steering gear housing.
- The clamps with which the protective cover is attached are cut off. Disposable parts are made of plastic.
- The protective cover is removed.
- On the left side of the device, the support and protective cap are removed.
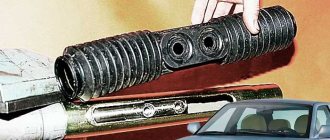
- Using a “17” wrench with an octagonal head, the rack stop nut is unscrewed, the part is removed, the spring and the retaining ring are removed.
Removing the nut, spring and retaining ring
The rack stop is knocked out of its socket. To do this, the crankcase hits a wooden stand. For sealing, a rubber ring is mounted in the groove of the stop.
- The seal is removed.
- The gear boot is removed by simply prying it off with a screwdriver.
- The lock washer is removed.
- Use a special 24mm wrench with an octagonal head to unscrew the nut that secures the gear bearing.
- The nut is removed from the shaft.
- Using a “14” wrench, the gear is removed from the crankcase along with the bearing.
Removing the gear with bearing from the housing
- The rack is removed.
- The bushing is removed. To do this, use a screwdriver to pry up the support sleeve, its protrusions should fit into the crankcase holes and the part can be freely removed.
Removing the support sleeve
- A new bushing is installed. To do this, new damping rubber rings are put on it so that the thin parts of the ring are located opposite the cuts in the bushing. The protrusions of the bushing must fit freely into the holes in the crankcase.
- Along the edges of the bushing, the rubber rings are cut and the cut off parts are removed.
- The retaining ring is removed from the gear shaft.
- Using a two-jaw puller, the ball bearing is pressed.
Removing the ball bearing
Pressing out the needle bearing is done using a special puller. If it is not there: two holes with a diameter of two millimeters are drilled in the end of the crankcase to allow the needle bearing to exit onto the ring. Through it, the bearing is knocked out of the crankcase.
Pressing out the needle bearing
The crankcase cavity of the structure is washed. The needle bearing is pressed into place using a piece of pipe. After this, the hole is sealed with preparations similar to “cold welding”. Bearings, drive gear and teeth on the rack are generously lubricated with FIOL-1 lubricant.
UNIOL-1 lubricant is placed in the cavity, which is located above the nut holding the bearing of the drive gear. The steering rack assembly is assembled in the reverse order. The protective cover is attached and secured with clamps. The rack stop and nut are adjusted so that there is a gap of 0.12 millimeters between them. After adjusting the rack clearance, the stop nut is capped to prevent unwinding.
Changing the rack yourself
There are two ways to replace the rack. The method is selected based on why exactly the mechanism is being removed - for replacement or repair.
In the case of installing a new rail, you should first determine its completeness.
They go on sale both assembled with steering rods and without them.
The first replacement option involves pressing out the tips from the steering knuckles, so the work will require a special puller.
Tools and accessories
To carry out the replacement you will need:
- Socket or open-end wrenches for 10, 13, 17, 22 (but better - heads with a knob equipped with a ratchet mechanism);
- Jacks and supports;
- WD-40 product;
- Flat screwdriver;
- Hammer;
- Rags;
- Tip remover (if the rods are also dismantled).
Work technology
Let's look at how to replace the VAZ-2114 steering rack without changing the rods. The technology for carrying out the work is as follows:
- We put the car on a flat area or hole, immobilize it (tighten the handbrake, put wheel chocks under the rear wheels);
- Loosen the wheel bolts;
- Using jacks, we hang up the front of the car, then secure it with props. If you have one jack, first lift one side, put a support, remove the lifting mechanism and go to the other side;
- Remove the front wheels;
- In the arch on the left side, in the direction of travel of the car, there is a technological hole that can be covered with a lid (not always). We dismantle this cover;
- If there is an absorber, loosen the clamp securing it, pull out the element and move it to the side;
- Using a hammer and a screwdriver, we bend the antennae of the plate, which prevent the bolts securing the rods to the rack from loosening (for ease of work, you can turn the steering wheel to position the rack in a place that is easy to access);
- We unscrew the fastening bolts and pull them out together with the fixing plate;
- We move the rods to the side;
- In the cabin, in front of the front shield, at the bottom we find the junction of the column shaft with the gear shaft of the mechanism. Unscrew the fixing bolt. By moving the steering wheel towards you, we move the connection;
- Using a 13mm socket, unscrew the nuts securing the brackets that secure the mechanism. They should be treated with WD-40 first, as they often rust. Attempts to unscrew without pre-treatment may lead to breakage of the pin;
- Remove the staples;
- We move the mechanism towards the engine so that the gear shaft completely comes out of the hole in the shield;
- We pull out the assembly through the technological hole;
- We push the new mechanism through the hole, correctly place it, fix it and connect it to the column.
Reassembling the steering control is done in the reverse order of removal.
Tightening and adjustment
As the practice and experience of VAZ 2114 owners shows, if problems arise with the racks, they can most often be repaired. The only condition is that you have an inspection hole at your disposal.
Full analysis
The first step is to tighten the rack. But how is this done? To do this, simply tighten the adjusting bolt. Adjustment is made with a 17 mm key.
After tightening the bolt, take your car out for a few kilometers to check whether the knocking or play remains. If these symptoms of the problem disappear after you have tightened and adjusted the steering rack, the repair can be considered complete.
But this doesn't always happen. The knock may remain, but the play may go away, or vice versa. In any case, if at least one sign still remains, you will have to begin a full-fledged repair with your own hands. Now you can find a number of useful videos that describe in detail the procedure for repairing this unit. Take a look, it will be useful for you.
Article on the topic: Selecting and replacing brake fluid on a VAZ 2114
Order of Operations
The steering rack is located in the engine compartment. It is installed with clamps on the wall. Work should begin with installing the machine. Its immobility must be secured with a brake. Further operations are performed in the following order:
- You need to jack up the car and remove the front wheels.
- Then the on-board electrical circuit is de-energized by disconnecting the negative terminal from the battery.
- Now you need to unscrew the cardan stopper bolt, this is done from inside the car. The fastener is located under the steering wheel between the pedals.
- Now we go to the engine compartment and remove the adsorber there. You don't have to take it out, just move it.
- Then we pull out the cotter pins and disconnect the ends, having first unscrewed the nuts.
- The tips must be removed from the racks. This is done using a special puller. You can even buy a cheap tool; it will easily withstand one-time work. If you do not have this device, tap them from the bottom, but carefully so as not to disturb the threaded threads.
- Now you need to work on the fastening nuts. They need to be cleaned of corrosion. The nuts are lubricated with a corrosion removing compound; it is important to wait until it is absorbed.
- Now comes the removal of the VAZ 2114, 2113 or 2115 steering rack. To do this, the mechanism must be moved to the right side of the driver’s seat.
- Note that we unscrew the nuts of the clamps and remember how many turns they were screwed on, so that during assembly they can be installed correctly. With this operation we remove the tips from the steering rack.
- It is advisable to remove dirt with a rag before installing a new mechanism. And let's start installation.
- For a new device, you first need to remove the side plugs. The housing must be filled with lubricant as much as possible.
- Then we screw the ends to the steering rods; it is important to install them correctly in their original places. It's not difficult, they are different. Just pay attention to this moment.
- The new mechanism is installed in its regular place. The nuts are attached to the clamp studs.
- At this stage the master will need a partner. It should help you insert the shaft gear. It is difficult for one person to accurately hit the regular place on the rail. It is important that the pins match exactly. If everything worked out correctly, you can complete the work.
- Tighten the cardan stop bolt.
- Further operations are performed in the opposite sequence to that described above.
Also, see the procedure for replacing the VAZ 2114 steering rack with your own hands in this video:
>
Also check out
- If you don’t have a tie rod puller with you, you can use a hammer and a powerful pry bar.
Self-replacement of the VAZ 2115 steering rack - step-by-step instructions
- Unscrew the nuts that secure the steering rack.
- Remove the rack on the right.
Self-replacement of the VAZ 2115 steering rack - step-by-step instructions
Self-replacement of the VAZ 2115 steering rack - step-by-step instructions
Self-replacement of the VAZ 2115 steering rack - step-by-step instructions
- Remove the rack from the splines. Usually this does not cause difficulties.
- After removing the rail with lugs, unscrew the lugs and count the number of screws. Thanks to this, after replacement it will be more comfortable to get to the service station.
- Open the side plugs on the new rail. Fill the holes with lithol.
Self-replacement of the VAZ 2115 steering rack - step-by-step instructions
Self-replacement of the VAZ 2115 steering rack - step-by-step instructions
Self-replacement of the VAZ 2115 steering rack - step-by-step instructions
When screwing the tips, it is important not to confuse the sides, because the left one is different from the right one. To install a new rail you will need someone's help. Return the rack back, attach the fasteners on the right
A partner must provide assistance if the steering cardan gets into the splines. To loosen the clamp, drive a chisel into it. After this, the slots will fit in easier.
Worth checking out:
Installation of new front struts on Lada Priora cars
- There is a special groove on the rack in which a locking bolt must be installed.
Reassemble in reverse order. After the VAZ 2115 steering rack has been replaced, make the wheel alignment adjustment.
Tools you will need for your work
To repair the steering rack of a VAZ 2113 2114 2115 with your own hands, you will need the following tools:
- hexagons;
- jack;
- special puller for disconnecting steering rods;
- penetrating fluid, such as WD-40;
- a set of keys;
- lubricant, in the factory version it is “CV joint-4”, but another composition can be used;
- rags.
Do-it-yourself repairs are economically justified, since the price of replacing a VAZ 2114, 2113 or 2115 steering rack in car repair shops averages 1.2 thousand rubles as of January 23, 2019. And this is half the cost of the device itself.
DIY repair
First you need to stock up on the necessary set of tools:
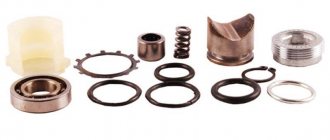
- repair kit for the steering rack (as mentioned above, they are sold in three variations);
- bearings;
- lubricant;
- necessary keys and screwdrivers;
- We should talk separately about repair kits.
Minimum basic sets. Such sets usually have only 4 elements:
This set can only fix the simplest faults. Medium priced sets. Here, in addition to the things described above, there are shafts and other bearings. Expensive sets. There may already be entire slats here.
When purchasing, please note that you are purchasing a set specifically for your car (the brand is indicated on the package). Sometimes it happens that a car has a non-original rack, then it is necessary to purchase a repair kit for the car from which this rack was removed
Actually, any repair must begin with disassembling the steering rack. Often the problem is just a small bearing, and the entire rack does not require replacement.
Work order
- Removing the steering rack
- Unscrew the thrust nut using a 17mm hexagon.
- Remove the thrust nut, retaining ring, rack stop and spring.
- Remove the drive gear shaft boot, and then the retaining ring.
- Unscrew the nut holding the steering gear bearing. It goes quite tight - this is normal.
- Press out the drive gear shaft.
- Remove the rail itself from the housing.
- Remove the support sleeve, then lubricate it and insert it into place (this will need to be done with force)
- Replace all bearings. Some will be difficult to get (very difficult), so you can simply chop them with a chisel and pull them out with tongs.
- Inspect all parts for defects, replace broken ones with new ones (from the repair kit), lubricate all moving parts.
- Reassemble the rail in reverse order.
- That's all, if you did everything correctly, then the rack works with a bang. All that remains is to put it in place.
Putting the rack in place
- First, you need to enlist the help of a partner; without him, you won’t be able to do everything quickly and accurately.
- We install the rail in the same place and attach the fasteners.
- With the help of a partner, we insert the rail into the spitz.
- To loosen the clamp, use a chisel.
- We tighten the mounting bolt.
That's all, now the rack is in place, then we put the wheels on, tighten the nuts and remove the car from the jack. Now you know everything you need to repair your steering rack in a timely manner. The main thing to remember is that you shouldn’t delay repairs.
Repair
To perform the repair, you will still have to disassemble the steering wheel. You can see detailed instructions in the material on replacing the steering rack.
Replacement process
Let's move on directly to the repair procedure.
- Remove the rail from its seat.
- Remove the thrust nut with a 17mm hexagon.
- Remove the thrust nut, remove the retaining ring, spring, and rack stop.
- First, the gear shaft boot is removed, after which you can easily get to the locking ring.
- Remove the nut that holds the gear bearing in place. Be prepared for the fact that it will be quite difficult to unscrew it; use some force. This is fine. It's worse if it practically doesn't hold on.
- The drive gear shaft is pressed out.
- The rail is removed from the housing.
- Next, remove the support sleeve, lubricate it and put it in place. It may take some effort to push it back.
- Replace all bearings present in the assembly. Some are difficult to extract, while others are almost impossible. But it needs to be done. If you cannot remove it at all, then cut the bearing with a chisel and remove it with pliers.
- Examine the condition of all surfaces, parts, and assemblies for any defects or damage.
- If you notice faulty elements, replace them using a repair kit.
- The design will have quite a lot of moving elements. Each of them must be lubricated with high-quality lubricant. Litol will perform well here.
- Reassemble by following the reverse disassembly sequence.
- You will definitely need help for reassembly. Therefore, agree in advance with a friend or someone else who can help you in this matter.
- Place the repaired rail in place and attach its fasteners.
- A rack is inserted into the spitz. This is where you will need an assistant. It is almost impossible to do this yourself.
- Use a chisel to loosen the clamps.
- Tighten all mounting bolts in place.
Let's summarize
As you can see, the work will require some skill. But, if desired, they can be performed by a beginner who knows how to handle the tool and has common sense. Repeating the operation no longer causes problems.
After repairs, you should perform a wheel alignment procedure or do a simple check. To do this, you need to start the car and drive at a slow speed. If, with the steering wheel in a straight position, the vehicle does not pull to the side, everything is in order.
To protect fasteners with threaded connections from dirt and water, experts recommend using lithol or graphite-based lubricants. Parts must be lubricated carefully. You can further enhance the protection with tubes. They are put on the joints of the steering tips and traction devices (heat shrink can also be used).
Why should you order from us?
Experienced craftsmen
Diagnostics in just 1 hour
Repair in just 1 day
Hunter 3d stand
Guarantee on all work
Your own turning park
Replacing the steering rack on a VAZ 2114
Now let's proceed directly to the procedure. If the operation is not carried out on a lift, then you need to hang out the entire front part and use some kind of stands or pedestals. It is imperative that the car is stable.
Next, use a 22mm wrench to unscrew the steering ends, then knock down the bipod with a hammer. If you plan to install the tips in the old places, then under no circumstances should you use all kinds of pullers, because the fork will pull out the finger, and the thread puller will ruin the thread, you will have to either go through it with a hole saw or change the tip.
Now you need to unscrew the four nuts securing the rack to the body. This must be done from under the wheel arch, otherwise you won’t be able to reach it. It is advisable to use a ratchet with a long head of 13. After this, we crawl under the driver’s feet and unscrew the bolt of 13 from the steering shaft. To loosen the clamp, you can insert a sharp chisel and hit it with a hammer several times. At this time, it is advisable to pull the rack from the shaft; this can be done well using a crowbar.
The rack is installed in the reverse order. After replacement, it is imperative to adjust the wheel geometry, otherwise goodbye, tires.
Video: replacing the rack on a VAZ 2114
As you know, the performance of any vehicle depends on the serviceability of each component. If one element is faulty, soon the next one will not function in a chain reaction, and so on until the fault is repaired. If the problem is not resolved in time, it will not only entail additional costs for spare parts, but will also significantly affect traffic safety, on which your life and health depend. Therefore, you should not neglect replacing parts, especially if this VAZ-2114 is no exception: spare parts here fail in the same way as on any other car.
How is this element dismantled and how to adjust it? We will consider the answers to all these questions in our article today.
Car steering
One of the important components of a car is the steering mechanism. The steering rack in a car is the most important part of the unit. Through it, the force applied by the driver to the steering wheel with the help of tips and rods is transmitted to the turning levers, which are connected to the steered wheels through axles. It follows from this how important the serviceability of the steering rack is for the safe movement of the car.
Steering design
The photo shows the elements that make up the steering control design.
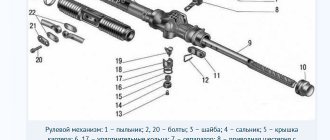
Steering rack device
Steering rack assembly components:
- Position 20 – staff.
- Position 21 – rack support sleeve.
- Position 22 – damping ring.
- Position 23 - rubber-metal hinge.
- Positions 10, 11, 14 – parts for attaching the rack to the steering rods.
- Position 12 – brackets for attaching the steering device to the shield in front of the body, 13 – rubber supports for the steering mechanism, 15 – protective cover for the device. The rack of position 20 engages a drive gear mounted on bearings in the housing of position 17 of the steering rack assembly. A cermet stop, sealed with a rubber ring in the crankcase, presses the rack against the gear with a spring, which rests against the nut.
We will answer your questions
Good afternoon. Yes, we can repair it within one day.
No, this shouldn't happen. Regarding self-repair of such important mechanisms, we are always against it. Not only because they are interested in providing services, but also because then we will have to correct your mistakes during independent repairs, and this is much more difficult. When there is a knock in the rack, in order to determine the cause, you must initially completely disassemble it. Only knowing how the mechanism should be designed can you notice its malfunction. Not everyone, even the most experienced driver, is sufficiently knowledgeable about the internal structure of the rack.
We have not yet learned how to conduct remote diagnostics. This can indicate either the situation you first voiced or signal a serious breakdown. In a car service center, in case of temporary wear, you may be offered a rack restoration procedure. In this case, the mechanism is disassembled, and all obsolete parts are replaced with completely new ones. If repairs are necessary, the technician will disassemble the rack and decide what and how to change or repair.
Since you come into contact with its work directly while driving a car, it will not be too difficult to detect a breakdown. If not during the next diagnostic, then while driving the car, you will notice noises or knocking, play in the rack. This serves as a direct signal to visit a car service center.
No, depending on the design of the mechanism, the racks can be electrical, hydraulic or mechanical. In each individual case, the master must understand the mechanism and carry out the repair procedure in accordance with its structure.
Yes, this is a very important component of the car. Scientifically, it is called hydraulic power steering, and its purpose is already clear from the term itself. The rack helps you turn the steering wheel
It is also an important part of the hydraulic system. Now the second part of the answer: do you think that you will be able to drive your car normally if you cannot turn and brake normally? The question of the importance of a working steering rack should not even arise
Selecting a replacement unit
The choice of a new unit for the VAZ-2114 should be approached seriously. The main problem is that very often there are defective products on the market that are already faulty or will fail in a very short time.
The best option is to purchase an original unit. The VAZ-2114 uses the same mechanism as the cars of the Samara 1 family (2108, 2109, 21099). Therefore, its catalog number is 2108-3400012, that is, when searching, you can safely ask for a rack for the “Eight” and not worry that it will not fit. The average cost is $100.
You can also buy analogue racks produced by auto parts manufacturers. But here you should pay attention to the manufacturer (it must be well-known), as well as the availability of quality certificates.
Among analog products, we recommend paying attention to steering mechanisms from the following manufacturers:
- Weber CG 2108-0012 (its price starts at $80);
- Pilenga SR-P 1141 (costs $100);
- Trialli CR 108 and CR S 708 (the first comes without rods and lugs and costs about $100, the second has an assembled mechanism, which is why it costs twice as much).
For those who want to slightly modify the steering, you can look for tuning racks. The main difference between them is the lower number of revolutions. They are also positioned by manufacturers as reinforced.
Regarding manufacturers, it is worth looking for products from the Italian company Brembo, the Polish company ATF, or the Russian company SS20.
As for the latter manufacturer, it only produces steering racks for the 10th VAZ family, so after acquisition the mechanism will have to be slightly altered.
But we note that tuning slats will cost much more than the original or conventional analogues. So, for a Brembo unit you will have to pay about $250, for ATF - about $200, and SS20 - approximately $210-220.