How to check the fuel pump on a VAZ 2114 - 4 ways
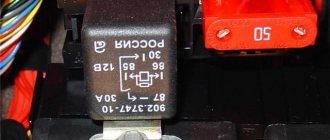
The electric fuel pump (EFP) is connected via a 4-pin relay to the following devices:
- with a battery from which the EBN receives power;
- with an ignition switch through which it is started.
The EBN must start almost simultaneously with the starter, since the starter gives the engine an impulse to start, and the fuel pump supplies fuel to the engine. If the fuel pump does not turn on in time and starts pumping gasoline, the car will not start. How to check the fuel pump on a VAZ 2114, why doesn’t the EBL turn on when you turn the ignition key? What problems arise in the electrical circuit, you will learn about this from our article.
Mechanical fuel pump for carburetor engine
A mechanical fuel pump was installed on the VAZ 2109 and earlier models, and currently on the VAZ 2110, 2111. It pumps up a pressure of 20-30 kPa, pumping at least 60 liters per hour.
To check the functionality, disconnect the hose between the fuel pump and the carburetor - gasoline under slight pressure should spray out. Then direct the hose into any container and turn the engine with the starter - if it pumps half a liter in 30 seconds, then everything is in order. If not, then you need to restore the system.
To do this you need:
- Bleed the fuel line with compressed air (between the pump and the gas tank)
- Check the cleanliness of the valves and filter mesh in the fuel pump
- Remove the adjusting shim from under the fuel pump
Checking the fuse
Blown EBN fuses are a common occurrence in the circuit of a submersible fuel pump. There are several reasons that render this protective device unusable, and before installing a new fuse, they must be eliminated:
- A short circuit in the electrical circuit occurs due to chafing of the wire insulation (rarely), and due to burnout of the wiring due to weak contacts. This happens much more often;
- Failure of the fuel pump relay increases the load on the fuse;
- Poor quality of the fuse itself. You should not skimp on switching devices. These little parts are inexpensive and the savings will be negligible. Therefore, when choosing fuses, you should give preference to well-known and trusted manufacturers. You should also not install fuses with a lower current strength than prescribed by the car manufacturer. The current strength is indicated on the mounting block box. For the fuel pump, select a 15A fuse.
Relay test
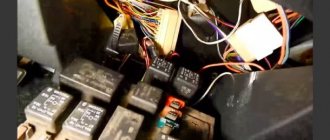
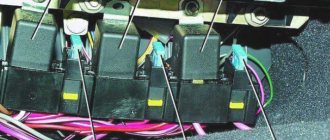
We continue checking the VAZ 2114 fuel pump. The module in which the fuse and EBN relay are located is located in the dashboard, below, on the passenger seat side. To check the relay, remove the side panel and listen to how the relay behaves when the ignition key is turned.
There should be a click after which the fuel pump starts. The absence of a characteristic click indicates that the relay has failed or there is no contact with this device. What could be the reasons for this? The serviceability of the relay is checked as follows: take a piece of wire and close the contacts with it. If the pump starts working, then the problem should be looked for in the relay. It should be replaced.
Please note that the ends of the thick wire are inserted into the sockets where the gray and pink wires go. When the pump is operating normally, the sound of its motor should be audible in the cabin.
You can also check the relay by installing a device that is known to work.
Popular breakdowns
Problems with the fuel pump can occur for several reasons. Therefore, your first priority is to determine the source of the problem. These may be:
- Fuel pump fuse;
- Fuel pump relay;
- Pump weight;
- Motor;
- Contacts;
- The pump itself.
If one of these elements fails, it can stop the normal functionality of the entire module.
Let us consider the situations with each of the specified elements of the fuel module in more detail.
Pressure
What exactly is a fuel pump? This is an element of the fuel system that allows fuel to pass through due to pressure. Therefore, if you take pressure measurements, you can get answers to many questions.
Let's give an example of normal pressure readings when checking in certain modes.
Check mode
Normal indicator
At idle
Without pressure regulator tube
When the drain is pinched
When you press the gas pedal
We recommend measuring with a small range of atmospheres on a pressure gauge (up to 7 atm). This will reduce errors to a minimum. Having a pressure gauge at hand will allow you to significantly save on professional diagnostics.
Contacts
The fuel pump includes three wiring:
- Plus (positive);
- Minus (negative);
- Fuel level indicator.
So, failure of the pump may occur due to a simple violation of the integrity of the wires. So if the pressure check shows normal, then we definitely examine the condition of the wiring.
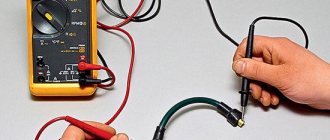
To check, you will need a 12V lamp, which is attached to the external connectors of the pump with positive and negative contacts. Turn the ignition key. If the lamp blinks, contact is present. In this case, you will have to check the condition of the internal contacts.
Checking contacts
Motor
If the pressure and wiring are normal, let's try to check the serviceability of the motor. It is this element that is responsible for moving fuel through the system.
- To check it, you will need the same 12V lamp;
- Attach it to any motor terminal;
- Turn the ignition key;
- If the lamp blinks, you will have to get rid of the motor and buy a new one.
Motor
Don't make hasty conclusions. Before checking, look at the condition of the terminals and motor wiring.
Fuel pump weight
The contacts are fine, but the fuel level sensor may provide incorrect information. In this case, you definitely need to check the weight of the pump responsible for dispersing the fuel.
Checking the power supply on the chip
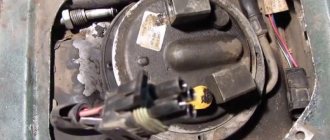
If no problems are found in the fuse and relay block, then you need to move on. In general, most electricians start checking the power supply to the fuel pump from here - from the gas tank hatch.
To do this, we lift the seat, move the backing, and under it we find the gas tank hatch. Having unscrewed two screws, we open it. It contains three terminals, two of which are positive (black and gray), and the third goes to ground. Both wires are checked one by one, connecting the ends of the test lamp wires with one end to positive and the other to minus (ground). We check the presence of power at the terminals with a test lamp. If the light is on, but the pump still does not pump, use a tester to check the voltage in the network. In order for the EBN to start, the voltage must be at least 10V. If it turns out that the voltage is lower and you are sure that the battery is sufficiently charged, inspect the condition of the connectors to see if they are acidified. Low voltage can also occur if there is a break in the wiring. Now that we have checked the entire electrical circuit and made sure that it is in order, that the wires are intact, the relay is working, the fuse has been replaced for prevention, the cause of the problem should be looked for in the pump itself. Next, you will learn how to check the operation of the fuel pump on a VAZ 2114 by measuring its pressure.
Diagnosis procedure
After you are convinced that the fuel pump has failed, you can proceed to the next stage. In particular, it is necessary to understand what exactly the problem is. There can be many options here. The easiest way is to check the integrity of the fuses. Let us remind you that the fuel pump itself in the “fourteenth” is located in the fuel tank. After the ignition is turned on, voltage is supplied to its terminals through fuse F3 and relay R2 - the latter are located in the cabin under the panel on the passenger side.
If the fuel pump fails, the first thing to do is remove the cover located under the panel on the right side of the console. This is not difficult to do - it is secured with two self-tapping screws. Under the cover you will see 3 fuses and 3 relays. The integrity of the above-mentioned F3 should be checked. Also, do not forget to inspect the contacts into which this fuse is inserted. If no problems are found here, move on to checking the fuel pump relay. The easiest way to do this is to borrow something that is known to work from someone you know and try how the car works with it.
If the fuse and relay are good, we move on. The next stage of diagnosis will be to inspect the terminals of the fuel pump itself. To get to them, you must first lift the rear seat cushion. Once you have access to the cover located on the bottom, unscrew the screws holding it. A hatch will open in front of you, in which there are 3 terminals. Please note that black and gray wires lead to the two positive ones. The third terminal is negative. Through them, power is supplied to the fuel pump itself. You will need to check whether there is voltage at the positive terminal, for example, using a test lamp. It should light up for 3-5 seconds after you turn on the ignition.
The light is on, but the fuel pump does not show any signs of life - which means we arm ourselves with a tester and check the voltage level. There should be at least 10 volts here. This is the minimum required value to start the fuel pump. Note that the reason why the voltage has decreased is quite often the oxidized contacts of the positive and negative wires. Accordingly, to fix the problem, you just need to wipe them. By the way, there is another verification option. Take long wires and apply voltage to the fuel pump terminals directly from the battery. In this case, everything will become immediately clear.
Don't forget to also check the ground of the fuel pump - it is attached near the parking brake lever, under the dashboard. This reason is quite common, this point also needs to be checked. With constant use of the handbrake, the mass may well be shifted slightly to the side. Just in case, remove the plastic casing covering the lever, disconnect the mass, clean the contacts and return it to its place.
These are all “external” reasons. If no problems are found here, then you will need to remove the fuel pump and look for the “internal” ones. One of the most common problems is worn or stuck brushes. Another fairly common cause is the motor. You can check it using the same test lamp, having first supplied power to the fuel pump.
Checking fuel pressure
Gasoline pressure in the fuel system is a significant parameter that affects the operation of the internal combustion engine. This indicator will allow you to check the fuel pump on the VAZ 2114 injector for stability. If the pressure is low, there will be no high-quality injection of the fuel-air mixture. At elevated pressure, fuel can flood the spark plugs and engine compartment, in the latter case a fire may occur. Fuel pressure is checked with a special device - a pressure gauge.
Before measuring pressure, you must do the following:
- Turn off the internal combustion engine;
- Unscrew the cap on the ramp and relieve the pressure inside it by slightly opening the valve with a screwdriver;
- Using a special valve cap, unscrew the spool with the valve;
- Secure the pressure gauge fitting to the fuel rail.
Now that all the preparatory operations have been completed, you can start the engine and measure the pressure in the ramp. Don't forget to have a rag ready in case the fuel splashes a little. This sometimes happens with high blood pressure. During normal operation of the fuel pump, the pressure should be 3 atm at the start, and during engine operation and at idle, the pressure decreases and settles to 2.5 atmospheres.
Fuel pump design
As for the element itself, it is of a membrane type. Its operating principle is based on an electric drive. The motor is powered from the vehicle's network. The main component is a special membrane, which can perform reciprocating movements during engine operation.
The membrane system or hydraulic supercharger assembly must have a safety valve in its design, which serves to relieve pressure. There is also a check valve located in the outlet part of the device. It is necessary to prevent fuel from penetrating from the power system into the tank. In addition, it helps maintain pressure in the system when the pump is turned off.
As for the operating principle of a mechanical hydraulic supercharger, they are divided into centrifugal and positive displacement pumps. The first can be of the turbine type, where the working part is similar to an impeller with a huge number of blades.
The second can be gear or roller type.
In a VAZ-2114 car, the fuel pump is constantly washed with flammable liquid, even if there is not much fuel in the tank. This design is used to keep the electric motor cool, because during operation it gets quite hot.
Symptoms of a problem
A malfunction of the fuel pump of VAZ 2114/2115 cars can be diagnosed by the following symptoms:
- when the ignition is turned on, there is no sound of the pump running;
- the engine does not start or starts with difficulty;
- the power unit is unstable at idle, the speed “floats”;
- “dips” appeared during acceleration;
- the motor has lost power.
The same signs also appear when other elements of the fuel system malfunction.
Before you begin diagnosing or replacing the fuel pump, you should make sure that:
- the fine fuel filter is not clogged (it is changed every 7 thousand kilometers);
- the injectors and fuel pressure regulator are operating normally;
- The sensors for mass air flow, throttle position, and oxygen quantity are working properly.
If the detected malfunction is accompanied by the lighting of the “CHECK” lamp on the dashboard, you should set the error code and decipher it.
Why doesn't the fuel pump deliver gasoline?
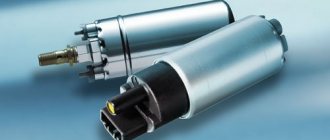
One of the most important elements of the fuel injection system of a gasoline engine is the electric fuel pump, which is located in the fuel tank of the car. The fuel pump pumps fuel into the system from the gas tank, creating a certain pressure.
Auto repair experts identify the following common fuel system problems that are related to the fuel pump:
- The fuel pump pumps poorly and does not create the required pressure;
- the fuel pump does not pump when the ignition is turned on;
Considering that the fuel pump is an electromechanical device, the most common fuel pump malfunctions are related to both the mechanical and electrical parts. Next, we will look at what signs indicate a breakdown of the fuel pump and why the fuel pump stops pumping partially or completely.
Read in this article
Diagnostics
A malfunction of the VAZ 2114/2115 fuel pump can be caused by:
- malfunctions in the device’s power supply circuit;
- failure of starting and protection elements (relay and fuse);
- wear of electric motor parts.
Checking the electrical circuit
At the beginning of the diagnosis, you should check the electrical circuit of the fuel pump. To do this you will need:
- car tester (multimeter);
- crosshead screwdriver;
- two pieces of wire about 2 m long.
Checking the electrical circuit is carried out in the following order:
- Turn on the ignition without starting the engine. When the key is in the first position, a click should be heard, characteristic of turning on the relay, followed by a slight whirring of the pump electric motor. If there is no click, the relay is faulty or is not receiving power. If there is a click, but no buzzing, the wiring coming from the relay or the pump motor itself is faulty.
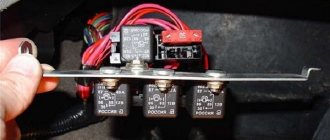
- Under the glove compartment, find an additional mounting block consisting of three relays and three fuses. The pump relay is located in the middle, and the fuse is located to the left of it. Remove the fuse from its socket, test it with a multimeter, and if the result is negative, replace it. When replacing the fuse, please note that it is rated for a maximum of 15 A.
The relay and fuse for the fuel pump on the VAZ 2114/2115 are located in the mounting block under the glove compartment.
Set your multimeter to voltmeter mode. Connect one probe of the device to the relay terminal to which the pink wire fits, and the second to the car body. Turn on the ignition. The device should show the on-board network voltage in the range of 11.7–12.4 V. If there is no voltage, the problem may be a broken wiring or a malfunction of the ignition contact group. In this case, it is better to contact an auto electrician. If power is supplied, check that the relay is working. With the ignition on, use a screwdriver or a piece of wire to close the contacts to which the pink and gray wires go. This closes the circuit bypassing the relay. If the fuel pump works, replace the relay.
Pressure check
If the pump is working properly, but the engine begins to operate intermittently, you should check the fuel pressure in the system. For this you will need:
- pressure gauge (can be a tire gauge with a measurement limit of 5–7 kPa);
- petrol-resistant hose with a diameter of 10–12 mm and a length of 50–80 cm;
- two clamps for a hose of the appropriate diameter;
- Phillips screwdriver;
- nipple cap;
- dry rag.
In addition, the presence of an assistant is desirable.
The verification procedure is as follows:
- In the engine compartment on the engine fuel rail, locate the pressure measuring fitting (on the right side).
- Remove the plastic cap (plug) from the fitting.
The fuel pump does not pump: causes and diagnostics
Let's start with the fact that if the gas tank is full, the battery is charged, the spark plugs are dry and there is a spark, the starter turns the engine normally, but the engine does not seize, then you should pay attention to the gas pump. A common problem is that there is no power to the fuel pump after the ignition is turned on. In a similar way, the malfunction manifests itself in motion, when the power to the fuel pump is lost and the engine suddenly stalls.
An equally important point is how much the fuel pump pumps. In other words, the pump may hum and buzz (power is being supplied), but not create the required pressure in the fuel line. The pressure in the fuel system with a working fuel pump must be more than 3 bar (which depends on the specific car model). The indicated pressure is accumulated in the fuel rail and has an indicator of 300 kPa and above.
To check, you need to measure the pressure in the fuel rail with a pressure gauge, taking into account the indicators that are the norm for a specific car model. Using the example of injection VAZs, the pressure when the ignition is turned on is 3 atmospheres, at idle the figure is 2.5 atmospheres, when you press the gas 2.5-3 atmospheres. This method will help you accurately determine:
- malfunction of the fuel pressure regulator in the rail;
- breakdown of the fuel pump or a noticeable decrease in its performance due to wear;
- severe contamination of filters (fuel filter and/or fuel pump mesh);
In the second case, when you press the gas, the pressure does not increase; in the latter case, the pressure gauge needle rises, but very slowly or jerkily.
A decrease in pressure below the norm will lead to the fact that the engine may not start or start with difficulty, stall, jerk, operate unstably and with failures. If this happens due to the fault of the pump and not the fuel filter, then there is a high probability that the coarse filter screen of the fuel pump is clogged. In this case, there is no need to change the fuel pump itself, since it will be enough to replace or even clean the mesh.
If you suspect that there is no voltage to the fuel pump, there is a quick way to check. It is enough to turn the ignition key and listen, as when you turn the key you should hear a slight hum from the fuel pump. If such a buzzing noise is not heard, it means there is no power to the fuel pump, there are problems with the wiring, etc.
Also in the general list of possible reasons why the fuel pump does not pump, the following are noted:
- failure of the fuel pump fuse;
- fuel pump relay failure;
- problems with the ground of the fuel pump;
- malfunction of the electric motor of the fuel pump;
- oxidation or damage to fuel pump contacts and terminals;
- the fuel pump itself is faulty;
Wiring to the fuel pump
On most cars, the wiring to the fuel pump consists of three wires: “plus”, “minus”, and also a wire for indicating the amount of fuel in the gas tank. If the fuel pump does not pump, then the cause may be a lack of power.
To check the power to the fuel pump, just take a 12-volt light bulb and supply it with power from the external connector of the fuel pump. After turning the ignition, the control lamp should light up. If this does not happen, then the problem is in the external circuits. If the lamp comes on, it will indicate the need to check the internal contacts of the fuel pump.
To check the external wiring, you should alternately connect the positive and negative contacts, which are removed from the fuel pump power connector, to the ground of the pump. The contacts must also be connected to the fuel pump relay. If you place the negative contact on ground, after which the ignition is turned on and the light comes on, then this means that this contact is faulty. If the light bulb does not light up, then problems with the “plus” are obvious. If you place a contact on the relay and the light comes on, there is probably damage to the wire on the section that connects the relay and the fuel pump itself.
Fuel pump electric motor
If checking the pressure in the fuel rail and the external wiring to the fuel pump gives positive results, then you should check the fuel pump motor. This electric motor is responsible for circulating gasoline inside the fuel pump.
When checking, you need to take into account that the terminals on the fuel pump themselves tend to oxidize, as a result of which power is not supplied and the pump does not pump. In this case, the motor is working, but the terminals need to be cleaned or re-soldered.
Fuel pump ground contact
Problems with the fuel pump mass may be indicated by a fuel level sensor that is not working correctly. The mass may be poorly secured; in this case, the fuel pump does not pump fuel. The ground wire is usually located under the dashboard and runs through the cabin. It is necessary to find the specified wire, check and clean all contacts, then securely fasten the ground to the fuel pump.
Fuel pump relay
The fuel pump relay is often mounted next to the fuel pump ground, that is, under the dashboard. A normally operating relay after turning on the ignition for a couple of seconds allows the pump to create pressure in the system and immediately turns off.
When the ignition key is turned, the driver hears a characteristic click (the relay is turned on), then a similar click will indicate that the fuel pump relay is turned off. If such clicks are not heard, this indicates a malfunction of the relay or its contacts. The optimal solution would be to replace the fuel pump relay with a new or known-good device. Let us add that the cost of spare parts is quite affordable.
Fuel pump fuse
During diagnostics, be sure to check the fuel pump fuse. The specified 15 A fuse is usually located in the fuse box in the engine compartment and is marked FUEL PUMP, which means fuel pump.
The fuel pump fuse needs to be pulled out and its contact inspected. The integrity of the contact will indicate that the device is normal. A damaged contact will indicate that the fuel pump fuse has blown. In this case, you need to install a new fuse, which has a very low cost (as in the situation with the fuel pump relay).
Selecting and replacing the fuel pump
Russian car owners prefer BOSH fuel pumps. You should only buy a new pump in specialized stores. The original product must be packaged in thick plastic film filled with special preservative oil. At the same time, a branded BOSH pump cannot cost less than 2 thousand rubles.
Video: how to distinguish an original from a fake
To replace the electric fuel pump on a VAZ 2114/2115 you will need:
- screwdriver with Phillips bit;
- thin slotted screwdriver;
- key or head 7;
- key to 10;
- key to 17.
Video: dismantling the fuel pump
The sequence of actions is as follows:
- Using a 10mm wrench, remove the negative terminal from the battery.
- Open the gas tank cap to reduce the pressure in it.
- Remove the rear seat cushion and peel back the carpet and sound insulation.
Injector
The two main causes of failure are electrical and mechanical.
There are several basic options for checking the fuel pump at home:
- Using a light bulb (checking power supply)
- Using a pressure gauge (check for mechanical wear)
- Using a measuring container
- Checking wiring with a light bulb (electrical)
If the fuel pump does not produce characteristic sounds when you turn on the ignition, you must first check whether voltage is supplied to it. A regular 12 V light bulb connected between the gray and black wires at the fuel pump terminal should light up when the ignition is turned on.
Video tutorial on checking the fuel pump
If the light bulb does not light up, or does not light up at full intensity, you need to check all contacts:
- Plug blocks
- Relay
- Circuit breakers
Often the reason lies precisely in the little things. To check, the relay and fuse can be swapped with a known good one. The contacts in the plug blocks may have broken off or oxidized. It is advisable to clean them and test them with an ohmmeter.
On VAZ 2112, 2114, 2115, etc., with an injection engine, an alarm can be installed that turns off the power to the fuel pump. In this case, you can turn on the pump directly from the battery or dimensions (turn on the light - it works).