VAZ 2110 fuel pump injector, VAZ 2112 fuel pump, etc. — electric fuel pumps, installed on many VAZ models with an injector. The operation of this type of fuel pump is partially controlled by an electronic control system (ECM), which takes into account the air-to-fuel ratio, throttle position and exhaust composition.
The VAZ fuel pump (2110, 2112) is designed to supply fuel from the gas tank to the vehicle’s internal combustion engine. In this case, fuel from the car’s gas tank must be supplied uninterruptedly to the internal combustion engine, and under a certain pressure. This is the key to stability and reliability of the car’s power unit.
If the fuel supply is disrupted or stopped altogether, there is a high probability of failure of one of the devices in the overall fuel supply circuit. One of these elements is the VAZ 2110 (21102) fuel pump. Next, we will look at why the pump can fail, what its malfunctions are and how to fix them.
Why does the fuel pump on the VAZ-2110 8 valves not work?
If the fuel pump does not work when you turn on the ignition, the cause may be:
- fuel pump relay
- fuel pump fuse
- the fuel pump itself
- wiring
- alarm (its blocking)
Let's talk about this now.
When should you check your fuel pump?
It is necessary to check all potentially faulty components one by one, and the fuel pump first.
Problems when starting and running the engine are not always associated with the fuel pump. Sometimes the signs of a fuel pump breakdown are the same as those of a faulty fuel pressure regulator , injectors or jets, spark plugs and high-voltage wiring. Even experienced specialists who know by heart all the signs of a “dying” pump cannot unambiguously determine the type and cause of the breakdown the first time, and it is necessary to check all potentially faulty components one by one. In this case, the fuel pump is usually checked first. In this case, there are two types of malfunction - the fuel pump does not work at all or does not produce the required pressure. In the first case, the malfunction can be recognized by ear, since it should start when the ignition is turned on. In the second case, you need to know how to check the pressure of the fuel pump. Here you need to use a special pressure gauge. We list the main symptoms of a fuel pump malfunction:
- the engine does not start;
- the engine is unstable;
- the engine lacks traction during sharp acceleration;
- The engine lacks traction at low speeds.
We recommend: Replacing front and rear brake pads on Lada Kalina
Fuel pump power supply diagram
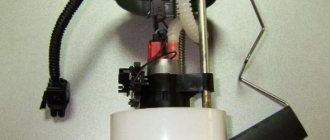
The fuel pump module looks like this.
- When you turn the key, positive is supplied to the fuel pump relay.
- The relay closes and already supplies power to the fuel pump itself. There is also a fuse built into the circuit.
Often, when installing an alarm system, a blocking relay is also built into this circuit.
This is a diagram of the main electrical components - simplified to make it clearer.
Verification algorithm
You should start checking by inspecting the relay and fuse.
On older machines, the positive wire often frays and shorts to ground, which causes the fuse to blow. This is a common occurrence.
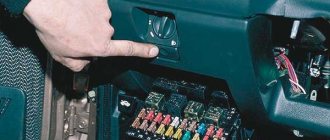
The fuel pump relay and fuse are located inside the panel.
To access the block you will need to unscrew 3 bolts. They are circled in red in the diagram.
The fuel pump fuse and relay are marked in the diagram.
The fuse can be checked with a multimeter, but it is better to buy a new relay, it is inexpensive.
Put it in the car, it may come in handy at the most inopportune moment.
Rules for selecting a fuel pump for a car
When choosing a fuel pump, every car owner wants the new element to fit the car perfectly, and also to be reliable and last for many years. Another important characteristic of a fuel pump is “noise”, because the quieter the fuel pump operates, the more comfortable it will be to operate the car.
As for the interchangeability of fuel pumps, when you open the spare parts catalog you can see many catalog numbers of fuel pumps that are used on the VAZ 2110 with an engine capacity of 1.5 liters: 2112-1139009-06, 2112-1139009-03, 2112-1139009-02, 2112-1139007 -06, 2112-1139007-01, 2112-1139007, 21102-1139009-06, 21102-1139009-03, 21102-1139009-02. As a rule, the difference is in the FLS (fuel level sensor), so when choosing a new fuel pump assembly, it is recommended to buy a spare part with a similar part number.
Separately, we can highlight the fuel pump with the following number - 21101-1139009, used on cars with 1.6-liter engines and having a built-in fuel pressure regulator. When choosing a fuel pump, confusion often occurs in such concepts as the fuel pump itself and the fuel pump module. In the first case, we mean the fuel pump motor, and in the second we are talking about the entire assembly assembly, which is removed from the tank.
Checking the power supply at the fuel pump terminals
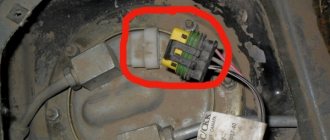
The fuel pump is installed in the tank. To access it you will need to remove the rear sofa cushion, it is not difficult.
The fuel pump is protected by a cover.
Fuel pump power supply.
When the ignition is turned on, there should be a voltage greater than 12 Volts at these terminals.
If there is no voltage, then you need to:
- ring the ground on the body. This is a white and gray wire. It is convenient to check the continuity of the bolt securing the rear seat belt fasteners.
- check the positive contact using a tester, or call it directly from the battery, etc.
Try to “fiddle” the wires; they often fray. The negative wire (ground) is connected to the handbrake bolt.
Check directly
It is necessary to carefully strip the wires and apply power to them. (As in the diagram)
If, when voltage is applied, the fuel pump shows no signs of life, then it is faulty.
To the last drop: how to check the fuel pump yourself?
Very briefly about the symptoms
Fortunately, most engine problems can now be diagnosed using a scanner.
This makes life much easier for motorists and car service workers, if only for the reason that misfires or sensor malfunctions do not need to be looked for using complex conclusions and step-by-step replacement of everything. There are exceptions, of course, and no one excludes working with the brain, but still. But what to do if all the electronic systems are in order, there are no errors, but the car is desperately stupid? This is where they usually remember that there is such a part - a fuel pump. And you have to check it the old fashioned way - with your hands, and not with a laptop. I will not describe in detail the symptoms of the breakdown: a lot has already been said about this. In short: failures, decreased dynamics, inability to start the engine, sometimes the engine tries to stall when turning, squeals and squeaks in the area of the same fuel pump. This could be the end of the symptoms, but the fuel pump has another malfunction: the valve that holds the pressure in the rail may stop working. In this case, the symptoms of the malfunction are very similar to those that are often tried to be attributed to a leaking injector: the engine does not start immediately, you have to turn the starter for quite a long time. This rarely happens, but we’ll still talk a little about this situation below. Now let's move on directly to the diagnosis. So, the engine does not start, there are no ignition errors. Where do we start?
Mindfulness itself
No matter how complex the car may be, there can be only two breakdowns that prevent the engine from starting: no gasoline and no spark. If there is a spark, you need to look for at what stage the gasoline disappears. And first you can make sure that it is definitely not there.
If access to the candles is easy, then the most basic action will be to unscrew these same candles. If they are dry, something is wrong with the fuel supply. So, we are going in the right direction.
When you turn on the ignition, we listen carefully: after turning on the ignition and before turning on the starter, you can usually hear a characteristic “zh-zh-zh” in the rear for a couple of seconds. It is the pump in the gas tank that turns on. If this “w-w-w” has always been heard, but now it’s not, it means the pump is not turning on. We think why.
First, we check two basic things: the alarm and the fuse. Most anti-theft systems provide for turning off the fuel pump. Therefore, you need to make sure that the alarm, immobilizer and everything else that was once installed on the car worked. If all this wonderful electronics is working properly, we check the fuse (we open the fuse diagram, look for the right one and make sure that it is intact). You can also check the relay, but it’s difficult to do without a multimeter. Therefore, you can skip this stage for now: the relay is usually intact anyway, and the reason is somewhere further.
Now you need to make sure that power is reaching the pump. To do this, we get to its connector and remove the terminal. If you are the happy owner of a car in which you need to remove the gas tank to do this (if there is no hatch under the seat), then my condolences: you will either have to go to a service center or cut out the hatch. It's all up to you. The main thing is that if there is no access, you will have to skip a couple of steps. Although there is still one way to check the pump, more on that below.
So, the terminal has been removed. You can check the power supply with a regular test light. You just have to look at it carefully, because it won’t burn all the time. After turning on the ignition, it should light up a little, then go out. If it shines, there is food. We climb further.
And then the simplest thing is to connect the wires directly from the battery to the pump terminals. If with such a direct connection it does not work, then the reason for the silence of the engine is precisely the fuel pump.
Repairing it is usually pointless; it’s easier to buy a new one. And you don’t always have to spend money on an original part: there are a lot of manufacturers, many of them are very high quality. Well, if it’s difficult to find a fuel pump specifically for your car (for example, a problem happened somewhere on the road), then you can install almost anything that fits into a regular place. Then, of course, it’s better to buy something more suitable, but a fuel pump from a “ten” often works wonders. At least you can get home (of course, if the engine has conventional multipoint injection, but I hope this was clear right away).
Everything seems simple, but that’s not all. Because the fuel pump may work, but not work well. And here you will need at least minimal instrumental diagnostics.
Pressure gauge, beaker and ammeter
To fully diagnose a fuel pump, it is better to have three tools: a pressure gauge, a beaker and an ammeter. Let's start with the pressure gauge.
Any gas pump must always pump fuel under a certain pressure. Usually - from three to five atmospheres, less often - a little more. It happens that the pump hums and seems to be pumping something, but the car does not drive. Either its idle speed is low, or it just doesn’t want to accelerate. In this case, you need to make sure that the fuel pump not only works, but works correctly.
In services, they check this in a couple of minutes: they connect a pressure gauge to the fuel rail (sometimes directly to the fuel pump) and see what pressure it produces. It’s very tempting to do the same thing in the garage, isn’t it? Especially if the worst thing happened: there is no access to the pump due to the lack of a hatch. In this case, this step is the most logical. Unfortunately, simply screwing the pressure gauge to the ramp is practically useless. Yes, if even in this position it shows zero, everything is bad. But with this device you need to not only make sure that the pump is alive (or dead), but that it is completely alive. To do this, you will either have to buy a ready-made pressure measuring system (in addition to the pressure gauge, it contains hoses, connectors and a tee, with which the device is connected to the system without affecting its operation), or “collectively farm” it from gas-resistant hoses and fittings of a suitable cross-section. And now with such a system you can check the operating parameters of the pump. This must be done at different speeds - at some speeds it can become mopey. There are people on the Internet who advise placing the pressure gauge somewhere on the windshield and letting the car burn. Like, then everything will be visible. I want to warn you: this is not only not necessary, but also very dangerous. If gasoline leaks somewhere into the engine, there can be major troubles. Just look at the pressure gauge readings at different engine speeds. First, find a “manual” for the car, which will contain the pressure values in the fuel line at different speeds. In general, if you don’t want to remove the tank ahead of time, this is the most suitable way to check the fuel pump for cars without a special hatch.
A beaker is used much less frequently than a pressure gauge. It is used to measure pump performance, but usually only in high-end services. It is used to measure how much gasoline the pump will pump by volume over a certain period of time. If it is less than the norm (which is determined from the technical characteristics of the pump), then it is considered faulty. Most often, this operation does not seem necessary: almost all the information can be obtained using a pressure gauge. But if there are those who use a beaker, it is imperative to talk about them. In general, I already said it. So let's move on to the ammeter.
This device is used to measure the current consumed by the pump. There really is some meaning in this operation. In some situations, the pump is able to achieve the required pressure, but the cost of this pressure (in the form of current consumption) turns out to be too high. Sometimes the electric motor of the pump itself is to blame for this, and sometimes it is a completely clogged gas filter, which is usually located directly in the pump. More and more often, this filter is considered irreplaceable and is part of the pump (may those who invented this burn in hell). Based on the increase in current, we can conclude that it would still be a good idea to replace the filter.
If, when removing the pump, it turns out that the filter has served its purpose, you will have to look for ways to do something about it. You usually don’t need to search for anything for a long time, because the people who at one time drank brake fluid, kept onions in tights and dangled BF glue on a drill have long ago figured out what can be done on a specific car. So all that remains is to look for a solution on the Internet, and usually there is no need to invent anything.
Nothing is eternal
Unfortunately, gas pumps have died, are dying and will continue to die. Like any other mechanism with moving parts, the pump has its limited resource. On some cars more, on some less, but on average the pump is measured somewhere around two hundred thousand kilometers. The most annoying thing is if the pump refuses to work somewhere on a long trip. How to avoid this?
By and large, no way. I can only advise two things: listen to how it works after turning on the ignition, and do not drive on an empty tank. In the first case, a change in tone should alert you. If the pump begins to hum “in the wrong tone” or too loudly, it is better to replace it in advance. As a last resort, carefully diagnose and replace the filter.
Driving with an empty tank is a different story. There is an opinion that the fuel pump can “grab air” and burn out. Or overheat and burn out. This is not entirely true. A short-term “snatching” of air, of course, can finish off an already almost dead pump, but this is still the exception, not the rule. And air won’t get in there that easily: the pump is in a plastic cup with gasoline, so it’s difficult for it to “dry out.” As well as gulping air in sharp turns with an empty tank. The same applies to overheating: this danger is greatly exaggerated, although not completely excluded. Still, an empty tank really harms the pump. Primarily due to the fact that condensation forms on the walls of an empty tank, which then gets into the gasoline. And this, of course, is bad, and not only for the pump. Well, secondly, there is still both debris and water at the bottom of the tank. And they don't do any good to the fuel pump either. So the advice not to drive on an empty tank is indeed useful, although for slightly different reasons.
Well, if possible, you need to change the fuel filter on time. Many machines still provide this, so this procedure should not be neglected. It’s somehow more pleasant to drive yourself with a clean pump than to drag yourself along the highway on a “tie” in an attempt to replace a suddenly failed pump.
Survey
Have you ever had problems with your fuel pump?
Your voice
Total votes:
Advantages of injection models
The main function of the pump is to supply fuel to the combustion chamber. It must meet certain requirements. The main criterion is pressure.
The pumps for injection and carburetor engines are different. Thanks to the engine with direct fuel injection, there is no need for preliminary preparation of the combustible mixture. As you know, the carburetor is the weak link. Difficult adjustments, clogged jets, difficult starting in cold weather create inconvenience for owners of classic VAZ brands.
Tens and VAZ-2112 internal combustion engines have significant advantages. Let us note the advantages of injection units:
- support for environmental standards;
- direct injection into the combustion chamber;
- fuel economy;
- system reliability;
- increased engine power;
- starting a cold unit without warming up;
- dispensing a portion of the mixture;
- The fuel module is controlled electronically.
Unfortunately, the injector has a number of disadvantages. Maintenance and repairs have to be carried out at a service station. It also requires qualified personnel and a computer to determine the malfunction of electronic components. Let us point out other disadvantages:
- design complexity;
- high requirements for the octane number of gasoline;
- complex diagnostics and repairs;
- expensive spare parts and equipment.
Features of the injection power system
The tasks of fuel pumps in carburetor and injection engines are somewhat different. If for a carburetor engine it is important to simply supply gasoline to the carburetor, then for an injection system this is not enough. The fuel pump must not only pump fuel from the tank to the ramp, but also create a certain pressure, without which the engine simply will not start.
Access to the fuel pump in injection cars is also complicated by the fact that in cars of recent years of production it is mounted together with a fuel receiver and a coarse filter directly in the gas tank. This complicates the diagnosis, repair and maintenance of the entire fuel module, but simplifies the design of the pump, since the gasoline itself lubricates and cools it. But this is precisely what often leads to unit breakdowns.
Master node of the system
The VAZ-2110 fuel pump is equipped with an electric drive. Its body is lowered into the fuel tank. Gasoline is both a pumpable fuel and a coolant. It should be remembered that traveling with an empty tank is fraught with overheating of the VAZ-2110 injector fuel pump.
This electrical device is an independent unit. Accordingly, its operation does not depend on the state of other mechanisms. A necessary condition for rotating the VAZ-2110 fuel pump rotor is maintaining normal voltage on the on-board network.
The voltage comes through the ignition switch. When the key is moved to position 1, the circuit is closed to turn on the drive. The VAZ fuel pump fills the fuel rail. The engine is ready to start.
Let's sum it up
Taking into account the above information, it becomes clear that the uninterrupted operation of the electric fuel pump of the VAZ 2110 or any other car will depend on correct and timely preventive maintenance, as well as on careful operation and compliance with certain rules.
We also recommend reading the article on how to change the fuel pump mesh with your own hands. From this article you will learn when and why it is needed, as well as how to replace the fuel pump strainer.
Only clean fuel should be poured into the tank and the fuel filter should be changed promptly. It may also be necessary to periodically change or clean the fuel pump strainer, use a moisture displacer from the gas tank, etc. Please note that it is not recommended to drive with an empty tank as the pump will not cool properly.
Finally, we note that in the event of malfunctions in the operation of the internal combustion engine, it is quite possible to diagnose and replace the fuel pump yourself in a regular garage (if you have the tools). However, working with the fuel system will require increased caution and compliance with all safety measures. If you are not confident in your abilities, it is better to turn to experienced specialists.
Diagnostic device
To determine the pressure in the main line, a device is needed. It's easy to do it yourself. You need to take a 10 atmosphere pressure gauge, a fitting and an oxygen hose with an internal diameter of 9 mm. We twist all the elements and tighten them with clamps.
The meter is connected to the ramp. To do this, remove the plastic cap from the end of the tube. Next, use a tire cap to unscrew the nipple.
Bleed off excess gasoline. Before draining the flammable liquid, place a rag to prevent gasoline from getting on the generator. Smoking and using electrified tools near the hood is strictly prohibited.
The free end of the hose is pulled onto the ramp. Secure the clamp. After connecting the battery, turn on the ignition. They take readings. The pressure of the VAZ-2110 fuel pump injector will deflect the pressure gauge needle to 3 atm.
After starting the engine, observe the movement of the needle. On working equipment, the pressure will be maintained within 2.8-3.2 units. If no deviations are found, then the VAZ-2110 fuel pump, injector and regulator are working correctly. It is advisable to remember the characteristics of the equipment.
The pump capacity is about 2 liters per second. If problems arise with the fuel supply, the pump must be replaced. Before checking the pump, make sure that the remaining elements are in good working order. The filter or mesh may be clogged. The fuel filter is changed and the mesh is cleaned.
Removing the pumping unit
Before starting work, you must disconnect the terminal from the battery. This will prevent damage to electrical equipment. In addition, replacing the fuel pump may cause a fire.
Let's prepare tools and materials. To remove the VAZ-2110 fuel pump, you need the following:
- Screwdriver.
- 10mm socket wrench.
- Collar.
- Open-end wrench 13.
- Rags.
The device itself is located under the rear seat cushion. To get to the installation location of the fuel pump 2110, you need to remove the seat. Under the casing we find a hatch. We unscrew the hatch. Disconnect the electrical drive connector.
Using an open-end wrench, unscrew the tips of the fuel pipes. We pull off the pipes. Using a spanner, unscrew the 8 nuts around the perimeter of the clamping ring. Release the flange.
There is a gasket under the pressure ring of the fuel pump 2110. The gasket is removed. It is better to change worn tires.
Then we raise the VAZ fuel pump together with the float. Gasoline will leak from the body. To avoid staining the interior, place a rag. There will be up to 1 liter of gasoline left in the old building. Drain it into the tank.
Assembly is carried out in reverse order. There is an arrow on the top of the cover. It should point towards the trunk. This is the correct pump position.
When replacing, do not forget to remove the float and level sensor.
These spare parts are installed on the new structure.
All operations, including preparation, will take less than an hour. After replacement, perform a test. Start the engine. Finally, you should check the fuel pump, make sure the connections are tight and there are no leaks.
Coarse and fine fuel filters: where they are, when and how to change them
Russian gasoline is not always of the same quality, so over time, sediment accumulates in the tank due to low-quality fuel. Dirt also clogs the sieve of the electric fuel pump; as a result of accumulated dirt, fuel does not completely enter the fuel line and the engine fails. To fix the problem, you need to replace or clean the coarse filter. However, to get to the filter, you need to disassemble the fuel pump.
The fuel system must be relieved of pressure before disassembling, otherwise fuel may leak into the vehicle when disassembling the fuel line fittings. To relieve pressure, remove the fuel pump fuse, start the engine and wait until it goes out. Replacing the fuel pump sieve with a “ten” (nozzle) is done as follows:
- Turn off the ignition.
- In the rear, locate the hinges and pull them to fold the lower seats forward (right and left).
- There are two bolts under the seat on the underside that hold the hatch in place.
- Unscrew the bolts and remove the hatch.
- Disconnect the wire connector that supplies power to the electric fuel pump by opening the latch and pulling part of the connector away from you.
- We unscrew the fuel line connectors - main supply and “return” (17mm wrench).
- Unscrew the nuts of the fuel pump pressure plate, there are 8 bolts (at 7mm).
- Since the nuts are small, it is better to put them in a jar, otherwise you can lose them. Remove the plate and remove the pump assembly from the fuel tank. The pump must be removed with the sealing ring; lift the pump carefully so as not to damage the fuel level sensor. When removing the housing, tilt the fuel pump so that it comes out of the tank.
- We remove the screen from the fuel pump and install a new part.
- Install the fuel pump.
The fuel pump and its role in the fuel system of the VAZ 2110
In the “ten”, as in other cars where power plants for fuel are installed, the gas pump serves as an element that pumps fuel in the “fuel tank-motor” circuit. It supplies gasoline to the metering component, the function of which, depending on the design of the fuel complex, is played by either a carburetor or an injector in the injection engine system.
In cars of different types of fuel supply, an electric fuel injector pump is used, or a mechanical fuel pump on carburetor modifications. Accordingly, in order to buy a gasoline pump, you need to know what type of gasoline units are installed and operated in a car that requires repair of the fuel system.
To buy VAZ 2110 fuel pumps, the price of which is affordable for most of our car enthusiasts, should be factory-made. Of course, this part for an injection engine is structurally more complex and costs more, but the price limits are very reasonable and acceptable within their limits. In addition, the fuel injector pump, the price of which is higher than its analogue on a carburetor engine, is technologically more complex and has a number of significant advantages.
Product selection
AvtoVAZ offers an original fuel pump for 4,000 rubles. The original catalog number is 2112-1139009 . But many car enthusiasts buy and install cheaper analogues instead of the original.
Analogs
Bosch fuel pump.
A non-original part is often no different in quality from the original. So, if the vehicle owner wants to save money, then you can install a non-original part. Let's consider the main offers of analogue companies:
- Fenox EFM33006O7 - the cost of such a part will be about 3,000 rubles.
- Bosch 0 560 454 035 - as they say, I took BOSCH, and ... (go ahead).
- Ween 192-0262 – the price on the spare parts market will be approximately 3,000 rubles.
- Pekar 2112-1139009 - will cost a little more than the previous two, the average price is 3,500 rubles.
- ATS 53453 - they praise, but the price tag is good. We know they put one like this as a replacement for expensive originals on Peugeot.
ATS fuel pump.
The principle of operation of the mechanism
Product diagram for injection engines:
Mechanical products are used in cars with a carburetor fuel system, where fuel is supplied under low pressure, and electric fuel pumps in vehicles with fuel injection equipment, where gasoline is supplied under high pressure.
1. Fuel pump on vehicles equipped with a carburetor as a dispenser. The drive lever (pusher) is in constant friction, but the diaphragm shifts to the lower plane only when it is necessary to fill the product chamber with fuel. The return spring moves the diaphragm to the upper position, thereby supplying fuel to the dispenser. Composition of a mechanical fuel pump:
- Fuel filling chamber;
- Inlet and outlet type valves;
- Diaphragm seal;
- Return spring;
- Pusher (drive type lever);
- Cam;
- Camshaft.
2. Electric fuel pump on injection cars. Such a device is similar in operating principle to a mechanical prototype: the core is pulled into an electromagnetic valve until the contact group opens, blocking the flow of electric current. Composition of this product:
- Fuel filling chamber;
- Inlet and outlet type valves;
- Diaphragm seal;
- Return spring;
- Electromagnetic valve;
- Fuel pump mesh;
- Core;
- Contact Group.
For beginners, we inform you where the VAZ 2110 fuel pump is located: it should be looked for under the rear seat cushion of the car.
Signs of a fuel pump malfunction
Signs of unit malfunction:
- a metallic howl or increased noise during its operation is detected by ear;
- the product does not pump fuel or the contacts do not work;
- The power of the power unit is sharply reduced.
First of all, we check the pressure of the “tens” fuel pump in the common fuel system by connecting a pressure gauge to the fitting. If the pressure in the product is more than 3.3 kgf/cm2, it becomes clear that the malfunction is a defect in the pressure regulator, which requires replacement. If the pressure gauge readings are less than 2.8 kgf/cm2, it is necessary to replace the fuel filter of the fuel pump, which caused the defect. If the car continues to act up, it is advisable to dismantle the fuel unit and clean the fuel filtration mesh.
In other cases, the VAZ 2110 injector fuel pump is replaced, because repair of the product did not give positive results. Also, when checking this electrical device, it is necessary to test the fuel pump relay, which is subject to elementary “sticking”. It would be a good idea to check the unit's fuse, which may also blow out and require replacement.
Where is the fuel pump located?
Like most fuel-injected cars, the VAZ 2110-12 has a fuel pump located in the tank; you can get to it from the passenger compartment by lifting the rear seat of the car. It is installed in the fuel module, so when replacing the pump you will first need to disassemble the module and remove the old pump. In order to get the fuel module, you need to lift the rear seat, unscrew the floor hatch, as well as the 8 nuts securing the module and two metal fuel pipes. C A BOSCH 580454138 fuel pump is installed at the factory. Its service life depends on the quality of the fuel used, as well as on operating conditions. It is also worth noting that this pump is suitable for most other cars, including imported ones. The cost of a BOSCH fuel pump at the moment is from 1,700 rubles.
Cheaper analogues are also offered on the market:
- WEBER FP 453-453 from 600 RUR
- ATS 2112-1139010 from 550 RUR
- PEKAR 2112-1139010 from 600 RUR
- FENOX EFP35005O7 from 700 RUR
- HOFER HF 830 301 from 550 RUR
- StartVOLT SFP 0153 from 750 RUR
- VOLTON VLT2112-1139010 from 650 RUR
Any of the above fuel pumps will be suitable as a replacement for the original one, however, not all of them are of the same quality as the original.
In addition to the pump itself, you may need a corrugation to replace it, and if the fuel pump mounting ring is damaged, you can order it or purchase it using the following article number:
- Electric fuel pump ring /2110/ metal price from 120 rub.
- Fuel pump corrugation /2110/ 1.5 white from 50 rubles per piece
- Fuel pump corrugation /21101/ 1.6 long from 60 rubles per piece
- If you decide to replace the entire fuel module assembly, you can select one of the suggested modules below.
- Electric fuel pump module /21101/ V=1.6 assembled PEKAR price from 2500 rub.
- Electric fuel pump module /21101/ V=1.6 assembled “UTES” price from 3200 rub.
- Electric fuel pump module /21102/ V=1.5 assembled “UTES” price from 3000 rub.
- Electric/fuel pump module /21102/ V=1.5 assembled HOFER price from 2000 RUR
If you decide to change only the fuel pump, we recommend that when replacing it, you immediately carry out a complete inspection of the module - check the check valve and both corrugations, and also, if necessary, replace the fuel grid.
Instructions for replacing the fuel pump First, move the rear seat to the side and fold back the piece of carpet that covers the fuel module hatch. Next, unscrew the two bolts securing the hatch and remove it.
A fuel module with two tubes will be visible in front of us.
Before unscrewing the pipes, it is necessary to relieve the pressure in the fuel system. To do this, you will need to remove the fuel pump fuse, or turn off the power to the module and start the engine. After the remaining fuel in the system has been used up, the car will stall and you can begin to replace the fuel pump. We can have different types of fuel module - quick-release and screw-on, depending on the year of manufacture of the car.
If the fuel pipes are on nuts, unscrew them with a 17mm wrench; if they are on quick releases, then simply tighten the clamps and remove them from the module. Now, using a wrench or a 7mm tube, unscrew the 8 bolts securing the fuel module clamp. Move the fuel pipes to the sides, raise the clamp and carefully, so as not to spill gasoline, remove the fuel module.
Disconnect the fuel pump plug.
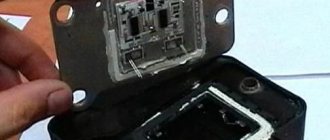
Remove the lock shown in the photo.
Using a flat-head screwdriver, unscrew the two bolts.
Remove the rubber bushing and the plastic part underneath it.
Now you can remove the fuel pump from the module and replace it with a new one. To install a new fuel pump and perform assembly, you will need to put a new corrugated hose on the pump. In order for this hose not to allow air to pass through, when it is put on the pump, it must be heated. Then we assemble it in the reverse order.
Replacing the electric fuel pump
Such a replacement is carried out in the following cases:
- failure or incorrect readings of the fuel sensor;
- weak throughput effect or defect in the fuel intake grid;
- failure of the electric fuel pump.
The tools you will need are a screwdriver and a 10mm socket wrench with a wrench.
- Reduce pressure in the fuel supply system.
- Using the fuel supply hose tip clamp, disconnect 2 hoses in turn.
- Disconnection should be carried out slowly, without using unnecessary force, so that the fuel block fittings remain intact.
- Unscrew the 8 nuts around the circumference of the clamping ring and remove it.
- A wire with negative polarity is attached to one of the nuts; it must be removed carefully.
- We take the electric pump block out of the fuel tank, tilting it slightly, to keep the fuel level indicator sensor lever intact, otherwise it will produce incorrect parameters.
- Remove the sealing rubber ring of the fuel block. If its properties are lost, the product must be replaced.
- Install the product in reverse order.
Important: during installation, the installation arrow on the electric pump cover must point towards the rear of the car!
Important: when installing fuel hoses, follow the direction of fuel supply indicated by the arrows!
Many people ask where the VAZ 2110 fuel pump relay is located? Let us clarify that this electronic device is located in a special recess on the front passenger side of the floorplane. You need to unscrew the plastic cover, there will be 3 relays. Closer to the hood is the required part.
Problems with the operation of the vacuum type device
The vacuum pump may malfunction. This can happen for several reasons:
| Problems | Causes | Solution |
| Insufficient vacuum | Insufficient oil level | Add oil to the required level |
| The oil has become dirty | Dirty engine. The higher the alkali content in the oil, the faster the engine cleans and the oil turns black. | Replace the oil with clean oil. If the alkali content is high, replacement is required after 5,000 kilometers. |
| The oil fill hole is clogged | Small particles on the surface of the lid | Clean the inlet and rinse the filter |
| The integrity of the hoses is compromised | Wear, mechanical damage, hose connection failure | Check hoses and their connections |
| Insufficient pump power | Loss of voltage from the generator to the pump due to unsuccessful implementation of standard wiring, insufficient device size | Replace the wiring or purchase a new part of the required power |
| Oil started leaking | The integrity of the oil container is damaged | Replace container |
| The cover of the hole for draining the oil does not fit well or the rubber ring has become unusable | The thread of the cover is torn off, the ring is worn out | Replace the cover and replace the gasket |
| Oil splashes | Permissible oil level exceeded | Drain some of the oil to the desired level |
| The pressure at the air evacuation fitting has been exceeded | Insufficient pump power | Install a more powerful pump |
| The pump is hard to start | The temperature has become too low | The device must be turned on and off several times in a row or the oil must be heated |
| Breakdowns in the electrical part of the pump | Voltage surges, short circuit | Check and eliminate breakdowns |
| Garbage has accumulated inside | Dirt in the gas tank | Examine the contents and remove the blockage, clean the gas tank |
Replacing a mechanical fuel pump
Unscheduled replacement of a mechanical type device takes place in the following order:
- We dismantle the air purification filter.
- Remove the fuel supply line to the fuel pump.
- First loosen the tightening of the clamp.
- Remove the fuel supply line to the carburetor.
- Unscrew the fasteners of the product.
Installation is in the reverse order. At the same time, do not forget to look at the arrows on the products showing the direction of movement of fuel to the carburetor.
VAZ 2110 fuel pump is a common cause of breakdown
The new VAZ 2110 models use injection engines, which are so popular today. To confidently drive any car, you need to know what can break down in it in order to quickly fix the breakdown or prevent it. The fuel pump of the VAZ 2110 is one of the most vulnerable points of this car. If the fuel system is not properly maintained, it will quickly fail.
The fuel pump in injection engines is very important, since it is the one that supplies the fuel injectors with the required pressure. If there is no pressure or it is incorrect, the injectors will supply fuel to the engine in the wrong dosage.
Fuel pressure is measured in the fuel rail using a special device.
In essence, the device for measuring fuel pressure on a VAZ 2110 is the same pressure gauge, only for measuring liquid pressure. If the pressure in the ramp on a VAZ 2110 does not fit into the values of 3.6-4 atmospheres, then the car is faulty and needs to be repaired urgently, as this can lead to failure of the fuel pump, if it has not already failed.
Symptoms of VAZ 2110 breakdowns
If suddenly the car begins to twitch at high or medium speeds, this indicates a drop in fuel pressure in the rail. The same applies to the case when the engine develops dips or even stalls.
The fuel pressure in the system can drop not only when the fuel pump fails, but also when the RTD or even the injectors themselves fail.
The fuel pump on the VAZ 2110 constantly pumps gasoline while the engine is running. In this case, excess gasoline is simply returned back to the gas tank through the return channel. It is on this channel that the check valve is installed. To check it, use a pressure gauge. After the engine is turned off, the gasoline pressure should drop gradually, not suddenly. The slower the pressure drops, the better the quality of the RTD valve.
Examination
- You can check the fuel pump yourself. The first thing you need to do is make sure that it is working, turn on the ignition and listen to the pump, it should start humming.
- If this does not happen, we proceed to a deeper check.
- Check the integrity of the fuse and relay.
- We check the secure fit of the pump control connector, which is located under the rear seat.
- Then we remove the connector and turn on the ignition, check whether voltage is coming to the fuel pump; if there is 12V on the block, then most likely the pump itself is faulty and requires replacement.
Insufficient pressure
The fuel pump does not always fail completely, that is, it turns off and does not pump fuel. The pump may be working, but not pumping up the required fuel pressure, which will lead to improper operation of the car engine.
To check the presence of pressure on the pump, you need to dismantle the pump, connect a pressure gauge to it, lower it into a container with fuel and turn it on from the battery. A working pump should deliver a pressure of up to 8 bar.
In systems with a return line, that is, on 1.5-liter engines, there is no need to dismantle the pump; you just need to connect a pressure gauge to the fuel rail and clamp the return line with the engine running.