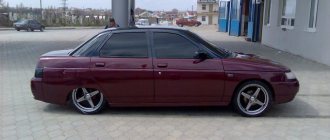
If you are the happy owner of a VAZ 2110, then you were able to fully appreciate the undemanding and easy operation of your dozen. But one day, if you have had the car for a long time or got it from someone, you will notice that it has begun to sag a lot. This can be noticeable even with a completely empty cabin and tank. The consequence of this subsidence will most likely be impacts from the tires into the fender liners. And, as a consequence, their mutual destruction.
You can solve this problem of your VAZ 2110 by using spacers for the rear springs by contacting the nearest car service center, but it will be much cheaper and more interesting for any real car enthusiast to solve the problem on their own. Moreover, the process of installing spacers will not take much time.
How to properly increase a car's ground clearance
The vehicle's ground clearance is a parameter that does not happen much on our roads. Although, if you look from the other side, it is not uncommon to come across a car on the street with a lowered suspension.
Most often they decide to increase clearance due to the following cases:
- A loaded car hits the fender liners with its rear wheels or the mudguards on the ground, so they want to lift the rear of the car.
- It touches the bottom or crankcase protection on uneven roads, so they want to raise the front of the car.
In some cases, they decide to raise the rear and front suspension at the same time. It is no secret to many that after such actions some troubles may arise, wear of some components may increase, and the characteristics of the car may change. Let's try to find the answer to the question: how to increase ground clearance without negative consequences.
What are they needed for
I won’t be unfounded, but I’ll just give simple examples from life. I think they will allow you to understand why it is worth considering the issue of installing spacers to increase ground clearance.
- The car is initially quite low. This applies to imported cars, since our automakers understand that fighting the roads is pointless, as is waiting for their quality to improve. Therefore, they try to adapt to current conditions, offering high ground clearance. But even that is not enough. As a result, driving through the next section, you again and again cling to the bottom, crankcase protection, cannot pass the curb, brake before each hole so as not to get hit. All this interferes with normal movement and driving turns into a test.
Installing spacers is the most optimal solution to the problem, if you look at it from a price-quality perspective. They increase rigidity and increase the distance from the bottom to the ground. Fortunately, my car is quite high, but this problem is very close to me, since my friends do not have such ground clearance. Actually, I would like to install inserts for them too, since I have to constantly take my car if we go somewhere in nature or outside the city. But let's not talk about sad things.
I think it’s very clear to you why these spacers are needed and what function they perform. But before you install and even purchase these elements, which are sold not only in Volgograd, but also in any cities such as Moscow, St. Petersburg, Novosibirsk, Yekaterinburg, Krasnoyarsk, etc., I suggest you find out what these spacers are.
How to properly increase a car's ground clearance
The vehicle's ground clearance is a parameter that does not happen much on our roads. Although, if you look from the other side, it is not uncommon to come across a car on the street with a lowered suspension.
Most often they decide to increase clearance due to the following cases:
- A loaded car hits the fender liners with its rear wheels or the mudguards on the ground, so they want to lift the rear of the car.
- It touches the bottom or crankcase protection on uneven roads, so they want to raise the front of the car.
In some cases, they decide to raise the rear and front suspension at the same time. It is no secret to many that after such actions some troubles may arise, wear of some components may increase, and the characteristics of the car may change. Let's try to find the answer to the question: how to increase ground clearance without negative consequences.
Installation process
The first thing to do is to jack up the rear of the car. Check that the car is standing securely, because you will have to move under it for quite a long time, so protect yourself in advance.
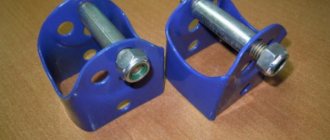
Spacer for shock absorber
Then, using two wrenches, you need to remove the bolt that holds the lower shock absorber ear in place. At the same time, hold the bolt nut with another wrench and unscrew it. Once the shock absorber is freed and the bolt is removed, it's time to install the spacer.
When installing this mechanism, it is easy to notice that both spacers are symmetrical; they can be placed on both the right and left sides under any rack. However, one important point should be taken into account: the side of the spacer, which has a larger gap between the lower edge and the bolt hole, should face the middle of the car, i.e. be located closer to the center.
Now all that remains is to place the shock absorber strut in our part and also firmly clamp it using the removed bolt and nut. By selecting the desired hole, you will adjust the ride height of the machine. In this case, it is necessary to select one of the three holes before starting installation, because otherwise the spacer will have to be rearranged with the other side.
On the other side of the car, you need to do exactly the same manipulations, unscrew the shock absorber, install a part to raise the level of the rack and thoroughly tighten all the bolts. Next, we lower the car to the ground, remove it from the jacks, and proceed to adjust the brake pressure, headlights and castor tilt.
VAZ 2110 body weight for scrap metal
I took the car for spare parts, I took off everything I could, I wanted to sell it as metal, but there are no scales to weigh the body. If anyone knows, tell me how much the bare body of a VAZ 2110 weighs (without doors, trunk lid, hood, rear and front beams, A-pillars, and fenders) in advance thanks a lot!
Comments 16
330 kg turned out
I also sold it without a roof for 2k, with the price of metal being 6.5r/kg
everywhere? Some of us also have 5. There are also 7, but there the scales are twisted too much))
yes, if you take the current to the city
at a price of 7-8 rubles per kg they give about 2-2.3 k for a bare body. cut into pieces. This makes it easier to transport and weigh
If the body is alive, they can buy a quarter or anyone who needs anything (left glass, roof, rear part), and this is more expensive than scrap metal
It’s a long time and he’s bothering me...
they seem to cost more in pieces)
from a penny entirely without doors and hood - pulled 330 kg, from 10 I don’t know
They accept bodies, don’t listen to anyone, you’ll just have to look where. I personally went there to hand over the metal - there was a gantry crane and scales on a hook, and workers there cut the bodies with a cutter and loaded them into the wagons right away. In small caricatures this may not be accepted, but in general they may require some kind of paper, a passport 100%. I didn’t hand over the body itself, a friend had been carrying a penny for a long time, he didn’t even ask about the weight.
| Model | Curb weight, kg | Permitted maximum weight, kg |
| VAZ-2101 | 955 | 1355 |
| VAZ-2102 | 1010 | 1440 |
| VAZ-2103 | 955 | 1355 |
| VAZ-2104 | 1020 | 1475 |
| VAZ-2105 | 995 | 1395 |
| VAZ-2106 | 1045 | 1445 |
| VAZ-2107 | 1030 | 1430 |
| VAZ-2108 | 900 | 1325 |
| VAZ-2109 | 945 | 1370 |
| VAZ-21099 | 970 | 1395 |
| VAZ-21011 | 955 | 1355 |
| VAZ-2110 | 1010 | 1485 |
| VAZ-21102 | 1020 | 1495 |
| VAZ-21103 | 1040 | 1515 |
| VAZ-2111 | 1040 | 1540 |
| VAZ-21111 | 1030 | 1530 |
| VAZ-21113 | 1060 | 1560 |
| VAZ-2112 | 1040 | 1515 |
| VAZ-21122 | 1020 | 1495 |
| VAZ-2113 | 975 | 1400 |
| VAZ-2114 | 970 | 1395 |
| VAZ-2115 | 985 | 1410 |
| VAZ-2121 | 1210 | 1610 |
| VAZ-2170 Lada Priora | 1088 | 1578 |
| VAZ-2170 Lada Priora station wagon | 1088 | 1593 |
| VAZ-1118 Lada Kalina | 1070 | 1545 |
The curb weight of a vehicle is the weight of a vehicle with standard equipment, various consumables (oil, coolant, etc.), but minus the weight of passengers, driver and luggage.
Technical characteristics of the “tens”
Initially, the car was equipped with a carburetor engine with 73 horsepower. What do reviews say about this VAZ-2110 engine? The motor did not differ in dynamic characteristics. Acceleration to hundreds took 14 and a half seconds. And the maximum speed barely reached 165 kilometers per hour. The carburetor required constant adjustment. And consumption in the city is about nine liters per hundred. In 2000, the “tens” came with a 1.5-liter injection engine. This unit was one and a half seconds faster than the previous one. In terms of fuel consumption, it is also more economical. A car spends up to eight liters of 92 per hundred in the city. Maximum speed is 170 kilometers per hour.
But the most valued in the lineup are the 1.6-liter engines. They came with both eight- and sixteen-valve timing mechanisms. These engines produced 81 and 90 horsepower, respectively. The “Ten” 1.6 accelerated to hundreds in 12-13.5 seconds. And the maximum speed was 180 kilometers per hour. In terms of fuel consumption, these engines were very economical - reviews say. VAZ-2110 consumed 7.5 liters in the combined cycle.
Let's start with body transformation
The manufacturer did not set out to create an original design. This car is an average urban station wagon from the 90s. The shapes are smooth, the body lines are straight, there are no bulges. Compared to modern models, Lada 111 remains unnoticed.
We begin tuning the VAZ 2111 with our own hands by installing new bumpers. We replace the civilian front bumper with a tuned one. The car accessories market is replete with all kinds of bumpers, stuffed with body kits, stampings and original parts. There are many options specifically for the standard mountings of the VAZ 2111. Installing front protection will instantly transform the frontal projection of the Lada.
Depending on the concept of tuning the Lada 2111, there are 2 main types of bumpers:
The first option is the details with which the appearance of the car becomes dynamic and aggressive. In this case, there are massive bumper shapes, body kits, original stamped transitions and a lowered design.
The classic style implies a solid low bumper without sharp inserts. This bumper has convenient large recesses for fog lights, radiator grille and air intake. An ergonomic location for the license plate seat must also be ensured.
After installing the front protective element, modifications are made to the side skirts and rear bumper. Leaving only the front bumper is unaesthetic, because when looking in profile, differences in ground clearance are visible. You can customize the parts included or combine styles. When installing tuned body elements, do not forget about the quality of Russian roads. Bumpers and skirts that are too low are impractical.
What can be done What to pay attention to If you are going to repaint your Lada 111, do it before installing the bumpers, so that you can then match the protection to the color of the body. You can do the painting process yourself or rely on specialists. When painting a car with your own hands, you need to dismantle the civilian bumpers, and also seal all the windows, headlights and wheels. Additional tuning of the car after painting is the application of vinyl. Choose the design you like at the tuning studio
Then paste the stencil onto the surface of the body area and paint. After painting, we peel off the excess parts, resulting in an original drawing. The finishing touches will help complete the exterior tuning. This is the modernization of rear-view mirrors, installation of deflectors, air intakes on the hood and roof rails of the VAZ 2111. Many may disagree about the last element, because the roof rails of the VAZ 2111 give the car the appearance of a “country” cargo station wagon. A matter of taste.
Materials used
Reviews from friends, online users and personal observations made it clear that it is extremely important what spacers you buy. When we install the first items we come across, bought for pennies, we greatly risk our own health and the health of our car.
Go shopping, go to the same Aliexpress, look carefully at the drawing of the proposed spacers. But the most important thing is the material they are made from.
Today spacers are produced on the basis of three different materials.
- Aluminum. Aluminum spacers are quite reliable. By installing them, you will eliminate the process of deformation of the bushings, and also provide a fairly high level of comfort. Many spacers have a negative impact on the ride comfort and performance of the car. Aluminum, as a rule, affects these characteristics less than others.
- Polyurethane. Polyurethane analogues are deformed due to the impact of springs on them when you often drive on uneven roads. Therefore, over time, the risk of damage to the body by its own bushings increases.
- Polymer or plastic. Plastic products are the most reliable and high quality. But only on condition that you buy spacers from truly proven and well-established manufacturers.
#7 11:39:39
Master From: Cherepovets Auto: two FF2 Registration: Messages: 24813
Thanked 1412 times in 1251 messages
Now I looked through the catalogues. On 2112 they can install springs from 2110, but this is probably only for 8kl.
Negative consequences of increasing clearance
If the vehicle's ground clearance is increased by no more than 5cm, then there should be no negative effects. But a further increase in clearance will be associated with unjustified difficulties. In addition to those points described above, add less stability of the car on the road (drift and large rolls) and greater wear of suspension components and assemblies. What does it mean ?
When the center of gravity rises and the car rolls and sways while driving, it increases
To prevent a rollover, it is important that the vehicle's suspension is adjusted correctly. An example would be a tall Mercedes A class when it capsized in front of journalists during the “moose test”
Then they delayed the release of the car and began to modify the chassis. It all ended with increasing the elasticity of the suspension and replacing the wheels with low-profile ones. You can combat vehicle roll by installing various additional stabilizers.
conclusions
Selecting and installing a spacer for VAZ-2114 shock absorbers to increase ground clearance is quite simple. Even a novice motorist can cope with this task.
It turns out that my husband installed spacers for me secretly :) I thought there were factory ones at the back. Now I'm convinced that this is a revision. It’s clear why my butt is raised so much...
This seems like a joke. If someone is serious about using the 2114 for cargo purposes, it would be better to sell it right away. In a year or two he will simply ruin the car.
Hello, dear friends! Are you bored? Me too. Today we are considering a rather interesting issue - spacers to increase ground clearance.
I know that car owners often try, on the contrary, to lower the car, to make it as low as possible. But you yourself understand who is doing this. Especially when it comes to cars such as VAZ 2109, 2110, etc.
Shock absorber modification
When transporting large loads (and often VAZ 2110 owners do not listen too much to recommendations regarding load capacity), the car seriously “sits down” and its ground clearance is significantly reduced.
If you have to constantly carry heavy things, it makes sense to install springs with class “A”. Naturally, they will make the shock absorbers stiff, and you will only be comfortable in a heavily loaded car, and without a load it will shake like on a cart.
There are also s, which are installed between the spring coils and do not allow the shock absorber to compress too much.
Interturn spacers in the shock absorber spring
In principle, such a car will no longer sag significantly under load, as well as nod off, but the shock absorber stroke will decrease and it will fail faster.
Homemade spacers
Any spacers are structurally simple, so they are not difficult to make. Moreover, this process is quite creative.
Some make them by simply cutting them out of an old tire, others use ebonite, steel, polyurethane and other materials.
Any tools are good for making. At home, a drill, jigsaw, files, etc. may be useful for this.
Those who have the opportunity to use a lathe simply turn them from blanks.
In general, any suitable material can be used for manufacturing, and it can also be processed with different tools and equipment. The only important condition is compliance with the dimensions.
For cutting, you can try to find drawings, and if they are not there, then focus on the dimensions of the components of the suspension (for example, a spacer for a spring is made based on the diameter of the spring itself and its seat).
In general, if you want to make spacers at home, it is quite possible.
Budget options for increasing ground clearance
First option. The easiest option to increase ground clearance by a few millimeters is to replace the standard wheels and tires with tires and wheels of larger diameter. This is perhaps the simplest and most “gentle” method, since in this case you practically do not change the design of the car’s chassis. When increasing ground clearance in this way, it is necessary to take into account the permissible parameters recommended by the car manufacturer; you can find them in the operating manual or from the dealer, or on the manufacturer’s website.
Pros:
- Increased ground clearance;
- Slight increase in lumen;
- Minimum costs.
- Increased fuel consumption;
- Violation of the accuracy of speedometer readings;
- A dirty body due to larger diameter tires, wheels touching the arches when turning for the same reason.
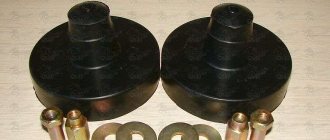
The second relatively inexpensive option is to install special spacers between the springs and the car body. When choosing this method of increasing ground clearance, you need to understand that such modification of the chassis is already considered an intervention in the design of the chassis, that is, you are deliberately changing and violating the factory parameters of your car. How the suspension will behave after such tuning and how this will change the safety of your car is anyone’s guess.
If this does not scare you, you need to choose the appropriate spacer option, since there are several types of them. Spacers can be made of plastic, aluminum, or polyurethane. The main difference between each of these spacers is their service life. Thus, aluminum spacers are the most durable; they will last many times longer than their plastic or polyurethane counterparts. When purchasing, you need to specify where exactly you are going to install the spacers, as well as the type of suspension of your car. There are spacers that are installed between the spring of the shock absorber strut and the body cup, as well as so-called intercoil spacers, that is, those that are placed between the coils of the springs. Different materials are used to make such spacers. In addition to increasing ground clearance, these spacers allow you to stiffen the suspension, thereby avoiding some of the disadvantages that arise after installing conventional spacers. The fact is that interturn spacers reduce car roll when cornering.
Pros:
- Increased ground clearance;
- In case of heavy load, the rear of the machine does not sag.
- Vibration and loads on the body and suspension;
- The suspension angles change, as well as the car's handling;
- The shock absorber stroke increases.
The third option to increase ground clearance is to replace the standard shock absorber springs with springs with a larger number of turns. This method is more expensive than the previous two, since it involves the purchase of reinforced springs with a large number of turns and shock absorbers for them.
Pros:
- Long service life;
- Uniform increase in ground clearance and no subsidence compared to the effect of spacers.
Adjustment work
Once again, it is worth saying that if you are an inexperienced person, then it is better to find a familiar specialist who would help carry out everything planned, from installing the described part to calibrating all the values, or take the car to a service station.
If you understand the structure of your car, then you need to start by adjusting the position of the pressure regulator. To install it correctly, you need to apply a force of 45-50 kgf to the rear of the machine. After this, you need to unscrew the bolt that holds the pressure regulator and move the drive bracket using a screwdriver until the gap between the spring and the lever is about 2 millimeters. You can check the remaining gap by simply placing a piece of wire with a diameter of 2 millimeters into it or taking a similar drill.
Now you can start setting the desired light level. To do this, you need to place the car on a flat horizontal surface at a distance of 5 meters from any light wall, let it be the wall of a house or garage, it doesn’t matter. It is better to do this “trick” together, at the same time the tire pressure is checked and the companion sits in the driver’s seat. Now a horizontal line is drawn on the wall at a height of 60 cm from the floor and split in half in the center of the car. Now, from the center of the horizontal line, measure the distance of the car headlights and draw perpendicular vertical lines. There should be a beam of light at the intersection of the horizon and vertical lines.
Communities › VAZ.EE › Blog › VAZ 2115- Front pillar spacer
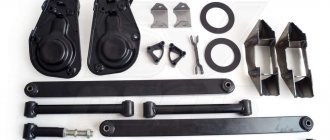
All the best. After my post about lifting the car, I received a lot of questions, how? What? Where? etc. As a result, today I decided to tell you how it was done. The spacer is placed between the front strut support and the engine body. Depending on the make of the car, spacers have different shapes. In any case, the spacer on top follows the shape of the A-pillar support.
This photo shows SS20 spacers, 12 mm thick, which often come complete with supports. Such spacers can be made from different materials, but each material has its own disadvantages. Plastic ones are considered the safest for a car; it is assumed that they do not cause negative consequences. Polyurethane ones have a tendency to deform the body. Metal ones can speed up the corrosion process at the joints with the body, but this effect can be virtually neutralized by simply painting (and protecting with varnish) the spacers before installing them. If you have the appropriate tool or friends at the factory with a milling machine, then you can make such spacers yourself, of the thickness you need. I bought silumin spacers on the market:
To install the spacers we will need to remove the struts. There is no need to disassemble the strut, just remove it along with the hub. It seemed to me that this was the simplest option, which also did not affect the alignment. (You still need to do the wheel alignment, because it will eat more rubber, but getting to the service center is still safer). In order to do this, we need to unscrew 4 bolts and unscrew 4 nuts (not counting the removal of the wheel).
First of all, I would recommend looking at the ball mounting bolts; for most domestic cars, this is a 10mm bolt with a 17mm head. If so, then you are lucky and you should not experience problems with them. However, in recent years, our cars have begun to use foreign standards and you can see a smaller bolt head - an asterisk. A 10mm head fits perfectly on it, but most likely you won’t be able to unscrew it; you’ll tear off the corners. Therefore, you should think about purchasing a head for such bolts in advance. Also, you should take care of the steering rod puller in advance, especially if the car is not very new. My car is 3 years old and without a puller it was already difficult. The puller usually looks like a clamp, one of the pads of which has a cutout (looks like a two-pronged fork):
READ How to Install a Cake Fountain
Source
Raising the rear of the machine
Installation of spacers and high springs in the rear suspension of a car is carried out in the same way as in the front. Even the set of tools remains unchanged, and a puller for pressing out ball pins is not needed at all. The difference lies in the order of disassembling the chassis:
- Remove the trunk trim or rear seat backrest to access the upper strut mounts.
- Release the upper strut support by unscrewing the nut on the stem. The latter must be held with a second key so that the shock absorber does not rotate.
- Raise the car with a jack and remove the rear wheel, then lower the body onto the block. Place the jack under the hub and lift it.
- Unscrew the lower strut support and knock out the bolts if they cannot be removed manually. Remove the assembled unit from the glass, disassemble it and replace the standard spacers with a spring with reinforced ones.
The rear pillar mount is hidden under the trim
The rear multi-link suspension is disassembled using the same algorithm as the front one: first, the lower shock absorber mount is unscrewed, then the lower arm is released, the spring is tightened and removed from the socket along with the extensions. When assembling, be sure to install extensions for the shock absorbers so that the rod has enough travel on an elevated body.
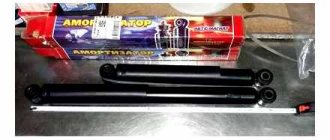
Spacer for extending rear shock absorber
Shock absorber modification
When transporting large loads (and often VAZ 2110 owners do not listen too much to recommendations regarding load capacity), the car seriously “sits down” and its ground clearance is significantly reduced.
If you have to constantly carry heavy things, it makes sense to install springs with class “A”. Naturally, they will make the shock absorbers stiff, and you will only be comfortable in a heavily loaded car, and without a load it will shake like on a cart.
There are also s, which are installed between the spring coils and do not allow the shock absorber to compress too much.
In principle, such a car will no longer sag significantly under load, as well as nod off, but the shock absorber stroke will decrease and it will fail faster.
Suspension adjustment after installation
This completes the installation of spacers on your VAZ 2110. Having returned the car to its normal position, you need to make a number of important adjustments. We are talking primarily about the pressure regulator for the rear brakes, headlights and front wheels.
In the case of the latter, we are interested in their longitudinal inclination angle, otherwise called castor. After installing the spacer on the rear pillars, the rear of your VAZ 2110 will naturally rise, and the castor, on the contrary, will decrease. This will negatively affect the vehicle's stability in motion and its overall handling. Obviously, these parameters are critical for your safety, so it is better to entrust castor adjustment to certified auto mechanics from a car service center.
The first two settings of the VAZ 2110 can be done independently.
Having picked up a speed of about 35 km/h in the car, we sharply brake. At this time, the assistant should observe how soon the rear wheels will lock. Normally, it lags somewhat behind the locking of the front wheel pair. If this does not happen, then return to point 16 of the plan discussed above and change the size of the gap upward.
Salon
Inside, the car looks just as boring and ascetic. There is a simple two-spoke steering wheel without an airbag, as well as a primitive instrument panel with a pair of arrow indicators.
On the sides of the visor there are large buttons, in which “hellish” backlashes appear over time. There were also gaps on the center console. By modern standards, it does not boast a range of options. But there is everything you need here - a clock, a stove and a shelf for a radio (it was not installed from the factory). A 12-volt cigarette lighter with backlight was provided at the bottom. The seats in the “ten” are fabric, with minimal lateral support. As reviews note, the seats in the “ten” are quite hard, but you can drive for short distances. The rear row of seats is designed for three people.
But in fact, only two fit here. It will be very crowded here for three people. Depending on the configuration, the machine could be equipped with:
- Air conditioning.
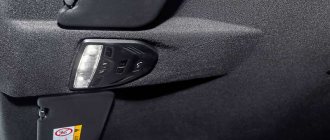
- Electric windows.
- Central lock.
Ground clearance of VAZ 2110, increase in ground clearance of Lada 2110
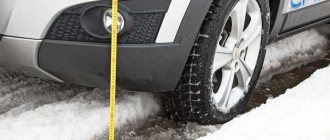
The ground clearance of the VAZ 2110, or ground clearance, as for any other passenger car, is an important factor on our roads. It is the condition of the road surface or its complete absence that makes Russian motorists interested in the ground clearance of the Lada 2110 and the possibility of increasing the ground clearance using spacers. To begin with, it is worth honestly saying that the real ground clearance of the VAZ 2110 may differ significantly from that declared by the manufacturer. The whole secret is in the method of measuring and where to measure ground clearance. Therefore, you can find out the real state of affairs only by arming yourself with a tape measure or ruler. The official ground clearance of the VAZ 2110 is 160 mm when the car is loaded. In an empty car, you can easily measure 180 mm of clearance.
Some manufacturers use a trick and declare the amount of ground clearance in an “empty” car, but in real life we have a trunk full of all kinds of things, passengers and a driver. That is, in a loaded car the ground clearance will be completely different. Avtovaz is honest in this regard. Another factor that few people take into account is the age of the car and the wear and tear of the springs—their “sagging” due to age. The issue can be solved by installing new springs or purchasing spacers for the sagging springs of the VAZ 2110. Spacers allow you to compensate for the sagging of the springs and will add a couple of centimeters of ground clearance. Sometimes even an inch of curb parking makes a difference.
But you shouldn’t get carried away with “lifting” the ground clearance of the VAZ 2110, because spacers to increase ground clearance are focused only on springs
If you do not pay attention to the shock absorbers, the travel of which is often very limited, then independently upgrading the suspension can lead to loss of controllability and damage to the shock absorbers. From the point of view of cross-country ability, high ground clearance in our harsh conditions is good, however, at high speeds on the highway and in corners, serious sway and additional body roll appear
At the rear of the “ten”, so-called “houses” are traditionally used to increase ground clearance. Which simply lift the entire rack assembly. This method is suitable for almost all front-wheel drive Ladas. For an example, we suggest watching the video.
Any car manufacturer, when designing the suspension and choosing the ground clearance, looks for a middle ground between handling and cross-country ability. Perhaps the simplest, safest and most unpretentious way to increase clearance is to install wheels with “high” tires. Changing wheels makes it easy to increase the ground clearance by another centimeter. Do not forget that a serious change in ground clearance can lead to damage to the CV joints of the Lada 2110. After all, the “grenades” will have to work at a slightly different angle. But this only applies to the front axle.
myautoblog.net
Suspension adjustment after installation
This completes the installation of spacers on your VAZ 2110. Having returned the car to its normal position, you need to make a number of important adjustments. We are talking primarily about the pressure regulator for the rear brakes, headlights and front wheels.
In the case of the latter, we are interested in their longitudinal inclination angle, otherwise called castor. After installing the spacer on the rear pillars, the rear of your VAZ 2110 will naturally rise, and the castor, on the contrary, will decrease. This will negatively affect the vehicle's stability in motion and its overall handling. Obviously, these parameters are critical for your safety, so it is better to entrust castor adjustment to certified auto mechanics from a car service center.
The first two settings of the VAZ 2110 can be done independently.
Having picked up a speed of about 35 km/h in the car, we sharply brake. At this time, the assistant should observe how soon the rear wheels will lock. Normally, it lags somewhat behind the locking of the front wheel pair. If this does not happen, then return to point 16 of the plan discussed above and change the size of the gap upward.
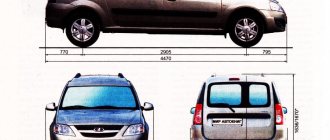
Parameters of Priora bodies
In any Priora body, the characteristics of its wheels and wheelbases will be the same, and therefore it makes no sense to indicate them separately everywhere. These are the parameters:
Meaning
These dimensions are valid for all bodies except the coupe. Hatchback parameters:
- The distance from the rear to the front point of the car is 4210 mm.
- The front overhang of the car is 770 mm.
- The rear overhang of the car is 660 mm.
Station wagon and sedan parameters:
- The distance from the rear to the front point of the machine is 4350 mm.
- The front overhang of the car is 740 mm.
- The rear overhang of the car is 830 mm.
- The distance from the rear to the front suspension of the car is 440 mm.
- The wheelbase of the car is 2492 mm.
Overhangs for cars of sportier variants are not specified by the manufacturer. Considering that the Priora's ground clearance is 165 mm, we can choose the best body type that allows us to use ground clearance more successfully than others. Having analyzed all the available characteristics, we will definitely come to the conclusion that the hatchback option is much better than all the others.
Dimensions of Lada Priora
The fairly large wheelbase of the body, despite its small length, allows us to call the car a cross-country vehicle.
However, it is necessary to remind Priora owners that, even if you own a hatchback, you need to be very careful when parking next to high curbs. This warning is especially relevant when your machine is fully loaded
But if the Priora hatchback can, with a stretch, be called the conqueror of forest roads and mountain peaks, then the coupe body cannot receive such a title. Such a car has too long a distance between the front and rear wheels and a very large front overhang. Whatever one may say, it will be difficult to drive along rural country roads. This car design is only good for asphalt surfaces.
However, even they will need to be driven very carefully where there are large potholes and there is a need to overcome artificial unevenness. But since there are no unnecessary or protruding parts from under the transmission on the Priora, you can confidently count on the quality of the available ground clearance.
Despite the absence of parts sticking out from under the bottom of the Priora, you can greatly reduce the ground clearance if you put a lot of people in the car and load the trunk with things. Reducing its length by only 20 mm will be enough for the bottom to touch the surface of the speed bump. It is necessary to force such obstacles with special care in order to eliminate the possibility of breakdowns in time.
Universal intercoil spring spacer for rear and front suspension (2 pcs.) auto buffer
Dear customers, in order to avoid errors when sending a set of round, interturn spacers 2101-2912600U (universal) for the rear and front suspension (autobuffers), in the “Comment” line indicate the model of your car, year of manufacture, for which spring (standard, with variable step, barrel-shaped).
Spring spacers (Autobuffers) are shock-absorbing pads (shock-absorbing inserts) installed in the spring to improve the performance of the car. In a nutshell, changes in the driving performance of a car after installing autobuffers can be described as the effect of air suspension. The high sides of the grooves firmly hold the autobuffer in the spring and do not allow it to jump out.
Spring spacers 2101-2912600U are interturn, universal for rear and front suspension, have the simplest design and are very easy to install. They can be used on rear and front suspension springs. The use of interturn spacers makes it possible not to change the vehicle's ground clearance, while increasing the stiffness of the springs. As a result, the springs can carry a greater load without sagging to unacceptable limits.
The design of spacers 2101-2912600U for rear and front suspensions can be quickly installed without the use of special tools. To install the interturn spacer, it is enough to jack up the wheel and spread the spring as far as possible. The part can be mounted using a regular screwdriver. To make the spacer easier to insert, it must first be moistened in soapy water.
Do not use oil during installation, because spring spacers 2101-2912600U interturn, universal rear and front suspension (autobuffer) will slide along the turns.
Before installation you will need: rags and water to clean the spring, as well as liquid soap or silicone grease to facilitate installation of the autobuffer if it is tight in the spring.
Problems that most motorists face:
— rolls, nods, longitudinal and transverse rocking;
— insufficient ground clearance (the bumper touches, the bottom widens, the wheels rub against the arches);
— instability of the car at speed (swaying, throwing the rear);
— bumps and knocks when driving over uneven surfaces (potholes, asphalt joints, rails, speed bumps, dirt roads, country roads, country roads);
— car sagging (many passengers or heavy load);
— structural rigidity of the car;
— structural softness of the car;
— low car comfort (“stool”, “tin can”, motion sickness);
— rigidity when driving on low-profile tires or reinforced springs;
— damage to the car’s suspension from driving on bad roads (springs, struts, shock absorbers, stabilizer struts);
— poor performance of the short-travel suspension.
Spring spacers 2101-2912600U interturn, universal rear and front suspension (atobuffers) dampen sharp shocks of the suspension, breakdowns occur much less frequently. Driving on broken roads is quieter, vibrations are reduced, and road unevenness is smoothed out. When braking sharply, the car “bites” the front less.
Spring spacers 2101-2912600U interturn, universal rear and front suspension (autobuffers):
— protect the suspension from breakdowns: the service life of shock absorbers and other suspension elements is significantly increased;
— an increase in ground clearance up to 2 centimeters without changing the suspension geometry and without threatening the springs and shock absorbers;
— the car’s handling is improved both on a flat road and on sharp turns: the roll and sway of the car are reduced, and the roll is reduced. The car's behavior becomes more collected and stable.
— the problem of car sagging under high load (many passengers or heavy load) is solved;
- reduce fatigue during long trips.
Other article numbers of the product and its analogues in the catalogs: 21010291260000U, 2101-2912600U.
VAZ 1111 / Oka, VAZ 2101, VAZ 2102, VAZ 2103, VAZ 2104, VAZ 2105, VAZ 2106, VAZ 2107, VAZ 2108, VAZ 2109, VAZ 21099, VAZ 2110, VAZ 2111, VAZ 2112, VAZ 2113, VAZ 2114, VAZ 2115, VAZ 1117, VAZ 1118, VAZ 1119, VAZ 2170, VAZ 2190, VAZ 2192, VAZ 2194, Datsun / Datsun on-Do and mi-Do, VAZ 2121, VAZ 21213, VAZ 21214, VAZ 2123 , VAZ 2131, Lada Urban.
Any breakdown is not the end of the world, but a completely solvable problem!
How to independently replace the front suspension spring on a front-wheel drive VAZ car.
With the AvtoAzbuka Internet Store, repair costs will be minimal.
Just COMPARE and BE SURE.
Don’t forget to share the information you find with your friends and acquaintances, as they may also need it - just click one of the social networking buttons below