What is a door switch? - This is a device that is a regular switch. As a rule, it is located at the point of contact between the car door and the body. The main part (button) is on the body, the counter part is on the door. Its main task is to inform various vehicle systems about the closing or opening of a door. Light in the cabin, alarm system, “open doors” lamp on the dashboard - all these components use limit switches in their work.
In this article we will talk about such elements as Lada Vesta door limit switches. There are 6 limit switches installed on Vesta - 4 on the doors, 1 on the hood and 1 on the trunk. The door limit switch on a VAZ is not fundamentally different from the limit switches of other cars, so the diagnostic and replacement principles described in the article can also be applied to any other cars. Any diagnostic and replacement work can be done independently, without contacting a service station.
What is a limit switch and why is it needed in a car?
The term limit switch is nothing more than a common abbreviation for “limit switch”. In it, the contacts are closed without fixation by a movable rod - this is convenient for monitoring the position of moving elements. Limit switches of various types are installed in cars on the doors or in the trunk; they control the position of the brake pedal and handbrake lever.
However, reality diverges from the factory’s conclusions, which forces car owners to independently resolve the issue with Lada Vesta door limit switches. And then they found several ways out of the situation:
- Replacing anthers;
- Dismantling;
- Spring installation;
- Sawing.
Each of these methods has the right to life, as it allows you to normalize the operation of the system.
Replacing anthers
Some go to replace the boot with some kind of analogue. One of the most popular is a product from the Toprun brand, which can be found under article number 104035756. The price of such a limit switch varies from 50 to 100 rubles. We remind you that the original boot is sold under article number 11190-3710206-00.
Analogous to the standard limit switch.
The end cap itself is the same as the standard one, but the boot is made of much more elastic rubber, which guarantees its flexibility in severe frost. Moreover, it is not worth replacing the limit switches directly, if the standard ones are working properly, of course. It is enough just to install other anthers.
The boot is installed instead of the factory one. It is not necessary to change the limit switch itself.
Dismantling
This option captivates many precisely because of its simplicity. It would seem that you just need to remove the factory cuffs and be done with it. But the problem is that this element protects the limit switches themselves from contamination, so you will have to constantly monitor their cleanliness. A compromise option is to dismantle it only during frosty periods.
You can simply remove the boot from the end switch.
Spring installation
This method of solving the problem is tempting because there is no need to waste time searching for an analogue. If you have small springs that are about 12mm in diameter and about 18mm in length, you can use them. To do this you need to place a spring under the boot.
It will prevent the cuff from remaining compressed in the cold.
Spring under the limit switch cuff.
Sawing
Another option for independently modifying the limit switches of the Lada Vesta. If you remove the boot and turn it inside out, you will see a small spike in the center, a couple of millimeters long. It needs to be carefully cut off, then use a file to slightly grind off the boot from the inside - this will make the edge of the cuff thinner. Afterwards, all that remains is to lubricate the treated surface with anti-silicone and put it back.
As you can see, there are enough options, so every car owner will be able to modify the limit switches of his Lada Vesta in the way that he considers optimal.
Electrics, sensors, battery Lada Vesta
Products from the Dustershop77 range on the topic of the article:
| Name | Manufacturer | Price | Availability | Add to cart |
| intro iso ant-1 | Antenna adapter Intro iso ant-1 | INTRO | 500 / 350 rub. Discount: 300 rub. | 1 |
| OBD-BT01 | Bluetooth OBDII - adapter for diagnostics | China | 1500 / 1000 rub. Discount: 700 rub. | >10 |
| DC1711 | Renault Duster engine temperature sensor digital indicator with screen | 1900 / 1700 rub. Discount: 1450 rub. | >10 | |
| multi-vc730 | On-board computer Multitronics vc730 | Multitronics | 8000 / 7300 rub. Discount: 6900 rub. | 1 |
| DC1250 | Set of small fuses (10 pcs) | Analogue | 200 / 150 rub. Discount: 100 rub. | 8 |
| OBD-WF01 | Wi-Fi OBDII ELM327 - adapter for diagnostics | China | 1700 / 1500 rub. Discount: 1300 rub. | >10 |
| DC691-LA6-V003 | Anti-theft protection of the electronic control unit (ECU) for Duster 2015, Largus, Logan 2, Sandero 2, Vesta, Xray, Arkana | 4900 / 3900 rub. Discount: 3400 rub. | 3 | |
| PU-4TC-BLACK | Multitronics PU-4TC parking sensors for on-board computers (sensor color: black) | Multitronics | 4000 / 3800 rub. Discount: 3400 rub. | 2 |
| DC954-8200719629 | Manifold absolute pressure sensor MAP sensor for 2.0 and 1.6 engines - F4R/K4M original 8200719629 | Original | 2500 / 1900 rub. Discount: 1700 rub. | 1 |
| DC1143 | Renault mirror control button (joystick) original 255706283R | Original | 700 / 500 rub. Discount: 450 rub. | 4 |
| DC1949 | Fuel level sensor Duster, Largus, Logan, etc. | ASAM | 1900 / 1300 rub. Discount: 1000 rub. | 1 |
| DC190 | Monitor for rear view camera, foldable | China | 2500 / 2000 rub. Discount: 1700 rub. | 1 |
| DC1728 | Horn from Volga - sound signal (set of 2 tones) | 3000 / 2400 rub. Discount: 1950 rub. | 1 | |
| DC1195 | Fuse set 180pcs in a plastic box | China | 1000 / 800 rub. Discount: 700 rub. | 1 |
| DC990-8200060049 | Seat heating switch original 8200060049 | Original | 800 / 700 rub. Discount: 600 rub. | 5 |
| DC997-255678753R | Steering column switch right analog 255678753R (MODIS) | Analogue | 2800 / 2700 rub. Discount: 2400 rub. | 1 |
| DC1999 | Brushes for VALEO generator | Analogue | 300 / 150 rub. Discount: 100 rub. | 8 |
| DC485-497612479R | Power steering fluid pressure sensor original Renault 497612479R | Original | 2000 / 1600 rub. Discount: 1300 rub. | 1 |
| DC1754-104035756 | Door limit switch Lada Vesta HANS PRIES TOPRAN (1 piece) 104035756 | Analogue | 300 / 200 rub. Discount: 100 rub. | 6 |
| DC1998 | Contact rings for VALEO generator (1 piece) | Analogue | 800 / 600 rub. Discount: 400 rub. | 8 |
| DC1736 | Additional cigarette lighter socket with cover | 800 / 500 rub. Discount: 300 rub. | 1 | |
| DC1750 | Oil change pump via dipstick | 2800 / 2100 rub. Discount: 1800 rub. | 1 | |
| DC1360-7711238598 | Rechargeable battery original Renault 7711238598 | Original | 15000 / 12000 rub. Discount: 10900 rub. | 1 |
| DC1913 | Seat heating connector (4-pin male connector analogue 98822-1045 Molex with wires) | Analogue | 110 / 100 rub. Discount: 80 rub. | 3 |
| DC2034-593546 | Voltage regulator Duster, Terrano, Logan, etc. VALEO 593546 (2 contacts analogue 7701055052) | Analogue | 4300 / 3300 rub. Discount: 2900 rub. | 2 |
| PU-4TC-GRAY | Multitronics PU-4TC parking sensors for on-board computers (sensor color: gray) | Multitronics | 4000 / 3500 rub. Discount: 3200 rub. | 2 |
| DC1027-8201167988 | Left steering column switch with PTF article number 8201167988 / 255400337R | Original | 6000 / 4700 rub. Discount: 4000 rub. | 1 |
| DC1833 | 6.3 series female tip with locking (without wire) | 10 / 7 r. Discount: 5 rub. | 5 | |
| DC1945 | Lubricant for electrical contacts and battery terminals Liqui Moly | Analogue | 600 / 400 rub. Discount: 300 rub. | 2 |
| DC1881 | Headlight connector block H4 with wires Duster, Vesta, Terrano, Logan, etc. universal (1 pc.) | Analogue | 100 / 60 rub. Discount: 50 rub. | 4 |
| DC1950-172024388R | Fuel pump Largus, Logan, etc. (one fitting) 172024388R original | Original | 2500 / 2100 rub. Discount: 1800 rub. | 3 |
| DC1737 | Sound signal 2 tones (Airline kit) | 1600 / 1200 rub. Discount: 900 rub. | 2 | |
| DC1404 | Trunk lid and door lock activator (Asam/MANOVER analogue 7700712901) | Analogue | 1400 / 900 rub. Discount: 700 rub. | 1 |
| DC1520 | Solenoid relay 1.6 H4M analogue 233003999R | Analogue | 1900 / 1600 rub. Discount: 1400 rub. | 1 |
| DC1812-6001547488 | Heater resistor Duster, Logan, Terrano, Sandero, Kaptur, etc. original 6001547488 | Original | 1500 / 1200 rub. Discount: 950 rub. | 1 |
| DC1826-35372201 | Pin fuse 7.5A 35.3722-01 (1 pc.) | Original | 10 / 7 r. Discount: 6 rub. | 7 |
| DC1914 | Seat heating button connector analogue 98172-1003 Molex with wires with wires | Analogue | 250 / 200 rub. Discount: 150 rub. | 2 |
| DC2132-110678071R | Relay control unit for glow plugs K9K Renault original 110678071R | Original | 6500 / 5900 rub. Discount: 5500 rub. | 1 |
| DC2167-172024388R | Fuel pump module assembly Largus, Logan and other analogue 172024388R | Analogue | 6100 / 5600 rub. Discount: 5000 rub. | 2 |
| DC1729 | Pneumatic horn - pneumatic sound signal (set) | 2200 / 1800 rub. Discount: 1500 rub. | 1 | |
| DC1742-723377705 | Windshield wiper relay with pause adjustment with rain sensor (723.3777-05 with rain sensor) | 2300 / 2000 rub. Discount: 1700 rub. | 2 | |
| DC634-601986892R | Speed sensor (plug) for cars with ABS original 601986892R | Original | 1900 / 1300 rub. Discount: 1000 rub. | 2 |
| DC1793 | Ignition coil connector Duster, Terrano, Captur | Original | 600 / 500 rub. Discount: 450 rub. | 7 |
| DC1827-35372202 | Pin fuse 10A 35.3722-02 (1 pc.) | Original | 10 / 7 r. Discount: 5 rub. | 3 |
| DC1828-35372203 | Pin fuse 15A 35.3722-03 (1 pc.) | Original | 10 / 7 r. Discount: 5 rub. | 3 |
| DC1830-35372205 | Pin fuse 25A 35.3722-05 (1 pc.) | Original | 10 / 7 r. Discount: 5 rub. | 3 |
| DC1927 | Connector socket for baseless lamp T10 W5W with wires | Analogue | 120 / 80 rub. Discount: 60 rub. | 3 |
| DC1935-255404709R | Left steering column switch (without front PTF, horn on steering wheel 2015-) original 255404709R | Original | 8500 / 6500 rub. Discount: 4900 rub. | 1 |
| DC1958-793710 | Glove box limit switch 1118,2170,2180 Vesta, Handbrake 2123 - 79.3710 original | Original | 200 / 120 rub. Discount: 100 rub. | 2 |
| DC2002-8200194414 | Windshield washer pump Duster, Logan, Sandero, Largus original 8200194414 | Original | 1700 / 1400 rub. Discount: 1100 rub. | 2 |
| DC2135-8200671275 | Oil pressure sensor Duster and others original 8200671275 | Original | 2500 / 2100 rub. Discount: 1750 rub. | 2 |
| DC1739 | Digital multimeter with dial (tool) | 1000 / 800 rub. Discount: 700 rub. | 1 | |
| DC1773-983747 | Automotive relay 12V 5-pin 98.3747 | 250 / 180 rub. Discount: 120 rub. | 1 | |
| DC996-255675128R | Steering column switch left article number 255675128R | Original | 4700 / 4300 rub. Discount: 3800 rub. | 2 |
| DC2067-7700712901 | Door lock activator (solenoid) Duster, Logan, Terrano, etc. original 7700712901 | Original | 3500 / 2600 rub. Discount: 2200 rub. | 2 |
| DC1665-21800141301000 | Manifold absolute pressure and temperature sensor MAP sensor 1.6l VAZ 21129 original 21800141301000 | Original | 2800 / 2200 rub. Discount: 1900 rub. | 1 |
| DC1816-284375765R | Parking sensor 284375765R original (1 piece) | Original | 2000 / 1400 rub. Discount: 1100 rub. | 2 |
| DC1829-35372204 | Pin fuse 20A 35.3722-04 (1 pc.) | Original | 10 / 7 r. Discount: 5 rub. | 4 |
| DC1841 | Ring lug 8.2mm (without wire for crimping) | 10 / 7 r. Discount: 5 rub. | 4 | |
| DC1867 | Seat back heater connection connector for Largus, Vesta, X-Ray | Analogue | 100 / 60 rub. Discount: 45 rub. | 1 |
| DC1900 | Seat heating connector Vesta, Largus, X-Ray, etc. Renault, Lada, Nissan | Analogue | 250 / 200 rub. Discount: 150 rub. | 6 |
| DC1919 | Door limit switch Lada Vesta, VAZ 2190, 1118, 2123 original | Original | 150 / 80 rub. Discount: 60 rub. | 4 |
| DC1933 | Flat fuse holder with cover and wire from 1 to 30A | Analogue | 190 / 120 rub. Discount: 90 rub. | 2 |
| DC1944 | Quick-detachable negative battery terminal with clamp (1 pc.) | Analogue | 700 / 500 rub. Discount: 350 rub. | 2 |
| DC1946 | Lubricant protection of terminals and contacts 210 ml LAVR aerosol in a bottle | Analogue | 600 / 400 rub. Discount: 300 rub. | 2 |
| DC1947 | Electrical contact cleaner aerosol 0.2L | Analogue | 500 / 300 rub. Discount: 200 rub. | 2 |
| DC2100-251451432R | ESP switch off button Duster, X-Ray, Renault, Lada 251451432R original | Original | 2500 / 1900 rub. Discount: 1500 rub. | 2 |
| DC2118-7700844253 | Yellow fan relay, fuel pump Duster, Logan, Sandero, Terrano, etc. original 7700844253 20240077 | Original | 1300 / 1000 rub. Discount: 800 rub. | 1 |
| DC2122-8200351489 | Relay gray 5 contacts 35A Renault original 8200351489 | Original | 900 / 600 rub. Discount: 400 rub. | 1 |
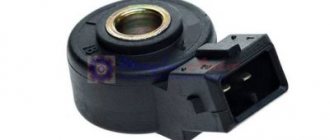
| DC2136-8200680689 | Knock sensor Duster and others original 8200680689 | Original | 3000 / 2200 rub. Discount: 1800 rub. | 1 |
| DC2139-8200177718 | Reversing sensor Duster, etc. (3 contacts, rectangular connector) original 8200177718 | Original | 2000 / 1700 rub. Discount: 1500 rub. | 1 |
| DC2434-ZD172289 | Heater fan for cars with air conditioning. Sontian ZD172289 analog N109986D | Analogue | 5800 / 4500 rub. Discount: 4500 rub. | 1 |
| DC2124-7701418358 | Antenna adapter JASO - ISO original Renault 7701418358 | Original | 400 / 250 rub. Discount: 200 rub. | 2 |
| DC1743-75377710 | Automotive relay 12V additional 75.3777-10 | 250 / 150 rub. Discount: 100 rub. | 2 | |
| DC623-8200547283 | Speed sensor original Renault 8200547283 / 6001548870 (without ABS) | Original | 1600 / 1100 rub. Discount: 900 rub. | 1 |
| DC2181-7701044743 | Throttle position sensor 7701044743 (original AvtoVAZ) | Original | 1600 / 1200 rub. Discount: 800 rub. | 1 |
| DC2219-407009322R | Tire pressure sensor Renault 407009322R original | Original | 2200 / 1900 rub. Discount: 1500 rub. | 4 |
| DC2033-8200671272 | Oil pressure sensor Duster, Terrano, Captur F4R, K9K, etc. original 8200671272 | Original | 2200 / 1800 rub. Discount: 1300 rub. | 1 |
| DC1825-353722 | Pin fuse 5A 35.3722 (1 pc.) | Original | 10 / 7 r. Discount: 5 rub. | 5 |
| DC1831-35372206 | Pin fuse 30A 35.3722-06 (1 pc.) | Original | 10 / 7 r. Discount: 5 rub. | 5 |
| DC1832 | 6.3 socket series tip with fixation (crimped with wire) | 15 / 10 rub. Discount: 8 rub. | >10 | |
| DC1844 | Pin lug series 6.3 with fixation (without wire for crimping) | 20 / 10 rub. Discount: 6 rub. | >10 | |
| DC1842 | Ring tip 8.2mm (with wire) | 45 / 30 rub. Discount: 20 rub. | 3 | |
| DC1843 | Pin lug series 6.3 with fixation (crimped with wire) | 45 / 30 rub. Discount: 15 rub. | >10 | |
| DC1847 | Split corrugation for cable with a diameter of 6.8 mm (corrugated tube with a cut) price per 1 meter | 50 / 30 rub. Discount: 25 rub. | >10 | |
| DC1848 | Split corrugation for cable with a diameter of 11.5 mm (corrugated tube with a cut) price per 1 meter | 50 / 30 rub. Discount: 25 rub. | >10 | |
| DC1850 | Corrugation for cable, cut with a diameter of 9.4-9.8 mm (corrugated tube with a cut) price per 1 meter | 50 / 30 rub. Discount: 25 rub. | >10 | |
| DC1892 | Connector for crankshaft sensor Vesta, compressor, turn signals Renault, Lada, Nissan | Analogue | 100 / 70 rub. Discount: 50 rub. | 2 |
| DC1907-12010996 | Connector for retractor relay Vesta 12010996 | Analogue | 110 / 80 rub. Discount: 70 rub. | 1 |
| DC1915 | Fuse holder connector with wires | Analogue | 110 / 80 rub. Discount: 60 rub. | 2 |
| DC1916 | 5-pin relay connection block with wires | Analogue | 110 / 80 rub. Discount: 60 rub. | 2 |
| DC1917 | Automotive wire PVAM 1.0 sq. mm, 5 m. | Analogue | 190 / 130 rub. Discount: 100 rub. | 1 |
| DC1918 | Connector for lambda probe, oxygen sensor, fuel pump | Analogue | 300 / 240 rub. Discount: 200 rub. | 1 |
| DC1943 | Quick-detachable positive battery terminal with clamp (1 pc.) | Analogue | 900 / 700 rub. Discount: 550 rub. | 1 |
| DC1959 | Cigarette lighter connector Largus, etc. | Analogue | 300 / 200 rub. Discount: 150 rub. | 1 |
| DC1960 | Tray for the battery (mat tray for the battery) Largus, Vesta, etc. | Original | 300 / 200 rub. Discount: 150 rub. | 1 |
| DC2034-0272220736 | Voltage regulator Duster, Terrano, Logan, etc. BOSCH 0272220736 | Original | 3100 / 2300 rub. Discount: 1900 rub. | 1 |
| DC2119-7700414484 | Relay black 5 pin 20A Renault original 7700414484 | Original | 900 / 600 rub. Discount: 500 rub. | 1 |
| DC2120-8200766093 | Relay blue 5 pin Renault original 8200766093 | Original | 900 / 600 rub. Discount: 400 rub. | 1 |
| DC2121-8200263342 | Brown relay 4 contacts 20A PTF, washer, etc. Renault original 8200263342 | Original | 900 / 600 rub. Discount: 400 rub. | 1 |
| DC2123-7700639864 | Turn signal relay Renault original 7700639864 | Original | 3000 / 2500 rub. Discount: 2200 rub. | 1 |
| DC2125-8200263345 | Relay brown 4 contacts 20A Renault original 8200263345 | Original | 1200 / 900 rub. Discount: 800 rub. | 1 |
| DC2126-8200766081 | Relay blue 4 pin 35A Renault original 8200766081 | Original | 700 / 400 rub. Discount: 250 rub. | 1 |
| DC2128-8200308271 | Relay pink 4 pin 40A Renault original 8200308271 | Original | 800 / 500 rub. Discount: 350 rub. | 1 |
| DC2129-7700844253 | Relay yellow 5 pin 40A Renault original 7700844253 | Original | 1500 / 1000 rub. Discount: 800 rub. | 1 |
| DC2130-8200351488 | Relay blue 4 pin 70A Renault original 8200351488 | Original | 600 / 400 rub. Discount: 250 rub. | 1 |
| DC2131-8200859243 | Relay control unit for glow plugs K9K Renault original 8200859243 | Original | 7000 / 6300 rub. Discount: 5900 rub. | 1 |
| DC2133-8201279378 | Side impact sensor for Duster airbags, etc. original 8201279378 | Original | 1100 / 800 rub. Discount: 600 rub. | 1 |
| DC2134-497610324R | Power steering pressure sensor Duster and others original 497610324R | Original | 1400 / 1100 rub. Discount: 800 rub. | 1 |
| DC2137-7700422630 | Reverse sensor Duster, etc. (2 contacts, oval connector) original 7700422630 | Original | 1500 / 1200 rub. Discount: 1000 rub. | 1 |
| DC2138-8200209496 | Reversing sensor Duster, etc. (2 contacts, rectangular connector) original 8200209496 | Original | 1400 / 1100 rub. Discount: 800 rub. | 1 |
| DC2221-438285 | Starter Vesta, Largus, X-ray, Granta, etc. VAZ-2190,1117,1118,1119,2170 (manual transmission with cable drive) VALEO 438285 | Analogue | 5200 / 4900 rub. Discount: 4500 rub. | 1 |
| DC2253-7700427640 | Door limit switch (switch) analogue 7700427640 AVTOGRAD | Analogue | 600 / 400 rub. Discount: 300 rub. | 7 |
| intro iso fr-12 | Adapter for connecting a radio | INTRO | 500 / 450 rub. Discount: 400 rub. | 0 |
| multi-vc731 | On-board computer Multitronics vc731 | Multitronics | 9500 / 8700 rub. Discount: 8400 rub. | 0 |
| multi-c590 | On-board computer Multitronics C590 | Multitronics | 7500 / 6900 rub. Discount: 6600 rub. | 0 |
| multi-cl590 | On-board computer Multitronics CL590 (without voice synthesizer) | Multitronics | 7000 / 6300 rub. Discount: 5900 rub. | 0 |
| DC689 | Anti-theft protection with lock for OBD2 connector | 5000 / 4000 rub. Discount: 3500 rub. | 0 | |
| DC1134-7700427640 | Door limit switch (switch) original 7700427640 | Original | 800 / 500 rub. Discount: 400 rub. | 0 |
| INTRO-PT-04 | Parking sensors with rear view camera included (black) | INTRO | 5200 Discount: 5200 rub. | 0 |
| Incar-VDR | Rear view mirror with DVR and monitor | INTRO | 25000 / 19900 rub. Discount: 19,000 rub. | 0 |
| INTRO-PT-05 | Parking sensors with rear view camera included (gray) | INTRO | 5200 Discount: 5200 rub. | 0 |
| VR-518 | DVR VR-518 | INTRO | 3600 Discount: 3600 rub. | 0 |
| DC129 | Rear view mirror with DVR and rear view camera included | China | 8500 Discount: 8500 rub. | 0 |
| DC1775-VDC118 | Rear view camera SWAT VDC-118 / in standard place LADA Vesta, X-Ray, Kalina | 3000 / 2700 rub. Discount: 2500 rub. | 0 | |
| DC1821 | Adapter for steering wheel and joystick buttons for Lada/Renault and radios with built-in steering interface | 2300 / 1800 rub. Discount: 1400 rub. | 0 | |
| DC2127-8200841587 | Relay blue 4 pin 40A Renault original 8200841587 | Original | 1300 / 900 rub. Discount: 700 rub. | 0 |
| DC653 | On-board computer Ancel (Ankel) | China | 3800 / 3200 rub. Discount: 2700 rub. | 0 |
| DC642 | 2.4G Wireless RCA Video Transmitter-Receiver (Camera to Monitor Kit) | China | 1700 / 1300 rub. Discount: 1000 rub. | 0 |
| VCO-2-02 | Headrest with monitor for Renault Duster (black) | China | 8800 Discount: 8800 rub. | 0 |
| VCO-1-02 | DVR VICO-TF2 PREMIUM for Renault Duster | VICO | 5900 Discount: 5900 rub. | 0 |
| VCO-1-01 | DVR VICO-SF2 for Renault Duster | VICO | 4700 Discount: 4700 rub. | 0 |
| VCO-1-03 | DVR VICO-TF2+ PREMIUM for Renault Duster | VICO | 6700 Discount: 6700 rub. | 0 |
| VCO-1-04 | DVR VICO-WF1 for Renault Duster | VICO | 8000 Discount: 8000 rub. | 0 |
| VCO-2-01 | Headrest with monitor for Renault Duster (gray) | China | 7800 Discount: 7800 rub. | 0 |
Connection rules
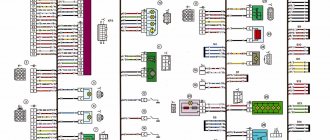
Despite the fairly simple design of limit switches, they are used in electrical equipment where there are complex electrical circuits. As a result, they must be connected by specialists who know how to work with circuit diagrams for connecting limit switches. The sensor is connected with two wires, red and black. The first is under voltage, the second is without it. They are installed in the circuit as indicated in the diagram.
When the device is triggered, a click is created. The indicator type of switch is connected in the same way as a regular mechanical one. There is also a third green wire. The LED will indicate that the switch has tripped with a click.
You might be interested in what a capacitor looks like in the diagram
Note! Operation failure may occur due to dust and sunlight. If the optical pair works, the light-emitting diode turns on.
Equipment connection specifics
AvtoVAZ's response
Despite the fact that complaints about the operation of the limit switches are far from isolated, the Russian automaker is in no hurry to admit the design defect. According to the official response to such a request, AvtoVAZ representatives indicated that at a temperature of -30 °C, the plant engineers did not observe any interruptions, and only at -40 °C was there a slight delay before turning on the lights in the cabin.
AvtoVAZ employees do not admit there is a problem.
Wiring check
Instructions for cars of the B0 assembly line (XRAY, Largus, Nissan Almera, Renault Duster, Sandero). Remove the limit switch and set the multimeter to voltmeter mode. We measure the voltage at the contacts of the block with the wires:
- If there is no voltage, the circuit of the interior lamp lamp or the lamp itself is faulty.
- if the voltage is significantly less than 12 V, the wire connecting the sensor to ground is probably damaged.
We set the multimeter to ohmmeter mode, connect one probe to ground (body), and the other to the terminal of the block with the black wire. The resistance should be close to zero. If the resistance is high and tends to infinity, the connection between the wire and the body is probably damaged by corrosion or the wire is damaged (treat the connection with a product to protect electrical contacts). If the fault cannot be resolved in this way, it is necessary to remove the interior trim from the pillar, find and fix the fault.
Replacement
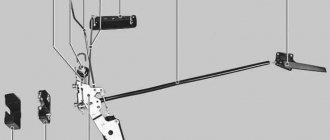
To remove the limit switches, open the doors, then:
- remove the protective cover from the sensor by simply pulling it towards you.
- pry off the limit switch with a screwdriver
- remove the limit switches by snapping off the three latches
- disconnect the block with wires.
On some Lada models (for example, Lada Priora or Niva 4x4), the limit switches are attached to the body with a screw.
On the Lada XRAY the limit switch is located in the door lock and changes along with the lock.
Installation is carried out in reverse order.
Algorithm of actions
The passenger card panel is covered with material. Usually it is removed only if you want to refresh the interior trim, but the panel itself is dismantled when replacing pistons or clips, repairing electrical wiring, changing a lock or handle. Instructions for disassembling the right or left door:
- Remove the plugs by lifting them with a wrench or a screwdriver.
- Unscrew the screws, remove the cover and handle.
- Unscrew the fasteners and unclip the clips.
- Pull the structure out of the internal niche.
- Disconnect the wires and remove the speakers.
- Remove the panel to which the trim is attached.
Now you have access to the door niche. You can carry out any repair work, including removing the facing material and installing a new one.
Typical breakdowns and their symptoms
If the door lock does not work on the Ford Fusion, then it is necessary to establish the cause of the malfunction. Basic moments:
- Dust, dirt or the element has not been lubricated for a long time.
- Oxidation and freezing occurred due to moisture ingress and concentrate ingress. An electrical leak may occur, or it may be caused by washing, precipitation, or sudden cold snap.
- Incorrect adjustment was made. High installation or too small stroke of this part.
- False alarm when dust or water gets into the gap between the contacts.
- Corrosion. Regular lubrication of the internal niche with an anti-corrosion agent will help prevent damage.
Checking the door switch
When the rod is recessed, the contacts are open. First of all, we check the serviceability of the sensors by opening all the car doors one by one.
Check with a multimeter. We connect a multimeter to the limit switch terminals in ohmmeter mode and check the closure of the sensor contacts (the contacts must be closed, the resistance is close to zero). We press the sensor rod and check the measurements (the contacts must be open - the resistance tends to infinity).
Let us remind you that in some cases (for example, in the cold season) limit switches may work intermittently. For Lada Vesta, Grant and Kalina 2 you can use this solution, and for Priora this.
Keywords: lada xray doors | Lada Vesta doors | Lada Largus doors | Lada Granta doors | Lada Kalina doors | Lada Priora doors | doors 4x4 | interior lighting lada xray | interior lighting for Lada Vesta | interior lighting for Lada Largus | interior lighting for Lada Granta | interior lighting for Lada Kalina | interior lighting for Lada Priora | 4x4 interior lighting | universal article
Found an error? Select it and press Ctrl+Enter..
- Lada Granta Cross sedan, what it could be
- Reviews of air conditioning and climate control Lada Vesta and XRAY
- Why does Lada Vesta CNG stall while driving?
- We expand the functionality of the standard Lada Vesta MMS using software
Limit switches. Types and device. Operation and Application
To limit the movement of various units and mechanisms, limit switches are used. Electricians can also call them limit switches or terminals. These devices are subject to requirements for their reliability, durability and safety during operation.
Types, device and application
There are many different types of limit switches, divided by operating principle and features. Each type may include additional types. This depends on where the device is used. Let's take a closer look at the features of each type.
Mechanical
This type of limit switch is popular in production, as well as in domestic use. Switches come in the form of a button, roller, float, or lever type. A good example of the use of terminals is a house elevator. Its design contains many limit switches: in the form of a sensor for the minimum and maximum height of movement of the elevator, a signal to open doors, a rope break sensor and many others.
In an apartment, many home craftsmen install limit switches in the form of microswitches on the door so that when it opens, the lighting in the room turns on.
Push-button or wheel switch
Includes a housing containing electrical contacts, which can be either normally open or closed. A button or roller is installed behind the body. It depends on the way it functions.
Often, on the housings of limit switches there is a connection diagram with contact numbers. Let's look at the principle of operation of a limit switch using the example of a device equipped with a roller.
The moving mechanism collides with a wheel, which pushes the rod down. As a result, the contacts open, thereby de-energizing the electrical network that was connected to them. We can say that the end stops the mechanism from moving further, or connects some device or alarm.
When installing the limit switch, special precision must be observed. Otherwise, the mechanism may not reach the roller, or, on the contrary, it will go too far onto the roller, which will lead to breakdown of the limit switch mechanism.
It must be said that single end switches are practically no longer found. Basically they are made in the form of a block of contacts in one housing. In our case under consideration, it is clear that there are normally closed and normally open contacts operating in pairs. This design option is convenient and universal, since you can connect to any pair of contacts, depending on the operating scheme. No need to look for a special design.
Sometimes a switch with two pairs of contacts is needed when you need to turn off the mechanism and turn on, for example, reverse.
Microswitches
Such miniature limit switches are a unique subtype of limit switches that are used in electronics and household devices. They are small in size. In essence, these are the same limit switches, but they have their own distinctive features.
With small dimensions, the movement of the working part is very small. Therefore, precise adjustment is required during its installation. If it is impossible to adjust a microswitch with a small stroke, switches with an intermediate link (roller) are used.
This makes it possible to increase the stroke of the rod and make the necessary adjustment of the limit switch.
Non-contact limit switches
This type of limit switch has become popular in industrial production. Based on capacitive switches, various level sensors are produced in dispensers (for checking the level of liquids, bulk materials, etc.). When filling a container with liquid, a limit switch located in the container will stop its filling at a certain time.
The retail chain offers a wide selection of non-contact limit switches, so you can choose a device for any type of structure. Before purchasing, it is advisable to get advice from a specialist so as not to make a mistake in choosing a specific switch model.
Reed switches
These are a type of limit switches that respond to a magnetic field. The reed switch device consists of several pairs of contacts made of ferromagnetic material.
The action of the contacts inside the reed switch occurs when a magnet approaches it. The advantage of this design is the absence of mechanical contact. This greatly increases its service life. When installing such limit switches, special attention must be paid to the presence of a magnet, since this device will not react to any other material.
The scope of application of reed switches is very diverse. The reed switch acts as a microswitch that can be easily installed anywhere. It is connected to various alarm systems on doors. When the door is closed, the magnetic field acts on the reed switch, and the circuit remains closed. When the door is opened, the magnet moves from the reed switch, the contact opens and connects the alarm or other device.
Inductive switches
Such limit switches are also not a separate device, but act as a block of several pairs of contacts in one housing. They are mounted in different ways: with glue, bolts, nuts. Their sizes vary widely. These limit switches must be energized. They are used as movement limiters for various units and mechanisms.
The inductive type of limit switches is used in security systems, since such switches react both to the weight of the metal and to its movement. Inductive switches are used in rods as a stroke limiter and in the mechanisms of safety protective casings. Their distinctive advantage is their unpretentiousness to pollution, which is why they are used in industrial production processes.
Inductive models by their design can replace mechanical types of limit switches. They are easy to use because they do not require direct contact to operate. Its design contains an inductor that reacts to metal. Therefore, no magnet installation is required.
Optical sensors
Non-contact limit switches are equipped with optical touch sensors. Therefore, such devices are widely used in areas where special precision is needed. Optical switches are used to regulate the movement of moving parts in automatic gate opening systems. They are triggered at the end of the movement of the gate leaves, or when foreign objects appear in front of the moving leaf.
Optical limit switches operate on several principles and are divided into types. Reflective sensors emit and receive light reflected from an object located in the sensor area. When light energy is captured, a certain logical level appears at the output. The distance from the object to the sensor depends on the size of the object, surface quality, color, etc.
The receiver and emitter are located in the same housing
Reflective color returners receive and emit color reflected from a special reflector. If the beam is crossed by an object, a control signal is issued. The range of action of such a limit switch depends on the environment and its light transmission.
Through sensors have a separate receiver and light source located opposite each other. An object that enters the area of the light beam interrupts the light, thereby changing the logical output level.
Wall optical sensors consist of an infrared diode and a silicon photocell, which are located on intersecting optical axes in a dark housing made of heat-resistant plastic.
The detector reacts to radiation from an infrared diode as an object passes through its field of action.
Capacitive switches
This type of switches is used as limit switches. Capacitive sensors detect conductive and non-conductive materials that are in liquid, powder or solid form. The sensor is triggered when the material is placed next to each other at a configured distance.
Capacitive switches include the main parts:
- A generator that creates an electric field to influence an object.
- A demodulator that converts the amplitude of RF oscillations into a change in voltage.
- Trigger – provides a certain signal value, hysteresis value, and switching.
- Amplifier – increases the input signal to a certain value.
- LED indicator - displays the status of the switch position and makes it possible to control operation and settings.
- Compound – provides some protection against foreign particles and moisture.
- Housing – serves to install the switch, protects all internal elements from mechanical damage, is made of brass or plastic. Hardware parts are included with the housing
The principle of operation of capacitive limit switches is as follows. The active surface of the switch consists of 2 metal electrodes. They can be considered the plates of a capacitor. The electrodes are located in the feedback circuit of the RF generator, which is configured so that when the object is not near the active surface, it does not work.
THIS IS INTERESTING: Your question: How to return overpayment of pension contributions?
When an object appears near the active surface, an electric field arises, thereby changing the feedback capacitance. In this case, the generator produces oscillations. Their amplitude becomes greater as the object approaches the surface.
Related topics:
Source: https://electrosam.ru/glavnaja/slabotochnye-seti/oborudovanie/kontsevye-vykliuchateli/
How to close the doors without an alarm - the battery is dead
There are situations when you cannot lock the car using the key fob. Often, this happens when the battery in it is low or the battery of the car itself is low. Naturally, in this case, the central locking will not work. Therefore, you will have to close the doors using the ignition key. For this purpose, the manufacturer provides some design features in their locks.
All doors, except the driver's door, have a groove with a lock button in the locks. The ignition key must be inserted into this groove and pressed down. The button should go down. Then the door is slammed, and it should already remain closed. Such actions will have to be repeated with each door except the driver's, which is closed last simply with a key. The lock on it is located to the right of the handle and is covered with a cap, which must be pryed off and removed.
Help: The same caps are also on the handles of other doors. But they cannot serve to close them. They are used when you need to open the car from the outside using just a key, without a key fob.
You can use the lock button. To do this, press it for a few seconds with the driver's door open. After clicking, the three doors will close back and forth. The lock indicator should be on. Then the driver's door is locked with the key.
see also
- How to open the door to the entrance
- Door jamb how to make
- Wenge interior doors with glass in the interior photo
- How to choose a door to the bathroom
- Is it possible to change the glass in an interior door?
- What doors to the toilet and bathroom
- The Indesit machine does not open the door after washing, what should I do?
- Corridor design with light doors photo
- Who sings when leaving, go away, close the door without knocking
- Urgent repair of locks on metal doors
- Lock for metal door
What else can be improved when disassembling cards?
Most often, this process is performed to repair electrical wiring, and not to improve the car. But gradually various recommendations appear on how to improve the car and make it more enjoyable to drive. And this is worth using, because otherwise you will face troubles with a gradual deterioration in comfort. Experience in operating a car is gradually accumulating, and you can already find many interesting recommendations.
Some tips for disassembling the card include the following:
- improving the acoustics of the car to get better sounding music - it is under the maps that the main speakers of the car are located, which are not the best from the factory;
- lubricating or modifying the window lift system in the rear, if you have mechanical means installed, this is a rather important point for lovers of the general comfort of car operation;
- improving sound insulation is the most necessary and useful advice, but to complete this task you need to buy high-quality and proven materials, so it’s worth reading reviews;
- tinting - it is much easier to perform high-quality pasting of the film by dismantling the card, this will allow you to gain access to the entire glass in order to evenly stick the lower part;
- sizing with anti-creaking and vibration-proof materials - this will significantly increase comfort in the car; various unpleasant sounds will no longer be heard from the doors.
As you can see, there are quite a few options for improving the car, and each of them deserves attention. But it is worth paying close attention to the question of the appropriateness of using funds. Since you can spend several thousand rubles on one door just to replace the speakers. So the investment in upgrading your car can be quite large. It is worth immediately considering how much such changes are worth the investment.
We invite you to watch a video with the process of dismantling the door card on Vesta:
Tips from the professionals
- When installing the system on the Lada Vesta, fastening the wires together at any connection points, you should use exclusively terminals specially designed for this purpose. Conventional windings will not allow you to achieve reliable and safe contact. Remember that safety comes first.
- Do not experiment or change the design and circuit of your alarm. First of all, this will entail the immediate removal of your device from the warranty, and also - this may cause breakdowns and malfunctions in the future.
- Before working on the main attachment points, make sure you have all the necessary tools to complete the job.
Using these basic rules, you can install any simple protection system on your Lada. If you understand absolutely nothing about electrics, then it is better to contact a car service center, where specially trained people will do everything for you, it will be much safer and more efficient.
vote
Article rating
Reasons for lighting failure
If the light under the ceiling in the car's interior does not work properly, this may be due to several reasons. They depend on the condition of the transport and the options for its operation.
Lamp burned out
It is not always necessary to delve into electrical circuits. Sometimes it is enough to replace a simple lamp in the car interior lighting to return everything to good condition. For ordinary light bulbs, you can check the integrity of the filament against light, but for other sources, you can use a multimeter or other tester.
When checking conventional lamps, it is necessary to set the ohmmeter mode, and if an open circuit is detected, the cable is replaced. For LEDs, we test the flow of current in one direction and non-passage in the opposite direction (during polarity reversal).
Fuse blown
When the light suddenly disappears from the interior lamp, we recommend checking the condition of the fuses. They are not separately allocated for this option, but are combined with some kind of device. In this case, another device will fail, for example, the sound from the radio will disappear or the clock in the cabin will go out.
Using the electrical diagram, we look for the block where the fuse is located by the manufacturers. Most often it is located in the cabin or in the engine compartment. The cause of the failure may be a short circuit. If you do not eliminate it, the lamp will have to be changed again soon.
You can take a new fuse under the block cover. It is necessary to select it by its value in Amperes. If the driver finds a higher amperage, then there is no need to install such a jumper in the vacated socket. The consequences may negatively affect the melting of the wiring.
Lost (oxidized) contact
There are many connecting contacts in any electrical circuit. An oxide film or scale may form in each of them, preventing the conduction of current. The main risk area is the ceiling lamp itself and the limit switches on the doors of domestic cars, since the latter do not have a protective rubber casing.
It is easy to detect oxidation at the contact visually. It is enough to unscrew the lampshade and remove the lamp. Next, we clean the contact area and return the light source to working condition. Cleaning is carried out with fine-grained sandpaper or a flat screwdriver with the battery previously disconnected so as not to create a short circuit.
Wires are broken
It is not always necessary to change the light bulbs in the lampshade, since they may turn out to be functional, and the culprit in such a situation will be a broken cable. In some places, the wiring bends significantly, which leads to breaks over time. Drivers encounter similar problems with a cable running through the trunk lid or door.
Damage can be detected by deformed insulation. It is visible at a twist, junction or bend. You can find out which wire is responsible for lighting from the electrical diagram or by testing the cables with a tester. Condition monitoring is carried out from the lampshade after its dismantling to the fuse box.
Broken starter
The starter is responsible for starting the engine, which occurs by igniting the fuel. If the starter fails, you will not start the car. Typically, the starter fails due to wear on the electrical solenoid. It can also break due to wear on the relay. The starter may not work as a result of other electrical failures. Yes, the starter can also be replaced or repaired in advance.
But there is one problem. It is impossible to predict when it will fail. The most you can do is to identify the problem with the starter during routine diagnostics.
Unfortunately, not all service technicians pay due attention to cars.
This is why finding your reputable auto mechanic is so important. Remember that a good car mechanic is the key to the long life of your car.
Remember that a good car mechanic is the key to the long life of your car.
Design solution to the problem
When replacing or connecting, you only need to restore the originally designed circuit. If no modifications are carried out, then the need to disassemble the locking mechanism and use insulating materials is immediately eliminated. Step-by-step instruction:
- Open the hood.
- Loosen the bolt connections and disassemble the device.
- Unscrew the terminals.
- Connect the wires from the battery.
- Pull the limit switch out of the hole.
- Pull out the switch.
- Stretch the wires and connect them.
- Bring the ends out through the hole.
- Strip the wires.
- Stretch the wires to the threshold to the installation site.
After this, you should check the functionality of the device, and then carry out final assembly.
Control of standard central locking via CAN bus
With this mechanism for controlling the standard central locking system, problems with connecting the Starline alarm system are eliminated automatically: if the twists are oxidized or the wire breaks, all functions associated with the CAN bus are unavailable at the same time. Therefore, if problems are observed specifically with the operation of the central locking system, it is worth checking the correctness of the settings of the CAN alarm module: if the firmware is incorrectly specified for a specific car model, the operation of the alarm system is often disrupted only in specific functions. This is due to the fact that some of the CAN commands, with the help of which the alarm system reads data about the state of the car and controls its electronics, can be the same on many cars, and some control commands will be individual.
First, find out the correct firmware number for your car. By specifying the brand and model in the search form on the website can.starline.ru, you will see this number at the very beginning of the list of functions supported by the firmware. For example, for a Ford C-Max the required number is 2319. Immediately look in the list of functions to see if central locking control is indicated there: if it is not supported, then the central locking is controlled from an alarm via analog circuits.
Something else useful for you:
Then we re-enter the firmware number into the memory of the CAN alarm module. In order not to remove the central unit, this is easiest to do with an assistant. After disconnecting the battery ground, find and hold down the service button (Valet) of the alarm. At this time, the assistant must put the terminal back on, restoring power to the alarm.
After the siren beeps 5 times, you need to release the Valet button. Starline will give 4 more signals, confirming entry into the programming mode.
Briefly press the service button again. In response, the alarm will give a single signal. After this, quickly press the button to enter the first digit of the firmware number and pause. As soon as the alarm confirms the entry, emitting exactly the same number of signals as the number of times the button was pressed, enter the second digit of the number in the same way, then the third and fourth. The main thing is not to be shortchanged: if you accidentally press the button more than 9 times, the alarm will return to the main programming menu, emitting 4 warning signals. In this case, start from the beginning of the paragraph.
A couple of seconds after successfully entering the last digit, StarLine will either confirm the result (two beeps) or report an error (four beeps). There will be an automatic return to the main menu. If everything is done correctly, but the alarm does not receive the correct number, then you should contact a service center to check and reflash the CAN module.
Backlight
Many drivers install additional lighting in addition to the standard one. LED lighting, which is mounted on the bottom of the door, is popular.
For installation you need to prepare:
- LED strip of the required length, price from 500 rubles;
- electrical wires with bare and stripped ends;
- electrical tape;
- soldering iron;
- glue;
- multimeter
Connection order:
- Solder and insulate wires of pre-measured length to the “plus” and “minus” of the LED strip.
- Remove the door trim.
- Using a multimeter, find the positive wire of the cigarette lighter and connect it to the corresponding wire of the LED strip.
- Connect the negative wire of the limit switch to the corresponding wire of the LED strip.
- Check the functionality of the backlight by opening and closing the door.
- Attach the LED strip to the door using glue.