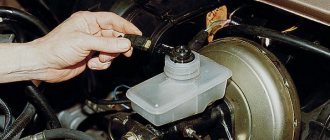
In the cold weather, the problem with the transmission, or more precisely with the clutch, returned. We fix the problem ourselves. In cold weather, the problem with the transmission returned; when driving in an outside temperature below -20 degrees, after pressing the clutch pedal, it very slowly returns to its original position, and when pressed it is tighter than usual. I encountered this problem last winter, but since the OD is very far from me, I decided to contact it when passing TO-1. The maintenance took place while on vacation and of course I forgot about this problem, since it was already summer and here it is again. TO-2 is still 3000 km away, it’s a long and expensive trip to the dealer, so I decided to handle it myself. The root of the problem most likely lies in poor-quality brake fluid or in non-compliance with its storage conditions. Brake fluid tends to absorb moisture, and this moisture is what causes the clutch to not work correctly and “stick” in cold weather. And so, on JR5 gearboxes, the clutch is hydraulically driven, the reservoir with hydraulic fluid is shared with the brake system. A decision was made to replace the brake fluid of the entire system; the work must be carried out with a partner. For this purpose, two liters of DOT-4 brake fluid were purchased; you will also need a 8mm wrench, a syringe for pumping out old fluid from the reservoir, a transparent thin hose of the required diameter and a container for draining the old fluid:
We begin the work by pumping out the old fluid from the reservoir: Next, you need to fill the reservoir with fresh fuel fluid and begin pumping the brake system, starting with the far wheel of a longer circuit. Remove the rear right wheel if there is no lift or inspection hole:
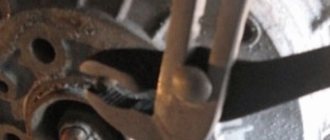
On the back of the drum, we find the drain fitting with a rubber cap on, remove the cap:
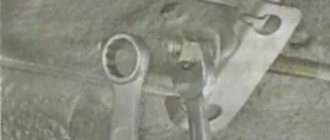
We put a 8 key on the fitting, if it is a cap, and then a hose, the second end of which we lower into the drain container:
We pump the circuit as follows. The partner presses the brake pedal 4-5 times and leaves it pressed. After this, you need to slightly unscrew the drain fitting, turning it counterclockwise 1/3 of a turn, while the old fuel fluid will begin to flow out of the hose, and the brake pedal will sink to the floor. Then we tighten the fitting, and the partner repeats the pumping procedure. We repeat until the old fluid is completely drained, which was much darker than the fresh one (light fluid will come out of the hose). Next, install the wheel and move to the front left wheel:
Don’t forget to add fuel fluid to the tank so as not to air the system:
Then we repeat everything with the rear left and then the front right wheels, do not forget to put rubber caps on the fittings. We're done with the brake circuits, now we need to bleed the clutch circuit. The work was carried out through the top, throwing off the air filter duct. The fitting is located under it, 30-40 cm lower:
Remove the rubber cap and put on the hose:
We lower the second end of the hose into the container:
Your partner pumps the clutch pedal 10-15 times and releases it, in the meantime you need to press the spring lock
Anti-lock braking system performance
Thanks to the presence of ABS in the braking system, it is possible to significantly reduce the braking distance, which allows the driver to maintain good vehicle control in emergency braking conditions. This allows you to avoid many unforeseen situations and makes it possible to maneuver during braking. These advantages make the anti-lock braking system an important element of the braking system.
The presence of ABS in the car is better for an inexperienced driver in any case; it allows emergency braking even in an intuitive way, applying maximum force to the brake pedal, while maintaining the ability to maneuver.
Among the many advantages of the anti-lock braking system, according to experts, there is only one drawback - braking the car on loose areas (gravel, sand, high snow). The braking distance becomes much longer than when the wheels are completely locked, since the car does not “bury itself” in the loose surface, but continues to move normally. However, today modern ABS already have algorithms that are successfully used when braking even on such surfaces.
Causes of malfunction
The causes of rear brake pad failure are no different from the front ones. But it’s worth dwelling on them to know them:
- Wear of the friction part. It can only be seen if you take the drum apart. According to the manufacturer's recommendations, the friction part should not be less than 2 mm.
- If brake fluid gets on the linings, it also leads to replacing the pads.
- The friction part is cracked, chipped or chipped. This indicates that the pad needs to be replaced.
All these reasons become decisive in the decision to replace the rear brake pads.
Tuning
Many car enthusiasts want to improve the rear brake; to do this, they replace the standard drums with ventilated disc brakes. This operation is done quite simply, but in frequent cases, the hub needs to be replaced.
The old rear drums are thrown out and replaced with brake discs, calipers and front pads. This significantly improves the car's braking. These and Sparko offer a full set of rear ventilated brake discs.
As practice shows, disc brakes are 30% more efficient in use, and replacement is carried out in the same way as front brakes. In this case, you do not need to buy separate pads for the rear and front parts. It is enough to buy 4 sets of front pads (each set contains 2 pads).
What kind of brake fluid should be used on the Lada Granta?
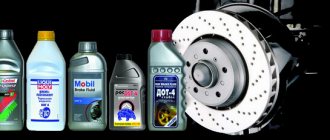
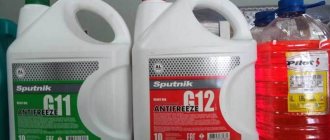
In order to replace the used fluid with a new one, it is recommended to purchase “ROSDOT”, produced in the city of Dzerzhinsk, or “KAPROS-DOT”. The volume of the replacement reagent must be at least 450-550 milliliters. According to consumer reviews, most of them prefer to use ROSDOT brake reagent for replacement.
Studies were carried out on the composition of DOT-4 working fluids. All of them can be combined with each other. True, there are slight differences between the substances and each other.
New Lada: Designation of icons on the dashboard
Modern classes of brake fluid differ from each other in purpose:
| Brake fluid | Description and purpose |
| DOT-3 (glycol based) | Used for vehicles traveling at moderate speeds. These vehicles are equipped with drum brakes or front disc brakes. |
| DOT 4 (mostly glycol) | It is widely used on new generation cars that develop high speeds and are mainly equipped with disc brakes for all wheels. |
| DOT 5.1 (mostly glycol based) | Used on fast racing cars that have high thermal overheating of the brake system. |
| DOT 5 (base consists of silicone) | It is almost never used on common cars. |
It is not recommended to mix the working reagents listed above. The only exception is that good mixing is possible if the color scheme of the reagents used is not particularly different from each other. If the Granta has ABS, then the on-board computer installed on it controls all the actions of the anti-lock brake.
In other words, ABS is built into the braking system of the Lada Grant. In the presence of such a system, the computer regulates the opening and closing of valves, pressure, and a jerk for pumping is organized.
Mechanical damage
The next point of troubleshooting will be a visual check of the hoses of the car's braking system: there should be no signs of leakage at the hose connections and on the car parts.
Often the cause may be a poorly tightened screw connection. You should also check the places where the pipes are attached to the cylinders on the brake discs: if this problem is detected, use an 8 mm wrench to tighten all the nuts that secure the pipes.
All hoses must be intact, without cracks or kinks. If this malfunction is detected, such hoses must be replaced with new ones. It is also worth paying attention to the condition of the master cylinder gasket - there should also be no signs of leakage or breakage on it.
The degree of wear of brake pads and brake discs also plays a special role. There should be no signs of wear on these system elements; the pads should not be worn down to metal. All these elements must be changed in a timely manner.
What kind of oil to fill in the power steering of Renault Logan
Car manufacturer Renault Logan has equipped some configurations of its line with such a useful and driver-friendly option as power steering. Oil is poured into such a system, just like into an engine, and over time it will also need replacement. Novice car enthusiasts have never asked such a question and have no idea what oil is suitable for car steering systems. In this article we will talk about this.
When is it official to change?
40,000 kilometers or no more than 2 years - regulations for replacing power steering fluid
The regulations from the official dealer state that the oil that is poured directly from the factory into Renault Logan is designed for a mileage of 40,000 kilometers or no more than 2 years of operation, whichever comes first.
In what cases may it be necessary to replace it ahead of schedule?
Details about a complete oil change in the power steering system for Renault Logan!
However, it is necessary to monitor the condition of the oil in the power steering expansion tank at every stage of vehicle maintenance. To change the oil outside the stipulated time frame, the following will apply:
- Metal trash
- Dark liquid color
- Unpleasant smell
For comparison, a drop of new oil (circled in blue) and a couple of drops of drained power steering oil
And also, for immediate repair and inspection of the entire steering system, there will be an insufficient level of power steering oil in the expansion tank, because if this malfunction occurs, the oil temperature will quickly increase, and the mechanism itself will fail.
The gearbox also needs regular checking of the oil level, but there’s no need to talk about checking the engine oil level!
Advice! If, while driving a car, you feel like the steering wheel has become difficult to turn, and it has become like oak, noise or an extraneous hum has appeared. Go to the specialist immediately. Because a breakdown of the power steering can result in, at best, a breakdown of the steering mechanism, and in the worst case, it can cause a traffic accident.
What kind of oil do we fill into the hydraulic booster?
For comparison, Dacia recommends the RENAULTMATIC D2
For stable operation and reliability during operation, the manufacturer recommends replacing fluid with a synthetic or semi-synthetic base of the D2 ATF or PSF standard.
Such oils have optimal viscosity and density and are designed for operation at ambient temperatures down to -36° C, which is quite suitable for winter weather conditions in Russia.
The service book “recommends” ELF RENAULTMATIC D2
To completely change the power steering fluid, the manufacturer recommends ELF RENAULTMATIC D2 oil for Dexron II class, which is indicated in the service book for any Renault Logan car.
However, if your car is subject to constant load on the steering, constant temperature changes, then in this case it will be important to use standard D3 fluid, or Elf Renault Matic G3.
There is constant debate about the use of oil in power steering D3 or G3! Take this into account when choosing, since Renault “does not approve” of such a replacement. Some Renault Logan owners notice improvements in the performance of the power steering, while others do not. This is a reason for discussion, what do you think about this?
Replacements (analogues)
In addition to what is recommended, Renault allows the replacement of fluids from other manufacturers that meet all the requirements and are similar to the original:
- Mobil ATF 220 (320).
- Liqui Moly ATF 1100.
- Castrol ATF D2 (D3).
One of the options for an alternative power steering oil change
It is necessary to pay special attention that mixing different types of liquid is not allowed. Otherwise, it will foam and the entire power steering mechanism may fail.
Therefore, such an operation may require a complete oil change. You can read about the nuances of such work and the process on our website in this article.
Follow maintenance rules
Compliance with such simple rules and tips for maintenance, inspection of the steering system and selection of the recommended power steering fluid for Renault Logan will certainly have a positive impact on the general condition of the control systems and the car as a whole. This will not only save money on unexpected repairs, but will significantly reduce the risk of an accident on the road.
Brief excursion
In numerous videos presented on the Internet, you can see this car, get acquainted with its characteristics and watch test drives. The spacious interior and large trunk are impressive, which is very useful for Russians - especially those who like to travel outside the city.
In 2010, Lada Largus was first presented to the public. After 2 years, the first car rolled off the assembly line and industrial production began. The car itself is a copy of the Dacia Logan MCV, presented under license for production at AvtoVAZ. Nowadays, several modifications of the Lada Largus are produced: with a station wagon body capable of accommodating 5 or 7 passengers, as well as with an all-metal body and a 2-seater saloon.
The car is equipped with two French injection engines with a volume of 1.6 liters - with 8 valves and a capacity of 87 hp. s., as well as a 16-valve engine with a capacity of 105 horses. A 16-valve engine has two camshafts, an 8-valve engine has one. The car is made on the Renaul Logan platform, and the engines are also taken from there. Transmission – manual 5-speed, French.
In the video you can see how the Lada Largus confidently moves along our roads. This became possible because the suspension, springs and shock absorbers are adapted to Russian road conditions and are designed for increased load capacity. Increased ground clearance also contributes to good cross-country ability.
What kind of engine oil should I fill in Lada Largus? It can be from different brands, but must strictly comply with the manufacturer’s specifications. The requirements for the 16-valve K4M engine are as high as possible. It is better to fill in the engine oil that is used at the factory when the car was produced.
Until recently, during the first refueling, ELF SOLARIS RNX 5W30 was poured into the engine. Before this there was LUKOIL Genesis RN 5W40. The latest official information from the manufacturer states: the first filling is carried out with ELF EXCELLIUM NF 5W40 lubricant. As you can see, in both last cases the oil characteristics are 5W40, which is what needs to be taken as the basis for further operation.
Please note that 5W30 oil is less viscous than 5W40. Renault advises refilling a 16 valve engine with ELF EVOLUTION SXR 5W40. But for an 8-valve engine, a 5W30 oil change is recommended. This is due to the fact that the more viscous 5W40 is better suited to hydraulic valve compensators. Therefore, whatever the lubricant is, it must have such characteristics.
There is no consensus among car enthusiasts regarding 16-valve engines. AvtoVAZ also does not have a clear position on this issue. Its first digit depends on the operating temperature: 0, 5, 10 or 15. For low temperatures from -30°C you need to use 0W, for moderately low temperatures (from -25°C) - 5W, etc. For all of the above cases a viscosity of 30, 40 or even 50 is required. In the presented video you can hear all the explanations why 40 or 50 cannot be poured into an engine designed for a lubricant viscosity of 30, even if it already has a good mileage.
The properties of the lubricant must comply with API SL/ API SM/ API SN. Requirements for the ash content of oil in a 16-valve engine are ASEA A1/ ASEA A2/ ASEA A3/ ASEA A5. The brands are not named, that is, you can pour in the motor oil that you subjectively like best. Now there is a new, most suitable modification on sale - ELF EVOLUTION 900 SXR 5W40. Surely it is produced with other parameters in terms of temperature and viscosity. How much lubricant should I buy? Replacement in Lada Largus requires from 4.6 to 4.8 liters of lubricant, the engine crankcase is designed for 5 liters.
Principle of operation
The operation of the anti-lock braking system is based on the laws of physics, mainly the law of friction. From 7th grade physics we know that static friction resistance is greater than sliding friction resistance. Based on this, we conclude: the braking distance of rotating wheels is shorter than skidding ones. But the margin for keeping the wheels in a spinning position, especially on uneven surfaces, is so small that even experienced drivers sometimes cannot cope with it. And ABS easily performs the task. How does it work?
As soon as the driver presses the brake pedal all the way, he will feel the characteristic sound of a “ratchet” and pulsation emanating from the pedal, which means the ABS has started working. Now the braking process is controlled not by the driver, but by the system ECU. Sensors read wheel speed and brake line pressure.
The computer calculates the required rotation deceleration rate for a given situation and sends a command to the modulator to close one or another brake circuit. When the deceleration rate coincides with the design one, fluid access to the brake circuit is resumed. This operation for each circuit is performed from several to 18-20 times per second, preventing wheel locking.
The driver can only continue to maneuver under ideal braking conditions, while the ABS slows down the car.
2283-4-24-02 (Copy)
An assistant must vigorously press the brake pedal all the way 1-2 times and keep it pressed.
In this case, liquid will flow out of the hose, and the brake pedal should be pressed all the way.
As soon as the liquid stops flowing from the hose, tighten the fitting, and only after that can the assistant release the pedal.
We repeat this operation until new brake fluid (lighter than the old one) comes out of the fitting.
We remove the hose, wipe the bleeder fitting dry and put a protective cap on it.
Remove the protective cap from the brake bleeder fitting of the left front wheel.
We put a hose on the fitting, and immerse its free end in a container partially filled with working fluid.
Features of replacing power steering fluid on Largus
Thanks to the close cooperation of the AvtoVAZ concern and Renault, car enthusiasts received a reliable and unpretentious Lada Largus car. This model has become quite popular for many reasons, including functionality, practicality, good build quality and affordable price. Due to the high ground clearance and low overhangs, excellent cross-country ability is ensured, the powerful power plant produces good dynamic characteristics, and the modern steering mechanism, complemented by hydraulic power steering, helps to steer the car with ease.
Characteristics of power steering of Lada Largus
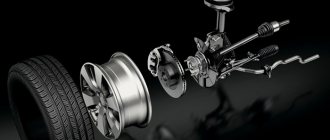
This unit is no less important than the brake system. The safety of the driver and passengers also depends on its performance. Power steering (hydraulic power steering) provides the ability to control the car by easily positioning the drive wheels in the desired direction.
Largus power steering diagram
The Lada Largus is equipped with a combined type hydraulic booster, i.e. some of its elements are located directly in the steering mechanism housing. In other words, they are a component of the mechanical part of the steering column. Power steering Lada Largus consists of a standard set of elements:
- tank;
- power steering pump, complemented by a working fluid bypass valve;
- pipelines;
- redistribution mechanism;
- working mechanism.
There are not many components, which explains the high reliability of the hydraulic booster. Malfunctions associated with its operation occur infrequently. Typically, problems arise due to violations of operating rules by the car owners themselves. Much less often - due to the natural wear and tear of parts, but, of course, one cannot ignore the low quality of components.
Maintenance comes down to following simple rules. The main thing is to regularly check the level of working fluid in the expansion tank of the system. The power steering does not require additional adjustments.
It's easy to check; just open the hood. The fluid in the system is also needed to lubricate the power steering elements. If the level is low, parts will begin to wear out too quickly. With such use, the unit is more likely to fail.
Features of the Lada power steering device
The Largus steering mechanism is conventional, rack and pinion type. It is designed on the principle of a gear moving along a rack, but a hydraulic booster is used to ease the applied pressure on the steering wheel. A similar mechanism is common on most passenger cars. This is explained simply: the design consists of a minimum of parts, the efficiency of the power steering is high. Despite its reliability, the power steering mechanism cannot withstand constant movement over potholes and uneven road surfaces, hence the frequent occurrence of vibrations.
A pump with blades is installed on the power steering of Lada Largus, with the help of which it is possible to move oil in the power steering system. The vane pump is located on the engine, where it is mounted on a bracket and built into the timing drive, i.e. the pump blades are driven by the crankshaft drive poly-V belt. This means that you need to tighten the generator belt in a timely manner, although there is a special tensioner roller for this.
The steering mechanism drive structurally has two steering rods connected to the suspension steering knuckle arms at the front using hinge joints. Unlike other VAZ models, the Largus has a subframe on which the steering rack with power steering is mounted in the boot (on all other VAZ models the steering mechanism is mounted on the engine compartment panel).
During the startup of the power plant, the oil in the Largus power steering system moves from the tank through the pressure created by the pump to the distribution valve. When the wheel is turned in one direction or another, using this valve, one of the power steering cavities is connected to the tubes, and the other to the high pressure pipeline. The power steering piston is connected to the steering rack and drives the gear, as a result of which the rack also begins to move. The movement of the rack to the right or left causes the steering knuckles to turn, thus making a turn to the right or left.
2283-4-24-03 (Copy)
Similarly, we bleed the brake mechanisms of the other circuit.
When pumping, you need to monitor the fluid level in the tank and add fluid if necessary.
After bleeding the hydraulic brakes, bring the fluid level in the reservoir to normal.
There is an even simpler option for replacing brake fluid. This method does not require the presence of an assistant. With this method, a certain supply of brake fluid is desirable (at least 1 liter).
We place the car on an inspection ditch or overpass and provide free passage between the place where you can refill the brake fluid reservoir in the engine compartment and the brake cylinders of all four wheels.
Use a rubber bulb or syringe to pump out the brake fluid from the reservoir. Add new fluid to the top edge. To speed up the process (to release fluid from all cylinders at once), it is advisable to select four pieces of tubes that fit tightly onto the bleeder fittings of all cylinders. We lower the free ends of the tubes into small transparent bottles.
We unscrew the fittings of all brake cylinders. We make sure that the liquid has flowed through all four tubes. We control the decrease in fluid from the reservoir located on the brake cylinder and immediately replenish the reservoir. We observe an increase in the level of liquid in bottles located near the wheel brake cylinders.
It is necessary to move several times from the position of observing the flow of fluid from the brake cylinder fittings to a position where you can check and replenish the fluid level in the reservoir located on the brake cylinder in order to prevent the reservoir from drying out.
Usually the level rises most quickly in the bottle into which the hose coming from the brake cylinder of the front left wheel is lowered. As soon as there is about 200 ml of liquid in the bottle of the front left wheel, wrap and tighten the fitting of this cylinder. Next, we wait for the same result for the front right wheel cylinder and tighten its bleeder fitting in the same way. The process can be completed after 200–250 ml of liquid comes out through the fitting of each rear wheel.
We make sure that all fittings are tightly tightened. We put on protective caps. Check the fluid level in the master cylinder reservoir.
Why did it happen so?
Perhaps the automatic requests do not belong to you, but to another user accessing the network from the same IP address as you. You need to enter the characters into the form once, after which we will remember you and be able to distinguish you from other users exiting from this IP. In this case, the page with the captcha will not bother you for quite a long time.
You may have add-ons installed in your browser that can make automatic search requests. In this case, we recommend that you disable them.
It is also possible that your computer is infected with a virus program that is using it to collect information. Maybe you should check your system for viruses.
If you have any problems or would like our support team, please use the feedback form.
LADA > Largus
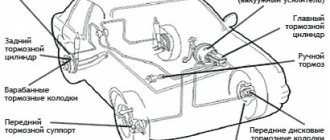
What is the difference between bleeding brakes with ABS and without ABS?
Bleeding the brakes on a car with ABS is not an easy task, and the problem is not the complexity of the pumping process itself, but rather a lack of awareness. Bleeding brakes on a vehicle with ABS and without an anti-lock braking system differs significantly in some key points and has its own characteristics.
Three main differences between an anti-lock braking system and a conventional brake:
- In an ABS system, unlike non-ABS brakes, the piping system (the rear wheel circuit) is under increased pressure.
- The presence of an anti-lock braking system requires regular monitoring of the brake fluid level. If its level is at an extremely low level, the drive pump runs dry and begins to pump only air, thereby quickly stopping functioning.
- The operating time of the pump should not exceed two minutes, but if it has worked longer, it is necessary to turn on the ignition for ten minutes to cool it down.
Types of ABS systems
Before you take steps to bleed ABS brakes, you should familiarize yourself with it. At the moment, there are two main types of ABS, which differ from each other in the main feature - the order in which the system components are placed.
1) The first type of ABS - the main unit contains the pump itself, a block of hydraulic valves, and a hydraulic accumulator.
The steps for bleeding the brakes occur in a sequence similar to bleeding as in a car with conventional brakes without an anti-lock system.
It is necessary to find the fuse responsible for the operation of the car’s ABS and remove it, thereby achieving a complete shutdown of the system. Find the RTC bleeder fitting and unscrew it. Further bleeding of the ABS brake system should be carried out strictly with the brake pedal depressed. Turn on the car ignition, but the ABS fault light should light up. At the same time, the pump starts, expelling air from the brake system. An extinguished brake light means that everything was done correctly.
2) The second type of ABS - all the components (hydraulic accumulator, hydraulic module with valves) of this system are located in different units.
You will need a special scanner that diagnoses the ABS system and retrieves all the necessary information from the electronic control unit of the brake system.
Such a scanner is quite expensive and is rarely found among car owners, which is why bleeding of brakes with ABS is usually carried out in a service station. Most ABS are equipped with activation devices SBC or ESP, just like ABS they are pumped only at service stations.
Lada Largus 2015, engine Gasoline 1.6 liter., 102 hp, Front drive, Manual — vehicle inspection
Comments 16
But most people have seen the line on the antifreeze expansion tank, is this a flash mob? I have one drawn like this too.)))
No, this is from the factory, all bolts, nuts and the level of filled liquids are marked by the factory's quality control department
Did the device help with pumping?
Of course, without her help it’s problematic to be alone.
check the brake hoses, according to the regulations they are also 5 years old
a tube with a non-return valve, put 4 containers and add more pressure, wouldn’t it be easier?
Well, yes))) take off 4 wheels at once to gain access to the fittings. Finding 4 containers with 4 hoses with check valves is MUCH easier)))
I also needed to bleed the clutch. We have one reservoir for both brakes and clutch. So download again. Dirt comes out of the clutch as soon as I started, and I then checked for moisture and pumped it again.
I forgot about the clutch))
I thought there was a separate tank there. Then he spat. Brakes 1 liter at a time to the wind. According to measurements, dirt adhesion and hydroscopicity are much lower than normal. There is a device that measures moisture in the brake fluid.
Yes, there is a device, but I decided to change it anyway since the service life of the liquid has expired anyway
Speaking of liquid. Test the new one before use. I picked up a turtle from the Dot4 store and it was already filled with water. The truth is not yet in the red zone.
Yeah. Well done you. Actually, not everyone reads the comments, correct the article)
I also changed it according to these instructions. And now I’m sitting and wondering why my fluid is dirty again)) Can you please provide a link to the replacement instructions?
In what order should the changes be made taking into account the clutch? Clutch at the end or no difference?
Not everything is so simple there. The clutch is powered from the same tank as the brakes. There is a separate compartment in the tank. I pumped out the dirty stuff as best I could with a syringe and then put pre-purchased silicone hoses (to a construction store) on all the brake releases, placed the bottles and the liquid flowed by gravity. At this time, the syringe with a silicone tube was put on the clutch. And having opened the pump, I pumped out the clutch with a syringe (I took 200 ml, I don’t know why). The second person monitors the level and adds quietly. It took a long time, but clear liquid began to accumulate in the tank. Then I shut everything off and bled the brakes. Because the clutch was pumped with a syringe without bubbles and it ran clean. Oh yes, the brake ones are also transparent. 2.5 liters of fluid gone
Yes, I also see someone pumping the clutch pedal, someone pumping it out with a syringe, but it seems like using a syringe is more correct. As I understand it (but I’m not sure yet), this does not have to be done simultaneously with the brakes. And by and large, it doesn’t matter what to bleed first - the clutch or the brakes. But since this is the top contour, it is logical to do it last.
While the brakes were dripping by gravity, I ran the clutch through with a syringe. Then, adding fresh transparent fluid to the reservoir, I realized that there was clean brake fluid in there. Well, then we started pumping the brakes.
Which brake fluid to choose for Priora
The manufacturer fills it with DOT 4. The most popular brake fluids among buyers are ROSDOT 4 and NEVA-M. The first option is more expensive, the second is cheaper. For cars with and without ABS, it is recommended to use different types of fluids.
- DOT-4 plus for vehicles without ABS
- DOT-4 class 6 is designed for modern braking systems (ABS, ESP, VSA)
Depending on the capacity, the cost of the brake fluid indicated above is from 50 to 150 rubles. You can also add DOT 5.1 fluid. It has a lower viscosity than the above samples, as well as a higher boiling point and, according to manufacturers, changes once every five years.
It is prohibited to mix liquids of different types with each other!
How to bleed brakes in the field
What if you don’t have the necessary material on hand to modify the brake fluid reservoir cap? We return to the standard method of bleeding the brakes:
- Press the brake pedal several times until it becomes firm;
- We place a pry bar or any other tool of suitable length (for example, a stick) between the seat and the brake pedal;
- We unscrew the brake fitting and watch how the brake fluid comes out along with air bubbles;
- We repeat the process for each wheel starting from point No. 1.
In all cases of bleeding the brakes, monitor the fluid level in the reservoir. If you can’t unscrew the fitting, spray WD-40 on it and wait a couple of minutes for it to dry out.
If the brakes do not bleed, the system is not sealed or one or more components, such as the master cylinder or pipe, are faulty. Also, do not forget to flush your car's brake system on time.
How do you bleed the brakes on your car? Let us remind you that it is convenient to search for other operating and repair instructions by content for each Lada model: Granta, Kalina, Priora, Vesta, Niva, Largus or XRAY.
Keywords: lada xray brakes | Lada Vesta brakes | Lada Largus brakes | Lada Granta brakes | Lada Kalina brakes | Lada Priora brakes | 4x4 brakes | Niva brakes | universal article
3
0