A modern car produced by VAZ, the Lada Granta brand, is characterized by the presence of a functioning brake system, equipped with a hydraulic vehicle driving system. It is necessary to change used brake fluid according to the existing conditions specified by the manufacturer: according to the time passed, the time it was used and the kilometers traveled.
The technical operating conditions indicate how much brake fluid should be available to be used for replacement, and what brand of brake reagent is most suitable.
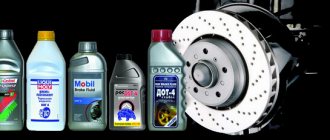
Brake fluid composition
Brake fluid comes in different types, but is usually made from a low-viscosity solvent, such as alcohol, and a viscous, non-volatile substance, such as glycerin.
Brake fluid is produced based on polyethylene glycol under the brands DOT 3, DOT 4 and DOT 5.1.
Based on silicone – silicon-organic polymer products grade DOT 5.
For vehicles with an anti-lock braking system, DOT 5.1/ABS brake fluids based on silicone and glycols can be used. About brake fluids wiki: link.
-3-7-08-01erate)
Attention! If brake fluid gets on your car's paintwork, plastic parts, or wiring, it can cause damage. Remove it immediately with a clean cloth.
It is necessary to bleed the brake system hydraulic drive until new fluid (lighter than the old one) begins to come out of the bleeder fittings of all working cylinders.
We carry out pumping to replace the fluid with the engine not running, first on one circuit, and then on the other in the following sequence:
- right rear wheel brake;
- left front wheel brake mechanism;
- left rear wheel brake;
- brake mechanism of the right front wheel.
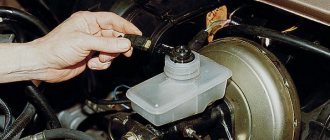
Before pumping, check the level of working fluid in the hydraulic brake reservoir. If necessary, add liquid.
Characteristics and properties of brake fluid
In order for the brake system to function properly, the brake fluid must have certain characteristics and meet quality standards.
Boiling temperature . New brake fluid does not contain moisture, so its boiling point is within acceptable limits. But over time, moisture from the surrounding air enters the fluid, usually 1-2% per year of the total volume, but the characteristics of the brake fluid begin to change.
During braking, the working fluid heats up to very high temperatures due to friction. At this point, it is very important that the brake fluid does not boil, since in this case the moisture evaporates from the liquid in the form of steam. And steam is dangerous because it is easily compressible and the next time you brake, the pressure on the brakes will be less, since part of the volume will be taken away by the compressible steam.
The boiling point of brake fluid directly depends on the amount of water in it. The more water, the lower the boiling point and the greater the chance of “losing” the brakes.
Hygroscopicity . Some brands of “brake guards” have minimal hygroscopicity (moisture absorption), for example, DOT 5 and can maintain the necessary characteristics throughout their service life. But the most common brands DOT 3, DOT 4 and DOT 5.1 gradually lose their properties due to the increasing amount of moisture in them.
Viscosity _ This characteristic will determine how the brake fluid will be pumped throughout the system. And it should pump well both at -30 degrees Celsius and at 200 degrees, during braking.
If the fluid freezes completely or in places, it blocks the brakes. Fluid that is too thick will have difficulty pumping throughout the system, which will lead to either poor braking or different forces on different wheels. Too liquid will lead to leaks.
Corrosion protection . The brake fluid itself acts as a protection against corrosion within the brake system. In this case, protection should be ensured even with small amounts of moisture inside the system.
Corrosion protection is provided by special additives. They also provide protection for the sealing elements.
Compressibility . Ideally, brake fluid should not compress at all, but there are certain tolerances for this characteristic. The main thing is that the liquid works equally well under different temperature conditions.
| “Dry” boiling point, °C | “Wet” boiling point (3.5% water), °C | Viscosity, mm2/s | Main components | |
| DOT 2 | 190 | 140 | — | Castor oil/alcohol |
| DOT 3 | 205 | 140 | 1500 | Glycol |
| DOT 4 | 230 | 155 | 1800 | Glycol/Boric acid |
| LHM+ | 249 | 249 | 1200 | Mineral oil |
| DOT 5 | 260 | 180 | 900 | Silicone |
| DOT 5.1 | 260 | 180 | 900 | Glycol/Boric acid |
Do-it-yourself replacement of brake pads on a Lada Granta
The brake pads of the Lada Granta are quite reliable, but they still wear out and need to be replaced. The brake system on this car is the most common. Disc brakes at the front, drum brakes at the rear - this is a classic design. It is suitable for vehicles where high braking forces are unnecessary. Replacing rear and front pads is labor-intensive, but in this article we will look at the nuances.
When is it time to change brake pads
The service interval for Grants is 15 thousand km, or one year. The maintenance regulations dated 06.2021 require checking the condition of the front linings at every service, and the rear ones at every second.
The front linings are more accessible for technical inspection. Their thickness is visually determined by removing the wheel. They are visible through the caliper slots.
The ease of rotation of the wheel when the brake pedal is released can be easily assessed by turning it by hand. Such a check will not be superfluous, for example, when changing tires during the season.
Defects involve partial disassembly, inspection of all components, measurement of the residual thickness of parts, checking the functionality, mobility of components, and the tightness of the system. The maximum permissible thickness of the linings on the front and rear axles is 1.5 mm.
It is not possible to look under the rear drum to judge the thickness of the lining by eye. The drum must be removed.
The main signs of wear on the Lada Granta pads are a metallic grinding sound, an increase in pedal travel, a drop in the fluid level in the reservoir, an increase in braking distance, the car pulling to the side, beating, and deterioration in the effectiveness of the handbrake.
The mileage of pads before replacement is very individual. They structurally have different rigidity, and therefore resource.
Choosing pads for Grant
Pads are consumables. Sooner or later they will have to be replaced, so it is advisable to have a set in stock. Then, most likely, defects will smoothly turn into replacement, and the work can be completed faster.
The original pads are produced by the Russian company TIIR.
The catalog number of the front brake elements Grants with an anti-squeak plate is 21920-3501080-10.
At the rear, components are installed for both a system with and without ABS. The version for ABS differs not only in the hole for the sensor, but also in the lining material, adapted to work with the anti-lock system.
Catalog numbers of rear brake pads for Grant:
- With ABS - 21920-3502090-55
- without ABS - 2108-3502090
Among foreign analogues, such eminent manufacturers as TRW, ATE, Brembo, Bosch and others enjoy the largest number of positive reviews. They all produce high quality products. Therefore, the choice of the best parts depends on the preferences and financial capabilities of the owner.
For a quiet ride, softer linings are suitable, which will ensure comfort and safety of discs and drums. At the same time, they themselves wear out faster. The wear of brake elements for sports driving is more intense. There are pads with and without a wear sensor.
Brake fluid compatibility
For topping up, you can use liquid from the same manufacturer, but subject to the following principles:
- Only liquid with a higher rating number can be added, that is, DOT 3 can be filled with DOT 4, and DOT 4 can be filled with DOT 5.1.
- Do not mix DOT 5 with other brands - DOT 3, DOT 4, DOT 5.1.
- Do not mix mineral (e.g. LHM+) and glycol fluids.
If you break the rules, this will lead to a serious change in the characteristics of the liquid for the worse.
Differences between ABS brakes
The main difficulty lies in ignorance of the nuances of operation and the main differences from the same procedure on conventional brakes.
Different car models have their own types of ABS, the design of which differs from each other. This leads to the fact that each brand of car has its own nuances of the system bleeding procedure.
Bleeding brakes with ABS has three main differences from conventional ones:
- the pipeline system in the presence of ABS is under increased pressure;
- During the procedure, constant monitoring of the brake fluid level will be required;
- the pump runs for no more than 10 minutes.
If you do not control the brake fluid level in the system, it will reach a critical minimum and the drive pump will begin to pump air.
This will quickly damage the device.
If the pump runs longer than the set 10 minutes, turn off the ignition and allow the unit to cool for 10-15 minutes.
How often to change brake fluid
The question of when to change the brake fluid can be answered unambiguously: once every two years or after 40,000 mileage. These are general recommendations.
If the car is operated in harsh conditions, then the brake fluid needs to be changed more often.
How many car enthusiasts follow the recommendations? Units. Most people simply add brake fluid or change it when their brake performance gets worse.
Conventional topping up cannot fully compensate for changes in the properties of the liquid - the boiling point drops, the chemical composition changes, and anti-corrosion additives work worse. You can use the topping up method only when carrying out repairs or in the event of a leak, when you just need to get to a service station or garage.
You can determine unsuitable brake fluid:
- Through a complete analysis using special equipment.
- “To the eye” - the old liquid is dark in color, while the new one is translucent.
- Using a device that determines the amount of moisture in a liquid. If it’s less than 3.5 percent, then you can still drive.
Step by Step Actions
The nuances of pumping depend directly on the ABS model. The location of individual components and the presence or absence of additional modules affect the order of the procedure.
The preparatory stage is the same regardless of the car brand. Turn off the ignition and press the brake pedal intensely several times.
Pumping using the example of Lada Granta
The car is placed on an overpass or driven into a pit. This is necessary so that you do not have to remove the disks for free access to the working surface. Next, turn on the ignition to open the solenoid valves. Start the procedure with the right rear wheel.
To bleed the brakes you need:
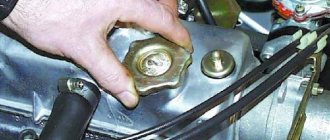
- Disconnect the wires from the tank cap;
- remove the cover;
- pour brake fluid into the reservoir (as much as will fit);
- remove the cap;
- use a spanner wrench to loosen the tension on the fitting;
- the prepared hose is connected to the tip of the fitting;
- place the second end of the hose in a container for waste liquid;
- press the brake pedal several times;
- fix the pedal in the lowest position and hold it;
- use a key to open the fitting;
- wait until the liquid has completely drained (at this moment the brake pedal will “fall” to the floor);
- close the fitting;
- pump the pedal again and repeat the procedure until the liquid flowing from the hose no longer contains air bubbles;
- tighten the fitting;
- remove the hose;
- reinstall all parts.
The process is repeated on each wheel in order of priority.
Bleeding the brakes of Lada Priora
The process of bleeding the ABS brake system for the Lada Priora is similar to the previous one. When bleeding the front wheels, the discs are removed, providing better access to the working surface.
After completing the process, you should not immediately drive out onto the road. First, they check the functionality of the system in a safe area, eliminating leaks and failures of the pedal.
How to change brake fluid
It is best to do this at specialized service stations. Most modern cars have an ABS system, and this leaves its mark on the procedure. Special equipment is required to pump the system with new fluid.
If you are told that you can change brake fluid without bleeding without special equipment, then do not listen to this advice. Yes, on some wheels the pressure from the reservoir can push through the system, but on all of them this will not happen. As a result, air or old fluid will remain in the system. At service stations, fluid is replaced under pressure, so subsequent pumping is not required.
The replacement procedure itself is as follows. New fluid is poured into the empty expansion tank of the cooling system, after which pumping occurs on each line, during which the new fluid displaces the old one.
The average brake fluid volume ranges from 0.75 to 1.3 liters.
Changing brake fluid without special equipment is clearly described in the video below:
Types and types of ABS anti-lock systems
Based on the number of control circuits, there are three types of anti-lock braking systems:
- single-channel - when one wheel is blocked, all four are released;
- two-channel - triggering occurs based on data from the best (high-threshold) or worst (low-threshold) wheel;
- four-channel - each wheel is adjusted separately, which ensures maximum braking efficiency.
Important! Modern cars are equipped with four-channel systems.
Depending on the location of components and maintenance features, there are three types of ABS:
- with components (hydraulic module, valves, accumulator and pump) located in a single unit;
- with components spaced in the form of different units;
- with optional SBC and ESP systems.
Despite the complicated design, it is quite possible to replace ABS brake fluid yourself.
Summary
You can replace the fluid yourself only on cars with a hydraulic accumulator and valves combined into one unit. List of required equipment:
- syringe with extension tube or bulb;
- transparent containers;
- transparent tube 20-30 cm long;
- open-end wrenches at “8” or “10”.
Briefly about the procedure for replacing brake fluid in a car with ABS on your own:
- replace the composition in the tank with a new one;
- bleed the left and right front brake cylinders;
- bleed the rear right cylinder with the brake pedal depressed and the pump turned on;
- bleed the rear left cylinder with the brake pedal released and the hydraulic pump turned on;
- check the system for leaks.
If there is a drain fitting on the ABS module, you should use the classical method according to the scheme specified by the factory to bleed all 4 brake cylinders, and then “drive” the ABS installation with excess pressure supplied from outside.
The serviceability and reliability of the brakes largely depends on the condition of the fluid in the system circuits. The mentioned consumables are far from eternal and during the operation of the machine they lose their working properties. Replacing brake fluid with your own hands is a completely common operation for experienced car enthusiasts who prefer to personally service the vehicle and thus save on car service costs. The procedure is really simple and accessible to every owner of a budget car.
Drain
First of all, during replacement, the old fluid is drained. It is performed as follows:
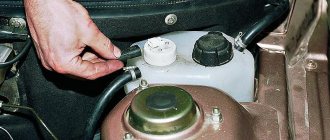
- The lid of the tank needs to be unscrewed. It contains brake fluid. The lid can be put aside, but it is better to place a rag under it, since the composition is in excellent contact with surrounding surfaces, without affecting them very well.
- The next step is to unlock the pressure regulator on the rear wheels, if necessary. To unlock this design, you will need to install a screwdriver between the plate and the piston.
- After this, you should prepare a hose and a container to drain the old fluid. It is best to use an empty bottle if you don’t have a container at hand. Before draining, it is necessary to clean the fitting from dirt using a brush. Subsequently, a hose will be attached to the fitting.
- Once the fitting is cleaned, you will need to remove the cap from it and insert one end of the hose into the hole, and the other should go into a container or bottle. Then you will need the help of a second person. He will need to get into the car and press the brake pedal several times. This must be done sharply so that the liquid can be drained, but between each press it is necessary to maintain a short break.
- As soon as the liquid stops flowing, you need to pull the hose out of the hole, wipe the fitting with a rag and close it with a lid. In this case, it is important to tighten the cap correctly. So, for example, if during the process of unscrewing it was loosened by 3/4, then it should be tightened by the same amount.
- The final action will be to begin pouring the new compound while tightening the fitting. As soon as new liquid begins to flow out of the existing hole, you can screw the cap on completely.
This fluid drain diagram is for rear brakes. As for the front ones, the procedure is practically no different. The main difference is only in the location of the fittings, but this will not be a problem if you familiarize yourself with the structure of the car and the brake system in advance.
Thus, the brake fluid is drained from both the front and rear brakes, after which it will be possible to begin filling in new fluid.
All motor oils recommended for use
Engine oil is usually replaced along with a paper filter. This consumes 2900 ml of fluid (for versions with automatic transmission – 4100 ml). The intervals between replacements are indicated in the service book. Recommended materials for use:
| Brand | Viscosity SAE | Quality |
| Lukoil LUX | 15W40 | SL/CF (B5/D3) |
| Lukoil LUX semi-synthetics | 5W30, 5W40, 10W40 | SL/CF (B5/D3) |
| Lukoil LUX synthetic | 5W30, 5W40 | SN/CF (B6/D3) |
| Rosneft MAXIMUM (Angarsk, Novokuibyshevsk) | 5W40, 10W40 | SL/CF (B5/D3) |
| Rosneft PREMIUM (Angarsk) | 5W40 | SM/CF (B6/D3) |
| TNK MAGNUM SUPER | 5W30, 5W40, 10W40, 15W40, 15W50 | SL/SJ/CF (B5/D3) |
| Gazpromneft PREMIUM | 10W40 | SL/CF (B5/D3) |
| G-ENERGY S SYNTH, F SYNTH | 5W40, 10W40 | SL/CF (B5/D3) |
| G-ENERGY EXPERT L | 5W30, 5W40, 10W40 | SL/CF (B5/D3) |
| GT TURBO SM (Hanval INC) | 10W40 | SM (B5) |
| ESSO ULTRA | 10W40 | SL/SJ/CF (B5/D3) |
| MOBIL 1 ESP FORMULA | 5W30 | SN/SM/CF (B6/D3) |
| MOBIL 1 NEW LIFE, PEAK LIFE, SUPER 3000 X1 | 0W40, 5W40, 10W40, 5W50 | SN/SM/SL/SJ/CF (B6/D3) |
| MOBIL SUPER 2000 X1 | 0W40, 5W40, 10W40, 5W50 | SL/SJ/CF (B5/D3) |
| SHELL HELIX PLUS | 5W40, 10W40 | SL/CF (B5/D3) |
| SHELL HELIX ULTRA, HX7, HX8, PLUS EXTRA | 5W40, 10W40 | SM/CF (B6/D3) |
| ZIC A PLUS | 5W30, 10W30, 10W40 | SL (B5) |
To narrow the range of choices, be guided by the climatic conditions in which the car will be used. It is recommended to determine the viscosity class based on air temperature:
| lower limit | Viscosity grade | Upper limit |
| –35 and below | 0W40 | +30 |
| –30 | 5W30 | +25 |
| –30 | 5W40 | +35 |
| –25 | 10W30 | +25 |
| –25 | 10W40 | +35 |
| –20 | 15W40 | +45 |
| –20 | 20W50 | 45 and above |
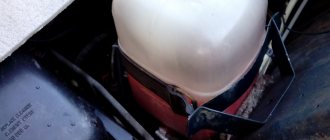
It is recommended to change the oil at a service station (service station). , however, the owner himself can add liquid to the tank.
Adding oil to the expansion tank