Do-it-yourself modification of the stove on Niva 21213 is necessary if the car’s heating system malfunctions. There is no point in delaying this, because uneven thermal regulation leads to foggy windows or icing. In any of these cases, the view of what is happening on the road deteriorates. The malfunction causes wear of individual elements of the device or manufacturing defects.
Improvement No. 1. We take air from the cabin
The main disadvantage of the Niva heater is that all the air into the heater radiator comes from the street, and when the air intake flap is closed, air circulation and heating stop completely.
To eliminate this drawback, I disassembled the heater (I had to drain some of the antifreeze and disconnect the heater radiator pipes), and in the side wall of the heater housing, opposite the wall where the radiator tubes exit, I made a hole in the shape of a rectangular trapezoid. I did it in such a way that there was 1.5-2 mm of the body wall left to the boundaries of the plane in which I made the hole, and 6-8 mm from the side of the stiffener for attaching the petal valve. I made the hole using a drill, marked it, drilled along the contour of the small diameter holes, then connected the holes using a knife, then filed the edges of the resulting hole, giving it its final shape. The area of the resulting hole was approximately 25 square centimeters. It is through this hole, when the heater air intake flap is closed, that air is drawn from the passenger compartment. Since the salon is a closed space, air circulation occurs in a closed circle, and the warming up air of the salon, passing through the heater radiator, becomes increasingly hotter at the exit. Despite the small size of the hole, due to the absence of a supply of icy air from the street, the time for warming up the interior to a comfortable temperature and melting icy glass is reduced by 4-5 times, and it is possible to achieve a comfortable temperature even in severe frost.
To prevent cold air from entering the cabin through the hole when the air intake flap is open and the heater fan is turned off, a petal valve is installed on the hole on the inside of the heater housing, which does not interfere with air intake from the cabin. The petal valve is a rubber band cut from a car chamber (preferably from a truck), 1.5-3 mm thick, in the shape of a hole, but slightly larger, and attached to a bolt in such a way that it can freely bend inside the heater body, opening the access of air from interior, and fit snugly against the wall of the heater housing, blocking the hole for the passage of cold air into the cabin, past the heater radiator.
Interior ventilation
Outside air can enter the vehicle interior:
- through open door windows;
- through nozzles 2 (Fig. 1-6) for blowing the windshield, if you move distribution lever 8 and lever 7 for controlling the air supply hatch cover to the right;
- through the side nozzles 1 for blowing the door windows, if you move lever 7 to the right and lever 8 to the left;
- through holes 9 of the heater casing into the driver's and front passenger's foot area, if you open the heater cover with lever 10 and move lever 7 to the right;
- through the central nozzles 5 directly from the air supply box when the car is moving, if the regulators 3 open the nozzle flaps (summer airflow). By moving lever 4 in the horizontal and vertical directions, the direction of the air flow from the nozzle changes.
In the middle position of lever 8 and in the right extreme position of lever 7, air will flow through nozzles 1 and through nozzles 2.
If the car is moving at low speed, you can increase the amount of incoming air by turning on the electric heater fan with switch 12.
How to remodel the stove on Niva 21213 with your own hands?
Step-by-step do-it-yourself replacement of the Niva Chevrolet stove fan
Do-it-yourself modification of the stove on Niva 21213 is necessary if the car’s heating system malfunctions. There is no point in delaying this, because uneven thermal regulation leads to foggy windows or icing. In any of these cases, the view of what is happening on the road deteriorates. The malfunction causes wear of individual elements of the device or manufacturing defects.
Fault Diagnosis
The stove supplied as standard will need to be modified for preventive purposes. The procedure will not take much time, but it will prevent many problems in the future. Driving experience suggests that the first severe frosts will undermine the “health” of the device. The list of main weaknesses is as follows:
- the optimal operating temperature range for model 2121 is from -5 to +10°C;
- inability to warm up the air in the cabin if outside is -8°C or lower;
- when the blowing power increases, the temperature does not increase;
- When driving in 2nd gear, the noise from the Niva's stove becomes significant.
That is why it is better to take the necessary measures in advance. The driver has few alternatives. On the one hand, everything remains in its place. The heating device is used at minimum power. During mild winters this is still tolerable, but with the onset of real cold weather the conditions will become unbearable. On the other hand, it's easy to spend a few hours rectifying the situation.
Technical details of the procedure
The efficiency of the new heating system on Niva will be determined not by the cost of the purchased parts, but by their quality. To operate, you will need the following elements: a car resistor, a figure-eight heater and a “snail”. It is a mistake to believe that only “original” spare parts are suitable for repairing a heating device. The main requirement is technical compatibility.
If in doubt, a drawing of the heating system will provide clarity. The further procedure is as follows:
- Cut a new mounting hole. This is done carefully, because the reliability of the heating system’s operation depends on the quality of the preparatory process. It is recommended to place the engine as low as possible in the air duct, otherwise the device will rest against the hood. This should not be allowed to happen, otherwise the stove fan will not last long.
The heating system of a new model is checked by test switching on. It is recommended to switch modes smoothly. The device must remain on each of them for at least 5-7 minutes. The driver’s task is to make sure that the operation of the system is not accompanied by extraneous noise and vibration.
LADA 4×4 URBAN Niva air conditioner and heater with cabin filter.
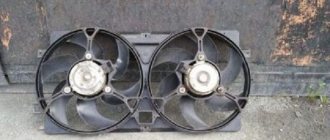
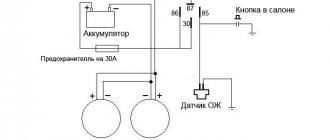
Radiator fans Niva 21214, connection diagram
You will need: flathead and Phillips screwdrivers.
Also interesting: How to unlock the steering wheel of a VAZ
1. Remove the window handle: remove the latch by prying it with a screwdriver between the latch and the washer.
2. Remove the door handle: take out the plug, prying it off with a screwdriver, and then unscrew the three fastening screws.
3. Remove the inner handle trim: pry it off with a screwdriver.
4. Remove the door trim (depending on the configuration and year of manufacture):
- Unclip the 8 plastic clips around the perimeter (two on each side and four on the bottom).
- Unscrew the door trim fastening screws around the perimeter (phillips screwdriver).
Procedure:
- Remove the door handle: take out the plug, prying it off with a screwdriver, and then unscrew the two fastening screws.
- Remove the inner handle trim: pry it off with a screwdriver.
- (For rear door trim) Remove the window handle: remove the latch by prying it with a screwdriver between the latch and the washer.
- Unscrew the door lock.
- Unscrew the screws securing the casing (4 on top under the plugs and 3 on the bottom).
- Remove the door trim by unclipping the rivets around the perimeter.
Read news about the new Niva
- Air conditioning Niva Chevrolet - design and repair
- Sound insulation of Lada 4x4 Niva according to the “Premium” option
- Niva tuning: 145 photos of ideas on how to improve the VAZ 2121 with your own hands
- Tuning for VAZ 2131 4×4 (LADA five-door) buy with delivery throughout the Russian Federation
- New Lada Niva 4x4 2022: photo of the interior in a new body, prices and when the updated model will be released
- Do-it-yourself Niva 4x4 tuning: updating the interior of the Lada VAZ-2121
- Tuning the Niva 2121 interior with your own hands: video instructions
- Tuning the VAZ 2121 interior - improving the Niva with your own hands Video
Dashboard
For subsequent modifications of the VAZ 2121, the instrument panel was thoroughly redesigned. In particular, the design and location of the warning lamps have changed, and new scales have appeared on the instrument panel indicators.
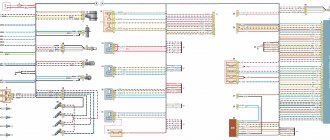
Conclusions: the owners of the VAZ 2121 car often serviced it themselves. And servicing electrical systems is impossible without original circuit diagrams. This was especially true for modernized versions, where changes were made to the operation scheme of components and assemblies.
vote
Article rating
Do-it-yourself modification of the Niva Chevrolet stove
Replacing the heater fan motor with impeller
Most often, tuning fields are carried out for off-road use. This is not a complex technological process; it is enough to install the following elements on the car:
- Power kit. Includes a heavy-duty front bumper made from bent steel tubing with a platform for a winch. Making this product is not difficult, you only need to have tools and equipment for working with metal: a pipe bender, a grinder, a welding machine
- Off-road tuning of a Chevrolet Niva necessarily involves replacing standard wheels and tires. The following sizes are perfect here: 1. 215/75/ R15. 2. 205/70/ R16. 3. 205/80/ R16. The first numbers are the tire size, its height and width, the designation after the letter R is the rim diameter. For the last two values, modifications to the front wheel arches may be necessary. Everything here will depend on the width of the tire.
- Installation of a snorkel - an exhaust pipe that goes to the roof. This is necessary if the Niva Chevrolet will be used in extreme off-road conditions.
- A separate item is the installation of a winch on a Chevrolet Niva. Do not assume that this equipment is only necessary for those who participate in competitions. This practical equipment will be an excellent helper during outdoor recreation, as well as in the country and fishing. It is enough to install an electric winch and the car will not care; it will be able to pull itself out of a hole or ditch, and will also help others. The equipment body can be hidden under a homemade metal casing.
Tuning a Chevrolet Niva for off-road use can be complemented with protective, military paint, matte or glossy. This requires certain knowledge. The repainting process is quite labor-intensive and requires an appropriate mark in the technical documentation, so painting is not a mandatory element of tuning 2123 Chevrolet Niva.
Heater diagram
1 – damper; 2 – electric fan casing; 3 – fan electric motor; 4 – impeller; 5 – heater radiator; 6 – radiator inlet pipe; 7 – radiator outlet pipe; 8 – radiator casing; 9 – air duct damper; 10 – air duct box; 11 – air duct for heating the windshield;
12 – central deflector damper; 13 – central deflector; 14 – crane control lever; 15 – control lever for the windshield heating flap; 16 – air duct damper control lever; 17 – control lever bracket; 18 – windshield heating flap; 19 – windshield heating damper cable.
And also interesting: Niva permanent all-wheel drive - How it works and rules of use.
Fault Diagnosis
The stove supplied as standard will need to be modified for preventive purposes. The procedure will not take much time, but it will prevent many problems in the future. Driving experience suggests that the first severe frosts will undermine the “health” of the device. The list of main weaknesses is as follows:
- the optimal operating temperature range for model 2121 is from -5 to +10°C;
- inability to warm up the air in the cabin if outside is -8°C or lower;
- when the blowing power increases, the temperature does not increase;
- When driving in 2nd gear, the noise from the Niva's stove becomes significant.
That is why it is better to take the necessary measures in advance. The driver has few alternatives. On the one hand, everything remains in its place. The heating device is used at minimum power. During mild winters this is still tolerable, but with the onset of real cold weather the conditions will become unbearable. On the other hand, it's easy to spend a few hours rectifying the situation.
Further developments proceed as follows. If the heating in the car is running at ½ power, you can limit yourself to minor repairs. The main thing is to make sure that there are no noises or extraneous knocks, otherwise the Niva 21213 should immediately go for a technical inspection.
The presence of an unpleasant sound indicates the need to replace the device. A specialized retail network offers ready-made options for heating mechanisms for Niva. If desired, it can be assembled independently.
The second option is considered more preferable. When you assemble it yourself, you have the opportunity to literally personalize the stove. To do the work yourself, you will need to visit a specialized store or market to buy spare parts.
When purchasing, original parts or analogues are selected. The main thing is that they have a quality certificate. Otherwise, they cannot be installed. It would be useful to rewrite the technical data of the vehicle so as not to exceed the parameters recommended by the manufacturer.
Original parts vs analogues: practical advice
As mentioned earlier, such a choice does not affect the quality of the heating system. At the same time, car mechanics make several reservations. For those who plan to use VAZ stoves, it would be useful to check the power system. It is different for some modifications. That is why all actions are consistent with the drawings.
It is permissible to use the VAZ 2108 heater, provided that two recommendations are followed. Firstly, the mounting socket is 1-2 cm larger than the size of the device. The additional area will reduce the vibration impact. Secondly, the switch is installed taking into account the specifics of the VAZ heating system. You will have to tinker less when minor modifications to the system are needed.
The ventilation system is updated in 1-2 hours, depending on the degree of wear of the engine.
If the factory-installed “snail” has no signs of physical wear, you only need to replace the heater “engine” itself.
It’s worse if the factory equipment of a Chevrolet model has manufacturing defects. A complete replacement of the device is recommended. This will save time.
The operation of the heating system determines the comfort and safety of driving. The driver constantly monitors the system's performance. If extraneous noise appears, it is necessary to urgently carry out a technical inspection.
Removing the radiator of the VAZ-2121 stove
The procedure for removing the heater radiator on a VAZ Niva does not require special skills and abilities
It is important to prepare the necessary materials and tools in advance. Most instructions for repairing car heaters contain a recommendation to drain the coolant before starting work.
In practice, many car enthusiasts limit themselves to draining only that part of the antifreeze that is located in the radiator itself and the nearby pipes of the cooling system.
Preparing tools
To replace the radiator, you will need the following tools:
- pliers;
- slotted screwdriver;
- Phillips screwdriver;
- a set of markers for identifying wires;
- spanner set to “7”;
- socket wrench set to “10”;
- socket wrench set to “7”;
- socket wrench set to "10".
Procedure for dismantling the radiator
All operations must be performed in the following sequence:
Unscrew the left self-tapping screw securing the storage shelf. The self-tapping screw is unscrewed with a Phillips screwdriver. Unscrew the two self-tapping screws for the right shelf fastening. The right side of the shelf is attached to the interior upholstery. Unscrew the central fastener of the shelf from the front panel
The central part of the shelf is unscrewed from the front panel. Carefully lower the right side of the shelf. The right edge of the shelf moves down freely. Move the left side of the shelf out of the center console panel
There is a special spike on the left side of the shelf. Unscrew the self-tapping screw securing the floor tunnel lining to the radio mounting panel. The lower part of the panel is also fixed with a self-tapping screw. Unscrew the screws for the left and right fastenings of the central panel. The process is shown on the right side, the left side is similar. Remove the radio panel. The panel is moved to the side. Disconnect the wire connectors from the radio panel. The wire blocks are disconnected to completely remove the radio panel. Completely dismantle the panel. After disconnecting the wires, the panel can be easily removed. In the engine compartment, loosen the clamps securing the hoses to the radiator pipes. Loosening the clamp is shown using the example of the lower pipe; a similar operation is performed with the upper one. Unscrew the screws securing the seal from the front panel. The screws are unscrewed with a socket wrench with a head set to “7”. Remove the seal. The removed seal allows you to remove the radiator pipes from the engine compartment. In the passenger compartment, loosen the nut securing the crane drive rod. The fastening nut is unscrewed with a “7” key. Remove the heater tap drive rod. The rod is removed from the valve lever. On the right side of the fan casing, remove the heater tap rod from under the bracket. The rod is disconnected from the fan casing. Disconnect the spring brackets securing the casing. The brackets are pryed off with a slotted screwdriver. Remove the casing and fan. The casing with the fan is moved to the side. Remove the radiator. After removing the fan, the radiator is carefully removed from its compartment. Unscrew the faucet fastening from the radiator. The tap and pipes are turned off with a key to “10”. Remove the heater tap. The removed tap is checked for leaks. Remove the lower nut securing the tap to the radiator. The lower nut often falls out and is lost. Disconnect the outgoing pipe. The two fastening nuts are unscrewed with a “10” wrench
After dismantling, you should carefully inspect the radiator for blockages in the grille and leaks from the tubes. Based on the results of the inspection, a decision is made on the possibility of repair or installation of a new radiator.
Video: installing a radiator
The process of replacing the heater radiator on a classic Niva has been studied far and wide by many car owners. In fact, the procedure is similar to the entire family of AvtoVAZ classics
However, caution and safety precautions should be observed when working. After completing the repair, before driving on public roads, you must make sure that all components and mechanisms of the vehicle are operating normally.
Only then should you begin daily use of the machine.
- 5
- 4
- 3
- 2
- 1
(11 votes, average: 4.4 out of 5)
Do-it-yourself repair and replacement of the Niva Chevrolet car heater
Diagnosis of faults, repair and replacement of elements of the VAZ 2113-15 stove with your own hands
Diagnosis of faults, repair and replacement of the Chevrolet Lanos heater radiator with your own hands
Heater device
1 – side deflector; 2 – side air duct; 3 – air duct for heating the windshield; 4 – central deflectors; 5 – air duct damper cable; 6 – air duct damper; 7 – stove radiator; 8 – radiator seal; 9 – radiator casing; 10 – radiator outlet pipe; 11 – radiator inlet pipe;
12 – stove tap; 13 – air distribution cover; 14 – electric fan casing; 15 – fan impeller; 16 – fan electric motor; 17 – stove tap cable; 18 – windshield heating damper cable; 19 – bracket for heater control levers; 20 – air duct damper control lever; 21 – control lever for the windshield heating flap; 22 – lever for controlling the stove tap.
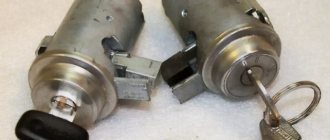
What is a stove tap, its functional features and location
The stove tap is a metal part that resembles a regular water tap. Antifreeze (coolant or coolant) constantly flows through it.
In the Chevrolet Niva, the coolant can flow through 2 cooling circles: winter and summer. The heating tap gives the driver the opportunity to switch to one of them. For example, with the onset of summer, when the tap is fully open, it is almost unbearable to be inside the car due to the heat, so it is closed for this period of time, and with the onset of cold weather, the tap is opened again. Due to active use, the part eventually becomes unusable and leaks coolant.
It is very easy to determine whether a part is faulty - lift the cover in the Chevrolet Niva interior. If there are obvious signs of leakage, the unit must be replaced.
In the diagram you can see where the heater tap is located and the circulation of antifreeze in two circles
Preparatory stage
Before proceeding with dismantling the structure and installing a new faucet, it is necessary to accurately determine the cause of the problem. Often, antifreeze leaks into the interior appear due to wear of the rubber gaskets located between the heater tap and the radiator. In this case, the problem can be resolved by replacing worn-out products with new ones.
If the reason lies precisely in the breakdown of the crane, then it makes sense to first familiarize yourself with the models and design options on sale. The modern range includes both metal and ceramic taps, differing in price and performance characteristics. According to most car enthusiasts, ceramic products have a higher durability and longer service life.
Improvement No. 3. Installing the grille on the air intake
When disassembling the heater, a large number of tree leaves and insect remains were found in the air intake casing and in the honeycombs of the heater radiator grille, which also reduced the efficiency of the heater. Therefore, after cleaning and flushing the heater core, I took measures to prevent the radiator from clogging.
To do this, I bent a wire frame to the size of the air intake inlet, covered it with a nylon mesh with a 1x1 mm cell, and installed it at the bottom of the rubber seal of the air intake inlet. It was perfectly fixed there in the fold, like an accordion, without additional fastening.
All work to modify the heater took me about 4 hours of time and did not cost a penny of additional costs. Unfortunately, during work I didn’t think to take a photo, but from the attached drawing and picture everything should be clear. I'm happy with the result, now the stove heats better.
Niva-stove cabin filter and fan motor 2108 are easy to install with your own hands in a Niva VAZ 2121 21213 21214 2131 LADA 4x4 URBAN 21215, 21219, Niva-Bronto, 2129, 21310, Niva-pickup, 21214-M, LADA 4x4 URBAN.
However, not everyone has time for such experiments; work and household chores can easily discourage the desire to remodel the stove in Niva. Despite the apparent cheapness of independently remaking a heater fan in Niva, personal time spent on remaking the stove can negate all savings. But the most annoying thing is when, having started to remodel the stove in Niva, for various reasons (some need to ask for welding, someone needs to look for an electrician to connect the fan), the matter is delayed, the money is spent, the stove in Niva has not yet been remade, and winter comes unexpectedly!
Everyone on our team has a Niva car, and we know this problem firsthand. Therefore, we offer various kits for remodeling the stove on a Niva, adjusted to size and ready for installation on both carburetor and injection Nivas. Niva stove kits for installing fan 2108 in Niva are very diverse in composition. From the most complete set (painted air intake housing for mounting fan 2108, rheostat, speed switch, handles, bolts, seals, volute 2108, reinforced electrical harness for connecting to standard wiring without damaging it) to any individual element. You can choose which items you already have and which you need to purchase. And time saved is essentially money saved. And believe me, no matter what method you choose to remodel the stove on your Niva, when you complete the remodel, the finished result will give you only positive emotions! And you will love your Niva even more.
Other details
The standard heater radiator and thermostat are also replaced.
Preference is given to three-row copper radiators. They are more efficient in operation and leak less often. The thermostat is replaced with an analogue one or its thermal insert is modified. Do-it-yourself modification of the stove on Niva 21213 with your own hands is quite labor-intensive and takes a lot of time. To modify the heating system of this car, you can find ready-made kits on sale that make this work easier. The procedure is presented in the video “Remaking the stove on Niva 21213 with your own hands: video instructions.”
Methods for modifying the stove in a Chevrolet Niva car
Before the heater is improved, it is necessary to understand the principle of operation of the dampers. Then you should completely dismantle the decorative panels located on the left side of the Chevrolet Niva stove. The next step is to remove the regulator responsible for the position of the dampers. When optimizing your car, you need to understand the design of the heating device, which will allow you to dismantle the “unnecessary” equipment without unnecessary delays. The motorist must remove the lower part of the regulator, through which the front flap is activated.
When dismantling all the plastic elements, you should not try to abruptly remove the parts, since almost all the components of the device being disassembled are made of fragile plastic, which breaks even under more or less significant impact. If, however, due to haste or carelessness of the owner of the movable property, the lower part of the device being removed gets a crack, it can be hidden with a soldering iron.
Modifying the Chevrolet Niva stove with your own hands involves the need to secure the lower damper so that it is tightly closed in the upper position. Of course, such a modernization completely eliminates the ability of the motorist to take advantage of the “front” position, however, it provides many other more significant advantages.
Once the “front” of the stove is in the closed position, you will need to think through the trajectory of the element that regulates the simultaneous supply of heat to the glass and legs. It is worth noting that skilled craftsmen, when upgrading their Chevrolet Niva, use all available means, in particular, an ordinary discount card will be useful for optimizing the stove. By means of which a cut line is drawn, then the element is glued with cyanoacrylate and filed to size with a file.
The modification of the Chevrolet Niva heater should be completed after the hand-cut part is glued with superglue.
The Chevrolet Niva is equipped with a liquid-type heating system combined with an engine cooling radiator. This design, the main function of which is to heat the interior, allows, if necessary, to increase the intensity of engine cooling. In addition, the LC and GLC trim levels include air conditioning.
Perhaps the problem is not in the interior heater, but in the cooling system. With the help of damper position regulators, warm air is directed to different parts of the cabin. First, the dampers should be adjusted.
To supply hot air to your feet, follow these steps: The engine warms up until the warm air can be felt with your hand. The heater fan speed switch is set to position 4.
This sequence of actions is due to assembly errors. Due to gaps and backlashes, interference is created with air distribution and installation of the damper in the desired position the first time. If after these steps the heat still does not reach your feet, the heating system needs to be modified.
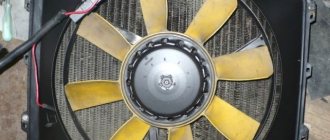
The aluminum radiator heats up quickly, is inexpensive, has good rigidity and is light in weight.
The Chevrolet heating system ensures high-quality engine operation, preventing overheating, which leads to engine failure. The interior heater of the Chevrolet Niva model is liquid. Warm air is exhausted inside the car, cooling the running motor. Two types of heating systems are available: without air conditioning and equipped with air conditioning. The interior heater does not require additional maintenance during normal operation of the Chevrolet Niva model.
Replacing the faucet
There is another element in the design of the Niva’s heating system that significantly reduces its performance. This is the stove faucet. It has a small cross-section, which in turn significantly slows down the circulation of antifreeze in the system, which is why the stove needs more time to warm up. Replacing this faucet will help improve the situation. The best option is to install this element from a foreign-made car. Heater taps from some Opel or Volkswagen models have proven themselves well.
The faucet is replaced as follows:
- It is necessary to open the hood and get close to the heater hose in the engine compartment, then loosen its clamp and remove the hose from the pipe.
- We unscrew the screws that secure the seal to the plane of the partition.
- Remove the sealant layer by first prying it off with a screwdriver.
- The glove compartment is removed.
- It is necessary to loosen the screw that secures the faucet by approaching it from the interior.
- There is a control cable on the crane lever; it must be removed.
- Depending on the design of the Niva-21213 stove, its body can be secured with two nuts or two screws.
- The new heater tap is installed on the car in the reverse order.
We emphasize that in the case of a screw fastening of the stove faucet to the heat exchanger, this procedure is somewhat problematic, since the nuts constantly fall out. To do this, they simply need to be secured with plasticine or chewing gum. In addition, it is worth adjusting in advance the cable that controls the position of the heater tap. If this is neglected, then during the operation of the stove you will have to constantly climb under the dashboard in order to set its position.
Fault Diagnosis
The stove supplied as standard will need to be modified for preventive purposes. The procedure will not take much time, but it will prevent many problems in the future. Driving experience suggests that the first severe frosts will undermine the “health” of the device. The list of main weaknesses is as follows:
- the optimal operating temperature range for model 2121 is from -5 to 10°C;
- inability to warm up the air in the cabin if outside is -8°C or lower;
- when the blowing power increases, the temperature does not increase;
- When driving in 2nd gear, the noise from the Niva's stove becomes significant.
That is why it is better to take the necessary measures in advance. The driver has few alternatives. On the one hand, everything remains in its place. The heating device is used at minimum power. During mild winters this is still tolerable, but with the onset of real cold weather the conditions will become unbearable. On the other hand, it's easy to spend a few hours rectifying the situation.
Further developments proceed as follows. If the heating in the car is running at ½ power, you can limit yourself to minor repairs. The main thing is to make sure that there are no noises or extraneous knocks, otherwise the Niva 21213 should immediately go for a technical inspection.
The presence of an unpleasant sound indicates the need to replace the device. A specialized retail network offers ready-made options for heating mechanisms for Niva. If desired, it can be assembled independently.
When purchasing, original parts or analogues are selected. The main thing is that they have a quality certificate. Otherwise, they cannot be installed. It would be useful to rewrite the technical data of the vehicle so as not to exceed the parameters recommended by the manufacturer.
There are two main radiator malfunctions:
- Clogged grille and radiator tubes.
- Radiator leakage.
Since the Niva is often operated in difficult road conditions, the likelihood of contamination of the grille from dusty outside air is very high. Clogging of the cells reduces the heat transfer area of the radiator, and as a result leads to a decrease in the heat released from the air ducts into the passenger compartment. In such cases, the stove radiator is dismantled and washed under high pressure.
A leak in the radiator tubes can be determined by a coolant leak, which usually forms on the right side of the center console in the passenger foot area. As a rule, a leak is accompanied by the smell of antifreeze (antifreeze) in the cabin. Don't rely on the smell of antifreeze alone. Coolant vapor is very volatile and can be misleading as to the source of the leak. The smell of antifreeze also indicates a leak in the engine compartment.
The leakage of the heater radiator occurs due to natural wear and tear of the metal from which it is made. Constant cycles of heating and cooling, exposure to various chemicals and consumable liquids eventually lead to the destruction of the metal and the formation of cracks. Cracks in a copper radiator can be soldered. The aluminum radiator will have to be replaced with a new one.
Typical malfunctions of the VAZ-2121 heater radiator can be eliminated in a garage environment
What to do in case of breakdown
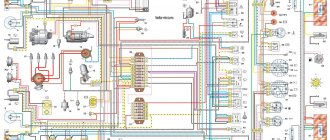
If serious problems are detected, the manufacturer recommends immediately bringing the car in for repairs. Operating a machine with a faulty electrical part can cause serious defects or accidents on the road. Also, when driving with broken lights or dimensions, traffic police officers may issue a fine or warning.
The electrical circuit of the Niva Chevrolet differs from the wiring of similar models due to its simplicity and ease of repair. The device does not contain highly complex units and parts that are difficult to replace. Due to the primitiveness of the design, the user can repair the machine himself, without the involvement of third-party specialists.
Tuning headlights of Niva 2121
Tuning the optics of the Niva 2121 sets the tone for the overall modernization concept. For example, installing headlights from Mercedes Gelandewagen will create the ambience of a powerful, aggressive SUV. Sports modifications of the headlights will add dynamics to the appearance and emphasize the streamlined shape. High power LED headlights can be installed to increase visibility. Another good option is to install lensed, crystal or bi-xenon headlights.
Helpful advice
The standard models have virtually no potential for modernization, so it is better to replace them with new ones.
Tuning the rear lights of the Niva 2121 is carried out according to the same scheme as upgrading the optics. It is easier and more efficient to replace standard lights with new modifications.
Possible heater malfunctions and ways to eliminate them
If the stove in a VAZ 21214 has stopped working, then, in principle, repairing it yourself is not a particularly difficult task.
The reasons for the malfunction why the Niva stove refuses to work are given below:
- Failure of the additional resistor. This element of the system is located behind the glove box and is designed to control the ventilating device for pumping warm air into the cabin. The problem is solved by replacement.
- Wear of pipes. Over time, the pipes begin to wear out, and temperature changes especially contribute to this. To detect worn hoses, each line must be carefully inspected. Wear may be indicated by cracks and other damage to the pipes through which antifreeze can escape.
- The heater valve is faulty. A breakdown of this component may be indicated by traces of a coolant leak in the vehicle interior. If the heater tap is being replaced, it is better to use a ceramic device; its service life is usually several times higher than that of traditional metal devices.
- Problems in the operation of the control unit. It is best to have this part repaired by a qualified electrician.
- The heater radiator has failed. On Niva 21213 you can easily replace it with your own hands, we will talk about this below (the author of the video is the OWNER G channel).
Diagnosis of heating and ventilation system faults
– Cause of malfunction
Elimination method
Heater fan motor does not work:
– The heater switch is faulty (check with an ohmmeter)
– The wires are damaged, their tips are oxidized or loose, fuse No. 1 is blown (no voltage is supplied to the electric motor)
Crimp the terminals, strip the tips, replace faulty wires, a blown fuse (checking the circuits it protects for short circuits)
– Wear, hanging of the electric motor brushes, break in the armature winding, oxidation, wear of the commutator (voltage is supplied to the electric motor, but it does not rotate)
– Short to ground of the armature winding (when turned on, the fuse immediately blows)
Heater fan motor does not operate at low speed:
– An additional resistor has burned out, its wires are damaged or their tips are not tightly put on
Replace the resistor, crimp the terminals, strip the tips, replace faulty wires
– Heater switch faulty
Heater fan motor armature rotates slowly:
– The collector is dirty or oxidized, the armature winding has an interturn short circuit (the fuse may blow). Seizing of the armature shaft in the bearings (creaking, squealing, the fuse may blow)
The car interior does not heat up well:
– Insufficient coolant temperature
Thermostat valve stuck open. Replace Thermostat
– There is little liquid in the cooling system
Add cooling system fluid and check the connections for leaks.
– Sticking of the valve in the closed position, sticking of the cable flaps or breakage of the control cables, loosening of their fastenings
Replace faulty faucets, cables, valves. Securely fasten the cable sheaths, lubricate the cables with engine oil, adjust the drives
– Heater radiator is faulty
The temperature in the cabin is not adjustable:
– Sticking of the heater valve, dampers, cables in the sheaths or their breakage, loose fastening of the cable sheaths
Replace faulty faucets, cables, valves. Securely fasten the cable sheaths, lubricate the cables with engine oil, adjust the drives
Source: avtomechanic.ru