Carburetor starter 2105, 2107 Ozone
The situation when a cold car engine refuses to start is known to almost any motorist. There are many reasons for this problem. Approximately 25% of their total number is due to a malfunction of the carburetor starting device. Often, owners of carburetor cars do not pay due attention to this small but very useful device. But in vain. With a fully functional and correctly adjusted carburetor starting device, starting the engine turns into a simple and easy procedure (you don’t need to constantly press the gas pedal, trick with pulling out and retracting the “choke” handle, etc.).
To better understand what it is - a carburetor starting device, and in connection with this, in the future, to properly regulate and configure it, you should know its purpose, structure and principle of operation. So, the object of our consideration will be the starting device of carburetors of the 2105, 2107 Ozone family. It should be noted that the starting device is present on all 2105, 2107 Ozone carburetors.
Purpose of the carburetor starting device 2105, 2107 Ozone
The carburetor starting device 2105, 2107 Ozone is designed to ensure a reliable start of a cold car engine. This is achieved by strong forced enrichment of the fuel mixture (2-3 times richer than when starting a warm engine) entering the engine cylinders during start-up mode.
Design and purpose of the main parts of the carburetor starting device 2105, 2107 Ozone
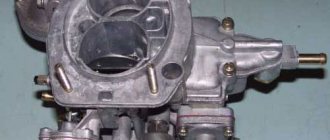
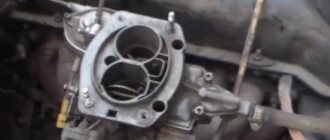
The images below show visible elements of the carburetor starting device 2105, 2107 Ozone.
On the front of the carburetor.
elements of the carburetor starting device 23105, 2107 Ozone (front view)
On the side part, the channel for supplying vacuum when starting the engine is clearly visible, from the throttle space into the cavity behind the diaphragm of the semi-automatic air damper opener of the carburetor 2105, 2107 Ozone.
elements of the carburetor starting device 2105, 2107 Ozone (side view)
And this is a hole in the channel for supplying vacuum from the throttle space. It is only visible if you remove the carburetor.
elements of the carburetor starting device 2105, 2107 Ozone (bottom view)
If you disassemble the carburetor a little - remove the cover and disassemble the opener body, you can again see the vacuum supply channel, the diaphragm in the opener body and the adjusting screw under the plug.
parts and elements of the housing of the diaphragm trigger mechanism of the carburetor 2105, 2107 Ozone
You can imagine the starting device of the carburetor 2105, 2107 Ozone in the form of a diagram, as is done in many manuals and books on carburetors.
diagram of the starting device for carburetors 2105, 2107 Ozone
Notes and additions
— The triggering threshold of the semi-automatic starting device is about 1500 rpm
Therefore, to reliably start the engine, it is also important to have a working starter and a charged battery.
— Remove the air filter housing and start the engine. Take a look at the carburetor from above. The air damper on it should automatically open slightly to the required starting gap. If it does not open slightly, the diaphragm in the opener body may be damaged, or the connections of the vacuum supply channel of the starting device may not be sealed.
Five more articles on Ozone carburetors
— Design of the upper part (cover) of carburetors 2105, 2107 Ozone
— Disassembling carburetor 2105, 2107 Ozone
— Diagram of carburetors 2105, 2107 Ozone
— The car engine starts and stalls (reasons related to the carburetor)
— Adjusting the carburetor air damper drive 2105, 2107 Ozone
Replacing the standard Solex carburetor on Niva 21213
Before installing a new carburetor, you need to perform several steps:
- Remove the old device;
- Install DAAZ 21083;
- Adjust the new carburetor.
To do this, open the hood of the car and take out the spare tire so that it does not interfere. Then, unscrew the fastenings of the air filter cover by hand and remove the filter element. Next, unscrew the nuts securing the housing and dismantle it.
We disconnect all the rods and hoses from the old device, unscrew the four nuts to 13 and remove the “Ozone”. Thoroughly clean the installation site of the new device and install a new gasket. The repair kit must be provided with such a gasket. If there are nicks on the collector, then it needs to be repaired.
Ream the mounting eyes of the new carburetor so that they coincide with the standard studs. Install it and tighten it crosswise. Assemble the parts of all the rods and reinstall the hoses. If you wish, you can install a system for pumping excess fuel back into the tank, or you can install a plug. The last option will be the most optimal, since there will definitely be no excess fuel. This happens because the float mechanism will work faster due to the small chamber, and its positions will change frequently. There is no need to monitor its level.
The air filter must be installed after the unit has been adjusted. It is better to change the filter element in advance.
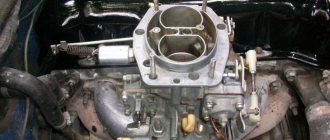
The process of removing the carburetor from the field
The process of removing the carburetor from the field
Main malfunctions of the Ozone carburetor
Like any mechanism, the VAZ 2107 carburetor sooner or later begins to act up, reduces its productivity and, in the end, may completely fail. The driver will be able to promptly notice the onset of a breakdown or malfunction if he carefully monitors the operation of the engine and carburetor. Thus, the following signs are considered symptoms of future breakdowns for Ozone:
- sharp pops when pressing the gas pedal due to detonation;
- high engine speed at idle;
- “floating” engine speed at idle, which indicates the need to adjust the idle speed;
- a long period of time between pressing the gas and accelerating the car. This is a sign of a malfunction in the drive of the second chamber of the carburetor or accelerator pump (or more often, both);
- black exhaust from the muffler, which is the first sign of clogged jets.
Engine won't start
The biggest problem with the carburetor is that the engine may simply not start - both cold and hot. This may be due to the following faults:
- valve depressurization;
- trigger wear;
- damper drive jamming;
- air damper axis play;
- ruptures in the diaphragm.
Video: what to do if the engine does not start
Overflows fuel
This malfunction is visible, as they say, to the naked eye. Spark plugs filled with gasoline do not produce a spark, and there may be puddles of fuel under the engine crankcase. The reasons lie in the following defects in the carburetor:
- breakdown of the starting device;
- instability of the accelerator pump;
- throttle valve sticking;
- clogging of jets;
- high fuel level in the float compartment.
Video: correct setting of the fuel level in the carburetor
No idle
Another problem typical for Ozone 2107 carburetors is the inability of the engine to idle. This occurs due to the solenoid valve being displaced from the workplace or due to its severe wear.
High idle speed
With this problem, there is a jamming of the throttle valve axis of the second chamber. The damper must always be in a strictly defined position, regardless of the operating mode of the carburetor.
The most common options for tuning the VAZ 2109 bumper
The most common options for tuning the VAZ 2109 bumper
The exterior design of the VAZ 2109 car is changed by many car owners in order to make this model truly unique and interesting. There are quite a few different ways to change the appearance of a car, some of which can significantly transform the design, while others help complement the style. Tuning for the VAZ 2109 bumper is selected taking into account the fact that this element of the car significantly changes the exterior design.
From the moment the car went on sale, owners began to want to change it. A similar desire was manifested by a change in the type of bumper, as well as the type of material used in its manufacture. Initially, it was simply repainted a different color, but the result obtained determined the low popularity of this method. At the same time, the mistakes made led to the fact that the paint coating quickly fell off under significant impact during movement: gravel, dirt, low and high temperatures.
Reasons for removing a part
Drivers of the “nine” dismantle the front and rear protective elements in such cases.
- Replacement of a VAZ 2109 bumper with the same (basic) one due to severe wear or breakage.
- Installation of a new, more beautiful, protective element.
- Lifting.
- Painting or straightening the body (followed by installing the protective element back).
- Removing the radiator, repairing lighting devices.
In the first case, the protection is removed because it has become unusable. Driving without a VAZ front bumper not only disfigures your car externally, but also leaves body elements and the engine cooling system unprotected. The situation is the same with the rear bumper: without it, the Lada does not look complete, and the body, muffler and rear suspension are at risk. Therefore, it is necessary to remove the damaged part and replace it with a new one. The factory element for BA3 2109 can be purchased everywhere in auto stores.
When replacement is made for the purpose of decoration or bumper tuning is performed, the driver removes the protection and looks for a new one to suit his taste. There are many options for lowered and chunky racing pieces on the market. Some people prefer to equip the “nine” with bumpers from its “successor” - Lada 2114. This is not the best step, because you will have to tinker with installation. The mounting holes are slightly different from those on the 2109. In addition, the rounded shapes of the 2114 exterior do not quite match the chopped style of the “nine”.
You will have to remove the factory part if you decide to completely repaint the body. After all, part of the body is located under the bumper. Dismantling is also necessary to get to the radiator and headlight wiring. If there are failures in the engine cooling system, there are times when you need to remove the radiator. In addition, there is a gap between the protection and the body (sagging), and many believe that such a solution spoils the appearance.
Car enthusiasts do the bumper lifting themselves. This procedure involves cutting off the top edge. Not everyone can do this kind of work with their own hands, and if you are not sure that you can cut the layer evenly, contact a specialist.
Features of bumper tuning
The buffers of classic VAZ models are also subject to changes. So the 2105 and 2107 series have some tuning features, and the newer 2108 and 2109 have others.
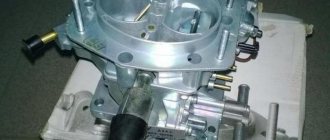
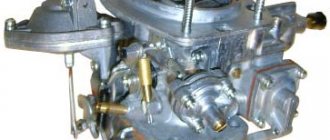
Installation of the OZONE carburetor
The OZONE carburetor is quite difficult to install and repair, so you need to figure it out.
First you need to connect the fuel supply and return lines to the fittings. Next you need to attach the throttle control cable. Attach the wiring to the idle air solenoid valve, and the vacuum hose to the ignition distributor. Then you need to install all the vacuum and air hoses, as well as the air cleaner housing.
Next, start the engine and let it warm up a little, since it takes time for gasoline to enter the carburetor and the mixture to enter the cylinders. Only then can you make all the necessary adjustments and check whether all the hoses are in place.
Principle of operation
First of all, gasoline is supplied to the chamber, before which it is filtered through a mesh. In this case, the fuel level is regulated by a float, and when the required amount is reached, the valve blocks the access of gasoline. Through the float chamber, gasoline is supplied to the first and second chambers. The air that has previously passed through the air filter also enters there. Air, already mixed with gasoline, is transferred into the chambers through jets, resulting in an emulsion. The mixture passes through the econostat and goes through the sprayers into the diffusers. The resulting finished mixture is sent through the throttle valve to the cylinders. When idling, fuel is taken from only one chamber. The second switches on only when the engine is warm and when power develops.
Carburetor Features
When modernizing the Niva in 1994, it was decided to install a Solex carburetor on it. Before this, a unit called Ozone was used. Which one is better? This question interests many owners.
Ozone is equipped with an old style breaker. In addition, it does not have a vacuum corrector. Solex does not have a microswitch for the economizer. This negatively affects the purity of the exhaust, and also partly on fuel consumption. Both carburetors have both their advantages and disadvantages. However, VAZ engineers opt for Solex, as a more modern model. In turn, many owners of cars with this carburetor often complain about its incorrect operation. Experts explain that this is caused primarily by the use of low quality fuel. In addition, troubles can arise for those who rarely change the fuel or air filter, and also do not clean the carburetor of oil soot entering through the ventilation system. Some owners of old Niva cars equipped with Ozone decided to install Solex instead. And they don’t regret it.
Adjusting the carburetor VAZ 21213
This procedure may be necessary when jerks or dips appear during movement. In addition, adjustment is needed if the car has an unstable idle. It is advisable to know what fuel consumption accompanies these symptoms. If you have no desire to go to a car repair shop, you can adjust the carburetor of the VAZ 21213 and eliminate the causes of incorrect operation with your own hands. This is not much more difficult than adjusting the carburetor of a VAZ 2101.
First you need to remove the air filter. But before this, the engine must run for at least a few minutes. You can now disconnect the fuel supply hose. To remove the carburetor cover you will need to unscrew five bolts. After removing the lid, place it on a flat surface. Now we take a caliper and measure the distance from the edge of the body of the float chambers to the level of the fuel in them. Normally it should be 25.5 mm. In cases of non-compliance with the standard, the tongue of the float bracket should be bent. To achieve a positive result, this will most likely have to be done more than once. After each bending, we check the distance to the fuel and adjust our actions. Having achieved success, we put everything back together.
https://youtube.com/watch?v=TYFkDkxAyJc
Which carburetor is best for Niva 2121
Experienced auto mechanics offer two modern carburetor models for the Niva 2121 to choose from:
- Solex.
- Ozone.
According to experts, these carburetor models are almost identical. But there are still differences:
- Ozone is not equipped with a vacuum corrector.
- Solex operates without an economizer.
What is the importance of each of these carburetor devices? Let's consider their functional features:
- the vacuum corrector is designed to rotate a table located inside the toggle switch, as a result of which the ignition timing changes;
- The economizer is a heat exchanger that must preheat the water that is supplied to the steam boiler.
Although both models of carburetor devices are suitable, many experts are inclined to think that Ozone is much more finicky than Solex. This is due to individual differences in their designs.
Carburetor VAZ 2107
In the 1970s, it was important for AvtoVAZ designers to create a new, easy-to-use and reliable car. They succeeded - the “seven” is actively used on the roads today, which indicates its high quality and ease of maintenance
The plant produced cars with both carburetor and injection systems. However, the classic standard equipment for this model is a two-chamber emulsion carburetor. After all, this was the only way to achieve simplicity and ease of use.
The carburetor itself on the “seven” had very modest dimensions and weighed three kilograms:
- length - 16 cm;
- width - 18.5 cm;
- height - 21.5 cm.
The standard carburetor on the VAZ 2107 is marked DAAZ 1107010. This two-chamber unit has a falling mixture flow and is equipped with a float chamber.
DAAZ 1107010 carburetor design
The carburetor consists of more than 60 different elements, each of which is designed to perform its own function. However, the main parts of the mechanism that directly affect the operation of the car are the following:
- cast body;
- two dosing chambers;
- throttle valve;
- float in the float chamber;
- econostat;
- accelerator pump;
- solenoid valve;
- jets (air and fuel).
Possible faults
Technical components of a system such as ozone carburetors for model 2105 can fail at the most inopportune moment; in order to prevent breakdown on the road, you should pay attention to the first signs of system operation
Main fault indicators:
- Jerking of the car when revving up or releasing the accelerator pedal;
- Loss of speed when pressing the gas pedal sharply;
- Increased fuel consumption, unstable engine operation;
- Noticeable loss of power and acceleration speed.
The OZONE carburetor consists of many parts that can affect the operation of the car
It is necessary to take into account all signs and malfunctions in order to avoid major breakdowns. It is difficult to answer the question of which is better, OZONE or Solex carburetors, the latter has a simpler system of operation and adjustment, and has increased dynamic performance
A diagram of how to adjust fuel consumption, which is controlled by installing jets of smaller diameter.
Engines with the correct carburetor setting Ozone Lada 2107 are famous for their reliability, ease of operation, and maintainability. Adjustment and configuration for preventive purposes can be done with your own hands. If problems of a larger scale arise, you should contact a workshop where they will repair and tune the ozone carburetor, which will help avoid global problems in the future.
Source
Carburetor DAAZ 21083-11070M with enlarged diffusers 26/28 in Kosteryovo
Carburetor 26/28 DAAZ 21083-1107010M for carburetor engines for front-wheel drive VAZ cars. It is also possible to install it on VAZ 2101-07 Classic cars using an adapter kit. This carburetor has diffusers with a diameter of 26/28 and enlarged main fuel jets (GFJ). Recommended for installation on engines up to 1800 cm3. An original DAAZ carburetor was used for modification. Installation and tuning are carried out in the same way as tuning a standard carburetor, taking into account the specific features of the modification of a particular engine. Installing this carburetor allows you to increase engine power and torque in the medium and high speed zone.
Ozone carburetor design and operating principle
Cars of the VAZ family, equipped with ozone carburetors, had a greater number of advantages over their predecessors. The difference was in a more durable case in which the internal elements of the system were installed to eliminate the consequences of temperature influences and mechanical shocks.
DAAZ “OZON” carburetor (view from the throttle valve drive side): 1 — throttle valve body; 2 — carburetor body; 3 — pneumatic drive of the throttle valve of the second chamber; 4 — carburetor cover; 5 - air damper; 6 — starting device; 7 — three-arm air damper control lever; 8 — telescopic rod; 9 - lever limiting the opening of the throttle valve of the second chamber; 10 — return spring; 11 — pneumatic drive rod.
- Two main fuel dosing systems;
- Balanced float chamber;
- Idle speed solenoid valve, interaction systems between chambers;
- The air damper of the first chamber is driven by a cable drive;
- The pneumatic valve for opening the second chamber allows it to start working only upon certain engine loads;
- The accelerator pump allows you to supply a rich mixture when you sharply press the accelerator pedal.
Cars use an ozone carburetor, a device which allows the car to be operated under difficult conditions. Repairing and adjusting the ozone 2107 carburetor allows you to adjust the quality and quantity of fuel, and larger diameter jets allow you to work with fuel of the lowest quality.
Diagram of the econostat and economizer of carburetor power modes: 1 - throttle valve of the second chamber; 2 - main fuel jet of the second chamber; 3 - fuel jet of the econostat with a tube; 4 - main fuel jet of the first chamber; 5 - throttle valve of the first chamber; 6 - vacuum supply channel; 7 - economizer diaphragm; 8 - ball valve; 9 - economizer fuel nozzle; 10-fuel channel; 11 — air damper; 12 — main air jets; 13 — econostat injection pipe.
The OZONE carburetor is designed to get the most out of your car. The principle of operation is based on a number of systems, each of which is interconnected and important in the system. An OZONE carburetor whose device consists of the most important parts:
- The float chamber is filled more with fuel through a needle valve, previously filtered through a special mesh;
- Gasoline enters the working chambers through jets connecting the float chamber. Mixing of fuel occurs in emulsion wells with air entering through air jets.
- The idle channels are closed by an electromagnetic valve;
- To operate the car in XX mode, fuel moves through nozzles to the compartments of the first chamber, where it enters the fuel line;
- The economizer is responsible for enriching the mixture, which comes into operation at maximum loads;
- The accelerator pump is designed in the shape of a ball and operates under its own weight when gasoline overflows the valve.
CXX
When the power plant operates at low speeds, the damper closes almost entirely. In this case, the diffuser vacuum drops to such an extent that the supply of fuel from the gas pressure zone stops.
At XX, to prepare the fuel assemblies, the air hose zone under the diesel protection is put into operation, and the fuel is supplied by a separate part of the carburetor.
Idle system
Fuel liquid enters through nozzles from the float chamber. Air is mixed with it, sucked through a separate jet. As a result, a normal fuel mixture is supplied, capable of powering the internal combustion engine.
CXH is often called an autonomous system, and rightly so. Its influence on the main characteristics of internal combustion engines is well known. Many people think that CXX is the most simplified carburetor system, however, in fact this is not the case. It is with idle speed that problems and abnormalities often arise, requiring the motorist to intervene and adjust the screws.
The CXX operates when the damper of the first chamber is completely locked, when the GDS is turned off. It turns out that the idle system is a kind of separate mini-carburetor that complements the main one. Fuel liquid and air are supplied to it, the necessary fuel assembly is created, which is sucked into the inlet. Thus, in XX mode the device is entirely dependent on the mini-carburetor.
Adjusting screws are mandatory elements of the CXX. They interact with the dispensing needle. For example, using the quality screw you can adjust the gas supply, and using the speed screw you can adjust the number of shaft rotations per minute.
Among the other important parts of the SHS, we can also highlight the bypass channel. Without it, it is extremely difficult to regulate the fuel assembly, since the element is very sensitive and responds to any error in the location of the needle valve.
Basic principles of ozone carburetor tuning
In order to answer the question of how to adjust carburetors of the ozone family, you need to check several points. The float chamber is adjusted with screws first, since the amount of fuel in it must meet the requirements for normal engine operation. The float must be fixed in the fastening mechanism, smooth operation, no jamming. The needle valve is closed with a screw, moved to the side, the distance between the float and the lid is adjusted, it should not exceed 7 mm, and after immersion with the needle installed - 2 mm. The distance between the float and the needle should be approximately 15 mm.
The starting system is adjusted as follows:
- The air filter housing is dismantled;
- Fully pull the choke drive in the car interior;
- The drive is on a VAZ carburetor, the ozone is fixed with a screw with a hole, with the throttle fully open, the engine start and speed should be from 3.1 to 3.3 thousand per minute.
Idle adjustment
A separate part of how to adjust the carb and make repairs is checking and adjusting the idle speed screws. For adjustment there are quality and quantity screws. In order to answer the question of how to adjust the ozone carburetor, it is adjusted only when the operating temperature is reached; on a cold engine, adjusting the idle speed on the ozone carburetor is not allowed, it will not be correct. The quality screw is unscrewed to maximum speed.
The quantity screw adjusts the speed level 100 higher than required, devices of which are 700-900 per minute, depending on operating conditions. Next, you need to achieve the required speed value by adjusting the quality screw. After checking the functionality of the idle system, it is necessary to assemble the air filter housing, check the tightening of the screws and check the behavior of the car on the road. The idle speed should remain at the controlled speed level even after suddenly releasing the gas pedal.
Checking the strainer
It is necessary to pump up the fuel manually, and then fill the float chamber with fuel. The shut-off valve will then close. The next step is to slide the top filter cover and then unscrew the valve. Rinse it thoroughly in solvent and dry with compressed air.
Problems with fuel supply can be detected by such signs as loss or dips in power, “poor response” to pressing the pedal, and engine problems. Such problems may also indicate a faulty strainer.
It is better not to wipe the bottom of the float chamber with a lint cloth or any similar cloth, since the jets may subsequently become clogged with fibers remaining from it.
If you are also interested in replacing the Lada Kalina fuel filter and replacing the fuel pump mesh, information can be found here.
You need to clean the float chamber with a rubber bulb, then dry it with compressed air. You can also use a blower to check the tightness of the shut-off needle, since the pressure force generated during squeezing is the same as the pressure in the fuel pump.
When replacing the carburetor cover, make sure that the position of the floats is vertical. You should feel pressure during installation, then check for air leaks from the carburetor. If air flow is felt, the valve body and needle must be replaced.
Methods for tuning the Ozone carburetor for a VAZ classic.
1. We take out and throw out the spring from the vacuum drive of the throttle valve of the primary chamber. The method is already known and described by many. The improvement in dynamics is significant, fuel consumption practically does not increase: a maximum of 0.5 liters per hundred. 2. You can try to convert the secondary chamber throttle valve drive into a mechanical one. This is done very simply: we take a small piece of wire (You can take the same spring that was in the vacuum drive of the secondary chamber), straighten it, and bend it into a ring on one side. We put this same ring under the nut securing the throttle valve drive levers of the secondary chamber. Moreover, you need to slip it so that the protrusion on one drive lever is between this piece of wire and the second drive lever (as in “Weber”). Then you need to tighten the nut tightly. We get another improvement in dynamics, especially noticeable at high speeds; fuel consumption per hundred remains virtually unchanged. You may soon forget what overclocking failures are. 3. We take out the standard small diffuser of the primary chamber (inserted from above into the large diffuser above the throttle valve), marked 3.5. We put there a small diffuser marked 4.5, exactly the same as in the secondary chamber of the classic carburetor. If necessary, replace the standard (“30”) accelerator pump nozzle with a large (“40″) one (like the “Weber” 2101-03). Dynamics, especially at low speeds, improves. 4. Increase the jets (you must know what you are doing!). Primary chamber: install GTZh-125, GVZh-150. We do not touch the secondary camera yet. Dynamics and power have increased. We increase, neglecting recommendations for saving gasoline and environmentalists: we put GTZh-162, GVZh-190 in the secondary chamber! The largest jets ever produced and installed only on the Weber in the six (the diameter of the secondary chamber diffuser in the Ozone is similar to that in the Weber). Fuel consumption increases; a non-killed engine can be turned above 6000 rpm. increase!... In the primary chamber we put GTZh-130 for an engine with a volume of 1500 and GTZh-135 for an engine of 1600. It no longer makes sense to install jets - when you sharply press the gas pedal, the carburetor begins to “overflow” and “chokes” - the dynamics are worse, the power drops , consumption is higher. In the secondary, the same GTZh-162, GVZh-190 remain. Fuel consumption. The point is that if you have installed such a set of jets, then during normal city driving there is no need to press the pedal to the floor everywhere and always. Accordingly, gasoline consumption can be easily maintained at 10.5-11 l/100 km. At XX, gasoline consumption will remain the same all the time - we didn’t regulate it! . But if somewhere we need quick acceleration, our enlarged jets will help us a lot
An important circumstance when tuning a carburetor for a VAZ “classic”. The bottom line is that jets must be selected individually for each engine.
An average description is presented here, but a lot still depends on the condition and size of the engine, each specific carburetor and the jets themselves. Every detail makes a difference to the overall scheme! Installing a “Solex” in comparison with an “Ozone” will give better dynamics, but with a “Weber” or “Ozone” the car still drives easier, without failures, and there is also a minimum financial investment. And the biggest difference is reliability. A way to increase the amount of air entering the carburetor is “pseudocharging”. The heated air supply hose is replaced with a longer one. They take him to the radiator. Attach it close to the fan, so that air from the fan enters the hose in a direct flow. A slight increase in dynamics (cons: only warm air, a very “dirty” method - all the dirt not stopped by the filter flies into the cylinders - reduced service life).
Selection Basics
If we install, for example, Solex 21041 (volume 1.8) on a 1.5 engine. This carburetor has a 24x26 diffuser, fuel volume is 102.5, which is not enough for a 1.5 engine. We are looking for a match between the chambers and the diffuser. We find the closest option: Solex 21073. It has a 24x24 diffuser and a TJ - 107.5. And the first cameras are almost identical. By the way, if the diffusers are almost the same, and the engine volume is smaller, then the intake of gasoline will be less (the jet is rather poor). This means that we need fuel jets (fuel jets) from 110. Let’s get a few.
Next you need to decide
, what do you want to get: economical slowness or costly acceleration. Depending on the decision, we also select a fuel mixture: to adjust the enrichment or leanness of the air-fuel mixture (a lean mixture will lead to gasoline savings, but will affect the acceleration dynamics of the car).