Cars with an injector, which includes the Lada Priora 16 valves, have a specialized idle speed sensor. It is this sensor that maintains constant speed of the power unit directly at idle. It happens that the car owner begins to notice such an oddity in which the idle speed jumps within completely unacceptable limits. In this situation, you should check the idle air control as soon as possible, and to do this you need to know where this device is located in your car. After diagnosis, it often turns out that replacement is needed.
The effect of a faulty IAC is quite similar to the effect of a malfunctioning throttle position sensor. However, in this case, when the sensor is faulty, the “Check Engine” light necessarily comes on, because the signals coming from the gas pedal, ignition system, or fuel regulator, and so on, certainly pass through the computer and the signal is output to the dashboard. But the idle speed sensor is not integrated into the overall system, so it does not give any signals. Therefore, Lada Priora 16 valves need to be checked if there are symptoms of a sensor malfunction.
Idle speed sensor VAZ 2112 - replacement without specialists
The idle speed sensor is important for the car. It ensures proper operation of the power unit at idle speed. Prevents it from stalling when the transmission is in neutral or intermediate position.
What does DXX consist of and how does it work?
The idle speed sensor is a regulator (IAC), which is designed to monitor the process of engine operation. In cold weather, it is advisable to warm up the engine, even if it is an injector. It's better to let it idle for a while.
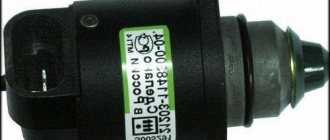
Idle speed sensor VAZ 2112
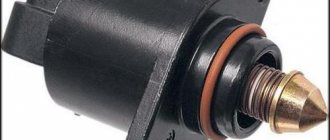
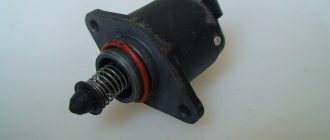
In appearance, it resembles an electric motor, consisting of a stepper motor, a spring and a rod with a locking cone needle. The sensor housing is attached with two bolts to the vehicle's throttle housing. Its function is similar to an injector that passes more or less fuel - to dose the amount of air entering the combustion chamber during idle operation. This is done by changing the location of the needle. Thanks to the needle, a special channel intended for air supply is blocked.
While the engine is running at idle speed, a pulse is transmitted from the crankshaft position sensor to the controller, which determines the required speed. According to this, IAC commands are sent to change the volume of air flow down or up.
If, with the throttle valve fully closed, the controller commands that the idle speed needs to be increased, the controller sends a signal to change the position of the needle. It moves, during which the inlet opening is completely or partially blocked. It serves to allow air to enter the combustion chamber, bypassing the throttle assembly, and mix with fuel.
Symptoms of sensor failure
The reliability of the vehicle's fuel system during idling directly depends on the condition of the regulator. The VAZ 2112 does not have an electronic self-diagnosis system, which is why no warnings about any malfunctions are displayed on the dashboard. The presence of a defect can be determined by the following symptoms:
- after the engine warms up, the number of revolutions does not increase;
- the engine suddenly stops working;
- smooth revolutions during idle;
- the car starts poorly, even when you press the gas pedal;
- when you turn on devices that consume a large amount of energy (headlights, stoves, radios, etc.), the speed decreases;
- The engine stalls if neutral is engaged or when changing gears while driving.
If the listed symptoms appear, we can conclude that individual parts in the XX sensor are faulty or a layer of rust has appeared on them. Then it needs to be replaced.
Device testing methods
To test the cold speed sensor for functionality, you need to disconnect the plug with cables from it and connect the multimeter to voltmeter mode. Next, the voltage supplied to the IAC is checked. The negative probe of the tester is connected to ground (engine body), plus to the removed block to terminals A and D. After turning on the ignition, the values produced on the XX sensor are checked, the voltage should not be lower than 12 V. For lower values, the reason may be a discharged battery, lack of voltage indicates a break in the circuit.
First, the electrical circuit as a whole is checked, then the control unit. If no faults are found, check the idle speed controller. Connect the terminals of a multimeter set to ohmmeter mode to the outputs of the block. The connection diagram is as follows:
- Initially, outputs A and B are checked, then C and D. If the device is working properly, the readings should be 53-54 Ohms.
- At the next stage, measurements are taken at outputs A and D, B and C. Resistance is close to infinite - this is the norm.
There is another way to check. The sensor is removed from the car and a block is attached to it. You need to press the needle with your finger and watch its movement. When the ignition is turned on/off, on a working device the needle begins to move.
Sometimes, to restore the functionality of the XX sensor, it is enough to remove it and clean it with special means, for example, carburetor cleaner in cylinders or WD-40. The product is applied to a cotton swab and the contacts are carefully processed. If there are a lot of oil stains and dirt, the entire throttle assembly is cleaned with the product. After cleaning, all parts should dry thoroughly.
How to remove and replace DHF: detailed instructions
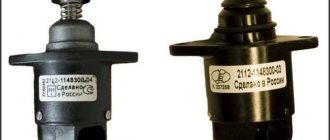
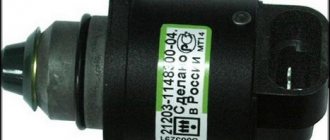
If it turns out that the idle speed sensor is faulty, it must be replaced with a new one. The procedure for replacing the sensor is simple and even a novice car enthusiast can do it. You need to purchase a sensor in advance. For VAZ 2112, the IAC with article number 2112-1148300 is suitable.
It is better to purchase the product in specialized stores. When purchasing, you need to pay attention to the quality of the font and the presence of holograms to avoid counterfeiting. The rubber gasket on the original is reddish in color, the distance from the body to the tip of the needle should falsely be 23 mm. There should be no mechanical damage, gaps, or play on the part; all elements are securely connected.
To unscrew the fasteners you will need a Phillips screwdriver. The replacement process is a sequence of steps:
- First you need to de-energize the car by removing the negative terminal from the battery.
- Then press the plastic latch, disconnect the wire block and put it aside so that it does not interfere with work.
- Then, using a screwdriver, unscrew the two bolts, but not completely. Finally, turn out the fasteners by hand so that they do not fall or get lost.
- Next, the faulty sensor is removed and the seat is cleaned of dust and dirt. So that they don't fall into the hole.
- Before installing a new device, lubricate the rubber seal with engine oil. The new IAC is inserted into the hole until it fits tightly.
- The device is secured with bolts. Then connect the plug with wires and connect the battery.
After completing the procedure, calibration is performed. No effort is needed; all the calibration work is done by the electronic relay. You need to turn on the ignition and let the engine run for a few minutes. After replacement and calibration, the turnover should be stable, not floating, either increasing or decreasing. The power unit must operate without failure. At idle, the crankshaft should rotate within 0.8±0.05 thousand rpm.
Purpose of the idle speed sensor
Idle speed sensor.
The sensor in the VAZ-2110 controls the operation of the engine. No one will like it if the engine's operation is not stable and it starts to stall while driving or stopping.
Therefore, such devices must work without failure.
Stable engine operation is always important. Especially if it is winter and you need to warm up the engine using the injector, although some argue that warming up the engine using the injector is not required. But this opinion is wrong. It is better to let the engine idle for 3-5 minutes in the cold season than to start tearing it up right away.
Location of the device on the VAZ-2110
Be careful not to confuse the sensor we need from below.
Externally, this part looks like a small motor.
It consists of two parts and three parts: a rod, a spring and an electric motor. It is fixed near the damper control mechanism and connected to it with bolts.
Principle of operation
Operating principle of IAC.
It is this part that is responsible for supplying more or less fuel to the combustion chambers at idle.
The element is no different whether the engine has 8 or 16 valves. It has a stable design. Unlike the injector, this part regulates idle speed, while the first one ensures stable speed under load.
The entire adjustment process takes place by retracting or pulling out the needle, which blocks the fuel supply channel.
Main symptoms of a malfunction
The following may indicate that the sensor is not working correctly:
- Poor engine starting even with the gas pedal depressed.
- Floating idle speed.
- When the transmission is in neutral, the engine stalls.
- When the engine is warm, its speed does not increase.
- When you turn on the stove, light or radio, the engine speed begins to drop.
Experts say that when the situations described above occur, this may not always be the reason that the sensor has broken down. This may be due to spark plugs, filters or fuel quality. All of them must be checked first.
Sensor check
Wiring diagram for idle speed sensor.
- Initially, you need to find a block with wires that supply voltage to the sensor. To do this, you need to unscrew the throttle assembly and move it down.
- Then use a voltmeter to check whether voltage is supplied to the sensor.
- If the device shows 12V, then this will indicate that there is no charging on the battery; when the device does not show anything, then this indicates that the problem must be looked for in the network, since no current is flowing to the sensor.
- If the readings are above 12V, you will need to check the mains voltage regulator.
The check can also be done in another way. To do this, you need to remove the sensor and start the engine, periodically pressing the gas pedal. The needle should float.
Cleaning
To clean the sensor, dip its rod in carburetor cleaner for a few minutes.
Sometimes you may simply need to clean the sensor itself if the needle does not float and voltage is applied to the sensor. If cleaning does not help, the unit will need to be replaced.
Replacement
All work is carried out in this order:
- Remove the negative from the battery.
- Disconnect the connector from the sensor.
Remove the block by pressing the plastic lock. - Remove the two bolts that secure the sensor.
Unscrew the bolts with a Phillips screwdriver. - Remove the regulator.
Old sensor. - Replace it with a new one.
- Assembly work is carried out in reverse order.
Before installation, apply oil to the rubber ring at the landing site to ensure a seal. If it is damaged, it will require replacement.
The calibration of the operation is carried out by the relay. It automatically adjusts the sensor when the ignition is turned on. After replacement, the engine speed should not fluctuate at idle.
Let's sum it up
As you can see, in order to accurately determine why the engine speed is not reset, in many cases in-depth diagnostics may be necessary. For carburetor engines, cleaning and adjustment of the carburetor itself is often necessary, while the injector will require computer diagnostics.
If the problem is not on the surface (the throttle cable has become sour, after washing or dry cleaning, the carpet in the cabin is not installed correctly, which presses the gas pedal, etc.), then it is better to take the car to a service center.
The most complex situation is when the design of the power system involves the presence of a large number of sensors and actuators. In this case, even the use of diagnostic equipment does not always allow you to quickly and accurately determine the problem.
Typical faults
The XX controller does not have self-diagnosis.
The following symptoms indicate its malfunction:
- the speed decreases when lighting, a stove or any load appears.
- when the transmission is turned off, the engine stalls;
- unstable engine idling;
- the engine speed spontaneously increases or decreases;
- if you start a cold engine, there is no increase in speed;
There are two common causes of IAC failure:
- the guide needle is worn.
- the contacts inside the regulator are open;
Before replacing, you can clean the sensor itself and the channel; if this does not help, replacement is required!
Why do you need a sensor?
The Priora idle speed sensor, like any other for an injection engine, stabilizes the crankshaft speed at idle. The second name of the sensor is pxx; the regulator adjusts the air supply to the cylinder, forming the required fuel-oxygen ratio. During idle, the throttle valve is in the closed position. The air supply and control of its quantity is ensured by the dhx, so the regulator is not classified as a motor control unit, but as an actuator.
In the engine compartment of the Lada Priora, where a large number of controllers are located, the idle speed sensor is located in the throttle block near the throttle valve control element.
Symptoms of a problem
The difficulty in diagnosing the regulator is that if the mechanism breaks down, the “Check” alarm signal does not appear on the dashboard. The regulator is not included in the general circuit of the ECU, so you need to focus on the characteristic features:
- sudden abrupt change in the number of revolutions of the internal combustion engine;
- when the speed is reduced to idle, there is no change in engine operation;
- after the start, when additional cabin equipment is activated (air conditioning, heater, lighting), the speed drops;
- The engine stalls between idle speeds when the gas pedal is pressed.
The cause of a malfunction of the regulator may be natural wear of the guide needle bushing or lack of power after an electrical circuit break. The Priora is equipped with a standard VAZ sensor, which is also used on other brands; when replacing, it is possible to use related components.
Malfunctions of the electronic gas pedal
The main faults are as follows:
- When shifting gears (from 1 to 3, most often when shifting to a lower gear), the engine speed increases briefly;
- When driving in first gear, without accelerating, the speed “floats”;
- The car does not “respond” to pressing the gas;
- “Check” is displayed on the dashboard.
If any of these signs appear, use the diagnostic connector on the hundredth - it is located under the glove compartment (glove box). Error codes along with explanations will indicate a specific breakdown. In most cases, the cause of this is mechanical damage to the wiring or sensors:
- Lack of sensor (after the repair, the mechanic forgot to connect or install it);
- Short circuit or open circuit;
- Sticking, oxidation, burning of sensor contacts, due to which signals to and from the ECU are supplied inconsistently.
This problem can be solved by simply replacing the sensors - they do not last forever, they have a short resource. But if two sensors in the pedal unit fail at once, the electronic control unit switches the engine to emergency mode, and then the car will operate at engine speeds no higher than 1500 per minute.
Causes of malfunctions
Reasons why repair or replacement of the TPS may be required:
- The contact elements have become acidic. This problem can hardly be called a breakdown, but it refers to malfunctions that can be eliminated. During prolonged use, the sensor contacts may oxidize. This is due to the operation of the TPS under conditions of temperature changes and exposure to moisture. To eliminate the problem, you need to dismantle the controller and clean the contact elements with cotton wool treated with WD-40.
- Erasing the coating based on the initial segment of the slider movement. If the resistive base is removed, the controller will not operate correctly. As the slider moves, the voltage supplied to the control module will increase. But as a result of erasing, this does not happen, since there is no resistance. This leads to problems, and sometimes the control module malfunctions.
- Damage to the tips on the device. If this happens, burrs will form on the lining, which will ultimately lead to failure of the remaining elements. In some cases, the contacts will continue to function, but this will not last long, especially since the wear on the substrate will increase. With such problems, the slider and the resistive layer will refuse to contact, which will lead to the inoperability of the machine’s motor.
- Slider failure. This component of the device wears out over long-term use. As a result, it may deviate from the required trajectory, which will lead to problems.
What to choose?
When replacing, many more or less experienced car owners have a question about which regulator is better to install. After all, there are two types.
Sensor type
Peculiarities
These sensors are usually factory installed. The service life of such a throttle position sensor is stated to be about 55 thousand kilometers, but in practice it has to be changed more often
The operation of such a device is based on the magnetic-resistive phenomenon; a Hall element is used. The cost is noticeably higher than the first option, but it is unlikely to have to be changed. Huge resource, high reliability
In pursuit of savings, many forget about the importance of quality. But it should be in the first place when choosing spare parts when repairing a car. TPS is an important but easy to replace device
The repair operation will take you no more than an hour, even if you are just beginning to learn the joys of repairing your car yourself.
TPS is an important, but easy to replace device. The repair operation will take you no more than an hour, even if you are just beginning to learn the joys of repairing your car yourself. But under no circumstances delay repairing the sensor, otherwise this may negatively affect the operation of the engine, its service life and the cost of fuel, which you will overuse due to incorrect data from the sensor to the ECU
But under no circumstances delay repairing the sensor, otherwise this may negatively affect the operation of the engine, its service life and the cost of fuel, which you will overuse due to incorrect data from the sensor to the ECU.
Useful for car enthusiasts - everything about cars
Malfunction of LED brake lights
If, after carrying out the measures described above, it is not possible to determine the reason why the brake lights do not light, you should clarify the type of lamps used. They can be made using LEDs. Their installation has a number of features. Typically, LED lamps have a certain polarity for connecting to the vehicle’s on-board network.
Manufacturers always take this into account when developing. Incorrect connection results in the lamp not lighting up. In some cases, such inclusion may lead to damage. If a connection polarity violation is detected, this indicates that the repair on the vehicle was carried out by an unqualified person.
Dynamic motorcycle brake lights
Developers and designers of modern motorcycle models pay great attention to increasing the visibility of two-wheeled vehicles on the roads. One of the new products offered for the first time by BMW is the dynamic brake light. We recommend: Advantages and disadvantages of gas-oil struts for VAZ cars
We recommend: Advantages and disadvantages of gas-oil struts for VAZ cars
It has several operating modes, depending on the intensity of the braking process:
- When the speed decreases to 50 km/h, the brake light begins to blink at a frequency of 5 Hz.
- When the vehicle slows down to 14 km/h, the hazard warning lights turn on (it blinks until the motorcycle comes to a complete stop or until the speed reaches 20 km/h).
This is interesting: E-Motion: Chinese management benefited the British MG concept
Starting from 2022, only top versions of BMW motorcycles are equipped with these devices. For motorcyclists with less prestigious models, such devices are offered as an additional option.
How to change dhx on Priora
Before checking the functionality of the controller, the ignition system is turned off and the negative terminal from the battery is removed. These are simple safety rules when working with vehicle electrical wiring and controls. Procedure for replacing dhx.
- Open the hood and remove the plastic engine protection cover.
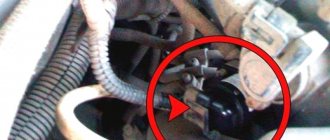
- The DXH is located in the throttle block, on the right side of the car.
- Remove the wire connector from the regulator.
- Use a Phillips screwdriver to remove two bolts.
- Dismantle the element.
After removal, the part is carefully inspected, cleaned and initial diagnostics are carried out. To do this, you need to insert the wire block into the sensor and turn on the ignition. Once connected, the working unit will respond with a noticeable movement of the rod needle. If this does not happen, the wiring is checked and the part is reinstalled with a new one.
How to diagnose IAC
Have you noticed the above “symptoms”? Make sure that it is a faulty sensor that is causing the problem. If you have a voltmeter among the tools, you can carry out the diagnostics yourself. To check the IAC Priora, do the following:
- secure the car by tightening the handbrake and making sure that the car does not move;
- open the hood, unscrew the screws on the plastic casing, remove the plate;
- take a voltmeter, a couple of cut wires;
- remove the component securing the harness block;
- disconnect the pads from the regulator;
- use the voltmeter probe marked minus and connect it to the engine;
- turn the ignition on in idle mode.
If the readings are below twelve volts, you will have to change the IAC, because it cannot be repaired.
If you do not have experience working with automotive mechanics, it is advisable to contact a car repair shop.
Good afternoon everyone! Tell me how to correctly change the IAC on a Priora? Somewhere it is written that you need something, either a rubber band or a rod, to lubricate the rod with oil, and somewhere they write that you need to plug it at some point and remove the terminals so that the rod comes out completely. So how should it be changed? Does anyone know the correct sequence of actions? If you remove the chip from the IAC while it is running, what should happen? Nothing happens to me) but when I remove it from the TPS, it stalls.
Removing and checking the idle air regulator
We remove the idle air control to check and replace. With the ignition off, release the latch. ...disconnect the engine management system wiring harness block from the regulator. Terminals “A”, “B”, “C” and “D” of the wiring harness block are connected, respectively, to terminals “67”, “66”, “65” and “64” of the controller. When the ignition is turned on, the voltage values (regulator control output signals) at these terminals change chaotically and therefore cannot be checked.
The connection between the regulator and the throttle assembly is sealed with a rubber ring. Using a tester (in ohmmeter mode), we measure the resistance between the terminals of the regulator connector. For a working regulator, the resistance between terminals “A” and “B”, as well as “C” and “D” should be 40–80 ohms. Install the idle air control in the reverse order. Before installing a new regulator...
...using a caliper we check the distance between the end of the valve needle and the supporting surface of the regulator flange. The distance should be no more than 23 mm. This is necessary in order not to damage the regulator during installation - the regulator needle should not rest against the seat of the throttle assembly. It is necessary to take into account that if the specified distance for the new regulator is more than 23 mm, then it will be possible to retract the locking needle into the regulator only with the help of a special tester (at a service station). Before installing the idle air regulator, clean the valve seat, air duct and surface for the sealing ring in the throttle assembly. Apply a thin layer of engine oil to the new regulator O-ring.
The reliable carburetor engine control circuit has long been supplanted by flexible electronics. The latter consists of a control unit and sensors operating according to a specific program. This trend has made it possible to achieve an increase in power and a decrease in fuel consumption. However, with the advent of electronics, the control system has become more vulnerable to malfunctions.
Your own diagnostician: why the engine speed fluctuates on a Priora - a theoretical basis
- failure of the mass air flow sensor (MAF);
- failure of the throttle position sensor (TPS);
- air leak;
- defective idle air controller (IAC).
What the engine will do in this state of affairs is to raise the speed of the power plant, while the volume of injected gasoline will remain the same. This means that the mixture will become leaner and the engine will begin to stall smoothly.
As the crankshaft speed decreases, the amount of air will decrease. After reaching a critical point, at which the injection volume of high-octane liquid is sufficient to obtain a combustible mixture of normal quality, engine operation stabilizes again. This process is called “floating revolutions”. It is closed and will be repeated until the causes are clarified and measures are taken to eliminate them.
Preventive measures
In order not to encounter a complete malfunction of the regulator in the future, it is worth periodically carrying out the cleaning process described above. How often to carry out the cleaning process depends on how actively you use your vehicle. If the car is a work vehicle, it is recommended to check and clean the sensor once a year; if you use it only for yourself, once every two years will be enough. But, of course, do not forget about the signs of a part malfunction; if they appear, do not delay. This will help you avoid complete failure of the part and enjoy a quality ride.
Together with you, we come to the conclusion that the part is unpretentious, simple in its functionality and use. Don’t forget: timely detection of a malfunction is the key to overall vehicle productivity. The full operation of the engine depends on the serviceability of each of its components, and if you neglect any part, including the idle speed sensor, this can lead to more labor-intensive repair processes and failure of the entire car.
Ignition
But it may turn out that when you unscrew the spark plug, you will see that it is wet. This indicates there is no spark. As a result, fuel combustion does not occur. The ignition is checked in the following order:
- First, let's visually evaluate the candle. It should be brown-sand color. If it is darker, then it may be faulty. It is advisable to check it on a special stand. The spark should be blue and white. If it is yellow or red, then this is a bad sign. You can, of course, try to clean it with sandpaper, but this may not bring the desired effect;
- Try using another spark plug and check how the engine runs. If everything returns to normal, then the cause has been found. Also check the high voltage wire;
- After this, check the ignition coil. It is the weakest ignition part in the Priora. To check, we reset errors from the ECU. And with the ignition off, they swap the supposedly non-working ignition coil with the obviously working one. The engine starts for a couple of minutes. The diagnosis is repeated. If the flash miss “migrated” along with the coil, the problem is in it. Replace it with a new one.
Important: checking sensors
The answer to the question why the idle speed on a Priora fluctuates can often be this: one of the three sensors (IAC, TPS, MAF) is faulty. It's quite easy to check:
- Start the power plant.
- Disconnect the IAC power supply and analyze: the IAC frequency remains the same or the motor stalls - the sensor needs to be replaced. If the frequency has increased, the sensor is working.
- Restore power to the regulator.
- Remove the chip from the mass air flow sensor and observe: the speed has increased - the mass air flow sensor is working; the engine has stalled - the mass air flow sensor should be replaced.
- Connect power to the TPS.
- Disconnect the block from the mass air flow sensor and analyze: the crankshaft rotation speed has increased - the mass air flow sensor is working, the engine stalls - the throttle position sensor is faulty.
- Attach the chip to the mass air flow sensor.
For your information. Often the problem is caused by a poor connection of the terminals of both the “negative” and “positive” wires.
Route map for eliminating unstable XX on a VAZ 2170
Unstable idle is caused by the fact that the computer incorrectly perceives or does not know at all the amount of air sucked into the intake manifold. A typical treatment recipe looks like this:
- Check the sensors (IAC, DFID, TPS) and replace the faulty ones.
- Make sure that the adsorber valve is in good condition.
- If, after cleaning the throttle valve on the VAZ 21126 engine, the speed fluctuates, you need to make sure that there is no air leakage through the connections to the pipes.
- Check whether the diaphragm in the vacuum brake booster is intact.
Verification methods
You can use several diagnostic methods for the sensor located on the distributor.
Depending on the available means and capabilities, the motorist can check the current condition of the Hall controller with his own hands, evaluate its performance and make the appropriate decision on replacement.
As soon as you notice one or more of the symptoms presented, you should get checked. You can do it in several ways. I propose to consider them separately.
Wedge with wedge
The simplest and most effective method that does not require you to equip yourself with a tester or multimeter. But you will need a known-good similar Hall sensor.
The essence of diagnosis is outrageously simple. You remove the old controller and install a new one in its place. If after the manipulation the symptoms go away and engine operation returns to normal, then simply leave the new part in place. If you borrowed a DH from a friend or neighbor in the garage, remove the device, say thank you, and go to the auto parts store.
Voltmeter and multimeter
Using a voltmeter or a classic tester, you can easily check the condition of the device.
I think every motorist can use the tester. The task is to measure the voltage at the sensor output.
If the DC is in good condition, the tester will produce values in the range of 0.4-11 V.
A universal multimeter is used in exactly the same way. You just need to select the voltmeter mode on it.
Sensor simulation
Quite an interesting and effective method. But here you will have to do a little work with your own hands.
The principle of imitation is as follows. First, remove the block from the DH, which has 3 plugs. Next, start the ignition on the car, then connect outputs 3 and 6 to each other.
If a spark appears during such manipulation, then most likely the DC has failed.
Without testers
When testers are not available, testing can be done using a slightly different method.
Here you need to carry out step-by-step manipulations:
- the spark plug is connected to the wire terminal from the coil;
- the threaded part of the spark plug is connected to the ground;
- the carriage with the sensor is dismantled;
- connector is connected;
- the ignition is turned on;
- a metal object is held near the sensor;
- When a spark appears on the spark plug, the DH is operational.
Just be extremely careful when doing such manipulations with your own hands.
Homemade tester
You can assemble an analogue of the tester from practically available materials.
The testing device consists of a regular LED, a 1 ohm resistance and two pieces of flexible wiring that need to be soldered to the leg.
Wires are connected to terminals 1 and 3 of the DC plug box. If the polarity is correctly selected, the LED should light up. If not, try swapping. Now you need to do the following:
- the first wire on the first terminal remains in place;
- the wire from the third terminal is connected to the second terminal;
- the camshaft turns (using a starter or manually);
- The behavior of the diode is monitored.
If the diode starts blinking, then everything is fine with the ignition sensor, and there is no need to change it.
There are really quite a lot of verification methods. Choose according to your taste.
Have you ever had to check a Hall sensor? What diagnostic methods did you use and what was the result?
What it is
A Hall sensor is a controller that is located in the distributor and is one of its key components. The distributor, in turn, is a breaker-distributor.
The Hall sensor (HL) is located directly near the distributor shaft, where a special magnetically conductive plate is attached. Outwardly, it resembles a crown. This plate has exactly the same number of slots as the number of cylinders in a particular power plant. Therefore, if you have a car with 6 cylinders, then there will be exactly 6 slots. A permanent magnet is installed directly inside the controller.
Now regarding the principle of operation. If you understand this issue a little, you won’t see anything complicated here.
When the shaft rotates, the metal blades pass alternately through the slots in the controller in question, that is, in the DC. As a result of rotation, a pulse voltage is generated.
This voltage, due to the presence of a switch, goes directly to the ignition system coil. This is where the conversion process to high voltage takes place. As a result, it ends up on the spark plugs. The design of the DC provides for the use of 3 different terminals at once. The first serves to connect to ground, and the second receives a plus, receiving a voltage with a nominal value of about 6 V. There is also a third terminal from which the pulse signal goes to the switch after conversion.
This is roughly how we can describe the operating principle of the sensor in question.
Symptoms of malfunctions
Symptoms of problems associated with this sensor can manifest themselves in a variety of ways. Sometimes even experienced auto repairmen cannot understand the first time why the engine is running intermittently.
DHs are installed on a number of vehicles:
Where is the idle speed sensor located on the Lada Priora 8 and 16 valves diagram
The 16-valve Lada Priora, like other cars with an injector, is equipped with an idle speed sensor, which is designed to maintain constant engine speed at idle. If you notice that the idle speed on your car has begun to jump within unacceptable limits, then this is a good reason to check, and in some cases completely replace the idle speed control. Symptoms of IAC malfunctions are in many ways similar to the incorrect operation of the TPS. But in the second case, a malfunction of the sensor on the Priora is indicated by the Check Engine lamp, since signals from the electronic gas pedal, fuel regulator, ignition system, etc. pass through the computer and are reflected on the dashboard, which does not happen if there are problems with the idle speed sensor. for lack of integration into the overall system.
IAC malfunctions
There are certain signs that can help identify a problem with the idle speed sensor:
- sudden change in engine speed;
- when the car switches to idle, no changes occur;
- when you turn on additional car options, the speed drops sharply;
- The car engine stalls when the electronic gas pedal is pressed in idle mode.
Among the probable causes of this problem, there are two: wear of the guide needle and breakage of the contacts located in the middle of the regulator body.
But you should not focus on this, since the faster the problematic unit is found, the less likely it is that more serious engine problems will occur. To check the performance of this unit on a Priora, you need to know where the idle speed sensor is located and how to get to it
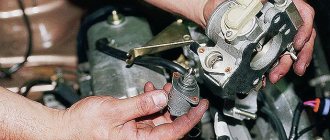
In order to detect it, first of all, you need to lift the hood and remove the plastic engine cover. Next, you need to carefully examine the throttle assembly. If you look in the direction of travel of the car, the necessary part will be located on the right side. Once the IAC is detected, you can think about how to remove it, check it and, if necessary, clean it. To remove the idle speed sensor you will need a large and small Phillips screwdriver and a telescopic magnetic handle
To check the performance of this unit on a Priora, you need to know where the idle speed sensor is located and how to get to it. In order to detect it, first of all, you need to lift the hood and remove the plastic engine cover. Next, you need to carefully examine the throttle assembly. If you look in the direction of travel of the car, the necessary part will be located on the right side. Once the IAC is detected, you can think about how to remove it, check it and, if necessary, clean it. To remove the idle speed sensor, you will need a large and small Phillips screwdriver and a telescopic magnetic handle.
Dismantling
We return to the IAC and disconnect the wire block. We unscrew the two bolts using a small Phillips screwdriver, since a large one may not fit in a limited space. After the bolts are unscrewed, pull the regulator out of its seat.
Inspection
Once the part is removed from the car, you can easily determine and decide whether it is worth replacing it with a new unit or just cleaning it. If a visual inspection does not reveal mechanical damage and it does not cause suspicion, you can clean the carbon deposits. To do this, you will need a clean rag and carburetor cleaner. It must be poured into all holes and wiped with a clean cloth, then allowed to dry. If mechanical damage is found on the regulator, it will have to be replaced with a new one.
After cleaning the IAC or purchasing a new regulator, it must be installed in its original place. Installing the idle air control valve is as simple as removing it, only in reverse order.
Once the idle air control is installed and the vehicle is started, the engine speed will reach its maximum speed. There is no need to be afraid of this, since the sensor needs to adjust for normal operation. When restarting, this will not happen, since the IAC will be inserted into the correct mode.
IAC cleaning
Place the idle speed sensor on a clean rag and spray the idle speed sensor needle with cleaning fluid from an aerosol can. While spraying, be careful not to get any liquid under the spring. If this happens, you will need to purge the sensor under high pressure, but this procedure will not guarantee that the IAC will work correctly. Next, wipe the needle with a clean piece of rags and wait until it dries completely.
If this is not done, you will subsequently have to dry and clean the car spark plugs. Use engine oil and wipe the idle speed sensor O-ring. After that, install it in the seat and securely fasten it with two screws.
When installing the sensor, care must be taken, since the IAC will not operate normally with a damaged seal. If after cleaning the idle speed sensor does not want to function normally, it must be replaced with a new one.
Features of installing the new IAC on Priora
In fact, there should be no difficulties when installing a new sensor, since everything is done in the reverse order. But it is still worth noting one fact.
This is probably all that could be said about replacing this part.
About six months ago, I noticed that when stopping at intersections, the tachometer needle floated slightly. After pressing the gas pedal, the speed leveled off. I went to the diagnostics, but it showed nothing. It was decided to replace the fuel filter and the mesh in the gas tank. No replacement solved this problem.
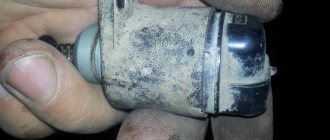
Therefore, today I was in the city and decided not to skimp and replace the Idle Air Controller, also known as IAC. Its price was 350 rubles. Having arrived home, I immediately began to remove the old sensor. Removal showed. that it is covered in heavy carbon deposits, and the place where it is installed. I cleaned the hole and installed a new sensor. Replacement is simple: 2 Phillips screws.
I started the car at 3k rpm. I didn’t understand this, I gave the gas even higher than 4 thousand. I think it’s all burnt somehow, since it was different from the factory one. I turned off the car and started it again - everything worked fine, I accelerated several times, the engine whispers. The revs have become somehow smoother and the engine picks up without delay.
Then I realized that the liquid that I was cleaning everything inside was flammable, it was clear that it was generating high speeds.
Good luck to everyone in operating their cars!
If “floating” speed appears on your Lada Priora, then you definitely need to check the idle speed sensor. Among all engine problems, incorrect idle speed can occur in the following cases:
- The engine stalls when changing gears.
- The engine speed increases or decreases independently.
- When stopping the car with the engine running, the speed drops sharply.
All of these symptoms indicate a faulty idle speed sensor. But before you start repairing it, you need to know exactly where it is and what it looks like.
If the Priora stalls while driving, there may be the following reasons:
— the first is the idle speed sensor. It should keep the car idling while starting the engine. If the Priora stalls at idle or the car does not start (the starter turns the engine), you can easily check what is causing this: if the car does not start, then you need to lightly press the gas pedal, in which case the car should start.
But if you take your foot off the gas pedal, the revs begin to fluctuate, and then the car stalls. This is typical for idle speed sensors (IAC). It should be changed. This is quite easy to do on Priora. Experts note this cause of failure as the most likely.
- the reason that the Priora stalls while driving may also be that the throttle valve in the car is clogged. In this case, the idle speed of the engine will float and the car may stall. With this type of malfunction, it is enough to clean the throttle valve.
— if the Priora stalls while driving, there is a possibility that the throttle position sensor (TPS) has become unusable. It should be replaced only after cleaning the throttle valve itself. This is located next to the XX sensor. It changes very quickly.
Here are the main reasons why the Priora stalls at idle. In this case, experts recommend changing two sensors at once: throttle position and idle speed. But this should be done only after you have cleaned the damper itself.
After this, the car should work as before. Such breakdowns are quite easy to fix. You can try to figure it out yourself or entrust your car to specialists so that the breakdown can be repaired professionally and without unnecessary hassle.
How does idle work?
Most people who are little familiar with automotive technology have little idea what engine idle is. It is quite possible that some believe that this mode is the easiest to implement. But in reality this is far from true, because it is quite difficult for the engine to operate at low speeds for the following reasons:
- It takes effort to warm cold gasoline to normal temperature. After all, you need to take into account that when using a fuel mixture with a low temperature, the engine will not be able to operate normally.
- The efficiency value is quite low, therefore, the wear of parts increases. This happens due to the fact that there is a very large pressure difference between the intake and exhaust manifolds.
- The exhaust gas contains a very large amount of carbon dioxide.
All this happens because the fuel is supplied at a very low speed. And if the amount of incoming air is incorrectly adjusted, the motor will not function correctly.
Low quality fuel
At domestic gas stations, low-quality fuel is by no means uncommon. But even at branded gas stations you can buy low quality gasoline. As a result, the car will be difficult to start. The car will leave the gas station on the remaining old gasoline, and the engine will be warmed up. But after being idle, it will be quite difficult to start the car. There are several types of low-quality gasoline.
Fuel may be dirty: it may contain various deposits. They clog the fuel channels as well as the filters. As a result, the pressure in the fuel rail will be insufficient, and it will be very difficult to start the engine.
Gasoline can also be low octane. Most often, with such fuel, the car may not start when cold even the third time. You will hear the noise the engine is making, you will feel weak thrust, and detonation will occur. Experts do not recommend starting a car on this fuel.
To eliminate the cause, it is enough to drain the bad fuel and then flush the fuel system. Then you need to fill the tank with good gasoline.
How to check the sensor?
If you have a tester, checking is easy:
- Set the VAZ 2110 to the handbrake;
- Disconnect the IAC connector to check;
- Check the voltage of the VAZ 2110, 2112 sensor circuit, while connecting the “minus” to the engine, the “plus” to the removed block, namely to terminals A: D (marked on the block, you can see the diagrams);
- The ignition is turned on and the readings given by the idle speed regulator are checked, which should be about 12 V. The value will be less - most likely the battery is discharged. When there is no voltage, it is necessary to check the entire circuit, and then the electronic control unit. There are no malfunctions, which means the circuit is working - the IAC installed on VAZ 2112 engines and other modifications are checked;
- The tester terminals are connected to the block, the circuit is as follows - first to terminals A: B, then to C: D. The resistance should be within 53 Ohms;
- Next, pairs A: C, B: D are checked - in this case, the resistance on a working product will be infinitely large.
When, as a result of these checks, the sensor reveals a discrepancy in the readings, it should be replaced. Also, the inoperative state of these VAZ 2110, 2112 engine sensors, in the unscrewed position, can be checked by attaching a block to them, then you need to turn on the ignition.
When the power is connected to the working product, the rod with the needle will change position. No changes will occur on a broken sensor. If a breakdown of the idle air regulator is detected, of course, it must be repaired. But there is no need to rush to a car service center - you can do the repairs yourself, saving money and time. But first, in general, it is worth cleaning the IACs; often after this they return to “life”.