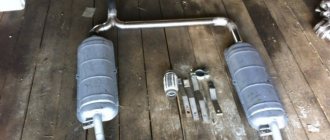
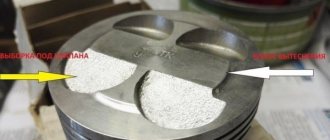
Hello everyone, I decided to combine all the posts into one. And so, from the moment I bought the car, the exhaust made itself felt as it covered 155,000 km. First of all, the rear muffler burned out. After inspection, it became clear that it could no longer be repaired. CBD GAL015 Muffler VAZ 2172, 21723 hatchback, stainless steel. steel "CBD" RUB 1,254.26 —————————————————————————————————————————— —- After 3 months of driving without problems, the muffler roared again, this time the resonator fell off. It also rotted from the inside beyond the possibility of repair. Resonator assembly CBD RAL007 Resonator VAZ 2170 Lada Priora with corrugation, 21101/103/104/12/11/70 from 2008 onwards. stainless steel steel "CBD" 1895.28 rub. ————————————————————————————————————————————- Well, according to tradition, it remained The last part to replace is the cat manifold. This time there was no sound, just the check p0422 Low catalyst efficiency came on. After throwing it off a couple of times it appeared again. The car began to feel sluggish when accelerating and gasoline consumption increased to 8.9 liters per hundred. I thought for a long time what should Spider4-1 do? Subaru sound? turbo manifold? As a result, seeing that my budget is not a fountain, all this went by the wayside. and was purchased on Avito for a used cat manifold, ideally Euro4. 1500 RUR AvtoVAZ 21124-1008089-00 Manifold gasket 124 issue 1.6V metal (VAZ-VATI) 145.57 RUR AvtoVAZ 21100-1203021-12 Muffler flange GASKET
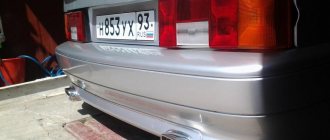
2110.1118.2170 83.95 rub. AvtoVAZ 11190-1203075-00 Locking plate for resonator nuts 1119, Serdobsky Machine-Building Plant, PO ZAO, Serdo 37.67 rubles Plus three copper nuts m8 60 rubles Additionally, in place of the standard catalyst screen, I put a screen from the vest. 8450006428 Vesta catalytic collector screen RUR 730.55 The screen from Vesta looks more modern than the standard Prior one. To install it, you need to drill 2 holes and cut an M6 thread. Attached from the bottom normally. And bend it a little from the bottom so that it doesn’t rest against the engine shield. In general, after installation everything looks cheerful. I like. And most importantly, the car has become an order of magnitude more energetic, with a more powerful response from the engine to the gas pedal. Along the way, with a dead catalyst, the ECU reduces the dynamics for the sake of the environment. And when he is a living machine, it’s just sad. In general, there is no smell of exhaust now and inspection can be passed without any problems. Consumption became 7.5l And the check is not lit) ———————————————————————————————————————— ——- And that repair of the standard system = 4999.06 rubles —————————————————————————————————————— —————- And I was fired up with the desire to make a double exhaust. The desire was initially after replacing the rear can. I was thinking from the beginning of buying a ready-made kit from the stinger. but the budget, as always, limited me at that time and I thought, with a price tag of 6000 rubles, I could do no worse! And I did: First of all, I And by chance, in traffic, I saw a Priora 95 region and a 2nd exhaust on Moskovsky Avenue))) Lexus Style
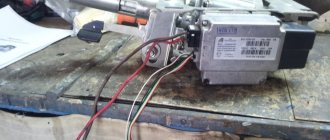
and then I was inspired to do the same. But after googling what it cost, I realized it was expensive (((I monitored Avito and found original used nozzles from a Lexus RX 2014 at an affordable price)) 600 rubles for the left one and 850 rubles for the right one. The advertisements were in different disassemblies and the chance to buy a pair was 50/50, I took a chance and bought it)) And so now there are attachments, they need to be implemented. but as? They are large and cannot be pushed through the hole. Moreover, they are welded to the diffusers. I found a solution: break out the weld from the diffuser cover. Next, we adjust the diffuser to the bumper and then connect it back with rivets. Based on the gaps, it is not ideal and it is understandable because they are from another car. and that’s 1450r for nozzles ============================================================= ===================== The nozzles are now in place, but there is no exhaust in them, what should I do? To begin with, the budget is as always minimal. I decided that the exhaust on the right side would be controlled (namely, I would install a throttle), a stronger and a straight pipe. On the left side there will be a new bank drain. Having thought about this whole thing. Started manufacturing For this I bought: A11-1200017 SILENCER MOUNTING BRACKET 2 pcs 87.06 RUR (for the right side) then standard rubber bands 2170 140 RUR (for the right side) CBD STAL102 Stronger universal CBD 50550.90, aluminum body 704.10 RUR bolts 8x60 70r + copper nuts 60r damper drive selected choke cable from 2108.150r plus throttle cable stops from 2111 8klop 2pcs 30r and that +1241.16 —————————————————————— —————————————————- Additional hardware: a broken throttle body from a Mercedes W210 was found at work. All unnecessary elements were sawed off and the holes for M8 bolts were enlarged, from the factory M6. The plates for it were made of steel because you can’t weld pipes to aluminum. With the plates, we just outline the damper, cut it out and drill holes. the plates were cut from a sheet of iron from 4mm scrap metal. there is a damper and then I took the pipes from an old resonator that had rotted. I sawed off the defective elements. I took the pipes for the nozzles from 2107 lower pants. (from scrap metal) fastenings for new ears on the right side, also from a standard dead resonator.
What are the advantages of dual exhaust?
Even if the engine on the Priora remains factory, installing a dual exhaust pipe allows you to:
- accelerate the removal of fuel combustion products, which leads to an increase in engine power;
- reduce noise;
- give the vehicle a more sporty look;
- improve the sound of the installation.
The last two points, of course, are more related to image issues.
It is worth noting that there are only two options allowing a car owner who wants to refine the appearance of his Priora to install a double exhaust:
- buy a ready-made twin muffler in specialized stores, which are now available in almost every city in Russia;
- make it yourself.
It should be recognized that the first scenario requires quite serious financial investments, but the second will cost much less, since the result is achieved rather through accuracy and painstakingness.
Reviews
Delivery of goods is carried out throughout Russia and the CIS:
1. Russian Post (from 350 rubles and above)
Delivery to all regions of the Russian Federation and CIS countries
2. Transport Companies (from 350 rubles and above)
Delivery throughout Russia and the Republic of Kazakhstan
- TK Energy (nrg-tk.ru)
- TC Business Lines (dellin.ru)
- TC SDEK (www.cdek.ru)
- TK PEK (pecom.ru)
- TK KIT (tk-kit.ru)
3. Pickup
The order can be picked up at the office at Tolyatti, 40 Let Pobedy 38, TD “Malachite”, 1st floor.
The waiting time for sending an order in our online store is approximately 2-7 working days, large orders 7-14 working days. days; color of bumpers, mirrors, body parts, spoilers, etc. 7-14 work. days; sewing covers, upholstery, steering wheels, gear knobs, EVA mats, etc. 7-14 work. days.
During this period, we will send you a tracking number by email. email to track the parcel en route.
Payment can be made in the following ways:
1. Payment to a Sberbank card
You can pay using the SBERBANK-Online application and other Bank applications.
After placing an order, making payment, do not indicate comments , we ourselves will understand by the amount of the order and the name of the sender. After receiving the funds, the status of your order will be changed to paid until 17.00 of the current day, or from 9.00 of the next Moscow time.
2. By bank card
Automatic acceptance of payments using MIR Bank cards, VISA International, Mastercard.
You can also pay with credit cards with a grace period.
To select payment for goods using a bank card, on the corresponding page you must click the “Pay for order by bank card” button.
2. Payment to QIWI wallet 89272115207
3. Payment on Yandex.Money 410013993950891
5. Payment to a bank account for legal entities and individual entrepreneurs (commission 6%)
Send your organization's details to [email protected] for invoicing. After paying the bill, be sure to send a payment order.
4. Cash on delivery of Russian Post (commission from 4%)
IMPORTANT! When sending by cash on delivery, RUSSIAN POST will take a commission for providing the cash on delivery service of 150-300 rubles, and the delivery cost also increases due to the evaluation of the goods.
Cash on delivery delivery is possible only within Russia.
ATTENTION! When choosing cash on delivery, the delivery cost is paid in advance before shipment, for the product itself upon receipt.
The amount of the order by cash on delivery should not exceed 5000 rubles; also, painted parts, goods made to order, covers, upholstery, door inserts, EVA mats, steering wheels, etc. are not sent by cash on delivery. (minimum 50% prepayment).
Be sure to save the payment receipt or a screenshot of the transfer.
The best guarantee of order fulfillment and quality is the feedback from our customers.
Reviews of our work can be found in our VKontakte group https://vk.com/topic-136384247_36675422?offset=180
Product delivery options
Note! Below are the shipping methods available specifically for this product. Payment options may vary depending on the shipping method. Detailed information can be found on the “Delivery and Payment” page.
Transport companies
Available payment methods:
- Using cards Sberbank, VTB, Post Bank, Tinkoff
- Yandex money
- QIWI
- ROBOKASSA
Delivery is possible to any locality where there is a representative office of the transport company. Delivery time is from 2 to 10 days. Sending large parcels is approximately 50% more profitable than by Russian Post.
Pickup from our warehouse
Available payment methods:
- Cash upon receipt
- Credit, installments
- Using cards Sberbank, VTB, Post Bank, Tinkoff
- Yandex money
- QIWI
- ROBOKASSA
Pickup times must coincide with store opening hours.
Roar, shooting, condensation and other reasons to look under the car
It's easy to spot muffler problems. It is difficult not to notice extraneous sounds coming from under the car, or a sharp change in the tone and volume of the response to pressing the gas. It is not uncommon to notice fluid leaking or even splashing from the exhaust pipe. All these are signs of malfunctions, but do they all indicate problems in the exhaust system?
Fluid in the muffler
Fluid dripping from the exhaust pipe is a common occurrence. However, it is worth distinguishing what kind of liquid it is. If it's water, there's nothing wrong with it. When the ambient temperature changes, moisture from the air condenses on the surfaces of the muffler. If a steel muffler is used, this can lead to corrosion, but usually the Priora exhaust system uses aluminized steel or stainless steel, which means that damage from water will be minimal. In cases of heavy accumulation of water, experienced motorists usually drill a drainage hole in the “barrel” of the muffler.
If there is excessive accumulation of water in the muffler, in winter you may encounter icing of the exhaust pipe
If antifreeze drips from the exhaust pipe, the fault should be looked for not in the muffler, but in the engine. The reason may be wear of the cylinder head gasket, as well as depressurization of the block itself. Antifreeze in the exhaust pipe is a symptom of serious problems, and if it is detected, you should immediately diagnose the engine.
Pops and shots from the exhaust pipe
Popping noises coming from the muffler indicate a malfunction. However, this is also a malfunction of the engine, not the exhaust system. Shots or pops from the exhaust pipe indicate that the mixture of air and gasoline does not burn out in the cylinder block, which means that when you hear them, you should check the spark plugs and spark plug wires, as well as the serviceability of the gas distribution mechanism. Problems with combustion of the mixture are not a symptom of a muffler failure, but they can be its cause.
Video: this is what pops from the muffler sound like
Knocking from under the car
A knocking sound from under the bottom of the car while driving or rattling from vibrations is an unpleasant phenomenon. The muffler may touch the gas tank or the underbody. There are several possible reasons for this.
- First of all, check the rubber muffler hangers. Their wear leads to loosening of the entire exhaust system. These mounts are sold at most auto parts stores. Their price usually does not exceed 100 rubles per piece. Replace the suspension with new ones and the knocking will stop.
- It is worth checking whether the clamp connecting the main muffler and the additional muffler is loose. If necessary, replace the fastening bolts and nuts. For replacement, it is best to use fasteners made of heat-resistant materials.
- Using the wrong model of muffler with pipe bends that differ from the original spare part can lead to contact between the exhaust pipe and various components of the car: the body, the gas tank and even the suspension. Be careful when choosing a muffler.
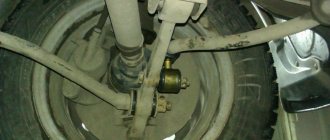
Lowered the car - the muffler is knocking
When installing a short-travel suspension on a Priora, tuning enthusiasts often encounter a situation where the suspension beam, which has moved closer to the body, begins to touch the muffler. This problem can be solved by replacing the muffler hangers with new ones of a more suitable shape.
Loud roar at revs
If a vehicle's exhaust system loses its seal, it cannot effectively reduce the volume of exhaust emissions. In this case, the exhaust often takes on a “pseudo-sports” sound. Therefore, if the muffler growls, you should look for a gap in it. It can be on the muffler body or on the pipes. It makes sense to check the connections and their fastenings. If the metal from which the muffler is made is of low quality, the exhaust pipe may burn out due to temperature. Time, corrosion and the quality of domestic roads cause damage to the exhaust system.
Pressure and temperature can cause holes
A burnt or broken muffler is easiest to replace. If depressurization occurs at the joints, you can limit yourself to replacing the sealing ring and the necessary fasteners.
Tips for choosing the right muffler for tuning
The main attention should be paid to the weight of the muffler and the quality of the metal from which it is made. The greater the weight of the muffler, the better. Check the quality of the welds: they should be smooth and not completely thin. The main attention should be paid to the weight of the muffler and the quality of the metal from which it is made
The main attention should be paid to the weight of the muffler and the quality of the metal from which it is made
You also need to look at the painted areas of the muffler. If you detect even the smallest area of paint chipping, there is no need to take it: this is the first indicator that the muffler is already susceptible to corrosive processes and will not serve you for long
Most of the options on offer are now made from alloys or stainless steel. Pay attention to the length of the new muffler and its attachment points to the body.
For a VAZ car, you should choose a muffler that completely suits you in terms of design and level of noise absorption
For a VAZ car, you should choose a muffler that completely suits you in terms of design and level of noise absorption, because it is the one that can ensure comfortable movement in the car.
Workflow Stages
Types of Dual Homemade Silencers
Let's consider the simplest and low-budget method of installing a dual exhaust on a Lada Priora with the installation of outlets from the muffler pipe under the rear beam of the car. Note that here you can choose one of two options:
- Distribution of pipes of different lengths with welding of branches to the main muffler.
This is interesting: Private transportation
Two pipes of different lengths are welded to the main muffler pipe
- Welding two pipes with similar lengths, angles and number of turns to the main muffler pipe.
Two identical pipes are welded to the muffler pipe. Remember that different lengths of pipes, although they affect the amount of gases released (this will be especially noticeable at high engine speeds), do not affect the operation of the engine itself.
Preparing for work: tools and materials
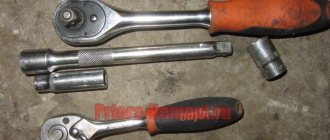
To carry out a full cycle of work, we will need to prepare a set of simple tools and a number of inexpensive materials:
- wrench (socket, open-end, socket) to “13”;
- electric drill with 1.5 mm drill;
- Phillips screwdriver;
- self-tapping screw 4 mm - 2 pcs.;
- standard exhaust system fasteners (clamp + ring);
- muffler cushion - 2 pcs.;
- fastening bracket (holder - bracket).
A clamp with an O-ring, a homemade bracket, a muffler cushion.
At the preparatory stage of work, you need to take the necessary measurements and draw up a simple diagram of the design of a double exhaust. There is simply no universal drawing that would be suitable for each individual project. Professional craftsmen advise taking all measurements at the place of work, transferring the data onto paper in a form convenient for you.
Diagram of a homemade dual exhaust outlet bracket
Note that the exhaust system of the Lada Priora sedan and station wagon differs from the same equipment installed on hatchback cars in the length of the main muffler pipe. Installing a dual exhaust on a car with such a body for the first two modifications will result in the system pipes protruding from under the bumper by 150–160 mm.
How to make it yourself
Let's look at the process of installing a bifurcated muffler using the example of a finished sample - all the steps we performed are suitable for installing any structure of this type. The only nuance that can affect the progress of work will be the possible deviation of the pipes of the independently manufactured system from the fastening elements of the original muffler. However, this is not a problem, since all brackets can be easily made and installed with your own hands.
We install the car on a lift or inspection hole, prepare all the necessary tools, be patient and get to work:
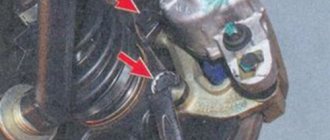
- We dismantle the original main muffler by disconnecting the clamp at the point of its attachment to the resonator (additional muffler).
- We will hang the right part of the new structure on its seat, installing it on the existing cushions (replacing them in case of critical wear). We do not attach the left side of the muffler yet, but only connect the common terminal of the dual exhaust to the resonator, slightly “baiting” the clamp and the O-ring.
Installing a part of the structure on the seat of the original muffler.
Let's attach the left bend to the side member on the bottom of the car, mark the attachment point of the bracket-bracket.
Left part of the structure, mounting bracket and muffler cushion
Using a drill, drill two holes and securely fasten the bracket with self-tapping screws.
Preparing holes for installing the bracket-holder
We hang the muffler outlet on the bracket using a fastening rod, after inserting the cushion into the holder bracket.
Installing an additional muffler outlet
Connecting the branches to each other using a clamp
- It remains to check the angle of the dual exhaust outlets relative to the ground. After making sure that they are at the same level, tightly tighten the clamps at the junction of the inlet pipe with the resonator and at the junction of the two pipes (if such an element is in the design).
This is interesting: The advanced Ferrari model will receive about 1000 “horses”
Checking the angle of the taps relative to the ground
Split design options
Note that there are several design solutions for installing a homemade dual exhaust on the Lada Priora. Let's look at the most common options:
- Divergence of two outlets from the main muffler pipe (at the rear beam);
- Wiring of two mufflers directly from the resonator;
- Installation of two resonators with mufflers immediately after the catalyst;
- The output of two pipes from each of the dual mufflers.
So, there are many ways to tune the exhaust system, the final choice depends on which option suits you best.
Workflow Stages
Types of Dual Homemade Silencers
Let's consider the simplest and low-budget method of installing a dual exhaust on a Lada Priora with the installation of outlets from the muffler pipe under the rear beam of the car. Note that here you can choose one of two options:
Two pipes of different lengths are welded to the main muffler pipe
- Welding two pipes with similar lengths, angles and number of turns to the main muffler pipe.
Two identical pipes are welded to the muffler pipe
Remember that different lengths of pipes, although they affect the amount of gases released (this will be especially noticeable at high engine speeds), but do not affect the operation of the engine itself.
Preparing for work: tools and materials
To carry out a full cycle of work, we will need to prepare a set of simple tools and a number of inexpensive materials:
- wrench (socket, open-end, socket) to “13”;
- electric drill with 1.5 mm drill;
- Phillips screwdriver;
- self-tapping screw 4 mm - 2 pcs.;
- standard exhaust system fasteners (clamp + ring);
- muffler cushion - 2 pcs.;
- fastening bracket (holder - bracket).
Clamp with O-ring, homemade bracket, muffler cushion
At the preparatory stage of work, you need to take the necessary measurements and draw up a simple diagram of the design of the double exhaust. There is simply no universal drawing that would be suitable for each individual project. Professional craftsmen advise taking all measurements at the place of work, transferring the data onto paper in a form convenient for you.
Diagram of a homemade dual exhaust outlet bracket
Note that the exhaust system of the Lada Priora sedan and station wagon differs from the same equipment installed on hatchback cars in the length of the main muffler pipe. Installing a dual exhaust on a car with such a body for the first two modifications will result in the system pipes protruding from under the bumper by 150–160 mm.
How to make it yourself
Let's look at the process of installing a bifurcated muffler using the example of a finished sample - all the steps we performed are suitable for installing any structure of this type. The only nuance that can affect the progress of work will be the possible deviation of the pipes of the independently manufactured system from the fastening elements of the original muffler. However, this is not a problem, since all brackets can be easily made and mounted with your own hands.
We install the car on a lift or inspection hole, prepare all the necessary tools, be patient and get to work:
Installing a part of the structure on the seat of the original muffler. Let's attach the left bend to the side member on the bottom of the car, mark the attachment point of the bracket-bracket.
Left part of the structure, mounting bracket and muffler cushion Using a drill, drill two holes and securely fasten the bracket with self-tapping screws.
Preparing the holes for installing the bracket-holder Let's hang the muffler outlet on the bracket using a fastening rod, having previously inserted the cushion into the bracket-holder.
Installing an additional muffler outlet In our case, the elements of the dual exhaust need to be connected to each other using a clamp with O-rings (do not tighten too much). We exclude this stage of work when installing a solid structure.
Connecting the outlets to each other using a clamp It remains to check the angle of the dual exhaust outlets relative to the ground. After making sure that they are at the same level, tightly tighten the clamps at the junction of the inlet pipe with the resonator and at the junction of the two pipes (if such an element is in the design).
Checking the angle of the taps relative to the ground
What you need to prepare
You will need a fairly small set of tools, which, without a doubt, can be found in any garage. The list is as follows:
- key to 13;
- drill;
- drill 1.5 mm;
- Phillips screwdriver;
- screws 2 pcs. (4 millimeters);
- standard clamps for fastening the exhaust pipe;
- 2 muffler pillows;
- mounting bracket.
When preparing a drawing, it is important to take into account the length of different types of bodies. If, for example, you assemble an exhaust according to the dimensions for a station wagon or sedan and install it on a hatchback, the pipes will protrude too far.
The difference should be taken into account, and then the bumper and pipes will look more harmonious and elegant.
Which muffler to choose
Before changing the muffler, you need to select it. There are a lot of options on the market, and seemingly identical mufflers can differ in price by two to three times. We recommend that you pay attention to the thickness and type of steel, as well as the country of manufacture.
Stainless steel or aluminized steel
Mufflers for cars of the Priora family are made of steel of various thicknesses. The thicker the steel, the stronger the muffler. The type of steel is no less important. Most car enthusiasts prefer stainless steel that has been proven over the years. However, modern aluminized steel is not inferior to it in terms of resistance to corrosion, and is significantly superior in overall strength and ability to absorb vibrations. This means that an aluminized steel muffler will be quieter than a similar one made from stainless steel.
Manufacturers and prices
Exhaust system parts for Lada-Priora cars are produced not only in Russia. There are mufflers and resonators made in Poland, Turkey and Germany.
Polish and Turkish mufflers are usually cheaper than German ones. However, their service life is half that of the best domestic models and mufflers from Germany.
A muffler for a Priora costs from one to five thousand rubles. At the lower end of the price range are models made of thin steel; aluminized models usually cost at least three thousand rubles. The situation is similar with resonators. Prices for them start at about one and a half thousand rubles.
Bifurcated exhaust on a Priora sedan
This product was chosen by 5 customers
- Description
- TC delivery and payment
- Reviews (0)
Sound level: loud. Material: steel 08 PS, used for the manufacture of high-quality exhaust systems. Dimensions:
- pipe diameter 51 mm;
- pipe wall thickness 1.5 mm;
- barrel diameter 100 mm.
Installation:
The forked muffler for the Priora is installed with the original resonator, or with the Stinger Sport resonator without the use of welding, and for ease of installation, the forked muffler on the Priora is made dismountable. Advantages:
Installing a bifurcated muffler on a Priora gives an increase in power and gives an aesthetic appearance. The muffler is designed in such a way that exhaust gases exit both pipes evenly, the design is direct-flow. Additional information: without attachments, for self-installation of attachments.
Set: 1 muffler
Warranty: 6 months
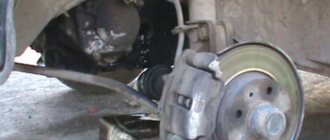
Removal and installation of the main muffler of the Lada Priora
Replacing the muffler on a Priora yourself is possible within the garage. The presence of an inspection hole will greatly help the replacement event. Replacement can also be done using a jack. In most cases, the main muffler and resonator are dismantled; other parts rarely break.
- To remove the main part, unscrew the fastening and connecting clamp. The module is disconnected from the resonator.
- We discard the sealing ring located between the nodes; when reassembling, a new gasket is used for connection.
The resonator hangs on rubber hangers, lift it up and unfasten it.
The number of exhaust rubber bands on a Prior hatchback and sedan is different. The exhaust pipe on the Prior is attached to the exhaust pipe with a bolted connection, which is sometimes difficult to unscrew; it is advisable to pre-treat the bolts and nuts with WD-shkoy. Often after dismantling it is necessary to replace them with new ones. Before installation, it is recommended to clean all connecting elements from fumes and dirt. Removing the exhaust of priors “on the knee” is a tedious task, but doable!
Muffler device for VAZ 2108 and 2109
It should be noted right away that the mufflers of the VAZ 2108 and VAZ 2109 cars are practically no different from each other in design. The only difference is the dimensions: the exhaust pipe on the “nine” is 8 cm longer.
Muffler for VAZ 2109, body made of stainless steel
The muffler on VAZ 2109 and 2109 cars consists of two parts:
- main muffler;
- additional muffler (aka resonator).
The main muffler body has the shape of an oval pipe and is made of alloy steel. The housing has a number of partitions that form resonator compartments. There are also two exhaust pipes (exhaust and inlet) and the main exhaust pipe. All these elements are connected using rolling. Spot welding is practically not used in such devices, so as not to reduce their corrosion resistance.