Replacement
The work must be carried out using the necessary tools. There are two options for replacing the wheel bearing - with subsequent wheel geometry and without its need. The replacement is similar for all VAZ cars (front-wheel drive).
Tool you will need:
- Ratchet with head "7", "10", "13", "17", "19" or E30;
- A key for unscrewing the CV joint or a head at “30”;
- Powerful flat head screwdriver;
- Gas torch or wheel bearing puller;
- Hammer;
- Steering wheel end puller (may not be needed);
Replacement with subsequent wheel geometry
- You need to start by unscrewing the CV joint nut; the car should be installed on a horizontal plane with the steering wheel turned slightly to the side. Using a wrench, unscrew the grenade nut counterclockwise.
What is a CV joint?
CV joint is a Constant Velocity Joint (not to be confused with lubrication). Colloquially it is called a "grenade". It got its name because of the presence of a large number of balls inside and its appearance similar to a combat grenade. There is also CV joint grease -3 and 4, used to lubricate this joint.
- We jack up the car and secure it so that it does not roll or fall off the jack. Remove the wheel;
- Separate the brake pads using a flat screwdriver;
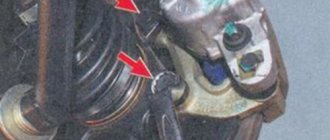
- We unscrew the caliper from the steering knuckle and hang it by the wire (under no circumstances hang the caliper by the brake hose).
- We dismantle the brake disc by unscrewing the guides.
- Unscrew the two bolts securing the strut to the steering knuckle.
- Unscrew the bolts securing the ball joint.
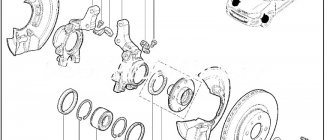
- We remove the steering knuckle from the car.
- We take out the retaining rings on both sides of the fist.
- Next we need to knock out the old bearing; for this you can use a punch of the required diameter or use a puller.
- Then, once the bearing is removed, a new one must be installed. Pre-install one retaining ring and press in a new one on the opposite side.
- If you have a puller, then carefully press in the new bearing, avoiding distortion.
- If you don’t have a puller, you first need to put the new bearing in the freezer for a couple of hours.
Why in the freezer?
According to the laws of physics from the school curriculum, cold bodies contract, and hot bodies expand. Therefore, a cold bearing will have a smaller diameter than a hot one, making installation easier.
- Next, use a torch to heat the steering knuckle and carefully lower the bearing into it, tapping a little. IMPORTANT, avoid distortion; the bearing should run smoothly without snagging.
You can use an old bearing as a mandrel.
- After the bearing is pressed in, install the second retaining ring and assemble everything in the reverse order.
Replacement without wheel geometry
In order to carry out a replacement without the need for wheel geometry, it is necessary to completely dismantle the steering knuckle assembly with the strut.
- Without removing the wheels from the car, we need to loosen the CV joint nut (grenade) to “30”. To do this, unscrew the grenade nut counterclockwise with a wrench.
- We tuck the car, which is fixed, so that it does not roll or fall off the jack. We remove the wheel.
- Separate the brake pads using a flat-head screwdriver.
- We unscrew the caliper from the steering knuckle and hang it by the wire (do not hang the caliper by the brake hose).
- Remove the brake disc by unscrewing the two guide wheels.
- We unscrew the steering tip mount and remove it from the strut bipod using a puller.
- Unscrew the two ball mounting bolts.
- Unscrew the three bolts securing the strut support to the side member.
- We remove the strut along with the steering knuckle from the car.
The next step is to remove the bearing from the knuckle and install a new one.
- We remove the retaining rings on both sides from the steering knuckle.
- Next, you need to knock out the old bearing; for this you can use a punch with a diameter smaller than the diameter of the bearing or use a puller.
- After the old bearing is removed, a new one must be installed. Pre-install one retaining ring and press in a new bearing on the opposite side. To do this, if you have a puller, carefully press the bearing into place, avoiding distortion. If you don’t have a puller, then you first need to put the new bearing in the freezer for a couple of hours (so that its diameter decreases slightly).
- Next, use a torch to heat the steering knuckle and carefully lower the bearing into it, tapping a little. IMPORTANT: avoid distortion; the bearing must run smoothly without snagging.
An old unnecessary bearing can be used as a mandrel for installing a new one.
- After the bearing is pressed in, install the second retaining ring and assemble everything in the reverse order.
The wheel bearing replacement process is complete.
How to diagnose the front wheel bearing on a Priora and the causes of failure
At the beginning of the article, signs of a malfunction were already mentioned, if they occur in the VAZ 2170, it is necessary to check the hub assembly. To diagnose a breakdown, it is enough to do several operations:
- Raise the car with a jack;
- Check the play of the suspended wheel with your hands;
- Rotate the wheel and listen for noise;
- Watch several videos on the principle of diagnosing the front wheel bearing of a Priora.
Faulty wheel bearing:
An example of the operation of a failed wheel bearing:
How to check the ball bearing of a wheel hub:
Wheel bearing diagnostics:
Why does the front wheel bearing of a VAZ 2170 (Priora) fail:
- Expiration of service life;
- Incorrect operation of the suspension, aggressive driving style, road quality;
- Poor quality ball bearing (defect, counterfeit, manufacturing defect);
- Depressurization (dust, moisture, dirt);
- Malfunction of adjacent components (brake disc imbalance, etc.);
- Road accidents, collisions with deep potholes in the asphalt or holes.
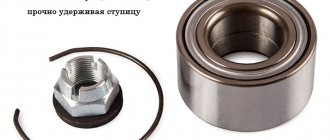
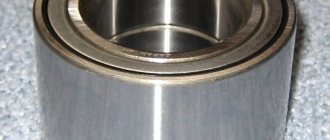
What front wheel bearing is in Priora: dimensions, number, prices, characteristics
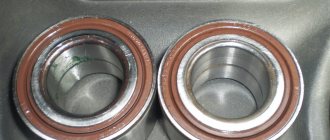
Before you begin the repair, you need to know which front wheel bearing is on the Priora, as well as which one is better in terms of price, reviews, quality, and manufacturer. The designers at the manufacturing plant included in the design an angular contact double-row sealed ball bearing with lubricant inside (LITOL-24).
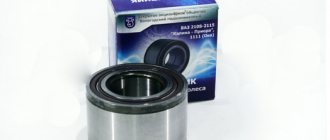
According to reviews and statements from VAZ owners, the best option would be original products from VBF or foreign manufacturers: SKF, SNR, SWAG, FAG.
The dimensions of the front wheel bearing, as well as the catalog numbers of recommended manufacturers, are presented in the tables in a similar article on replacing the wheel bearing in a Lada Granta car; look for detailed information there.
Priora front wheel bearing number:
- GOST: 6-256707А1КЭ12
- ISO: 256707A1KE12.P6Q6/L2
- Factory article: 11180-3103020-00
- SKF: VKBA1414
- FAG: 713 6140 30
BEARING SIZE CHART 6-256707
| Characteristic | Unit | Value according to GOST (TU) |
| Hole diameter | mm | 35 |
| Outside diameter | mm | 68 |
| Installation height | mm | 37 |
| Dynamic load capacity | kH | 40,0 |
| Static load capacity | kH | 32,0 |
| Nominal speed | rpm | 3500 |
| Axial clearance | mm | 0,04-0,08 |
| Steel type | — | SHH-15 |
| Hardness of steel and rollers | H.R.C. | 61-65 |
| Contact angle | hail | — |
| Torque | kN*M | 190 |
| Ring roughness | Ra | 0.32 |
| Number of balls | PC. | 28 |
| Weight | G. | 295 |
Preparing for work
This process is best carried out in the light if we are talking about the street. A bearing is a miniature component. It will be ideal if you drive Priora into the inspection hole. We will disassemble the front hub part, since this is more difficult than carrying out the same operation with the rear hub, especially without removing the strut. And now to the tools:
- Spanners for 17, 19.
- A bearing puller is the main tool, so without it you will have to dismantle the strut and perform a wheel alignment.
- The head is 30, it is desirable that it be equipped with a reliable wrench.
- The frame is usually a homemade tool, which is a cut of a pipe of a certain size. With its help we will knock out the hub.
- WD-40 lubricant.
Lada Priora, like other passenger models of this brand, is a front-wheel drive vehicle. There are many more parts in the front, hence the more complex process of removing the bearing. The rear support component of the hub is removed in the same way; you will need less time to do it, so the instructions describe the rear support bearing.
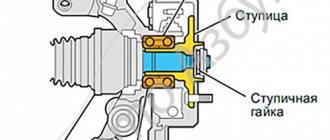
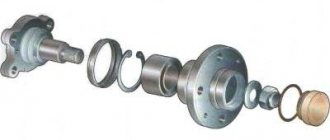
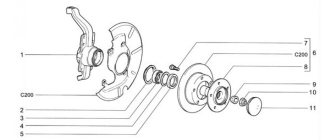
Priora hub design
These Priora parts are available both rear and front. Therefore, replacing the bearing bearing on them is somewhat different due to design features and differences. Therefore, it is first worth considering their differences before talking about replacing the rolling mechanism itself.
Front hub "Priors", device
The front hub of the Priora, like on other cars, has an independent suspension. That is, it is not tightly fixed to the body, but has a certain freedom of movement being in the steering knuckle. In addition, the front wheels are driven and swivel. This is what causes certain differences in design. Although it is quite simple, replacing the bearing on it is a rather complex procedure. The front hubs of the Priora are metal discs with a neck, inserted into the steering knuckle with devices and devices designed both for their movable connection with the body and for the free movement of the wheel in the direction of rotation. In addition, the drive shaft from the gearbox enters the center of the hub. Therefore, slots are cut inside it. A lever system and a shock absorber strut make this connection. And the ball joints of the steering mechanism control the steering knuckle, into which the hub is pressed.
Replacing the bearing on the front strut of a Priora
To carry out this operation you will need the following tools and devices:
- hammer;
- mandrels;
- screwdriver (large);
- retaining ring remover;
- core;
- chisel;
- two-jaw bearing puller;
- head at "30"
- wrench set to “17” (socket);
- pliers.
The most convenient way to replace a wheel bearing on a Priora is to use a lift. As a last resort, you can jack up the front part and hang the wheel.
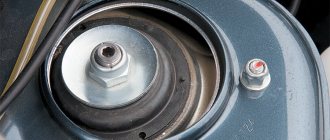
First of all, having removed the decorative plug, remove the cap of the hub fastening nut. Under the nut there is a special locking washer, the edge of which is bent over the nut. Using a thin chisel, loosen the nut and loosen it a little.
Now the Priora can be lifted and the wheel completely removed. Using a 17 key, loosen the fastening of the steering knuckle to the strut. Unscrew the ball joint mountings a couple of turns. Completely remove the hub mounting nut. Remove the caliper and brake disc one by one. Completely remove the mounting bolts and remove the steering knuckle and hub.
Removing the old bearing
Using a special drift, knock the hub out of the fist. Often the inner race remains on the hub journal. It needs to be removed with a puller. Pull out the retaining rings on both sides of the bearing. Now it can be pressed out either with a special diameter drift or with a new bearing.
After inserting the new one, secure it with retaining rings. Apply lubricant generously and reassemble the Priora in reverse order. Replace the second bearing in the same way.
Analogue bearings
As an alternative, you can consider the products of two manufacturers:
- "Weber", product catalog code - "BR 1118-3020";
- "Pilenga", part number - "PW-P1313".
The products of these companies have proven themselves well. The cost is approximately 1 thousand rubles. The contents are identical to the original delivery.
In practice, it has been revealed that a bearing from a VAZ-2108 may be suitable for the LADA Kalina hub, but it is a few hundredths of a millimeter narrower. Experts do not advise leaning towards this alternative, since there have been cases when the product rotated inside the hub.