Print this article Font size 16
The hub bearings are responsible for the free rotation of the wheels on the axle. They are mounted directly on the hub body, and are attached to the wheel axle with an internal race. There are plastic plugs between the clips that prevent moisture and dust from negatively affecting the mechanisms. But replacing the wheel bearing on the VAZ 2110 will still be necessary over time. Today we will talk about this.
Front bearing
Changing the front wheel bearing on a VAZ-2110 with your own hands
Domestic manufacturers, willy-nilly, have to adapt to European standards. And this is very cool, because in the regime of Soviet technical isolation we would still be using outdated solutions. Such a seemingly trifle as a front hub bearing, but with the transition to the European HUB system (closed roller or ball bearings, maintenance-free), the service life of the part has almost tripled. Even if we take into account the costs of local production.
Nuances
In the process of reassembling the entire node, you must proceed as follows:
- Press in the bearings;
- Install retaining rings;
- Collect your fists;
- Mount new bearing components on them;
- Mount the assembly on the hub;
- Using a mandrel, you need to drive the hubs until they stop.
You can use a puller or press to press in bearing parts. But in no case should you use a hammer, since in this case cracking of the component will inevitably occur. The forces should be directed to the outer rings.
It should also be noted that double-row ball bearings are installed in the hubs, which do not require lubrication and adjustment measures.
Due to the lack of such care, the VAZ 2110 bearings will certainly be destroyed when removed from the hub, so this measure should only be resorted to for a complete replacement.
Which wheel bearings are best to buy for a VAZ-2110
Front hub bearing 2108-3103020-01.
Western European engineers took an active part in the development of the VAZ 2108. That is why the front-wheel drive first-born VAZ received the most advanced solutions at that time. Including the front wheel bearing. Domestic manufacturers have always been proud of their bearings, but time has shown that out of a huge number of factories, only five turned out to be competitive in modern conditions. And it was the hub bearing that made them industry leaders.
The tenth roller wheel bearing has article numbers 2108-3103020-01 and 2108-3103020-02 , its dimensions are 34x64x37 mm .
This part is supplied to the conveyor by the Lada-Image company. The service life of the original bearing is very mediocre and, of course, it depends on operating conditions - from 30 to 45 thousand mileage.
"Needle" test
When replacing, you can carry out a “file” test : take the new and old bearings, try to file off the edge with a file. A good clip will not give in to anything ; the file will simply slide across the surface without leaving marks. Cheap domestic bearings are made in violation of technology and therefore the needle file leaves noticeable marks on the test area - the metal is raw, and, therefore, such bearings do not last long before play appears or even fails.
Quality and inspection
This is the lyrics, and now let’s go to the store and choose a quality part. We ask Chinese artisans not to worry; we pay attention first to domestic factories. Their bearings are cheaper, but you have to choose from the following list:
- The 23rd Vologda GPP is now called VBF ;
- The 3rd GPP from Saratov is called SPZ ;
- The 10th GPP (Rostov) did not change its name;
- VPZ 15 is the Volzhsky plant;
- The 9th gas processing plant from Samara turned into the SVZ-Group plant.
Marking
When choosing, you need to pay attention to the markings: a certified bearing will be marked only according to the European standard (not GPZ-15, but VPZ, for example).
A Vologda bearing will cost about half a thousand rubles.
The price of domestic parts can range from 500 to 700 rubles per piece. Imported analogues are more expensive, but the quality standards there are different, if you do not take into account fraternal China:
- German LGR bearing with catalog number LGR-4703 , price about 700 rubles , excellent quality, if not fake;
- Italian Marel ( 2108-3103020M ) with a price of about 750 rubles , high-quality and durable, ESSO lubricant is guaranteed to be used;
- for 800 rubles you can buy a Sachs wheel bearing with number 3464 0037 , a renowned company, excellent quality;
- SNR (R172.03) , Japan, price about 1200 rubles, almost eternal bearing, if not a fake.
How to adjust the differential preload of a VAZ 2114
It happens that the blocking begins to lag or does not work at all. The reason is that the preload decreases or disappears altogether. In this case, you should not rush to change the entire assembly; it is recommended to try to increase its value (preload) yourself. To do this, you need to select the required thickness of the adjusting ring and install it in the gearbox housing socket. The whole procedure is quite labor-intensive, so it is recommended to use the vehicle’s operating instructions.
Causes of malfunctions
Due to the design features of the differential and its operational purpose, destructive processes occur due to friction, force loads and other reasons. As a result, active wear of the unit and its elements occurs. The main causes of malfunctions are as follows:
- Bearing wear and damage to their integrity;
- Damage or wear of oil seals;
- Insufficient amount of oil in the transmission, as well as its poor quality;
- Other reasons.
The first signs of problems in the operation of the VAZ 2114 differential:
- Increased noise in the bridge or box;
- Oil leaks;
- Bridge jamming;
- Plays and knocks during inspection;
- And other non-standard operation of the unit and its components.
If you observe abnormal operation of the differential mechanisms, the first thing that is recommended to do is to check all the connections of the unit for tightness and no oil leakage. If the integrity of connections and fastenings is not broken, and signs (noise or disruption of functionality) are present, dismantling and disassembling of the unit is required to identify and eliminate the causes.
Symptoms of failure
We replace the bearing when the following symptoms appear:
- Noise and knocking noise in the front hub.
- Severe play on the bearing.
- Leakage of grease from under the bearing seal.
- Mechanical damage to the unit.
Steering wheel beating
It happens that when braking, vibration and beating occurs in the steering wheel. Many car owners immediately rush to have their wheels balanced. This could also be due to the front hub.
And it doesn’t matter what brand of car: VAZ or foreign car. The beating is mainly felt at speeds of 70-120 km/h
Severely worn tires can also cause vibration in the steering wheel. Unfortunately, vibration and beating are the most common problem. Causes of beating:
- Balance imbalance.
- Disc or tire deformation.
- Hub curvature.
- Low tire pressure.
- Runout due to loose mounting bolts.
- Worn suspension.
After identifying any problem, you need to fix it
It doesn’t matter how this happens: at a service station or on your own. The main thing is to solve the problem in a timely manner
Don't forget to save the article!
Methods for replacing the front wheel bearing on a VAZ-2110
The replacement procedure is not the easiest, but you can save a thousand or one and a half thousand. This is exactly the amount they ask for just for work at a service station.
For everything to go smoothly, we will need a wheel bearing puller 2108-2112. Unfortunately, without it we will not be able to remove or press in a new bearing. The screw puller is very simple in design and costs about 300-380 rubles, so it will not become a burden on the budget and will come in handy more than once. We also need a 30 mm wrench or socket and a standard set of tools.
The technology for replacing a bearing depends on whether we will carry out incidental repairs or replacement of suspension elements, braking system or steering. You can go one of three ways:
- Removing the bearing without removing the steering knuckle . The fastest and easiest way. You don't even need a viewing hole. It is also good because we do not violate the set wheel camber. The downside is that pressing out the clips while hanging is not very convenient.
- Replacement with removal of the fist . There is a lot more work, but the bearing itself can be removed in a vice on a workbench.
- Dismantling the hub assembly with the strut . This option is the most labor-intensive and is used when we simultaneously change the strut, silent blocks, ball bearings, strut swivel bearing or other parts. Completely removing the strut to replace the bearing is irrational and time-consuming.
If you remove the fist, you can press out the bearing without a puller.
Replacement algorithm
Having all the necessary tools, you can start working without delay. We will replace the bearing following the first algorithm, that is, without disassembling the strut and knuckle
- We place the car on a flat surface, tighten the handbrake and put stops under the rear wheels.
- Remove the protective cap of the bearing nut.
Remove the protective cap.
We place a support under the bottom of the car.
We move the caliper to the side.
Unscrew the nut completely and remove the washer.
Screw in the bolts to the full depth of the hub.
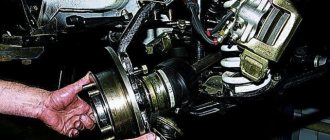
By sharply hitting the bolt heads with the brake disc, we press out the hub.
We unscrew the ball joint bolts and remove the CV joint from the bearing hole.
Use pliers to pull out the retaining ring.
Use a puller to remove the old clip.
Reassembling the front hub is carried out in the reverse order. Strong chassis and smooth roads to everyone!
After assembly, we tighten the new bearing nut until it stops, put the wheel on, lower the car, tighten the nut with a good lever and lock its side.
Tools and spare parts
Before going down into the pit, you need to prepare all the tools and materials. It should also be noted that replacing the front wheel bearings is much more difficult than doing the same work on the rear components.
Therefore, you need to start work from the front node.
A list of required tools should be provided:
- A special puller to remove the bearing;
- The so-called mandrel, that is, a pipe cut of the required size. This device is used to knock out hubs;
- Head 30, equipped with a high-quality wrench;
- Socket wrenches 19 and 17 sizes.
In addition, you need to purchase new suitable bearings that will be needed for replacement. For a VAZ 2110 car, you should choose Russian-made bearing parts rather than giving preference to Chinese analogues. The difference in price for these products is small, so there is no need to experiment.
Lada 2112 ᵀᴴᴱ ᴼᴿᴵᴳᴵᴺᴬᴸ › Logbook › WHEN DO YOU NEED TO REPLACE THE HUB BEARING FOR A VAZ 2112
Free rotation of the wheel on the axle is ensured by the hub bearings.
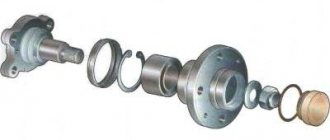
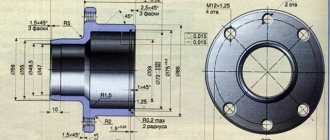
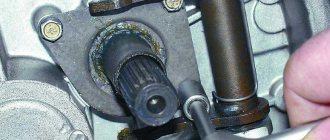
They are installed in the hub body, and the inner race is put on the wheel axle. The ball mechanism is reliably protected from moisture and dust by plastic plugs secured between the clips. Timely replacement of bearings in the VAZ 2110 hub ensures long-term operation of the unit under heavy loads. The article offers instructions on how to properly replace bearings on a VAZ 2110 car with your own hands. DIAGNOSTICS OF VAZ 2112 HUB BEARINGS The wheel hub has two single-row roller bearings installed. During operation, constant maintenance of the elements is required, which consists of adjusting the gap and replacing the lubricant in the bearings. To check the play or clearance, you need to hang the wheel and shake it. If the play cannot be eliminated by adjustment or noise appears while driving, then there is a high probability that the hub bearing has failed. Only one element or two at once can come out. The bearings should rotate on the axle without jamming and freely. Rollers and rings should not show any chips, pits or signs of wear. If they are detected, the bearing on the hub of the VAZ 2110 needs to be replaced. To check the bearing in the front wheel hub, you must: Raise the front wheel with a jack. Remove the wheel. Using a chisel, remove the protective cap from the front wheel bearing. Remove the brake pads. Attach a clock type indicator holder to the steering knuckle. Place the indicator leg against the wheel hub as close as possible to the adjustment nut. Place ring wrenches on the studs and tighten with nuts. The keys are taken to “14”. Holding onto them, the hub rotates and moves in the axial direction. The indicator measures the amount of axial movement or clearance. If it exceeds more than 0.15 millimeters, the gap must be adjusted. The wheel is installed in place without a protective cap and secured with two diametrically located bolts. Use a bevel or chisel to straighten out the jammed shoulder on the bearing nut and use a socket wrench “27” to unscrew the nut. The new adjusting nut is tightened to a torque of 2.0 kg-cm. Tip: The wheel needs to be rotated in both directions, this will make it possible to correctly install the wheel bearing rollers. The nut is loosened and tightened again, but the torque is already 0.7 kg-cm. The adjusting nut is gradually released by 20-25 degrees, the wheel is rotated in a vertical plane until a barely noticeable play appears. The gap is checked; its value should not be more than 0.08 millimeters and less than 0.02 millimeters. In this position, the nut is locked with the collar caulked in the grooves located at the end of the axle in the steering knuckle. The old grease is removed from the protective cap of the hub and approximately 25 grams of new grease Litol-24 or similar is added. The protective cap is installed on the hub bearing. The wheel is put in place. The cost of such operations is not high, but it will prolong the life of the wheel bearing. After adjusting the gap, it does not correspond to the required parameter, then the wheel bearing on the VAZ 2110 needs to be replaced. How to replace a VAZ 2112 wheel bearing. The work is best done in an inspection hole or overpass: Remove the hub cap. Using a narrow chisel, straighten the dented shoulder of the wheel bearing nut in two places. The car is put on the handbrake, and shoes are placed under the wheels. First gear is engaged. Use the wrench head at “30” to loosen the hub bearing nut. Tip: The nut in the assembly is tightened with a large torque. This requires the use of a knob and head of sufficient strength when unscrewing it to transmit the required force. The bolts securing the wheels are loosened. The front of the car is hanging out. This is done so that the anti-roll bar does not interfere with dismantling; it will push up the suspension elements of the VAZ 2110 car. The wheel, along with the caliper, the brake pad guide and the brake disc are removed. The brake pad guide and caliper are tied in such a way that they do not hang on the brake hose. The wheel bearing nut is finally unscrewed. The washer is removed. Two bolts with an M12x125 mm thread and a total length of 130 millimeters are passed through diametrically opposite holes located in the brake disc. The mounting bolts are screwed into the holes of the hub to a depth equal to its thickness. The bolt heads are sharply hit by the brake disc, the hub is pressed out. The fastening to the steering knuckle of the ball joint is unscrewed and the CV joint is removed from the bearing hole. The CV joint is disconnected from a VAZ 2110 car. Another dismantling method involves first disconnecting the ball joint and removing it from the CV joint hub. The hub rotates and is knocked out of the steering knuckle with a soft metal drift. Use pliers to remove the retaining ring. The VAZ 2112 bearing is pressed out with a puller into a cup located outside the steering knuckle. Then the bolt will press on the inner ring of the product through the washer located inside the fist. When pressed out, the bearing ring almost always remains on the hub, and it is difficult to remove it due to the tight fit. Tip: You can remove the ring using a puller; its paws should fit into two small grooves on the VAZ 2110 hub. If the puller fails to remove the ring, you can pry it off with a screwdriver and, moving it, remove it, as shown in the photo. If necessary, nicks on the hub are cleaned with a file. The mud ring is installed and sealed on the hub. The inner surface of the car's steering knuckle is cleaned and lubricated. Replacing the VAZ 2112 wheel bearing ends with pressing the new element into the steering knuckle of the VAZ 2112 car. In this case, the large puller washer rests on the steering knuckle from the inside so that its mud rings are not damaged. You can press through the old bearing when pressing in a new bearing, while the old one will transmit force through the outer ring. The retaining ring is installed. Installation of the retaining ring The hub is pressed into the bearing using a puller.
The puller washer should rest against the hub and bearing race. Replacement of VAZ 2112 wheel bearings has been completed. Further assembly is performed in the reverse order of disassembly. The bearing nut is tightened to the required torque, and the shoulder is locked by jamming it. As on a VAZ 2112 car, replacing the hub bearings is done correctly and can be clearly seen in the video. If you carry out preventive measures in time and replace worn wheel bearings of a VAZ 2112 car, you can increase the reliability of operation and the period between major repairs of the car. Like 21 Subscribe
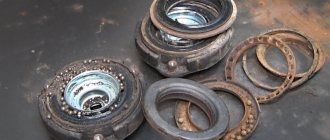
Inspection of the hub and further actions
After removing the part, you must immediately check the condition of the trunnion. If it is seriously damaged, you will have to replace it too. For minor scratches and dirt, it is enough to remove everything with sandpaper. The front hub itself undergoes the same inspection. The presence of cracks and deep potholes indicates the impossibility of its further use. Minor scratches allow the part to be reused.
To remove the bearings, first remove the O-rings on both sides. Then there are the bearings themselves. A special mandrel, hammer and drift will help here. The main thing is not to distort the outer ring to avoid damage to the inner surface. Bearings are removed in a similar way when repairing the rear hub. When both bearings are removed, you need to clean and inspect the inner surface of the part.
If there is serious damage, a new spare part must be installed. If, as a result of an external inspection, it is determined that the cause of the malfunction was the bearings, and the hub itself does not have serious damage, then we install new bearings in the old part after cleaning and lubrication.
If necessary, we purchase a new hub into which we press both bearings. This is done using the same mandrel
Next, we reassemble the entire assembly in the reverse order, paying attention to the wear and performance of the remaining elements of the front suspension. You need to know that the procedure for removing and installing the rear hub is significantly different from the one suggested
If you have ABS, it is important not to forget to check the performance of the gear and install the sensor
Lada 2110 › Logbook › Changing the rear wheel bearing of a VAZ 2110.
I would like to greet all Drayvovo residents, residents and guests of the community! This post is more intended for car owners who have little experience in self-repair; for clarity, there are photos of the process and brief explanations. Perhaps someone does it differently, criticism is appropriate, but I did it as I imagined. So we have a hum from the rear right wheel bearing, as well as noticeable play in the suspended wheel (the situation is somewhat neglected due to the negligence of the owner, i.e. me). In general, there is nothing wrong with replacing a bearing, as some people imagine. The most important thing is the presence of desire, time and a certain amount of dough. So let's begin. Everyone knows how to jack up a car and remove a wheel; we won’t dwell on that. We have a brake drum that is 90% stuck to the hub. There is no need to hit it with heavy and scary hammers to avoid damaging it. We unscrew the guides and screw them into adjacent holes, thereby pulling the drum out of its seat. For me this moment was indicated by a characteristic click.
The drum was removed and put back for a photo, the point is clear.
Having removed the drum, we inspect the condition of the brake pads, if necessary, remove dust, cobwebs, spiders and various evil spirits from there))). I didn’t have this, the pads are within normal limits, there are no fluid leaks, everything is dry, which is good.
everything looks fine
Next, we unlock (or what is correct?) the hub nut and unscrew it with a 30mm socket. I didn’t hesitate to use a one and a half meter long pipe as a lever, thanks to which the nut was happily unscrewed.
do not forget to install the washer during reassembly
Removing the hub occurs differently for everyone. In my version, she first walked with force, then stood up, and I finished her off with a puller
the puller is not very good, but it helped me
We inspect the bearing seat for wear, metal scoring, etc. I was afraid for this place, but I was lucky, the condition is normal.
Inspected it, wiped it seems to be ok.
Upon inspection, it was determined that the bearing said goodbye to us, so we knock it out. First remove the retaining ring. I don’t have any knockouts, but I have another 30 socket, so I knocked out the bearing through it.
placed it between the short pieces of timber (used for kindling the stove)
The bearing, as I already told Khan, took off the boot from it and it’s not clear what’s inside, there’s some kind of rust, not surprising.
there is no lubricant, instead there is a rusty butor
After removing the old bearing, the hub went to the stove to warm up, and the new bearing, on the contrary, went outside into the snow to cool. Everyone understands why... To facilitate the installation of a new bearing. There’s no need to heat the hub until it’s red))) my water boiled while drinking coffee, it turns out that in my version it reached 100 degrees, and even then it’s probably a lot.
Somehow like this. When the hub heated, the metal expanded, which gave me the opportunity to install the bearing almost halfway by hand, and then using the old bearing as a mandrel, install it completely. It is important not to damage the boot and the inner races of the bearing. We act only on the outer race of the bearing. Don't forget the retaining ring!
bearing with ring in place.
Reassemble in reverse order. If desired, if anyone is not sure of the presence of lubricant in the new bearing, you can carefully use a thin awl or screwdriver to pry the boot off from the side of the inner race, remove it and make sure that there is lubricant or not. In my version there was lubricant and I didn’t bother, I installed it as is. It took about 3 hours to complete everything, including preparation, lighting the stove, tea, coffee and other drinks, until the repair was completed, leisurely work with smoke breaks, etc. That is if everything goes as it should. If we get lucky! Good luck to everyone on the roads, thank you for your attention and if there is a repair, then only successful!
Replacement procedure
Please note that the hub nut is tightened very tightly and is difficult to budge. To make this task easier, you can use a metal pipe as a lever. A chisel and pry bar may also come in handy - it's best to keep them nearby. It is very good if an experienced motorist can help you replace this element yourself for the first time.
This procedure is performed in the following order. First of all, the car should be placed in a garage equipped with an inspection hole. If this is not possible, then you need to find a flat area for repair work. Then use the gearshift lever to engage first gear, and place wheel chocks under the front wheels (ordinary bricks will also do). Having done this, use a balloon wrench to slightly loosen the wheel bolts and lift the side on which the wheel bearing will be changed using a jack.
Then the mounting bolts are unscrewed completely and the wheel is removed from the axle. The guide pins are unscrewed and the brake drum is removed.
If you can’t do this right away, you should take a hammer and, applying a small plank to the drum, tap it around the circumference.
If tapping does not produce results, you can try screwing the pins into place - sometimes the drum comes off after this. If all methods are ineffective, the part must be dismantled using a puller, but there is a serious risk of damage. If this happens, the brake drum will also need to be replaced with a new one.
The hub nut is unscrewed using a socket wrench and (if necessary) a metal pipe.
The hub nut is removed from the axle using a puller
You can try to remove the hub without a puller. To do this, you need to put the removed wheel back in place, and then pull it sharply (but you don’t need to be too zealous, otherwise the car will fall off the jack)
The best wheel bearing for VAZ 2110, VAZ 2111, VAZ 2112
About the types of wheel bearings. Bearings are usually distinguished by the type of rolling elements into roller and ball. The advantage of roller bearings is that they have a large bearing area, which allows it to operate under large weight loads (that’s why the rear hub bearing is fitted with a roller bearing, and the front one with a ball bearing). And the disadvantage over ball bearings is that it rolls worse.
Checking the wheel bearing. There is something humming in the cabin and the hum intensifies as the speed increases. Instructions for checking bearings.
Removing the VAZ 2110 wheel bearing. It is worth noting that replacing a wheel bearing on an old car is quite difficult.
The VAZ 2110 front wheel bearing has the catalog number:
- 2108-3103020-01
- 2108-3103020-02
The rear wheel bearing of the VAZ 2110 has the article number:
- 2108-3104020
- 2108-3104020-01
- 2108-3104020-02
About the price of a wheel bearing. For a VAZ 2110, the approximate cost of bearings is 350-650 rubles.
Where to buy a wheel bearing for a VAZ 2110. In online stores.
So, let's vote and leave reviews about wheel bearings :
- What was the service life of the old bearing?
- Which wheel bearing manufacturer is the best?
ps All off-topic comments will be deleted.
Which brand of wheel bearing is better to choose?
After how many km? mileage Did you have to change the wheel bearings?
A few tips for motorists
As you have already seen, DIY repairs are easy. Such repairs may have to be done every year, because the roads in the country leave much to be desired. But self-service will cost several times less than if you turn to a service station for the service. If you prepare in advance and do all the work sequentially, taking into account each step, the replacement will not take much time. You do not risk anything, the cost of the part is not that high. But such a simple job involves many nuances that are important to consider.
Source
The best wheel bearings
When a wheel (wheel) bearing breaks, it must be replaced. This detail, small in size, is very important; it ensures freedom of rotation of the hub mechanisms. Continuing to use a broken one is dangerous: it will jam, and then a major accident cannot be avoided. The range offered at car markets is quite wide. To decide which wheel bearing is better, it is useful to study its characteristics and the features of bearings offered by different companies. Of course, your choice will be influenced by what exactly you want: to qualitatively repair your favorite car, sparing no expense, or simply to make inexpensive repairs and put the car up for sale.
Preparation and disassembly
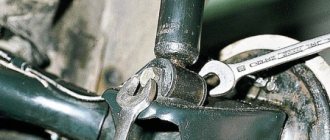
When replacing the wheel bearing of a VAZ 2110, it is necessary to park the car level, and be sure to install stops under the rear wheels. Before lifting the wheel being repaired, be sure to loosen the hub nut and loosen it (you can even unscrew it completely). This is done using a socket or socket wrench set to “30”. It is extremely important that there is a large lever - a considerable amount of force must be applied to rip off the nut.
Replacing the rear wheel bearing of a VAZ 2110 is carried out in almost the same way as the front one. The only differences are in the puller used and disassembly in order to get to the hub. That's all, now you need to lift and remove the wheel. Look carefully, what is stopping you? That's right, support! You remove it and hang it under protection so as not to damage it. And don’t even try to “accidentally” press the brake pedal.
Unscrew both bolts securing the ball (if you do not plan to replace it, then there is no point in removing the pin). You also unscrew the two guides from the disk. The disc can now be removed and put aside. Mark the position of the hub on the stand and unscrew the nuts (so as not to disturb the camber angles of the front wheels). That's all, you can try to rip the hub off the grenade. It is better to do this if you put the wheel on a couple of bolts with the back side facing it. You jerk the wheel sharply, trying not to fall.
Structure and types of bearings
There are three types:
The separator in the bearing keeps the rotating parts at the same distance, evenly distributes the load, ensuring quiet and unhindered rotation. The most durable, reliable separators made of metal are also made of polymer.
Bearings are divided into open and closed, the latter being preferable as they are protected from dirt getting inside.
Stage-by-stage work
Replacing the front wheel bearing, as mentioned earlier, should be carried out in stages:
- The VAZ-2110 needs to be put in 1st gear;
- stops are placed under the wheels of vehicles so that the car remains in a constant position;
- Use a wrench to unscrew the wheel fastenings in the form of bolts and nuts. If the VAZ-2110 has alloy wheels, then the wheels must be removed completely. It is recommended to use the help of an assistant when turning the nuts that act as a lock for the front car hub, since unscrewing the part is much easier if you hold the brake pedal;
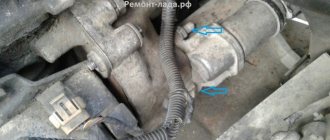
- use a reliable screwdriver to press out the calipers;
- using a 17 key, unscrew the calipers, which are fixed to the steering knuckles. To avoid damaging the caliper when unscrewing, this element should be tied to the brake hose;
- By using the car key, the VAZ-2110 brake discs are unscrewed from the hub itself.
Is it worth buying the original?
It is often advised to buy original bearings. An original is a part selected by a car manufacturer for sale on markets. These are the parts that are delivered to conveyors. When buying an original bearing, you will be absolutely sure that it will suit you. But there are several questions that need to be addressed here.
The original or a fake?
The original bearings are all the same and if you examine it carefully you will find the engraving. It is located on the edge of the upper or lower part. It should contain several information:
- manufacturer (logo);
- Country of Origin;
- designation digital or alphanumeric details, sizes;
- Additional information is possible;
- The kit must include a hub nut (usually disposable), there may be pins or bolts, seals.
- SKF brand
- Full bearing designation
- Manufacturer country
- Production date code
- Deviation of the average outer diameter ∆Dm [µm] and the position of the maximum eccentricity of the outer ring
- Deviation of the average bore diameter ∆dm [µm] and position of the maximum eccentricity of the inner ring
- Marking of thrust end, stamping
- Serial number (for bearing sets only)
- "V" marking (matched bearing sets only)
If the country of origin is not indicated, it is not an original, but a fake.
Is it worth paying extra for the original?
As a rule, you will find completely similar bearings from different companies on the market. So is it worth paying more for the original if other companies produce the same parts? If you decide to pay attention to any company, then choose well-known, popular manufacturers that supply parts to conveyors. Some people prefer Japanese companies, others prefer European products, for example, they trust only German quality. Our rating of the best manufacturers will help you determine which wheel bearing company is better and who to give preference to. Even if these companies offer products made in China, they will be high-quality products that meet all the requirements. Pay attention not to the country of origin, but rather to the supplier’s brand.
So do you need to change when changing shock absorbers?
To be honest, the question is twofold. And it is not always possible to say in the affirmative. Let's look at two situations:
1) The suspension has covered 30,000 kilometers, but after the winter the strut began to leak and needs to be replaced. In this case, the mileage is really small, you just need to change the strut itself and the rest of the elements can be left, by the way, this also applies to the support bearing. Metal fatigue will be at a low level, and corrosion will not yet make large changes to the parameters. There is only one condition - you need to install an original or the same rack.
2) Mileage is about 80 - 100,000 kilometers. I will say this - with an average motorist driving 20,000 per year, such a mileage is approximately equal to 4 years, in small towns it can be 5 - 6 years. What am I getting at, even if you only drove on smooth roads, then the winter road (which means salt, sand and many other delights) definitely has a bad effect on the metal that makes up the springs. YES, and with such a mileage, metal fatigue is already significant. Therefore, if your shock absorber “dies,” in this case you need to replace it completely with the spring.
I’ll list them point by point again, for those who are “squeezing for money”:
— From sand, reagents, stones, etc. – the metal wears off and suffers, which reduces strength.
- Fatigue from time, 80 - 100,000 is a serious mileage.
- Subsidence. The spring may decrease in size, albeit not significantly, but this will be enough for a new shock absorber; its service life will decrease.
Therefore, with such long runs, we definitely change it.
List of suppliers
- SNR is the largest French supplier in Europe and rightfully ranks first in product quality;
- SKF is the second-ranked supplier of bearing products, known in the markets for 100 years;
- NSK is also the second largest manufacturer of wheel bearings in the world from Japan;
- FAG is a manufacturer from Germany, absorbed by the INA concern, with high quality products;
- NTN is Japan's largest manufacturer;
- Kouo is the third largest manufacturer in Japan and is part of the Toyota concern;
- Timken is a manufacturer from the USA, the largest in the production of tapered bearings, the quality of which is exceptional.
These companies own many factories around the world, producing products of similar quality that meet the most stringent requirements.
If you need bearings for agricultural machinery, then it is better to pay attention to FKL, a Russian company located in Voronezh. Parts from this company have been supplied to all European countries for 50 years, are known for their high quality, and have no analogues in the world.
Working with the puller
If you still don’t want to damage the bearing, then you can replace it without knocking it out of the hub. In order to remove it from there, you can use a special puller. Removal is much easier with this device.
To do this, you need to carefully insert the puller's paws into the grooves on the hub and remove the ring. Sometimes this requires some effort; the ring must be pryed with a screwdriver and removed. Using the device, the part is removed and the nicks on the component are smoothed out.
Then, using a puller, you can also press the new part into the steering knuckle. This tool allows you to press the hub with high quality. Working with a tool of this type greatly simplifies the entire process, and the technician will need less time for all removal and installation. But operating the unit requires some skill and great care.
As you can see from this article, even such a simple repair job as replacing a wheel bearing can have many nuances.
Packaging companies
These companies do not produce the parts themselves, but pack them in branded boxes, and often the parts are of low quality.
- Ruville is a packager that interacts with product leaders and small firms;
- Optimal is a company from Poland that packages parts from Eastern Europe and China, often of poor quality;
- Corteco, QH, NK, Coparts - pack the cheapest parts, even fakes;
- CX is a packer of Chinese parts with low quality.
It is better not to buy products offered by these companies, even if they are much cheaper. The quality will be low, the parts will not last long.
Bearings for cars of the Russian automobile industry
The domestic auto industry, which produces passenger cars, still uses old types of bearings in production - single-row roller bearings. Only AvtoVAZ switched to two-row closed hub type HUB-1. HUB-1 means there are no flanges on the body for mounting to the hub. Therefore, owners of Russian car brands have a question about which wheel bearings are better. The most common vehicles on Russian roads today are VAZ 2110, GAZelle, and UAZ Hunter. Of course, you can purchase original parts, but they are often twice as expensive as similar ones from other factories. Let's look at the example of these particular brands of companies that produce the necessary parts.
Bearings for VAZ 2110
For the modern line of VAZ passenger cars (except Niva 4x4, Chevy Niva), three standard sizes of wheel bearings are produced:
- 256907 - for front-wheel drive VAZ 2108-2112;
- 256707 - on Granta, Kalina;
All these models belong to HUB-1, double-row, ball, closed, angular contact. Lada Granta and Kalina differ only in height.
Traditional suppliers of bearings for cars from Togliatti are 5 factories:
- CJSC "LADA Image" - manufactures and sells original Lada wheel bearings through secondary markets;
- Saratov plant - produces parts under the SPZ brand;
- Volzhsky Plant - uses the Volzhsky Standard brand;
- Vologda plant - sells products under the VBF brand;
The price-quality ratio of these factories is optimal. The cheapest products are those from the Samara plant (less than 200 rubles), other companies on average sell parts costing 230-275 rubles.
Bearings for UAZ
UAZ hubs use bearing 127509 - roller, conical, single-row, angular contact. There are additional parts marked: A - reinforced and AK - with minor design changes. The part can withstand large axial loads, so the car can be operated in difficult road conditions.
Parts of this type are produced by the Samara and Saratov plants, already mentioned above, as well as the Moscow GPZ-2 and Lutsk (LPZ) plants.
The most affordable products are from GPZ-2, the cost is 182 rubles.
Bearings for GAZelle
The front hubs of GAZelles are equipped with two tapered bearings, roller, angular contact, single-row. The outer one is marked 7305АШ, the inner one is marked 7307А. Both are designed to handle heavy loads.
Such bearings are manufactured at the Volzhsky and Saratov plants. The kit often consists of two bearings, fasteners, lubricant, stopper, and seals. The cost of such a kit from VPZ is 350 rubles.
In addition to Russian manufacturers, there are foreign companies that produce similar products, but prices are usually higher.
Before purchasing parts for hub repair, carefully study which suppliers offer the highest quality products, and check that the parts have the appropriate engraving. It’s better not to try to buy cheap, low-quality parts, because your safety depends on it, and such “savings” can lead to a major breakdown and a serious accident.
Replacement of rear and front parts
To repair your car, you can contact a car service center or replace the front struts yourself. It all depends on desire, financial capabilities and free time. So, for independent work you will need the following tools:
- jack;
- special key for the rod and a set of keys;
- spring tie.
First we remove the old stand. To do this, we jack up the car and install supports for safety. When securing the car, put it on the parking brake. After this, remove the wheel, then unscrew the two bolts that secure the strut to the steering knuckle (axle), as well as the nut securing the steering rod. We take out the stand from the fist. We free the bowl from the nuts. Now pull the shock strut out through the wheel arch. After this, you can begin assembling the shock-absorbing element, performing all the steps in reverse order.
Now let's consider a situation where it is necessary to repair the rear pillars of a VAZ 21099.
To repair rear shock absorbers, a pit or overpass is required. If there are no such conditions, you will have to put the car on a jack to remove the wheel and prevent the spring from being released. Now let's free the lower part of the strut by unscrewing the bolt connecting the shock absorber and the bridge. You need to remove both the bolt and the bushing. The next step is to remove the nut that connects the shock absorber to the body. After this, carefully remove the stand. Once the new rear strut is in place, it needs to be adjusted in height.
Replacing the rear struts on a VAZ 21099 requires one condition to be met: parts must be replaced in pairs. Otherwise, the car will become unbalanced while driving, which will lead to rapid wear of the axle and suspension. Therefore, it is better not to save money and change both racks at once. After all, good and high-quality elements will serve you for a long time!
No matter what perfect modern cars of domestic or foreign production are offered to car enthusiasts, there will always be a demand for time-tested inexpensive models, such as the VAZ 21099.
Over time, every car owner is faced with the need to replace old racks that have lost their efficiency and performance with new ones. But here a logical question arises: which ones are better and what to choose among this variety? Let's try to figure it out.
VAZ bearings
Category: | Date: 28 Mar 2013
The VAZ still remains the most popular passenger car in the country, the main competitive advantage of which is its low price, as well as the not very high cost of ownership, primarily due to inexpensive, ubiquitous spare parts, including bearings. However, the peculiarities of the Russian market are such that among consumers there prevail those who focus solely on price, which is a fundamentally wrong approach. Trading organizations, guided by this logic of car owners, are happy to offer the lowest prices... But all this cannot but affect the quality of the supplied bearings. The situation is that it is simply impossible to buy normal bearings (not Chinese, not counterfeit, not used) at retail - everywhere they offer everything that is the cheapest, and therefore extremely unreliable. The service life of such products is completely unpredictable.
Thus, supposedly Lithuanian bearings “Craft”, Polish “CX” and some others, including those with supposedly Russian trademarks (APP, etc.), widespread everywhere, from one batch can last quite a long time, and from another they can break right away same. The same applies to Soviet bearings, which are still sold in large quantities; they are given a marketable appearance by cleaning with an abrasive tool, while the internal structure of the metal has already been damaged and the dimensions have been changed. An even worse option is counterfeit. Some “businessmen” buy the cheapest bearings in China that can be found (and even in size they may not correspond to normal ones), they put stamps of existing Russian factories on them, usually incorrectly (for example, the Vologda plant labels products not 23 GPP, and VBF, and Volzhsky is not 15 GPZ, but VPZ) and is sold at very low prices. Every year such “bearings” spread more and more, like a cancerous tumor filling everything. This gives rise to the belief that Russian bearings are “all bad.”
It is best to buy high-quality bearings for VAZ only from official representatives of Russian factories, or well-established companies and auto parts stores (there are also those who try to buy only from dealers, despite the fact that in terms of prices they are inferior to their competitors, who sell “only it would be cheaper"). Or you can use imported analogues (a list of the main imported brands that can be bought in Russia, roughly sorted by price and quality, is presented on the website in the corresponding section). In some cities, bearings can be purchased directly from dealers, which not only guarantees quality, but also low prices.
You can read more about Russian manufacturers and their dealers at the end of the article.
Failures in the chassis of the car, design and fastening of the hub
Experienced motorists can easily diagnose problems with the car's chassis. These include:
- body swaying when turning or braking;
- uneven abrasion of the tire surface;
- easy compression of shock absorbers or leakage;
- constant deviation of the car to the side from straight-line movement;
- increased vibration;
- extraneous sounds when driving.
The causes of these phenomena are most often unacceptable wear of suspension parts, poor mounting of shock absorbers, and incorrect wheel alignment. Broken joints and deformation of at least one lever can also cause trouble. The front wheel hub of the VAZ 2110 is most susceptible to failure in front-wheel drive cars, to which this model belongs.
Most cars with front-wheel drive have independent telescopic front suspension and hydraulic shock absorbers with springs. Stabilizers are located on the lower wishbones. The hub itself is attached to the lower arm through a ball joint with a nut and to the shock absorber with bolts. It communicates with the steering rod through the steering knuckle.
The part is cast from durable steel, and inside it there is a bearing, which is the most vulnerable element. Its failure is indicated by extraneous noise when moving. The brake disc and brake caliper with pads are also attached to the hub. Unlike the rear hub, the front hub is more complex, so repairing it requires more care and skill.