In order to connect the wheel to the shaft, a hub is installed in the vehicle structure. While driving, this wheel assembly is most subject to loads and wear. Over time, the backlash increases and axial vibration of the wheel appears. The reason for this may be the Niva Chevrolet wheel bearing and this problem can be solved simply by tightening the wheel nut. But any part does not last forever, so over time, tightening may not help and the wheel will stop rotating and a complete replacement will be required.
Purpose and design of a wheel bearing
Bearings serve a dual function. On the one hand, they provide support for an axis, shaft or other element of rotation. On the other hand, they convert sliding friction into rolling friction. The wheel bearing is designed to ensure uniform rotation of the wheel hub. This is the connecting link between the hub and the axle of the car. Note that these elements ensure rotation of not only the front, but also the rear wheels.
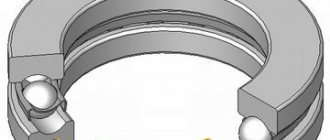
Any bearing has the same basic structure:
- Outer ring (outer race);
- Inner ring (inner race);
- Guide for rolling elements (cage);
- Conical, cylindrical or spherical elements).
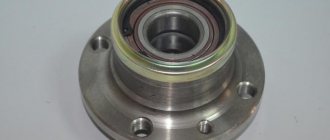
Bearings of modern imported cars have a more complex structure. Typically, their inner race is part of the hub, and the design itself contains electronic sensors. They are characterized by an increased service life. Russian manufacturers have not yet reached such technology, so they use simpler devices. On Chevrolet Niva cars, as on previous generations of the VAZ SUV, a pair of tapered bearings are installed on each hub.
Simplifying a unit negatively affects its reliability. Moving elements are especially sensitive to sharp impacts that chassis parts receive when driving over uneven surfaces.
The main purpose of the wheel hub
The main task of the transmission is to transmit torque from the engine to the wheels. A shaft system is used for this. But if the wheel is connected directly to the drive shaft, then it will be structurally impossible to assemble a load-resistant platform.
Difficulties also arise when designing front-wheel drive or all-wheel drive vehicles. The front wheel must have two degrees of freedom, that is, it rotates and turns at the same time. The rear wheels should also rotate easily, giving the vehicle a smooth ride. The intermediate link between the drive shaft and the wheel is the hub.
The hub is made of durable metal and serves to transmit torque from the shaft to the wheel. To ensure rotation of the hub, rolling bearings are used. It has not yet been precisely established whether the hub belongs to a suspension or transmission part.
On the one hand, it ensures wheel rotation and vehicle braking. On the other hand, it participates in the transfer of torque.
Non-adjustable hubs for Niva
Every car has weaknesses. In this case, these are the front hubs, which previously required periodic adjustment for normal operation, which, of course, could not but affect the reviews of car owners. That is why the designers created a non-adjustable hub for the Chevrolet Niva in order to avoid unnecessary fuss in terms of repairing the car.
In general, independent adjustment of bearings is almost impossible, due to the very complex design. Also, do not tighten the bearings all the way. And, besides this, there is a whole bunch of difficulties that are difficult to solve without the intervention of experts. It was precisely in order to make life easier for motorists that non-adjustable hubs were installed on the Niva. Reviews from those who purchased a car already with this innovation can be summarized into a specific list:
- there is no need to engage in constant minor repairs and maintenance of this part, be it lubrication or adjustment;
- the bearing will not turn on the hub;
- there is no need to constantly lubricate the hub, and even suffer, choosing a better quality lubricant;
- no friction occurs;
- there will be no need to replace the bearing.
There are a whole bunch of advantages if your car has this mechanism. But now the Niva is producing a reinforced non-adjustable hub. But if the car owner is confident in his abilities, then everything can be done with his own hands.
Advantages of Iveco non-adjustable bearings
The new modification of 2123 hubs for the installation of non-adjustable bearings is gaining popularity - it is convenient and practical, and if you have certain skills, you can do all the work yourself. The advantages of installing Iveco parts are obvious:
- long service life - about 100 thousand kilometers;
- the units can withstand high loads, which are three times higher than those of factory bearings;
- You can install wheels with a large offset on the car;
- the bearing does not need adjustment and does not require maintenance during the entire period of operation;
- you can do the alteration yourself.
How to change a wheel bearing on a Niva
The steps to replace the front bearing after removing the nut can be divided into 4 stages:
- Removing and disconnecting the steering knuckle and brake drum along with the hinges, from the strut and CV joint.
- Pressing out old parts.
- Pressing in new wheel bearings (two for each wheel).
- We put the unit back together and tighten the nut and adjust the gap.
For repairs, you will need a standard set of plumbing tools. We also recommend that you familiarize yourself with the structure of the node.
Required set of tools for work:
- A 30mm socket wrench to loosen the nut;
- Screwdriver to unscrew the brake caliper;
- Set of sockets and ratchet;
- Round nose pliers;
- Hammer;
- Mandrel or pipe for pressing;
- Puller with claws (if possible);
- Puller with claws;
- Jack and vice;
- Torque wrench to properly tighten the hub nut.
We place the car on a flat surface, engage first gear, remove the handbrake, and put chocks under the wheels. This completes the preparation
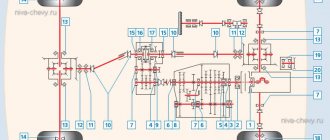
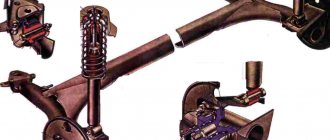
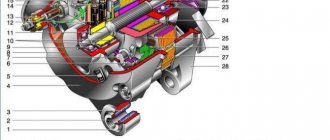
Also, before repairing, it is necessary to study the location of the elements of the car’s chassis according to the diagram: (pay attention to the steering knuckle - position 27, bearing - position 9)
Removing the front hub
The first stage begins with the following actions:
- Loosen the wheel and hub nuts. You need to carefully remove the decorative cap, then lift the replacement side and lower it onto the stops. We place wheel chocks under the rear wheels.
- We remove the front wheel using the well-known method, freeing it from the bolts. Next, you need to carefully remove the decorative cap.
- Unscrew the hub nut. To do this, you need to unlock it with a screwdriver. Remove the cone washer and unscrew the ABS sensor (if equipped).
- After that, the pads are removed and the caliper bolts are unscrewed, and the casing bolts are also unscrewed. The caliper itself, after being removed with wire, is attached to the upper arm.
Next, you need to remove the entire rotating mechanism from the CV joint splines along with the ball joints. To do this, several operations are performed:
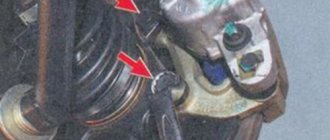
- Press out the steering rod ball pin using a puller, having first unscrewed the fasteners, as shown in the photo.
- Unscrew the pin bolt on the top ball. supports and pull it out of the socket.
- The lower ball joint must be disconnected from the lever by unscrewing 3 nuts.
- Once all the joints are disconnected, you can safely remove the entire assembly and begin replacing the wheel bearing.
Disassembling the unit and removing the ball bearing
We place the car on a level surface or hang it on a lift. Be sure to install wheel chocks, and the raised side of the machine is additionally supported on a reliable base, for example, several thick bars or a special tripod. Great efforts are applied during dismantling, and there is a risk of dropping the car from an unstable support.
Procedure for removing the rear axle shaft:
- Remove the wheel from the faulty side.
- Unscrew the brake drum mounting bolts. If the drum cannot be removed by hand, these bolts can be used as a puller by screwing them into special holes. Or carefully knock it out with a hammer through a wooden spacer.
- The hub is held in place by 4 17mm mounting bolts, which can be accessed from the back of the brake mechanism protective casing. At this stage, you can visually assess the amount of axial clearance in the bearing.
- After unscrewing the bolts, raise the rear axle so that the oil from the gearbox does not leak out through the stocking.
- We pull out the axle shaft with an impact puller or a reverse hammer. You can use the spare tire as an inertial puller. To do this, throw on the disk and lightly tighten the nuts. With energetic jerks we pull the axle shaft out of place.
- We take out the axle shaft along with the rubber seal. We hang the brake pads by wire to the suspension elements.
We inspect the axle shaft for mechanical damage, whether it is bent and the condition of the spline joints, then it is better to replace the axle shaft with a new one. In other cases, simply replace the bearing and seal.
Adjusting the wheel bearing
To work, you will need an indicator and a torque wrench.
To prepare for adjusting the wheel bearing, you must perform the following operations:
- Secure the indicator by resting its leg on the hub near the adjusting nut.
- Place spanners on the studs and secure them with nuts.
- Rotate the hub and move it axially. (Screwed spanners are used as handles).
- Measure the amount of axial movement (clearance) of the hub, guided by the indicator readings.
- If the stroke exceeds 0.15 mm, adjust the play.
The adjustment is carried out as follows:
- Straighten the collar of the nut.
- Unscrew it with a spanner.
- Install a new nut and tighten with a force of 2 kgf*m.
- Loosen the nut and tighten again with a torque of 0.7 kgf*m.
- Loosen the tension by turning the key 20-25 degrees counterclockwise.
- Check hub play.
- Make sure that the indicator readings correspond to the norm (0.02-0.08 mm).
- Lock the nut by pressing its edge into the groove of the outer CV joint.
You can adjust the hub play without using a torque wrench. To do this you need:
- Tighten the nut tightly.
- Rotate the wheel a few turns.
- Check the play.
- If necessary, loosen or tighten the nut slightly.
- Continue until the free play of the hub is within 0.02-0.08 mm.
- Lock the nut collar.
The design of the rear wheel mounting of the Chevrolet Niva is very different. However, they also use bearings that need periodic replacement. They are replaced either together with the axle shafts or separately. The second option is much cheaper, but requires good metalworking skills and a torch to heat the metal.
To work you will need:
- Jack, wheel wrench, chisel, hammer.
- Standard set of screwdrivers and wrenches.
- Axle puller.
- Gas (gasoline) burner or muffle furnace.
- Repair kit including bearing, oil seal and retaining ring.
- A pipe with a diameter of 40-45 mm, the length of which exceeds the size of the axle shaft.
Replacement of bearings is carried out as follows:
- Place the machine on a level surface.
- Place wheel chocks or bricks under the front wheels.
- Jack up the car.
- Remove the wheel.
- Place a support under the rear axle.
- Unscrew the brake drum mount.
- Dismantle the part.
- Unscrew the nuts holding the bearing.
- Load the rear axle by lowering it onto the stand.
- Pull out the axle shaft using a puller.
- Hang the brake mechanism on a wire.
- Knock down the retaining ring using a chisel, hammer and grinder.
- Crack the bearing races using a chisel.
- Remove rust and dirt from the seating surface.
- Put the new bearing in place.
- Heat the locking ring to 200-250 degrees (dark red color) and hammer it into the seat with a pipe
- Replace the oil seal.
Assembly is performed in the reverse order of disassembly. The bearing does not need adjustment.
A visual process of replacing a Niva Chevrolet axle bearing
Another element that experiences heavy loads while driving is the Niva Chevrolet axle bearing. Which are recommended to be changed along with the axle.
A symptom that this part needs to be replaced is the appearance of loud noise at any speed, as well as the appearance of axial and radial play. This part is not in short supply and can be purchased at any auto store, its factory part number is 2121-2403080, the analogue has part number 62208-2RS, and the industrial part is 180508.
To make the replacement, first of all you need to remove the axle itself and do the following:
- To remove the retaining ring with the bearing, take a vice and clamp the axle shaft in it
- We take a grinder and cut the stopper and bearing in several places, this must be done carefully so as not to touch the axle shaft
- Take a chisel and split the retaining ring and bearing
- We remove rust and dirt from the ring and bearing seats
- We take the pipe and use it to press the new bearing into place; during these actions, we must not allow the cage to rotate
- We take a blowtorch and use it to heat the locking ring until red and use pliers to install it in its place
- We wait until the axle shaft cools down, while it cools down in the brake flap we replace the oil seal
After everything has been changed, you need to check the transmission oil level in the rear axle. At this point, all replacement work can be considered completed. As you can see, all the work can be done independently without the participation of a specialist; it is enough to have a little knowledge and a standard set of tools.
Chevy-Niva :: View topic - FAQ Wheel assembly with a double-row IVECO truck from Fogpro
Iveco bearing at NIVU
The quality of newly purchased analogues of standard bearings may similarly have an impact. Check after any dismantling. At this stage, everything is ready to complete the mounting of the fist and hub.
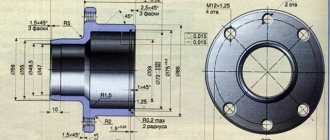
Try to place the calibration plate 56.3 between the shoulder pads, as indicated in the diagram. For experienced people it is purely advisory.
You can try to replace the cylinder sealing ring before running in. If the swing arm is removed from the bolts, then I leave it on the car.
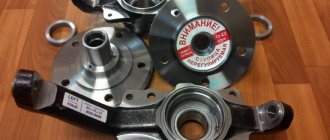
They refused to use additional seals; they explained this to me by saying that the standard seals will retain water, but without them, water will come out when the wheel rotates. The price of this unit is rubles, complete with hubs. Boring a Chevrolet Niva fist for non-adjustable bearings Bored fist. Iveco bearing on the left and standard ones on the right.
Pressing the bearing into the fist. Retaining ring. Place the fist on the CV joint and rock it a little back and forth. If the bearing is pressed against the CV joint, then such marks will remain on the holder. If the CV joint race is clean, you can apply a little old grease from the old bearing. If there are no traces left, then slightly push down the CV joint boot with a stop and a hammer.
It may not allow the CV joint to adhere to the race and then may become wedged when tightened. If everything worked out, then when you put your fist on the bearings again, an imprint will appear.
DIY cable for flashing VAZ ECU
It will be an additional barrier against water penetration. Here it’s convenient for anyone and how it was filmed.
If the swing arm is removed from the bolts, then I leave it on the car. If the bolts become sour, I remove the fist along with the lever and then disassemble it using Feng Shui. If you removed the fist with the lever, it comes together with it. The old mud ones had a less functional design of protection compared to the new ones. Both ring options are not interchangeable in shape.
The VAZ hub is a technologically complex, expensive part!
Similar technologies and metals are used in landing gear parts in aircraft manufacturing. Naturally, prices for such analogues are sometimes more than 2 times lower than those of VAZ and are more attractive for trade and buyers. This naturally squeezed high-quality conveyor hubs out of the market, among which only 24-spline hubs remained!
How to change the wheel bearing on a Chevrolet Niva with your own hands?
For repairs you will need:
- Powerful socket wrench 30.
- Puller for steering rod pin.
- A mandrel for pressing out a bearing or a piece of pipe of suitable diameter.
- A set of spanners or ratchet sockets.
- Balloon wrench.
- Hammer.
- Round nose pliers.
- Jack.
- Wheel chocks.
- Vise.
- Mount.
- Torque wrench.
- Boards or wooden block.
The replacement process is divided into five stages:
- Disconnecting the assembly (brake disc, hub and steering knuckle) from the CV joint strut.
- Pressing out old bearings.
- Installation of new parts.
- Assembling the unit and installing it in place.
- Tightening the adjusting nut.
Work is carried out on a level area. The presence of an inspection hole is not necessary.
To change bearings, you must perform the following steps:
- Place the car on the site and place wheel chocks under the rear wheels.
- Jack up the wheel.
- Unscrew the wheel rim mounting bolts.
- Build an improvised support under the side member from a wheel with boards or timber laid on it and lower the jack so that the car rests on it.
- Jack up the lower arm, compressing the suspension spring.
- Turn the steering wheel to the right or left (depending on the side from which the replacement is performed).
- Unscrew and remove the caliper, caliper and brake pads.
- Hang the caliper so that it does not put any weight on the brake hose.
- Turn the steering wheel in the opposite direction.
- Remove the ABS sensor.
- Unscrew and unscrew the tie rod nut.
- Remove the pin using a puller.
- Unscrew the hub nut.
- Remove the ball joint mounting bolts.
- Carefully remove the hub along with the steering knuckle, ball joints and brake disc.
- Remove the caliper protective screen.
- Remove the brake disc.
- Unscrew the steering arm.
- Clamp the steering knuckle in a vice.
- Remove the seals with a pry bar or a powerful screwdriver.
- Substituting the mandrel, knock out the outer races of the bearings.
- Wipe and clean the seat.
- Disassemble new bearings.
- Press the outer races into the hub using a mandrel or old parts.
- Apply lubricant, filling ⅔ of the space in the cage.
- Install the bearing race and inner race.
- Carefully press in the new oil seal.
- Repeat the installation operation for the bearing on the second side of the hub.
- Place the assembly on the CV joint splines.
- Tighten the hub nut.
- Screw on the ball joints and steering bipod.
- Install the protective cover and caliper bracket.
- Tighten the bolts securing the protective screen and lock.
- Put the caliper and brake pads in place.
- Jack up the car.
- Place and secure the wheel.
- Tighten the hub nut by tapping the wheel in the 6 and 12 o'clock directions.
Detailed video about replacing wheel bearings
Possible improvements
The Chevrolet Niva hub does not require any maintenance work during operation. In this case, the car owner is obliged to constantly monitor the condition of the wheel bearings. By replacing them, improvements are possible. First of all, this is the installation of non-adjustable, reinforced bearings. Instead of two single-row ones, one double-row bearing is installed, and the landing part of the steering knuckle is bored. The landing part of the hub is also bored. Today you can already buy a non-adjustable hub along with a steering knuckle. You just need to pay attention to the number of splines for the drive. Such bearings are more reliable. In addition, there is no need for constant adjustment.
The fact that the wheels on a Chevrolet Niva rotate smoothly is determined by the presence of bearings in the hubs. They can stand on both the front and rear wheels. Bearings are designed to reduce friction.
If such bearings fail, the wheel warps and the rubber begins to wear unevenly and quickly . If the bearing is damaged while the car is moving, the wheel will simply lock and stop rotating. For this reason, it is important to pay timely attention to bearings, especially on the Chevrolet Niva, since the car is an SUV and therefore experiences heavy loads on the chassis.
Car "Niva"
The presence under the cylinder boots of a small amount of crimson-colored lubricant, very expensive and specially developed for VAZ, is one of the signs of originality. After installing the camshafts from Iveco, be sure to check the heating above the described points of the hub assembly. If the hub nut and the cylindrical part of the knuckle are even a little colder than the brake disc, solve the problems of your brake system as described above. All these problems can be easily solved without removing the Iveco hub assembly from the suspension - just remove the wheel.
The installation instructions contain additional information with photos on these issues. After the starting test runs, be sure to check the tightening torque of the hub nut kg after a run of 1.5 tkm.
Remove the caliper and leave it hanging on the brake hose, put a thick, flat layer of hard rubber in it, like a hockey puck, start the car and operate the brake pedal very many times. Along with the rubber, flat objects of different thicknesses can be laid to perform running-in at different degrees of cylinder extension.
Like any part, they wear out, which leads to breakdowns. Having tried to fundamentally solve this problem, manufacturers of various brands of cars are installing non-adjustable wheel bearings.
Wheel hub for Niva and Niva CHEVROLET with IVECO bearing
Non-adjustable hubs for Niva Any car has weak points. In this case, these are the front hubs, which previously required periodic adjustment for normal operation, which, of course, could not but affect the reviews of car owners.
REINFORCED NON-ADJUSTABLE HUB FOR NIVA (LADA 4X4) AND CHEVROLET NIVA
That is why the designers created a non-adjustable hub for the Chevrolet Niva in order to avoid unnecessary fuss in terms of repairing the car. In general, independent adjustment of bearings is almost impossible, due to the very complex design. Also, do not tighten the bearings all the way. And, besides this, there is a whole bunch of difficulties that are difficult to solve without the intervention of experts.
It was precisely in order to make life easier for motorists that non-adjustable hubs were installed on the Niva. Check the condition of the rubber bushings of the anti-roll bar and the reliability of fastening the stabilizer brackets to the lower arms. In this case, the tires wear out unevenly, and the service life of the bearings themselves is sharply reduced.
The complete absence of clearance, at which tight rotation of the hub is observed, also leads to a decrease in service life.
Place the car on supports. If there is no indicator, swing the hanging wheel in a vertical plane. If you feel any play, the bearing clearance may need to be adjusted.
To make a final check of the bearing, have an assistant press and hold the brake pedal. Rock the wheel again in a vertical plane. The disappearance of wheel play during such a check confirms the need to adjust the clearance in the bearings.
Symptoms of a problem
Bearing wear manifests itself as the following symptoms:
- Vibration of the front wheels, which can be reflected in the steering wheel or felt in the cabin.
- Knocking or crackling sounds in the front of the car when driving;
- Heating of the front wheels in the axle area.
If such manifestations occur, you need to check the condition of the wheel bearings. To do this, jack up the car and rock the wheel in different directions. Play and knocking in the bearing area indicates the need for replacement and adjustment. The malfunction may also manifest itself in the form of noise when the wheel rotates.
Separately, it is worth mentioning two problems that arise during the operation of the Chevrolet Niva:
1. The hubs get hot. It is important to understand that when braking, the kinetic energy of the car is converted into thermal energy. As a result, the brake discs and the hubs on which they are attached become very hot. Heating of the part during movement, and not during braking, indicates wear of the bearing or its incorrect adjustment.
The second option is typical for adjustable hubs. The adjusting nut must be tightened with a force of 2 kgf*m. If you tighten it further, the tapered bearings will be too tight.
Their rotation will be difficult. Prolonged operation of the machine in this condition leads to bearing failure and wheel jamming.
2. The adjusting nut is unscrewed while moving. Sometimes this happens literally after 20-50 kilometers. The phenomenon is observed in three cases: the master forgot to tighten the nut, there was a misalignment between the bearing races, or play appeared in the coupling of the CV joint with the hub.
Which ones are better to choose for a Chevy Niva?
The hub ensures free rotation of the wheel and its reliable attachment to the car suspension. It acts as a supporting structure and allows you not to change the entire hub assembly as a whole, but to separately repair parts (bearing, drum, disc).
The hub plays a key role in the operation of the drive, brakes and steering and is subject to severe stress while driving. Therefore, the comfort and safety of driving depend on the strength and condition of this unit.
Front-wheel drive parts for Shnivy are produced by dozens of companies. Products differ in prices, quality, permissible loads and service life. The standard configuration of the SUV includes adjustable hub units, the tightening torque of which must be controlled after 2-3 thousand kilometers. For those who value reliability and are not ready for regular maintenance, manufacturers have introduced non-adjustable (maintenance-free) wheel hubs. They differ in the following indicators:
- The possibility of wear of the bearing seat in the steering knuckle is eliminated.
- The unit does not require lubrication or adjustment during its entire service life.
- The non-removable design of the bearings prevents them from turning.
- Increased service life of the unit.
- Reduced friction due to the use of ball bearings.
The non-adjustable hub has a reinforced cross-section, which prevents its deformation under the influence of shock loads
This is very important when regularly driving off-road or on broken asphalt roads.
Parts with catalog numbers 2123-3103014 and 21230-3103014 are produced by the following companies: IVECO, SKF, Leader, GM-Avtovaz, VolgaAvtoProm and other companies. The cost of the part depends on the manufacturer and design (adjustable and non-adjustable). The price of the products is 1000-6000 rubles. You can also find more expensive units that include brake discs.
The maximum mileage of unregulated IVECO hubs is 100-120 thousand kilometers. Adjustable ones last less and their durability depends on the frequency, correct maintenance, quality of lubricant and manufacturer.
For Niva 4x4 you can find on sale reinforced, non-adjustable hubs with double-row bearings from the Iveco Daily truck. According to the manufacturer, this modernized unit has the following advantages over Nivovsky:
- there is no need to adjust (the bearing tightening is precisely set during its production);
- no need for regular lubrication;
- eliminates rotation of bearings on the hub;
- eliminates wear of bearing seats on the steering knuckle and hub;
- a ball bearing reduces friction in the hub assembly;
- The service life of the hub is increased due to thickening (see photo).
Removing an Obsolete Part
The previously removed assembly and steering knuckle no longer require further dismantling. The only thing that needs to be done is to remove the worn out oil seal.
Dismantling consists of several stages:
- Before starting work, it is necessary to separate the fasteners securing the brake disc from the rotating mechanism.
- To support the fist, it is better to invite an assistant, it will be more convenient.
- Next, the pipe is knocked out using a fitting.
- Through the separation, one of the rings continues to be on the hub, while the other remains inside.
- Next, you need to knock out the remaining part of the part from the trunnion by applying gentle blows to the attachment in the holder.
- Finally, the old grease is carefully removed from the cavity.
The procedures listed above must be carried out in the sequence in which they are presented.
Replacing the axle bearing
Another element that experiences heavy loads while driving is the Niva Chevrolet axle bearing. Which are recommended to be changed along with the axle.
A symptom that this part needs to be replaced is the appearance of loud noise at any speed, as well as the appearance of axial and radial play. This part is not in short supply and can be purchased at any auto store, its factory part number is 2121-2403080, the analogue has part number 62208-2RS, and the industrial part is 180508.
To make the replacement, first of all you need to remove the axle itself and do the following:
- To remove the retaining ring with the bearing, take a vice and clamp the axle shaft in it
- We take a grinder and cut the stopper and bearing in several places, this must be done carefully so as not to touch the axle shaft
- Take a chisel and split the retaining ring and bearing
- We remove rust and dirt from the ring and bearing seats
- We take the pipe and use it to press the new bearing into place; during these actions, we must not allow the cage to rotate
- We take a blowtorch and use it to heat the locking ring until red and use pliers to install it in its place
- We wait until the axle shaft cools down, while it cools down in the brake flap we replace the oil seal
Chevrolet Niva hub
A hub is a vehicle mechanism that is a rotating element to which the wheels are attached. Bearings are installed inside this element (in the hole), which play the role of smoothing the movement of the car. The larger the diameter of the hub disk, the stronger the design of the mechanism. In order to avoid distortions, manufacturers manufacture hubs with larger dimensions than the diameter of the installation hole.
The brake pads and axle flanges are attached to the hub. Thus, the presence of this mechanism makes it possible to use the car to its fullest:
- Reliability of wheel rim fastening;
- Possibility of wheel rotation;
- Holding ABS elements;
- Transmission of torque from the axle shaft to the wheel;
- Provides a base for securing the brake system and flanges.
Mechanism parts are made from cast iron materials or various metal alloys by turning and milling. The hub has the appearance of a round rim with holes located on it, as well as one main hole in the middle, which is due to the complexity of the configuration.
The hub is attached to the car using bearings that are mounted on the axis of rotation or the beam of the drive axle. The hub has a so-called flange to which the brake disc or drum (for drum brakes) is attached.
Device mechanism: purpose and hub breakdowns
Now let’s look at the purpose of the main components of the part’s design:
- Rim. It has holes for installing studs on which the wheel is subsequently attached.
- Inner hole. Designed for installation of bearings (roller).
- Hole with slots. Designed for mounting the product on a CV joint axle shaft.
During the operation of a Chevrolet Niva car, bearing wear occurs, which requires replacement. When operating a Chevrolet Niva on poorly paved roads or off-road, various types of malfunctions periodically occur. But most often the chassis of a Chevrolet Niva car - the hub unit - is subject to malfunctions. Reasons why the operation of these nodes may be disrupted:
- Lack of lubricant in the device mechanism;
- Low quality lubricant;
- Poor quality bearings;
- Late adjustment of bearings. Bearing adjustments must be carried out with micron precision to achieve high efficiency of the mechanism.
- Improper operation of the vehicle. The simplest thing: not disabling the center differential lock when driving onto an asphalt surface.
The problem is solved by replacing the hub unit, but the price of the issue is too expensive. In addition, the possibility of failure of the mechanism after its replacement and traveling a couple of thousand kilometers cannot be ruled out. The problem can be solved in the following way - install a non-adjustable hub unit.
On the positive properties of unregulated elements
So, it is almost impossible to adjust the bearing due to the complex design of the hub mechanism. Whatever bearings are installed in the hub device (ball or roller), they cannot be tightened with a nut until it stops. This will lead to the wheel simply not rotating or jamming while moving. In addition, it is difficult to compensate for misalignment of the bearing installation locations in the rotary cam. The problem can be solved by making adjustments every 2-3 thousand kilometers.
But there is a more constructive approach, which is popular among Shnivovodov - this is the installation of a non-adjustable mechanism assembled with a non-removable bearing. This mechanism has the following quality indicators:
- No maintenance of structural elements (adjustments, lubrication) is required;
- The possibility of turning the bearing in the device is excluded due to its non-removable design;
- There is no need for regular hub lubrication. It is filled from the factory with a special long-lasting lubricant;
- Friction in the assembly is reduced due to the operation of a ball bearing;
- The possibility of wear on the seats on the rotary cam is eliminated;
- The bearing is tightened in production and does not require adjustment, which is characterized by the quality of its work;
- There is no need to replace the bearing.
What it is?
The pads and axle flanges are attached to the front hubs. This makes it possible to take full advantage of the following functional features:
- Allows you to securely attach the wheel.
- Ensures normal wheel rotation.
- Normal torque transmission occurs.
- It is the basis for fastening the brake system.
How to replace the wheel bearing of a Niva Chevrolet
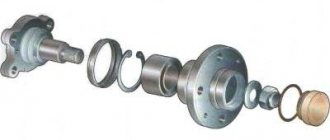
When pressing the outer race, you should use mandrels that prevent distortion. During the assembly process, grease is generously applied between the rings and the separator. It not only reduces friction, but also protects the rollers from dirt. There are two types of hubs available for the Chevrolet Niva. A conventional hub is installed with tapered bearings that need to be adjusted periodically
, and, if necessary, disassemble to replace the lubricant. The reinforced hub is installed with a double-row ball bearing.
Replacement of the wheel bearing is carried out according to the given algorithm.
- With the vehicle stationary, loosen the bearing nut.
- The jack is placed under the lower arm to partially compress the spring. Hang up and dismantle the wheel.
- Remove the brake caliper.
- Press out the steering pin.
- Unscrew the ball joints from the arms.
- Unscrew the bearing nut completely and remove the hub with the steering knuckle.
- Press the hub out of the inner races (the outer bearing cage may come out of its race).
- Using a screwdriver, remove the oil seal and thrust plate from both sides of the steering knuckle axle.
- Press out the outer bearing races.
- Install the bearings in the following order: race, cage, washer, seal.
- Press in the hub.
The wheel bearing is tightened using a torque wrench. First, the nut is tightened to a torque of 1.5 N*m, then released and tightened to a torque of 6.8 N*m. Next, the nut is released by turning 25 and locked. You need to drive the car 1 km and check the play.
Front-wheel drive parts for Shnivy are produced by dozens of companies. Products differ in prices, quality, permissible loads and service life. The standard configuration of the SUV includes adjustable hub units, the tightening torque of which must be controlled after 2-3 thousand kilometers. For those who value reliability and are not ready for regular maintenance, manufacturers have introduced non-adjustable (maintenance-free) wheel hubs. They differ in the following indicators:
- The possibility of wear of the bearing seat in the steering knuckle is eliminated.
- The unit does not require lubrication or adjustment during its entire service life.
- The non-removable design of the bearings prevents them from turning.
- Increased service life of the unit.
- Reduced friction due to the use of ball bearings.
Parts with catalog numbers 2123-3103014 and 21230-3103014 are produced by the following companies: IVECO, SKF, Leader, GM-Avtovaz, VolgaAvtoProm and other companies. The cost of the part depends on the manufacturer and design (adjustable and non-adjustable). The price of the products is 1000-6000 rubles. You can also find more expensive units that include brake discs.
The maximum mileage of unregulated IVECO hubs is 100-120 thousand kilometers. Adjustable ones last less and their durability depends on the frequency, correct maintenance, quality of lubricant and manufacturer.
Installing new bearings in the steering knuckle
Manufacturers do not lubricate their bearings and rings very generously, so you will have to add the missing amount of grease yourself. Litol-24 in an amount of 40 g is suitable, apply lubricant to the separator and rollers before replacing the Niva front hub.
- We insert a new outer race of the inner and outer roller bearing into the prepared hole of the steering knuckle. We press the clips on both sides, in the same way as they were installed at the factory.
- Next, apply lubricant to the raceways and spread it in an even layer.
- We insert the inner race and close it with an oil seal. Lightly press the boot with a mandrel of the required size. We do the same on the other side, install the clip and boot.
- Now we insert the hub into the steering knuckle, namely into the holes of the installed roller bearings.
- The hub must be inserted smoothly and without distortion. In some cases, depending on the actual mounting diameters, pressing through a press will be required. In this case, a spacer was used.
Read news about the new Niva
- We change the cylinder head gasket on a Niva Chevrolet with our own hands "
- Rear bumpers Niva Chevrolet - manufacturing
- Chevrolet Niva engine and its volume
- The advantage of a loan secured by a vehicle title at Autopawnshop 38
- Vehicle categories in technical regulations (M1, M2, M3, N) in 2022
- Lada Niva Travel 2022 prices, models, configurations, photos, new body, video
- AVTOVAZ increased prices for LADA Niva for the second time in 2022 » Lada.Online - all the most interesting and useful about LADA cars
- Chevrolet Niva 2019-2020: characteristics, price, photo and video review
How to change the wheel bearing on a Chevrolet Niva with your own hands?
Niva Chevrolet wheel bearings are subject to heavy loads during operation. Therefore, it is necessary to monitor their condition and change parts in a timely manner. Otherwise, the risk of a collision due to a seized bearing increases.
For repairs you will need:
- Powerful socket wrench 30.
- Puller for steering rod pin.
- A mandrel for pressing out a bearing or a piece of pipe of suitable diameter.
- A set of spanners or ratchet sockets.
- Balloon wrench.
- Hammer.
- Round nose pliers.
- Jack.
- Wheel chocks.
- Vise.
- Mount.
- Torque wrench.
- Boards or wooden block.
The replacement process is divided into five stages:
- Disconnecting the assembly (brake disc, hub and steering knuckle) from the CV joint strut.
- Pressing out old bearings.
- Installation of new parts.
- Assembling the unit and installing it in place.
- Tightening the adjusting nut.
To change bearings, you must perform the following steps:
- Place the car on the site and place wheel chocks under the rear wheels.
- Jack up the wheel.
- Unscrew the wheel rim mounting bolts.
- Build an improvised support under the side member from a wheel with boards or timber laid on it and lower the jack so that the car rests on it.
- Jack up the lower arm, compressing the suspension spring.
- Turn the steering wheel to the right or left (depending on the side from which the replacement is performed).
- Unscrew and remove the caliper, caliper and brake pads.
- Hang the caliper so that it does not put any weight on the brake hose.
- Turn the steering wheel in the opposite direction.
- Remove the ABS sensor.
- Unscrew and unscrew the tie rod nut.
- Remove the pin using a puller.
- Unscrew the hub nut.
- Remove the ball joint mounting bolts.
- Carefully remove the hub along with the steering knuckle, ball joints and brake disc.
- Remove the caliper protective screen.
- Remove the brake disc.
- Unscrew the steering arm.
- Clamp the steering knuckle in a vice.
- Remove the seals with a pry bar or a powerful screwdriver.
- Substituting the mandrel, knock out the outer races of the bearings.
- Wipe and clean the seat.
- Disassemble new bearings.
- Press the outer races into the hub using a mandrel or old parts.
- Apply lubricant, filling ⅔ of the space in the cage.
- Install the bearing race and inner race.
- Carefully press in the new oil seal.
- Repeat the installation operation for the bearing on the second side of the hub.
- Place the assembly on the CV joint splines.
- Tighten the hub nut.
- Screw on the ball joints and steering bipod.
- Install the protective cover and caliper bracket.
- Tighten the bolts securing the protective screen and lock.
- Put the caliper and brake pads in place.
- Jack up the car.
- Place and secure the wheel.
- Tighten the hub nut by tapping the wheel in the 6 and 12 o'clock directions.
Detailed video about replacing wheel bearings
(as well as the rear) Chevrolet Niva has exactly the same design as old cars, and their repair and replacement are carried out according to the same scheme. Initially, you should go to any car wash, where you should thoroughly wash the entire front suspension under high pressure. For crossovers, this advice is especially important.
- The front of the car is raised using a jack;
- The corresponding wheels, brake pads and calipers are dismantled;
- The hinge pin is untwisted and pressed out using a special tool;
- The bolts from the hinges and nuts are removed.
- After this, you have the opportunity to examine the part for damage and make appropriate repairs. Regardless of whether you plan to replace the bearings, you should change the seals.
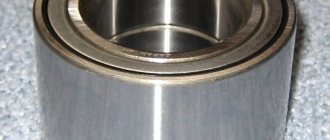
After removal, the inner race along with the rollers must be thoroughly washed with kerosene. After this, you will be able to visually assess the bearing damage. It is worth remembering that these parts are replaced only in pairs.
- There is no possibility of adjusting the backlash using a nut (tightening does not help);
- The rollers and clips are heavily scratched;
- Overheating is detected and a hum is observed.
Recommendations
Comments 43
Tell me, do your hubs themselves have 22 splines?
Yesterday I did the same. The hubs are from MVN and the fists are machined according to the same pattern with the rest. Slippers 32″ =). What’s interesting is that the original bearings ran on these 29″ wheels and the original factory hubs for almost 60k km. I adjusted it from time to time. Then I went to change the CV joints and saw a chipped inner race, well, I thought it was time to change it. Changed it to normal VBF. Since then I change it every three months =). The problem seems to be in the hub-inner race pair. At the factory, apparently mountains of hubs and bearings and on the conveyor allow a certain gap between them, the rest is rejected for spare parts =). In theory, if the hub has not yet died from wear, you take it and go to the store and start fitting the inner races until you find a normal fit. Who will let me do this? Well, as for the original wheels, everything said above is offset by the +58 offset and the original wheel diameter. If you have a 0 offset and a 32″ shoe, even a small gap with a sharp impact on the wheel easily breaks the rollers and inner race. Which is exactly what happened just two days ago. I got tired of all this and went to redo it the normal way. After installation, the looseness really disappears and the steering becomes clearer. There is no strained hum, now you can hear the whole transmission working hard =) We wax for 29″ + must-have slippers, or go and pick up the gaps on the soles.
Read more: Tire pressure for Skoda Octavia Tour
So far, during front suspension repairs, everything has been removed and put on without problems.
Sometimes you come across that you can’t then remove the hub without damaging the bearing? (Volgaavtoprom, etc.) how about this in this design
KORAM hubs are quite good in quality, I also liked them in the store, and in size too, I bought them 3 years ago. but when I came home and tried it on the grenades, I was shocked by the gap in the spline and soon sold it. because no amount of tightening will save you from displacement in the splines under alternating loads and additional transmission play. Then I bought hubs from MVN, there is no gap at all in the splines, but comments about quality are unnecessary.
Wow, I didn’t have any problems with this, apparently the Italians don’t shy away from selling defects either
This is no more a tribute to fashion. It’s like a raptor or Chinese miracle headlights. A waste of money that is never unnecessary. But the choice here is everyone’s. As they say, every hut has its own rattles.
In my opinion, it’s not a good comparison, the Raptor and the Vor are not the musculoskeletal system of a car, which should work as smoothly as possible, like a Kalashnikov assault rifle.
This is no more a tribute to fashion. It’s like a raptor or Chinese miracle headlights. A waste of money that is never unnecessary. But the choice here is everyone’s. As they say, every hut has its own rattles.
what the hell did you say
That my opinion does not fit into your consciousness. Read what is written carefully again. And please don’t show off your “wonderful upbringing.”
your opinion does not fit with common sense
You’d better check the clamps and hoses on your “miracle stove.” You’re healthy. Einstein sculpted there!
the stove works great, unlike your head
How is it that they feed well in the psychiatric hospital?
It seems to me, or has this article not been relevant for half a year now, if not more? And what kind of teapot do you have to be in order not to be able to adjust the wheel bearing?
I took it off my tongue. Another variation of “taz-gavno.” Moreover, it is crap solely due to the incompetence of the owner. Now from the factory the hub unit is on a double-row, but the archaic old design is much more repairable on a knee in the field.
Why now repair this unit in the field? If the goal is maintainability, then a Russian wooden cart is just right - I tied a stick to the wheel with a belt from a rituz and everything worked again
First changes and Lada 4x4
Since the mid-nineties, or more precisely since 1995, changes began to be made to the design of the car. Firstly, if previously the car had a 1.6-liter 4-cylinder 73-horsepower gasoline engine, now the volume has been increased to 1.7. The manual transmission now had five steps instead of the previous four. Secondly, they changed the dashboard, installed more comfortable seats in the cabin, and replaced the taillights with more modern ones in order to externally try to get closer to the Western automobile industry.
In 2006, “Niva” was officially renamed “Lada” 4x4, and models exported were called “Lada Taiga” 4x4 - this is what the car is now called in European countries. Externally and internally, the car has changed, if at all, only slightly: new mirrors have appeared - larger ones, the indicators and instruments on the panel have been changed. The new car model released in 2015 called “Lada 4x4 Urban”, which is considered “luxury”, did not receive any major changes - except for new bumpers, electric windows and air conditioning in the cabin.
Car "Niva"
“Niva” is perhaps one of the most popular SUVs, not only in Russia, but also abroad. Since the late seventies, this car began to be produced. The very first model was named VAZ-2121.
In the mid-eighties, Niva cars with Soviet racers inside took all three prizes at the Australian rally raid. Sales of the car soared: in Australia itself - twofold, in Europe - fourfold or more, depending on the country.
Indeed, this was a new word in the annals of the development of light SUVs, and it was written precisely by Soviet designers.
Recommendations for replacement
Despite the fact that it is recommended that the replacement be carried out at a car service center, this task can be performed independently, since installation does not require a special tool and no modifications are required during installation.
The main thing you need during installation is:
- Use new nuts and studs,
- Lubricate all system elements to prevent souring
- Clean the caliper
The only disadvantage of this hub unit is the high price, but by installing it, you will save yourself from the problems associated with standard elements, while increasing the reliability and cross-country ability of the SUV. And if you have a standard set of tools and a little knowledge, you can make the replacement yourself.
Where to install
This method of strengthening the front hub will be much more economical than contacting a car service.
The Chevrolet Niva SUV (VAZ 2123) is reliable and, like no other car, is adapted to the realities of road conditions in Russia. Thanks to the arrangement of the hub, wheel bearing, brake drum, and wheel disk, a community of parts is created that can withstand heavy loads. The greatest pressure falls on the wheel bearing; in fact, it holds the entire mass of the car.
The bearing experiences the greatest load during acceleration and braking, which cannot but affect the technical requirements placed on it.
Unfortunately, even on such a car, harsh operating conditions have a sad effect on the components, especially the suspension. That's why sometimes it breaks down.