Thanks to the arrangement of the hub, wheel bearing, brake drum and wheel disc, forward movement, braking, and steering of the vehicle wheels occur, ensuring the safety of the driver and passengers. Replacing the VAZ 2109 hub is quite possible with your own hands if you have all the necessary materials and tools at your disposal.
The time standards for replacing the hub, according to the technical data for the VAZ 2109, are 27 minutes with the wheel removed. These instructions with photos will help you change the rear hub.
Design and purpose of the rear hub
Diagnosis and repair of the rear hub of the VAZ 2109 does not require any specific education; this operation is within the capabilities of many car enthusiasts. However, in order to carry out the necessary measures correctly, it is useful to familiarize yourself with the structure of this component of the car.
The rear hub is mounted on the beam using four bolts.
Location of the rear hub in a VAZ 2109 car
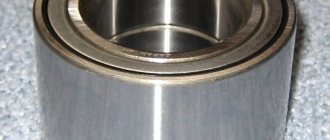
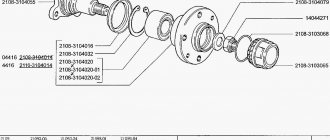
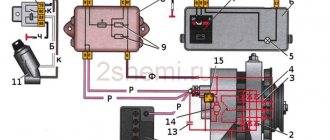
The hub itself includes several components. In the figure below you can see their list and relative positions.
Car rear hub device
From the presented infographics we can already conclude that the wheel bearing is the connecting link between the wheel hub and the vehicle axle. The wheel is attached to the hub flange using four bolts, and this entire structure rotates thanks to a rolling bearing.
The tasks assigned to the wheel bearing include:
- ensuring wheel rotation with minimal friction losses;
- quiet operation;
- comfortable and easy movement of the car;
- reliability and reliability;
- long service life.
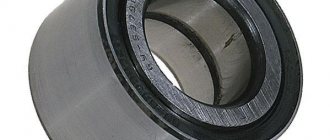
In turn, the bearing is a system of interconnected parts: a cage, a boot, rollers and a separator.
Wheel bearing arrangement
Wheel bearings operate under conditions close to extreme:
- temperature changes;
- aggressive environment (road deicing agents);
- exposure to moisture;
- impacts due to uneven roads;
- dynamic loads (acceleration, braking, sudden maneuvers).
Design Features
The rear hubs of the V8 are equipped with sealed angular contact ball bearings. Each of them has two rows of balls. This makes the structure as resistant to loads as possible, and also allows them to be distributed with the greatest efficiency.
The rear wheel bearing of the VAZ-2108 is made of heavy-duty steel. Its service life, declared by the manufacturer, is 90-120 thousand kilometers. By the way, these are not empty statements. Oddly enough, VAZ wheel bearings actually last a very long time and, if used correctly, can last twice as long as the stated mileage.
Checking the wheel bearing
The condition of the wheel bearings should be checked not only at intervals determined by the manufacturer, but also during each vehicle diagnosis. During inspection, it is necessary to determine the correct rotation of the wheel, which should not have free axial displacement (play). For this purpose, you need to act in the following sequence:
- We lift the rear wheel on a jack and give it torque by hand, while there should be no extraneous noise or “murmuring” of the rollers;
We spin the car wheel clockwise, checking it for extraneous noise.
- Alternately, in different planes, we loosen the wheel perpendicular to the hub axis. We act with both hands at the same time.
Checking for play is done by rocking the wheel in a vertical plane.
Be sure to test the rear hub for vertical and horizontal play.
In the horizontal plane, play is less common, but diagnosing this malfunction is mandatory
- In the first case, a check is made for the presence of corrosion “shells” and the cleanliness of the roller track, in the second, the wear of the treadmills is checked, where even a small play should not be noticed.
An example of wear on the running part of the outer race of the bearing
Video: how to check your car wheels for play yourself
Bearing replacement algorithm
In a garage environment, replacing a wheel bearing is not as difficult as it seems. An experienced car enthusiast will carry out this operation in a few hours. A beginner should either ask amateur craftsmen for help, or entrust this operation to car service specialists.
Tool for work
When replacing a wheel bearing we will need:
- hammer;
- knob;
- wooden block;
- extension cord (pipe, mount);
- head at “30”;
- spanner set to “12”;
- forceps;
- vice;
- crab type puller.
Sequencing
- The hub nut is loosened using a 30mm socket and a wrench. After this, use a 22mm socket to slightly loosen the mounting bolts on the wheel.
- Wheel chocks are installed under the front wheels, and the car is in first gear. After this, the rear wheel with the faulty bearing is jacked up and removed.
Brake drum cover visible
Removable using a 12mm socket
Removable using a puller
To do this, a puller or pipe is used.
The same puller is used to press a new wheel bearing into its place, after which the hub is reassembled and the wheel is installed in place.
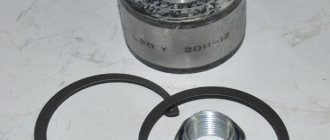
The retaining ring is visible above the orange bearing.
Video: How to remove and replace a VAZ 2109
How to remove a wheel: step-by-step instructions
To carry out repair work quickly, and most importantly, efficiently, adhere to the following algorithm:
- We park the car on a level surface.
- Opposite the wheel being repaired (diagonally) we install wheel chocks.
Diagram of installation of wheel chocks
Jack up the wheel. To avoid unforeseen situations, it is best to leave the gearbox in first or reverse gear.
- Remove the protective cap, then use a 30mm head and use an amplifier to unscrew the hub nut.
- We soak the drum mounting studs with penetrating liquids, wait a few minutes and unscrew them (in our case, the edges of the studs came off; when removing them, we had to act according to the situation).
An example of using an amplifier to unscrew a hub nut
We unscrew the “stuck” studs using improvised means
- Check the handbrake; it should not be engaged.
- Holding opposite sides with both hands, pull the brake drum towards you. If it cannot be removed, tap it from the opposite side with a hammer through a wooden block. We process the part over the entire area, achieving its uniform displacement.
Useful tips
By following these guidelines you will ensure that your new bearings last longer:
- when replacing a damaged part, place a new one on both front wheels, so the entire system will work more stable (after the procedure, the wheel alignment is checked);
- the bearing is cooled before use, and the rotating mechanism, on the contrary, is heated, this will allow pressing to be carried out with minimal labor costs;
- try to buy new spare parts in stores with a good reputation that have the necessary certificates of conformity and other documents confirming the quality of the products sold.
Source: ladaautos.ru
Symptoms of a problem
So, replacing the rear wheel bearing of a VAZ 2109 may be necessary:
- when noise appears (usually manifested in the form of a strong hum) or knocking in the rear of your car;
- the appearance of play in the bearing.
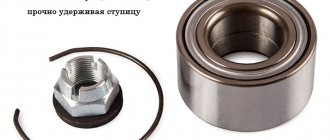
Rear wheel hub VAZ 2109.
Rear wheel hub VAZ 2109
If you have one of the above symptoms, you need to lift the rear wheels one by one and make sure that there is a malfunction or not:
- Spin each of the suspended wheels thoroughly and listen to whether any extraneous noise appears. The presence of a clear hum indicates problems with the bearing;
- be sure to check for play (done with the wheel hanging). To do this, grab the top of the wheel and pull it away from you and towards you. If the bearing is intact, then the wheel should not play. Otherwise, you need to prepare yourself for serious work.
There are situations when there is no time for repairs. Try to lightly tighten the hub nut. Such a trick sometimes helps to remove the backlash, but not for long. In the future you will still have to make a replacement.
Why is inaction dangerous?
It is better not to ignore a malfunction of the rear wheel bearing for several reasons:
- firstly, in the presence of noise and hum, driving a car is not nearly as pleasant as it might seem at first glance. To get rid of unnecessary sounds, car enthusiasts are ready to endure any costs;
- secondly, ignoring a bearing failure may lead to the need to replace the entire strut (which, naturally, entails more serious costs);
- thirdly, malfunctions of the chassis system are dangerous due to the unpredictability of the car on the road and an increase in the likelihood of an accident. Therefore, it is highly undesirable to joke with this.
Causes of failure
Of course, this bearing has its own service life. But, in practice, the main cause of breakdown is improper operation of the car. Let's look at what causes the problem:
- Careless driving
on bad roads. Do not forget that the hub is not protected from bumps by shock absorbers. Therefore, all loads fall primarily on it, and accordingly the wheel bearing. As a result, the clip gradually collapses; - Ingress of water and dirt
. The “nines” use a double-row ball bearing; it is not very sensitive to water, but regular wetting, and especially the ingress of dirt, significantly reduces its service life. This often happens when driving through mud and puddles;
- High speed
. This model does not respond well to constant high-speed operation. During a long trip, the hub heats up and the bearing begins to deform.
Required
To complete the work, nothing unusual is required - most are already in the car enthusiast’s garage:
- pliers (with their help it will be necessary to dismantle the retaining rings);
- socket wrench. If you have the whole set, great, but for this work, number “30” is especially necessary;
- spanner wrench Again, you can use a set, but one “12” key is enough for the job. Without it, it will not be possible to remove the guide pins from the brake drum;
- special puller (necessary for pressing out bearings);
- Additional tools that may be useful are a hammer, a small wooden block, a pry bar and a chisel.
Bearing replacement instructions
To quickly and accurately complete the job, follow these recommendations:
First, remove the protective cap and unlock the rear wheel hub (this can be done with a hammer and chisel).
Loosen the bolts on the hub and wheel. Please note that the tightening torque of the hub nut is very serious, so it would be useful to increase the “shoulder” of the wrench with an additional pipe.
Put the car in first gear and secure the car (this can be done by installing special “shoes” under the front wheels). Do not use the handbrake.
Finally unscrew all the bolts and remove the rear wheel.
Unscrew the guide pins.
And remove the brake drum.
Removing the brake drum
If it cannot be removed, you can use a block (as a spacer) and a hammer. By tapping on it, or turning the drum, you can easily blow it up from its “home” place.
Now move on to the main part. Completely unscrew the hub nut and remove it from the axle.
If you have a puller, use it.
If not, then you can use a simpler method.
Or use a pry bar.
Put the wheel back in place, screw it to the hub with bolts (you don’t have to tighten it all the way). After this, sharply move it towards you (the hub should come off).
Please note that this work does not always go smoothly. In particular, the inner ring of the bearing may remain on the journal. If you are unlucky, you will have to remove it with a chisel and a pry bar.
Or you can use a puller.
The bearing in the hub will be fixed by a special retaining ring - remove it. To do this, you can use special pliers or a regular screwdriver.
Now use a puller to press the bearing out of the hub. If you don’t have a puller at hand, then you need to find a pipe with a suitable diameter, place it and beat until “victorious”.
Clean the inside of the hub and lubricate it well.
Press in the new bearing. There are several options here - do the work using a puller, a vice, or a hammer and a wooden or metal spacer, as in our case.
Replacing the rear wheel bearing of a VAZ 2109
We return the locking ring to its place using a screwdriver and pliers.
We install the hub on the axle. If you can’t get the part into place manually, you can carefully tap the bearing from the inside.
To do this, use a pipe of the appropriate diameter or a spark plug wrench.
Replacing the rear wheel bearing of a VAZ 2109
Next, return the washer and nut to their place. Tighten the nut and press the hub until it stops.
Return the brake drum and wheel to their place.
Tighten the hub nut. Please note here that the tightening torque should be 19-23 kgf*m.
If you don’t have a torque wrench at hand, you need to tighten the nut with the same force with which it was tightened before. Don't forget to tighten the nut.
Replacing the front hub on a VAZ 2108, VAZ 2109, VAZ 21099
Welcome! The front hub is the so-called front wheel hub, which eventually becomes unusable and must be replaced, but basically the entire hub is replaced very rarely since it consists of a very durable alloy and it is deformed only after a serious accident, or after a very strong collision on a bump.
Note! In order to replace the hub, you will need to stock up on: Two different types of screwdrivers, as well as wrenches, a hammer, a soft metal drift, always a new hub nut which costs a penny in the auto shop, a jack, a wheel wrench, a vice, and also you need You will also need to stock up on a chisel and an extension with a set of socket heads, as well as a crowbar or a mounting blade, and we also recommend that you stock up on a hub bearing, because in most cases, when you remove the hub, the bearing itself is deformed from this!
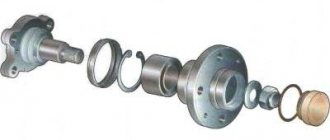
Summary:
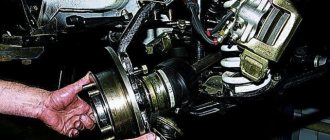
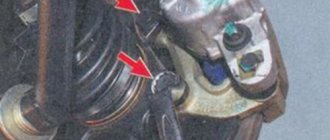
Where is the front hub located? It can be very difficult to see because the wheel itself rests on it and in addition it is covered by the brake disc itself, but in order to see its location in more detail, you will have to remove the wheel, then the brake disc and you will see a picture like this as shown in the photo below, where the hub itself was indicated with a red arrow for clarity.
When should you replace the front hub? It must be replaced, as was already said earlier, if it becomes deformed, but since the hub itself consists of a solid steel billet, simply running over a bump is unlikely to break it, so basically it either warps in the event of an accident, or becomes deformed when hitting a very sharp hummock And also the hub needs to be changed if, when the thread is torn off, the bolts that secure the wheel are screwed into it, so if the thread of the hub under any one bolt breaks, then most likely you will have to replace the hub because driving with three bolts is dangerous.
Note! By the way, not all hubs come with threads, some hubs are sold in auto stores with studs and the wheels are held on them with nuts, mainly such hubs are used for wheels that are too wide, not all bolts are very long, but the studs can be anything length and size, and it is much more convenient to throw the wheel on the studs, and another advantage of the studs is that they do not have threads as such, but a hub with threads does, and therefore if the thread breaks, you have to change the entire hub, but here you can simply remove the old pin, knock it out and install a new one in its place and don’t need to change anything!