Correct operation of a car engine is ensured by a combination of factors that must be constantly monitored, maintaining the necessary modes on the accompanying units.
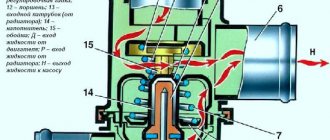
One of the important indicators is the temperature of the coolant, which directly affects the speed of warming up the engine and the removal of excess heat from it. As in any other car, in the Chevrolet Niva, control of the parameter is assigned to the thermostat. This device, to a certain degree of temperature increase, maintains the circulation of coolant in a small circle, facilitating engine warm-up. When the antifreeze reaches 80–90 °C, the regulator automatically changes the exchange to a large circle, which includes a cooling radiator. The latter prevents the antifreeze from boiling and ensures that its temperature is maintained within the limits of the norms for correct heat removal from a running engine.
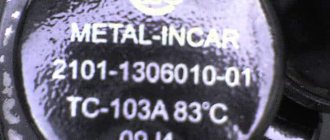
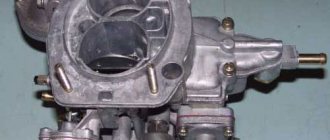
The thermostat itself on the Chevrolet Niva is mechanical. There are no third-party connections to it, except for the incoming and outgoing pipes of the cooling system.
Thermostat for Niva 21213 which is better
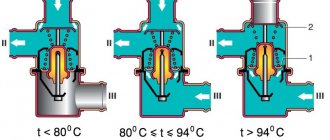
An internal combustion engine is designed to operate at a certain temperature. Only within a certain range of heating of the coolant are the correct temperature gaps of the rubbing parts and the factory-set characteristics observed. To speed up warm-up, the coolant first passes through a small circuit (bypassing the radiator).
Then, as it heats up, the flow is redirected along a large circuit through the radiator. If necessary, the cooling fan is also forced to turn on. Thanks to this three-stage system, heating occurs more evenly and operating temperature is reached faster. To switch antifreeze between cooling circuits, a special valve is provided - a thermostat. It opens under the influence of a certain temperature and is a regulator of engine cooling.
This item is actually a consumable. If it breaks down, the thermostat needs to be replaced, since it cannot be repaired. Correct operation of the thermostat is especially important on vehicles operated in difficult conditions: for example, SUVs. NIVA 2121 falls into this category. When driving off-road, the engine works under heavy load and gets very hot. And external cooling by air flow is not effective due to the low speed. It is in such a situation that a broken thermostat can lead to overheating of the internal combustion engine and deformation of the cylinder block.
The malfunction can be determined independently, without special diagnostics. During normal operation of the thermostat, the internal circuit pipe heats up first. As the temperature rises, after the valve is activated, the outer pipe also becomes hot. The engine overheats even though the cooling fan is working and the antifreeze level is normal. External signs: after warming up the engine, the internal circuit pipe is hot, the external circuit pipe is cold. Malfunction - the valve is constantly closed.
If such malfunctions are detected, it is necessary to dismantle the thermostat and check its functionality in a container with hot water. A thermostat is placed in the pan, the water is heated (constant stirring is required).
When the valve opening temperature is reached (checked with a thermometer), a working thermostat should work.
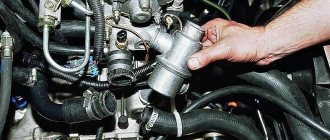
In the NIVA 21214 car, the valve is conveniently located; there is no need to dismantle adjacent elements. No special tools are required - just a Phillips screwdriver is enough. You may also need a flat blade screwdriver to pry up stuck hoses. Drain some coolant to a level below the connection between the pipes and the valve. Cover the generator with plastic wrap. If antifreeze gets inside the generator, this will entail a labor-intensive operation to clean and dry it. It is even possible that electrical equipment may fail, and the generator will have to be replaced.
Next, you need to loosen the clamps on the inlet pipes and check their free movement. When replacing, do not pull off the hoses with a sharp movement, as this may damage the pipe or cause injury.
After making sure that the joints are not stuck, unscrew the clamps until they sag and separate the pipes. Be prepared to catch any leaking antifreeze; you can use a rag to cover it. Inspect the supply pipes. If there are cracks or large creases, replace them. After removing the part from under the hood, inspect it for fallen springs or other metal parts.
If there is a foreign object left in the pipe, you will have to change the water pump as well. Before installing a new thermostat, thoroughly wipe the internal surfaces of the pipes to remove any deposits. Be careful not to allow debris to get inside the cooling system. Attach the new valve in reverse order. First, tighten the screws fully and check the connections for rubber kinks. Then crimp the clamps all the way. Add antifreeze to the standard level and start the engine. Check the joints for leaks. Check the functionality of the thermostat by touching the hoses of the circuits.
F O R U M
How to check
There are two methods for checking the functionality of the regulator, depending on whether a thermostat is installed in the car or not. If the unit is already connected to the engine and while warming up, the upper pipe going to the radiator immediately becomes hot, the exchange device is not working properly. The same applies to the case when the engine is warmed up, but the “large circle” line remains cold.
Another test method is used when the thermostat is disconnected from the vehicle systems. If low pressure air is supplied through the inlet pipe, it should not come out of the top of the thermostat. Only at the bottom. A violation of the current current directly indicates a faulty unit.
Thermostat from Shnivy to Niva (2121)
Thermostat from Shnivy to Niva (2121)
Post by Anatoly » 10 Dec 2010 22:20
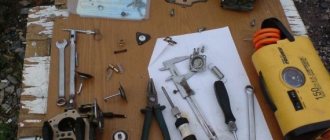
An article in the magazine “Behind the Wheel” made me think about improving the standard cooling system, because cooling the engine in winter is a real problem. There was no desire to solder an additional pipe into the original thermostat, so I settled on the option of replacing the thermostat with a Shnivovsky one. Having additionally studied the articles on Niva-faq by Turner, Mason and Chocolate Hare, as well as St.Rangera, I made a shopping raid, as a result of which I purchased:
Thermostat LUZAR — 340 rub. Set of pipes LUZAR VAZ 21213 - 300 rub. Clamps in assortment 200 rub. (a few left) Hose Ø16mm - 90 rub. meter (I took a meter) Sealant - 40 rubles. There was about 0.5 liters of antifreeze.
Let's start the installation: Drain the antifreeze, dismantle the thermostat along with the pipes. We are figuring out the location of the new thermostat, I decided to put it higher and in a horizontal position, as was done on Shnivy. We cut the pipes according to location. In general, nothing complicated, except for a couple of points: I plugged the outlet from the stove into the block with a stud of the GAZelle wheels, ran a hose from the outlet pipe of the stove to the thermostat (there is an electric pump in the section), put a suitable hose on the carburetor heating nipple (on the thermostat) and plugged it with a bolt. Fill with antifreeze and remove the plugs. ALL!
Installation time - 4 hours with swearing and smoke breaks, without much stress. It feels like - I start the car, turn on the heater - warm air blows from the heater when the needle moves at the “50” mark, as it warms up the heat increases. As a result, at idle the car warmed up to 80 degrees in about 7 minutes! At an outside temperature of -13°C, while driving the engine warmed up to 90°C and the needle froze. The air came out of the stove hot, and then the “Piano in the Bushes” came in, or rather the electric pump from the GAZelle! And this whole thing is blown through by a heater motor from a VAZ-2108! Can you imagine what Tashkent is like? And I felt
Lada 4×4 3D VYATSKAYA GUN › Logbook › Installing a thermostat according to the principle of the NIVA-Chevrolet scheme.
For a long time I was planning on switching to a thermostat from a Chevrolet Niva on the Niva, before that it was installed on the 2106... Unlike the native one, a more thought-out scheme ensures: - supply of coolant/oil directly to the cylinder block. - Air pockets are quickly expelled. - Faster warm-up motor and, as a result, the heater heats up faster in winter.
For the remodel you will need:
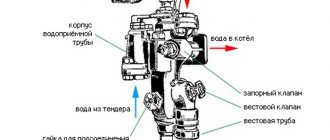
-2 pipes (in the picture No. 1 and No. 16) -Hose of 18 mm in inner diameter to the stove. -Hose from the expansion tank to the radiator (now this will be the return (in the picture No. 13) -Expansion tank (I took from 21214) - Chevrolet Niva thermostat. - Plug for the coolant/oil supply channel to the heater from the pump. (I made it myself) - Clamps (it is advisable to take NORMA GM, very high quality.
And in detail:
We remove all the old parts of the coolant/oil system and attach the thermostat to the pump with the purchased hose.
From the old hose we cut out a new pipe from the thermostat to the head.
We adjust the purchased hose from the thermostat to the radiator in place...
After that
Take a purchased hose with an internal diameter of 18mm
And pull it onto the upper pipe of the stove.
We connect the carburetor heating to the smallest fitting of the thermostat. I recommend using a very strong oxygen hose…
We install a pump plug made from a former pipe.
The radiator fitting, which previously served to supply coolant/fuel from the expansion tank, has a double cross-section; we attach a hose to the smaller one.
And we pull it into the new expansion tank.
Now coolant/fluid will circulate through it, expelling air pockets and constantly maintaining the required level of coolant/fluid in the radiator.
We slightly modify the radiator cap. We saw off the rod with a grinder and cut out 2 gaskets from the inner tube to seal the connection as much as possible.
General form.
And assembled.
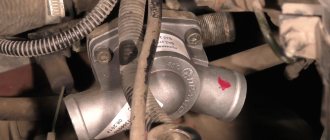
In addition to everything, I installed a thermocouple and an emergency coolant temperature sensor in the upper radiator pipe.
The sensors are oriented downward to avoid contact with steam and incorrect readings.
In the afterword, I will say that an electric fan with forced shutdown will be installed, and the emergency sensor will be displayed on a warning lamp. Do not switch