Why do wipers fail?
There can be many reasons why windshield wipers fail. Most often, wipers break due to electrical overloads, as well as when the mechanism jams.
In winter, wipers can fail due to a large accumulation of precipitation on the windshield or freezing to the glass. It is highly not recommended to turn on the wipers until the car's windshield has warmed up.
One thought on “Electrical diagram of Lada Priora in detail”
These materials present in an extremely simple and accessible form a description of the maintenance and repair of VAZ Lada Priora cars in a step-by-step manner using ready-made spare parts in a garage workshop. Possible malfunctions have been studied and methods for eliminating them have been considered.
Priora owners note two drawbacks of the windshield cleaning system: slow operation of the wipers and 4 working strokes of the wipers when the washer is turned on, when two would be enough. The article discusses the reasons for these shortcomings and provides ways to solve them by modifying the Priora windshield wiper.
Types of wiper breakdowns
Windshield wiper failures can be divided into two types: electrical and mechanical. Each type of breakdown is complex in its own way and makes it difficult to repair in the field. In some cases, it is necessary to remove many parts to get to the source of the problem.
The most common wiper failures:
- Fuse blown;
- Windshield wiper motor winding burnout;
- Wiper switch malfunction;
- Burnt out wiper relay;
- Breakdown of wiper splines;
- Mechanism failure or jamming;
- Gearbox jamming;
conclusions
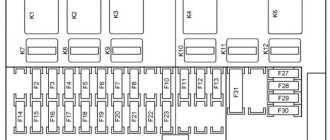
Priora has three mounting blocks with layout diagrams for fuses and relays - the main one and two additional ones. If the schemes are unchanged, then for the main one it changes depending on whether we are talking about standard or luxury trim levels. Knowing the location of certain elements, their designations and numbers allows you to speed up the diagnosis and solution of problems. Especially considering that some important relays are separated into different blocks - such as the fuel pump and starter.
Specialization: Graduated from the State Automobile University, worked for 20 years at GAZ-56, now I drive a Zhiguli.
To access the mounting block: Turn the plastic handles (3 pieces) holding the block cover from below; Pull the bottom of the cover, disconnect its upper holders to the instrument panel and remove the unit cover.
Types of mounting blocks
Block 1118-3722010-00
Delphi block 15493150
Circuit breakers
F1 (25A)
- DELPHI 15493150
- Not used
- Engine cooling fan motor
F2 (25A)
F3 (10A)
- High beam lamp (right headlight)
- Instrument cluster
- Headlight high beam indicator
F4 (10A)
- High beam lamp (left headlight)
F5 (10A)
- Mounting block, horn relay
- Sound signal
F6 (7.5A)
- Low beam lamp (left headlight)
- Motor-reducer of the left headlight beam direction regulator
F7 (7.5A)
- Low beam lamp (right headlight)
- Motor-reducer for adjusting the beam direction of the right headlight
F8 (10A)
- Mounting block, alarm relay
- Alarm sound
F9 (25A)
- DELPHI 15493150
- Not used
- Heater fan motor
F10
F11 (20A)
F12 (10A)
F13 (15A)
- Cigarette lighter
F14 (5A)
F15 (5A)
- Side light lamps (starboard side)
- Glove box light
F16 (10A)
F17 (10A)
- Fog lamp (left)
F18 (10A)
- Fog lamp (right)
F19 (15A)
F20 (10A)
F21
F22
- Since 2007 (20A):
- Windshield wiper motor (automatic mode)
- Windshield wiper activation relay and windshield wiper high speed relay, (contacts)
Mounting block
- Driver's door switch block
F23
F24 (15A)
- Since 2013:
- Airbag system control unit
F25 (20A)
- From 2013: Central body electronics unit
Windshield wiper
F26 (5A)
- Since 2013:
- Rear fog lights
F27
- Spare
F28
- Spare
F29
- Spare
F30
- Spare
F31 (30A)
F32 (30A)
- Since 2013:
- Electric heater fan
K1
- On a vehicle without air conditioning: Cooling fan relay ()
- Relay for turning on the low beam and side lights of the headlights (automatic lighting control system)
K2
- Heated rear window relay
K3
- Starter activation relay
K4
- Ignition switch relief relay
K5
- Not used
K6
- Since 2007:
- Windshield wiper relay
- Not used
K7
- High beam relay
K8
- Horn relay
K9
- Since 2007:
- Alarm horn relay
- Relay for automatic control of external lighting (unit for automatic control of external lighting (high and low beam headlights, fog lights, fog lamps in the rear lights, headlight beam direction control))
K10
- Fog light relay
K11
- Since 2007:
- Front seat heating relay
- Rear fog light relay
K12
- Luxury Plus package:
- Windshield wiper relay (intermittent and automatic)
Why don't the wipers work on the Priora?
If the windshield wipers fail on your Lada Priora, you must initially follow the instructions below.
- If the wipers do not work in cold weather after starting the car, you need to check them to see if they are frozen to the windshield. This happens after the car has been idle overnight, and if there was precipitation at night, this may be the reason.
- Blowing a fuse happens very often; if you drive a car in the rain and turn on the wipers at maximum speed, the current in the power circuit will increase, which can lead to a blown fuse. It is necessary to check the fuse in the mounting block numbered F11. If the fuse is faulty, it must be replaced with a new one with a rated current of 10A, and in hatchback and station wagon bodies 20A.
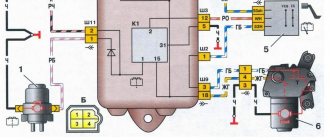
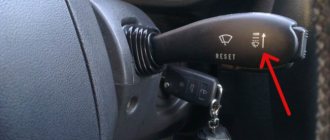
- Then you need to check the relay, and this is done like this. We turn on the wipers and place our finger on the relay number K6, it should make a characteristic click. If this does not happen, change the relay.
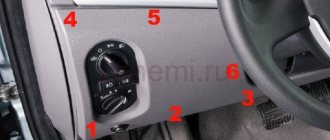
- Checking the steering column switches. This can be done by transferring them from another similar car.
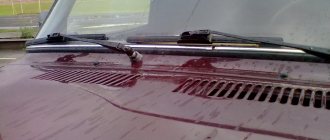
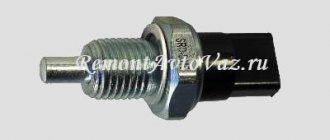
- Oxidation of contacts on the wiper motor. Since the engine is located under the frill, moisture can sometimes get there and cause oxidation of the contacts. To do this, you need to dismantle the wipers and frill, and then clean the contacts on the electric motor.
- Checking the engine for integrity. This can be done by applying a voltage of 12V to the motor contacts. A working motor should start to rotate.
- After disassembling the frill, it is necessary to inspect the mechanism for rust and corrosion. It is possible that the entire mechanism is jammed due to rust formation.
By following these instructions, you can easily repair the wipers yourself.
Removing and disassembling the windshield wiper motor
All the important parts of the rear windshield wiper are located under the trim. To remove it, I had to tinker, since it was attached to special holders, which are not so easy to remove without special tools. Fortunately, I had a nail puller at hand and it was perfect for removing these fasteners.
After unscrewing the rear wiper mount, I unscrewed the mount of the motor itself. I disconnected it from the block and took it home for inspection.
There appears to be no damage. Then he unscrewed the mount of the motor housing and pulled the structure out of it. The mechanism itself is covered in lubricant; there was plenty of it.
I looked at the gears, they were intact. Next, I examined the wires attached to the microcircuit. They had a raid. I thought this was probably the reason and decided to move them a little (in a good way, it would be better to resolder them), the “dust” flew off.
- That’s it, there’s nothing more to look at, I put the mechanism back together and went to connect the motor to the wiring block to see if it works or not.
I turn on the ignition and rear window wiper. That's it, the rear wiper is working. Hooray! I screwed everything into place and went for inspection.
Operating principle of the device
So, an electric pump is currently being installed; previously it was a mechanical one. We also have a tank in which the glass spray liquid is stored. Naturally, there are two tubes through which it flows to two sprayers. The volume of the tank can be 2.5-5 liters, which is quite enough for a long period of operation, due to the efficiency of the injectors. The electric pump located in the reservoir is activated by the steering column switch. This way, cleaning liquid is supplied to the windshield and the wipers turn on for a while.
Ordinary water is used as a working fluid - this applies to the summer period, but in winter, when it is cold, a special “anti-freeze” is added there. Two types of nozzles are used: jet and fan. It’s difficult to say which is better; both of them give excellent results. That’s probably all that concerns the device and operating principle of the washer.
Causes of washer malfunction
If the windshield washer does not work, it will not be difficult for an experienced driver to identify the cause of such a malfunction, and even a beginner, after familiarizing himself with the main failures in the cleaning system, will be able to eliminate them on his own.
Mechanical problems
The most important reason, as mentioned above, may be the lack of washer fluid; in this case, you just need to top it up. If it is present, but does not splash in the winter, then perhaps it is simply frozen. In this case, the problem can be solved in one of two ways:
- warming up the engine;
- bringing the car into a warm garage.
After the liquid has thawed, the system will begin to operate as usual, but it is better to drain the water from the tank after this and replace it with an “anti-freeze” one.
Similar products from other companies
- Air filter Sintec (Sintek) SNF-2405-b for foreign cars Chevrolet Aveo (Chevrolet Aveo), Daewoo Kalos (Daewoo Kalos) engine 1.4/1.4l 16v/1.6 98 b
- Air filter Sintec (Sintek) SNF-3466-b for foreign car Hyundai (Hyundai) County/hd65/72 engine Euro-3 433 b
- Oil purification filter Sintec (Sintek) SNF-2101-NF-01-m for VAZ, for Moskvich, for UAZ 107 b
- Air filter Sintec (Sintek) SNF-lr001-b round for foreign car Renault Logan (Renault Logan) 148 b
- Air filter Sintec (Sintek) SNF-luxtr105p-b for GAZ low 183 b
- Oil purification filter Sintec (Sintek) SNF-75/3-m for VAZ LADA Largus (LADA Largus), for foreign car Renault Logan (Renault Logan) 112 b
- Air filter Sintec (Sintek) SNF-2110-v (EKO-102 for VAZ injection engine, LADA Kalina (Lada Kalina), LADA Priora (Lada Priora), for foreign car Audi (Audi) 94 b
- Air filter Sintec (Sintek) SNF-2101-v (EKO-101/1) for VAZ, for Moskvich, for ZAZ Tavria carburetor engine 62 b
- Air filter Sintec SNF-1019-b for foreign cars KIA Carens 2/3, Cerato, Shuma 1/2, Sorento 2.4 83 b
- Oil purification filter Sintec (Sintek) SNF-2105-NF-05-m for VAZ 2110-2115 injection engine 104 b
- Air filter Sintec (Sintek) SNF-2413-b for foreign cars Hyundai (Hyundai) i40/ix35, KIA Sportage (KIA Sportage) 3 121 b
- Air filter Sintec (Sintek) SNF-luxtr104р-b for GAZ high engine ZMZ 406, Steyr (Steyer) 560 209 b
- Oil purification filter Sintec (Sintek) SNF-3105-m for GAZ 3102 Volga engine injection, for GAZ 2705 GAZelle, Sobol 117 b
- Air filter Sintec SNF-1015-b for foreign cars Ford Tourneo, Transit 92/95, Volvo 440/460/480 98 b
- Air filter Sintec SNF-1266-b for foreign cars Opel Astra g/h, Zafira |/||, Saab 9-3, for VAZ, Niva Chevrolet 1.8 i 16v 84 b
- Air filter Sintec (Sintek) SNF-402-v 103/1 for GAZ carburetor engine 111 b
- Sintec oil filter SNF-5540-m for foreign car Hyundai County/hd65/72/78 d4al/db/dd 211 b
- Air filter Sintec (Sintek) SNF-lr003-b trapezoid for foreign car Renault Logan (Renault Logan) 165 b
- Air filter Sintec (Sintek) SNF-2409-b for foreign cars Hyundai (Hyundai) i-30, KIA Ceed (KIA Sid) 98 b
- Air filter Sintec (Sintek) SNF-lr002/1-b panel original for foreign car Renault Logan (Renault Logan) 162 b
Do-it-yourself troubleshooting
The main reasons for the lack of washer fluid can be eliminated with your own hands.
Cleaning the injectors
Their replacement and cleaning occurs in the same way and it begins with the removal of these parts, the process is as follows:
- open the hood;
- make sure that they have plastic plugs; if they are present, they must be carefully removed;
- take a flat-head screwdriver and open their spring fasteners to remove the injectors.
Installation of new parts occurs in the reverse order.
To wash the injectors and free them from dirt, you should prepare a special cleaning solution of non-chlorinated water and vinegar, taken in equal proportions. The mixture is mixed well and then poured into the tank. After which you need to press the washer lever, even if the water does not reach the glass, it’s okay. So that the components of the solution have time to break down all the contaminants, you need to leave it in the cleaning system for 2 hours, and then press the lever again. After the dirty solution flows out of the nozzles, rinse the hoses with distilled water.
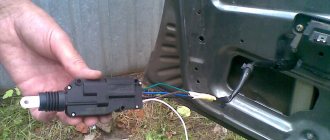
Replacing the motor
It is quite difficult to repair the motor yourself, so most often it is simply replaced.
Installation of a new device is carried out as follows:
- remove all liquid remaining in the tank from the tank;
- disconnect the contact between the battery and the pump;
- if necessary, you can dismantle the tank, but if manipulations can be carried out with a fixed device, then you don’t have to do this;
- remove the electric pump from the tank and unscrew all the hoses going to it, but just remember their location so that after repair they can all be returned to the correct places;
- connect a new pump to the system;
- screw all the tubes;
- connect the battery to the motor;
- pour liquid into the reservoir.
Check the operation of the motor by pressing the washer lever; if you hear a whirring sound from the pump, then everything went well.
Replacing the windshield washer reservoir
If suddenly for some reason there is a need to replace the tank, it is very easy to do it yourself. No special skills or tools are required here. All work can be done with almost bare hands.
Before removing the windshield washer reservoir, be sure to disconnect the hose and power cables from the motor and level sensor. Then use a 10mm socket to remove the bolts that secure the reservoir to the slots. Now this part will come off easily if you pull it up.
Don't forget to remove the electric pumps from the tank. The sealing sleeve can be easily pryed with a screwdriver and removed from its seat. If this part is no longer flexible or has any damage, it should be replaced.
After this, you need to remove the level sensor from the tank. To do this, you must unscrew the plug and remove the sensor. Now all work is completely finished.
Freezing of devices
The problem of brush failure in winter is quite common. Often car enthusiasts start looking for a cat in a dark room, disassembling the system and trying to find a breakdown where there is none. In fact, the reason may lie in elementary things, namely freezing. This often happens in the following cases:
- when the car is left in the open air after using water wipers;
- when the car ends up in an unheated garage.
Therefore, before disassembling, first try to find out if everything is normal with your brushes. Are they frozen to the windshield or rear window? Folding up the wipers after parking the car will help prevent this.
Priora generator brushes: how to replace them correctly and do it yourself
If the owner of the Priora notices that the charge from the battery is disappearing, first of all, he needs to check the condition of the generator brushes. Of course, at first the charge decreases insignificantly, but if the problem is not corrected in time, the charge will very soon disappear altogether. Replacing the brushes of the Priora generator, which are clearly worn out, will help correct this problem.
Important! The brush mechanism of the generator on the Priora cannot be repaired. If any breakdown occurs, only replacement along with brushes will be required.
Since this process is not so complicated, you can do everything yourself. You just need to take into account the recommendations of professionals.
What tools are needed for work?
Before changing the brushes on the generator, prepare the tools you will need for the job:
- flat screwdriver;
- wrench – it’s better if it’s an open-end wrench (size 13);
- car head with wrench (size 10).
Changing the generator brushes, process sequence
It is quite possible to replace the alternator brushes on a Priora that have worn out without removing it. But, according to experts in their field, the process is simplified if replacing the generator is preceded by removing it from its usual location.
Important! When carrying out any work on the generator (replacement, repair, etc.), be sure to disconnect the battery. After removing the generator on the Priora, replacement is carried out as follows:
After removing the generator on the Priora, replacement is carried out as follows:
- Use a screwdriver to remove the plastic cover, which is designed to protect the device. Having done this, you gain access to the brushes;
- disconnect the connecting plug from them;
- slowly unscrew both fasteners (they are located along the edges of the elements that are inspected);
- Take the above key and unscrew the locking bolt. Do this in the center of the element;
- Having unscrewed all the fasteners, remove the brushes, inspect them, assess their condition and replace them with new ones, connect the wires.
What are the signs that indicate that the generator brushes have become unusable?
The following external “signs” will help with this:
- if, upon examining this element, you find that its length is less than 5 mm, it certainly requires replacement;
- if the brushes are worn unevenly, this will also negatively affect the functioning of the generator, so they need to be replaced.
There is no need to skimp on buying new brushes. If you find a cheap option, it is highly doubtful that they will last long. It is more likely that such savings will lead to the need to re-replace the above-mentioned components.