In order for the VAZ-2114 car to work properly and not let the driver down on the road, the car owner must certainly monitor the technical serviceability of the car. At the slightest change in the operation of the car, it is important for him to establish the true cause of the malfunction and eliminate it as quickly as possible.
You need to constantly monitor the technical serviceability of the thermostat, injectors, manifold and even seals, because most often serious damage is caused by the failure of these elements, which can be quite easily replaced yourself.
If during operation a specific, previously unobserved knocking noise is heard, then this should be regarded as the first sign that replacing the valves on a VAZ-2114 8-valve car should be carried out as quickly as possible. After all, if this action is not carried out in the near future, the timing belt may break, which will lead to engine failure.
Experienced drivers and service station workers recommend changing the timing belt after 30-35 thousand kilometers, but these are just recommendations that do not always correspond to every car. Therefore, the car owner must independently monitor the condition of this element and promptly replace the one that has become unusable.
Replacing valves on a VAZ 2114 8 valves with your own hands
In order for the VAZ-2114 car to work properly and not let the driver down on the road, the car owner must certainly monitor the technical serviceability of the car. At the slightest change in the operation of the car, it is important for him to establish the true cause of the malfunction and eliminate it as quickly as possible.
You need to constantly monitor the technical serviceability of the thermostat, injectors, manifold and even seals, because most often serious damage is caused by the failure of these elements, which can be quite easily replaced yourself.
If during operation a specific, previously unobserved knocking noise is heard, then this should be regarded as the first sign that replacing the valves on a VAZ-2114 8-valve car should be carried out as quickly as possible. After all, if this action is not carried out in the near future, the timing belt may break, which will lead to engine failure.
Experienced drivers and service station workers recommend changing the timing belt after 30-35 thousand kilometers, but these are just recommendations that do not always correspond to every car. Therefore, the car owner must independently monitor the condition of this element and promptly replace the one that has become unusable.
Basic lapping methods
Valves can be ground in using specialized equipment or auxiliary tools:
- The first option is to use an automated machine. In this case, there is not even any grinding as such: the valve and seat are simply chamfered, which ensures the most rigid alignment and mating accuracy. The result is a high-strength profile that can ensure excellent engine performance.
Automated valve grinding process on a machine
- The valves can be ground in using a manual milling machine. There are many machines, including those designed for engines of certain modifications. Here, too, everything is done quite quickly and accurately.
If you have a manual milling machine in your garage, valve grinding can be done efficiently and quickly
- Do-it-yourself valve grinding. This is a popular method, but at the same time the most labor-intensive and time-consuming. All defects and surface irregularities are removed using a special abrasive paste, and the main tool is a special T-shaped device with a hole for inserting the valve stem.
A special wrench for manually grinding valves will simplify manual work
Where is the timing belt located?
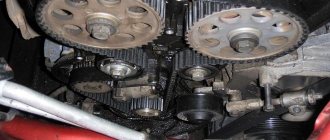
Monitoring the condition of the timing belt and its serviceability is quite simple, because this part immediately catches your eye after opening the hood. Its surface is toothed, it passes through the crankshaft and camshaft, and is a connecting link for the following elements:
- pumps;
- camshaft;
- crankshaft
Since the belt performs several tasks simultaneously, it can quickly fail, so you should pay very close attention to its appearance.
If it is noticed that this element often “slips” from its main place or begins to tear, it needs to be replaced as soon as possible. A broken belt in a VAZ-2114 will be indicated by an injector in the form of a light that lights up on the dashboard, while other models may simply stall on the way, and the driver will not be able to start the car on his own. However, not only a broken belt becomes the reason for replacing the valves; quite often the valves have to be changed due to a violation of the clearance in the motor chain. If the car owner notices that the valves are not positioned as usual, then the car is under no circumstances allowed to be operated until the valve guides are completely replaced. It’s really possible to do this kind of work yourself, despite the lengthy process. Every car enthusiast can handle it if he follows the instructions provided by professionals in their field.
Step-by-step valve replacement
- First of all, you need to remove the cylinder head from the car:
- the battery is de-energized and removed;
- Coolant and engine oil are drained into separate containers;
- vacuum hoses, cylinder head gaskets, cooling systems are completely removed from the car;
- the cylinder head cover is removed, the timing belt and casing are removed;
- Using a key, the fasteners that secure the cylinder head are unscrewed.
- After removing the cylinder head, you can begin replacing the valves. But before you start, you need to prepare a special tool called a puller. Of course, you can use improvised tools, for example, a chisel and a hammer, but this will complicate the work a little:
- the camshaft and gas camshaft are removed from the cylinder head;
- using a removable device or a hammer with a chisel, the studs are secured to the gas distribution shaft;
- a stand is placed under the “plate” of the valves, and the “crackers” are removed;
- the seals are removed. To make it more convenient to remove the camshaft oil seals, experts recommend using a clamp to press the oil seal, but not very hard, and carefully turn it in different directions;
- the springs and the “plate”, which is located under them, are removed.
- We remove the valves that have become unusable.
At this point, the valve replacement process can be considered complete, and assembly should be performed in the reverse order.
Nuances worth knowing about
To an experienced repairman, the tips below may seem unnecessary, but a novice repairman should definitely remember the following:
- It is better not to remove all rockers (cams on the valves) right away. It is necessary that each valve gets its own rocker back. While the engine is running, the camshaft cam and the corresponding rocker grind in and if they are “separated”, unpleasant clicks may appear when the valves operate, despite the fact that they have been properly adjusted before.
- And you also need to understand that each valve must return to its place. Changing them even after grinding in would not be the best idea.
- You can use various abrasive pastes in your work. You can start with the largest and end with the smallest. This will improve the results obtained.
- For a better fit, it is sometimes suggested to use machine oil at the finishing stage.
Valve grinding is carried out using various abrasive pastes
Replacing piston rings
The process of replacing piston rings, which most often become unusable due to mechanical damage, is carried out in the following order:
- the valve protective cover is removed;
- the ground wire is removed from the engine;
- the fixing fastener holding the cylinder head bracket is unscrewed;
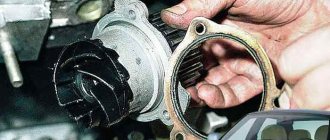
- The thermostat mount is disconnected;
- the thermostat is carefully moved to the side, the clamps and connecting hoses are removed;
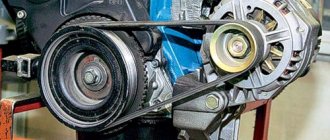
- the tension roller and bracket clamp is unscrewed;
- the timing belt and tension roller are removed;
- the crankshaft must be turned to such a position that the desired piston is in the “dead zone”, for convenient unscrewing of the connecting rod clamps;
- After removing the connecting rod cover, the piston is pulled out, the same process should be done with the remaining cylinders.
Next, all that remains is to remove soot and deposits from the surface, to examine the markings of the piston rings, buy similar components and install them in the reverse order.
As you can see, replacing valves, although labor-intensive, is still not a very complicated process, so every car enthusiast can cope with such work if he follows the instructions and recommendations. A video tutorial on the Internet resource, which you can watch at any time of the day, will further simplify the replacement process and help you find the answer to any question regarding replacing valves for the VAZ-2114.
How to achieve results at home
- Using a special machine. In fact, such a unit does not perform grinding - it chamfers the seat and valve, thanks to which it is possible to achieve the tightest possible alignment and ensure precise mating. The result is a high-strength cut profile that ensures high-quality engine performance. The advantage of the method is its simplicity - after processing, all that remains is to wash and assemble the head.
Lapping valves using a machine
- Using a hand cutter. Don't have a machine? Use a hand router. There are many units of this type, each of which is designed for a specific engine model. Using a cutter you can process old valves. The advantage of the method is high accuracy and no need to look for expensive equipment.
- Do-it-yourself lapping. If the valve does not need to be seriously adjusted, if there is neither a machine nor a cutter at hand, this option will be the best choice. Irregularities are removed with abrasive paste, after which the product can be safely used. The main advantage of the method is that it can be used at any time, anywhere.
Do-it-yourself valve lapping
Causes of wear of valve stem seals.
While the engine is running, the crankshaft rotates at 700-800 rpm at idle, and up to 4500 rpm when driving. In a minute, the valves can move in the range of 150 - 1200 strokes. A large load falls on the seals. In addition, the cap itself is affected by an aggressive chemical environment. In this case, the oil seal material is exposed to exhaust gases and oil. As a result of such loads, the material of the seals becomes hard. After this, the working edges of the part are erased. Wear can be seen by the bluish smoke that comes out of the exhaust pipe. Smoke may appear when the engine is braking or when starting the engine. The second sign of wear is an increased “appetite” for oil. In this case, no lubricant leaks may be observed. Consumption can increase to approximately one liter of oil per 1000 kilometers.
If the replacement of the caps is not done on time, then a major engine overhaul will soon await you.
Tools for repair.
To replace the valves, the following tools are required:
- special device for compressing the valve spring,
- pliers,
- tweezers,
- frame,
- tin solder rod
- hammer.
The rod should be no more than 8 centimeters in diameter.
Sequence of work
To perform the operation you will need a special paste. Please note that after repair it is imperative to remove it from everywhere, otherwise even a small amount will destroy the rubbing elements. You also need to take into account one feature: if you grind the valve onto one seat, you cannot place it on another during assembly! Therefore, be sure to outline the location of all elements.
Then install the valve grinding device and begin the procedure. The point is for the plate to fit as tightly as possible into the saddle. To do this, you will need to create tension - press these two elements against each other as much as possible. And after that, rotate in different directions - 5-15 revolutions, with the same amount in one direction and the other.
In this case, first apply lapping paste for rough processing, with its help you get rid of large surface irregularities. Then use the paste for fine processing and finishing. With its help you achieve an almost mirror-like surface. This is exactly how valves are ground in (VAZ or Volga - it doesn’t matter, the essence is the same).
Step-by-step replacement of valves from the guys from Drome
In short, the mileage was 130,000, the engine was burning oil, the traction was rather poor, the first cylinder was the “sickest”, judging by the spark plugs. I didn't measure the compression. The previous owner filled it with MOBILE oil, after my previous car TOYOTA SPRINTER, the owner also filled it with Mobile... It ate like a crocodile! That's why I immediately switched to VISCO 3000, my brother's Audi runs the same and I'm happy.
It took me a long time to decide whether or not to take on this difficult task. Someone said “I need to immediately prepare money for a new engine”, “maybe at a service station?”... But I know that my hands are straight, if only there were no people nearby who would distract or interfere. While it was still warm outside, we had to take it.
I won’t describe how to unscrew each bolt. It's always easier to disassemble.
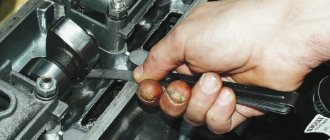
Before disassembling, we measure the thermal clearances in the valves.
The diagram on the left shows what tolerances should be - “max.” and within what limits is allowed.
And on the right is a diagram of the camshaft and cams to understand which valve is the intake and exhaust and which cams point upward.
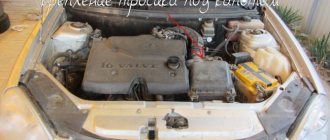
To make it easier to turn the shafts, put the handbrake on, put it in 4th gear and jack up the right side so that the wheel rotates freely. The camshaft and cams will be right in front of your eyes. Let's spin and take measurements! Don’t forget to pump out excess oil around the pushers with a syringe.
Let's drain the antifreeze! The plug on the radiator, without opening the expansion tank, slowly drain the coolant. The antifreeze will drain from all pipes and the radiator. But not from the block. There is a bolt on the blog, located next to the distribution coil from which the wires go to the spark plugs. Be careful not to break it. As soon as you unscrew the antifreeze, it will flow like water in a toilet bowl, so hold the bolt a little...
Well, then we continue to analyze...
We unscrew everything that is attached to the “head”. The sensors do not need to be unscrewed. The roller that tensions the belt will also have to be removed. There you also need to unscrew one nut that secures the metal boot to the “head”; it is located directly behind the camshaft pulley. We unscrew the manifolds, intake and exhaust. As you go along, you will understand where things are getting in the way.
We put all the bolts in one container, or put them where they were. The nuts on the intake and exhaust manifolds are the same size, so you can't go wrong, just don't lose the washers.
We put all the block bolts that attach the “head” to the block in order as they are.
The nuts that secure the camshaft bed can be “undermined” by half a turn while the “head” is firmly fixed to the block.
After you have removed the head, we look at the condition of the valves, cylinders and pistons.
Remove the camshaft, take out the tappets, shake the valve tappets one at a time, they should not have any play in the seat.
Exhaust valves (the smaller ones) are usually killed more than intake valves.
inlet valve
The valves are sold as a set, 8 pieces at a time. So for the sake of two I had to change everything.
I’ll say this: I don’t regret it! When I checked the tightness after removal, it turned out that only in one, the 4th cylinder, both valves did not pass.
Before working with the “head”, wash it externally to remove dirt and dust, and remove carbon deposits to make it more pleasant to work with. As it turned out, the new valves sat in the guides the same way as the old ones, some will have to change the guides, some will have to be rummaged around, each has its own case, I’m analyzing mine specifically.
So it was decided to change all the valves. The cost of the valves is 1100 rubles, lapping paste, the cheapest one is 100 rubles. Everything got used to it properly!
Grinded it in two ways:
They applied the paste.
Wipe the rod from dust and lubricate it with oil
1st.
I cut off a piece of hose, insert a drill on one side, and put the other end on the valve...
We take a screwdriver, hook it up, and start oiling it in one direction and the other. Press the valve with your finger and only turn it with a screwdriver.
We don't set the speed high. If you have a drill, then at low speeds.
IMPORTANT! Do not grind the valve for too long! Apply the oil for 15-20 seconds and see the result. A little bit.
2nd
There is another way, as you know, to grind the valves by hand. I didn’t have a special device with a suction cup, we take the same hose that we used, but twice as long, and instead of using a screwdriver, we oil it with our hands.
For me, doing it manually is of course more difficult, and takes longer. But grinding works the same way. The advantage of a screwdriver is that you press the valve with your finger, thereby it fits into place faster.
I watched a lot of videos on the Internet about how to grind them. I will tell you for my own reasons. The fact that you oil it for a long time will not rub it in better, it’s not a matter of time. It’s important not to screw up the very moment when he got used to it! You’ll think, “A LITTLE BIT MORE AND THAT’S ALL,” and he’ll miss it even more. So in this regard, we need to find a middle ground.
Checking the quality of performed operations
You can check the quality of the work performed in several ways:
- kerosene;
- by air;
- pencil.
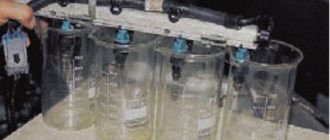
The most effective way to check is to use a vacuum tester, which simulates the processes taking place in a car engine. The gas that is passed through escapes through possible cracks.
It is better to check the cylinder head with a vacuum tester in a specialized service; purchasing a tester is quite expensive
A device is connected to both the intake and exhaust manifolds, resulting in a vacuum. If the valves are not properly ground in, the pressure gauge will record the minimum pressure level, since air passes through the gaps, which should not normally be the case.
Another way to check is to use kerosene. The cylinder head is positioned so that the combustion chamber is directed upward, and kerosene is poured on top. There is an opinion that kerosene should leak out overnight if the grinding is carried out incorrectly, but in reality this is not entirely true and the named method is not effective enough.
Checking the tightness of the cylinder head with kerosene is not the most reliable method of control
The uniformity of distribution of a special marking substance is another test option. Radial marks are drawn along the entire circumference of the valve seat, after which the part is inserted into place, pressed and scrolled. Then it is taken out and the formed pattern is examined. If the marks have been erased and the entire base of the seat has been painted evenly, then the valve can be put into operation. Otherwise, grinding is carried out again.
Grinding in valves is a necessary procedure to ensure the normal functioning of the car’s cylinder head. It is best to carry it out, despite the simplicity of the work and the availability of materials, with the help of specialists: this guarantees a long service life of not only the valves, but also the engine of the machine as a whole.
Fault diagnosis
Before starting work, it is logical to make sure of the feasibility of this event, initiated by the following reasons:
- The time has come to perform periodic checks, adjustments, and replacement of parts and components. Determined by mileage (15,000 – 30,000 km), operating conditions of the vehicle.
- The appearance of characteristic symptoms of damage, the occurrence of breakdowns.
The main signs signaling the driver to pay attention to the valves are:
- noticeable loss of engine power;
- “tripleting” of the engine, which manifests itself when operating at different loads (one or several cylinders fail, the mixture in the combustion chamber does not ignite, ignites with a delay, is not completely consumed, the phenomenon of detonation occurs);
- noticeable increase in fuel consumption;
- the car moves jerkily, the idle speed “floats”;
- the appearance of soot and soot on the spark plugs;
- extraneous knocks, noises in the engine compartment.
Similar symptoms are typical for different types of car malfunctions. An engine is not a fountain pen. Unreasonable disassembly and reassembly is a long, troublesome undertaking. You should first make sure that it is necessary.
Idle cylinder detection
If unstable engine behavior occurs, it is necessary to try to localize the cause, moving from simple checks to complex diagnostic examination methods. You should first make sure that the starter is working properly and that the battery is fully charged.
- Start the engine and leave it at idle speed.
- Raise the hood.
- Remove the spark plug cap from the first cylinder. The engine has stalled - the cylinder is working, no changes have occurred - intervention is required. In this way, go through the remaining cylinders.
- Change spark plugs and high-voltage wires on rejected cylinders. Repeat testing. The persistence of the situation indicates a search for a breakdown inside the engine.
Presence of spark, fuel
Check for spark. On an engine equipped with an injector, disconnect the injector power supply connector. Unscrew the spark plugs one by one, lean the body against the ground of the car, start the starter, watch, observing safety precautions. It is more convenient to perform these actions together (one is under the hood, the other is in the cabin).- Make sure there is fuel supply. On a cold engine, connect the injectors, disconnect the ignition module control connector. Turn out the spark plugs. Use the starter to crank the engine for seven to ten seconds. The threads of the spark plug seats are filled with fuel - this is normal. Dry holes mean problems with fuel supply. Questions arise about the fuel system and electronic control unit.
Compression test method
The search for the culprit continues by measuring the pressure in the cylinders at maximum compression. A compression gauge is inserted instead of a spark plug. The piston is installed at top dead center (the special mark on the camshaft gear is aligned with the mark on the cylinder head). Excessive pressure is created in the upper part of the cylinder. The normal value according to the device should be in the range of 11 – 13 kg/cm3. The acceptable value is indicated by the manufacturer in the technical documentation for the vehicle. Low compression - lack of tightness of the combustion chamber.
- The rings on the piston are worn out.
- The valves do not fit tightly.
- The cylinder head gasket is damaged.
- Cracks in the block, cylinder head.
Last stage of installation
Often valves are not included in new products. This is due to a decrease in their internal diameter after pressing. In order to correct the current situation, you need to apply sweeps.
- They are used in increments until the valve fits normally into the guide.
- Accordingly, you need to monitor the dimensions after using each scan.
- It is recommended to buy diamond-coated reamers, since ordinary steel ones very quickly lose their functionality.
Timely replacement saves a considerable amount of time and money.
Which manufacturer should you choose?
If you need to replace valves on a VAZ 2114, then when choosing new spare parts, you should approach the process wisely so as not to return to repairs in the near future. According to reviews from VAZ car owners, many prefer “original” valves; they are distinguished by high quality workmanship and an affordable price (around 350 rubles for 1 piece).
But when purchasing new parts, you should not pay attention to the box, since now there are a lot of analogues with a design like the original. Look at the catalog numbers, they should match these:
- 2108-1007010 (intake)
- 2108-1007012 (graduation)
Thus, you will not fall for a “good” fake of your original product.
You can choose several options from good analogues of intake models:
- AMP PLAD005-S-0-D (Poland);
- Freccia R4387/SNT (Italy);
- Master-sport 08IN-SET/4/-MS (Russia).
There is more choice of exhaust valves as the demand is higher. Popular models include:
- Osvat 0504 (Italy);
- Ae V91180 (Italy);
- Kolbenschmidt 17092 (Germany);
- AMP PLAD004-A-0-D (Poland);
- Master-sport 08EX-SET/4/-MS (Russia).
If you have the opportunity to consult with a mechanic who regularly carries out repairs, you can find out which models are more popular in your region and make a choice based on the information received.
Installation
Initially, before installation, you need to know the parameters of the actual tension. To determine it, it is necessary to measure the diameter of the seat and the outer diameter of the sleeve.
- The difference in values between them should not be more than 0.03 - 0.05 millimeters.
- It follows from this that when the diameter of the sleeve is significantly smaller in contrast to the seat, it is necessary to select a product of a different size. Otherwise, you can increase the diameter of the socket on the drilling machine.
- Before installing the parts into the mounting socket, you need to warm up the cylinder head to the above-mentioned temperature. And before installation, it is advisable to cool them in liquid nitrogen to reduce their size, which will ensure their smooth pressing. This will also protect parts from unwanted damage during installation.
- If you don't have liquid nitrogen on hand, you can cool the parts in the freezer.
In addition, it is recommended to lubricate the parts with oil.
Installation of parts in place occurs in the same way as dismantling. The tool used is also the same. Afterwards, through a series of blows, the bushing is hammered into place.
Peculiarities
A considerable part of the parts have a special collar on the outside for their necessary vertical fixation in the head. In the case when the bushing is smooth, its installation is carried out with a special mandrel.
On intake valves, the parts in question must not protrude in order to avoid increasing the aerodynamics of the valve resistance. In the exhaust, the bushings must completely hide the valve post so that it is not exposed to high temperatures and heat is better removed from it.
Dismantling
In order to remove the bushings from their seats, it is necessary to heat the cylinder head to 100 degrees Celsius.
This is done because the head has a greater expansion coefficient and when heated, the tension between the bushings and the cylinder head will decrease, which will make it easy to knock them out of their seats using a hammer or sledgehammer.
During the dismantling process, it is recommended to use a special drift. It will give precision pressing without distortions. Those car enthusiasts who professionally carry out repairs purchase pneumatic hammers and special attachments for such procedures.