Most common reasons
There are three main factors that can lead to unstable operation of the fuel injection system:
- Low quality fuel is a common problem in all post-Soviet countries.
- A long service life can equally be attributed to both advantages and disadvantages.
- Unprofessional repair work.
It should be noted that unqualified repairs are the most dangerous factor that can affect the normal operation of the injector. In the absence of certain theoretical and practical knowledge, it is not recommended to try to repair or clean the injector yourself. It is best to entrust such work to professionals who are well aware of all the nuances and features of carrying out work of this kind.
Improper cleaning of the injector can cause harm
There can be a great many reasons for a malfunctioning injector, so in this article we will analyze only the most typical signs of an injector malfunction inherent in engines of various types, and give recommendations for eliminating them.
Repair
Before removing the injectors from the dismantled rack, it is advisable to check their functionality. To check you will need:
- four identical containers,
- tester,
- wires.
Functionality check
- Connect the gasoline supply and drain hoses and the power connector to the rail with injectors.
- Place the rack over the measuring cups.
Place the rack over the measuring cups
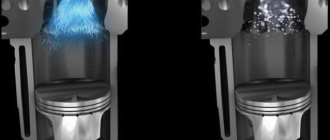
The shape of the cloud should be approximately the same for all nozzles
After the war, Germany received a ban on the development of injectors for aircraft engines. And engineers began adapting direct injection systems for passenger cars, discovering another important advantage compared to carburetors - efficiency.
Vladimir Berestenev
bvy.su
Replacement or flushing?
Some problems can be eliminated by cleaning and flushing. Others are “treated” only by replacement.
Table: problems with injectors
| Malfunction | Remedy |
| reduced performance | flushing, replacement if flushing fails |
| leakage | flushing, replacement if flushing fails |
| increased productivity | replacement |
| valve sticking | replacement |
| unstable valve sticking | flushing, replacement if flushing fails |
| overestimated or underestimated winding resistance | replacement |
In these cases, flushing is not a panacea. This method should be used taking into account the mileage and quality of service during operation.
Main symptoms
Lack of fuel mixture in the injector. Often, the presence of this symptom does not indicate a malfunction of the injector itself, but a failure of the fuel pump, or its incorrect installation after repair work.
In some cases, the reason may be a clogged fuel mixture inlet into the fuel pump. The fuel pump has failed.
Significant increase in fuel consumption. A fairly common phenomenon that indicates a clogged injector. Due to the small diameter of the injector nozzle, even slight contamination can significantly disrupt the mixture formation process, reducing the percentage of engine efficiency. This is explained by the fact that a clogged nozzle no longer forms a cone-shaped cloud of gasoline, which means that a significant amount of fuel begins to burn out in the exhaust manifold. The consequence of these processes is a deterioration in the dynamic characteristics of the vehicle and an increasing load on various electronic equipment of the car: coil, spark plugs, wiring, etc.
Idle speed sensor needs to be replaced
Unstable idle speed of the fuel injection system. This symptom can be the result of many malfunctions. The most likely cause is a malfunction of the idle air control valve or a clogged internal surface of the throttle pipe.
Problems starting the engine. If the vehicle engine does not start while the sounds of the fuel pump are heard, it becomes necessary to check whether the injector has a spark. For these purposes, experts advise using a spark gap.
It is not recommended to resort to checking the spark for a break, because Such actions can damage the ignition module and controller.
Trouble due to cylinder failure
Troit injector. In most cases, the culprit of this symptom is the presence of one or more inoperative cylinders. The breakdown can be eliminated by identifying non-working cylinders and then repairing them or replacing them with new parts.
Overflow of fuel mixture in the injector. This symptom also requires detailed diagnostics, which is best started by checking the sensor responsible for the throttle position.
Professional washing of the injector
The above signs of injector malfunction indicate the need for repair and maintenance work. You should not diagnose and clean the injector yourself if you are not 100% confident in your knowledge and experience. Specialized service stations are equipped with high-tech equipment, which, in addition to cleaning the injector nozzle, carries out its comprehensive diagnostics, showing the mechanical wear of the needle, the actual performance of the injector, etc.
If professional washing of the injector does not solve the problem of injection of the fuel mixture, then a reasonable solution would be to replace the injectors with new ones.
Replacing injectors
Symptoms of a problem
With proper care, the injectors on the VAZ 2110 can last quite a long time. But when the first signs of malfunction appear, it is recommended to immediately clean the elements. What are the symptoms?
- The engine starts with certain difficulties;
- Fuel consumption increases;
- Power and thrust drop;
- In winter, the car sometimes jerks;
- The engine starts to stall, etc.
If you notice at least one of the symptoms, be sure to check the injectors and decide whether to clean or replace.
Which indicates possible problems with the injector
Let us immediately note that there can be many reasons for unstable engine operation, ranging from a clogged fuel filter, a broken fuel pump, a failed spark plug or a faulty coil, to loss of compression, problems with the timing belt, etc. Along with this, one of the main signs of injector malfunction is difficulty starting the engine, especially when cold, as well as gasoline or diesel consumption (depending on the engine type), which increases noticeably. It is also necessary to note the unstable operation of the internal combustion engine in idle mode, similar to the so-called “triple” of the engine.
When driving, it is possible that one or several symptoms may occur quite frequently:
- presence of jerks, very slow reactions when pressing the gas pedal;
- obvious failures and loss of dynamics when trying to accelerate sharply;
- the car may jerk while driving, when releasing the gas, and also after changing the load mode on the engine;
It must be added that such a malfunction must be corrected immediately, since problems with the injector negatively affect not only the service life of the engine and transmission, but also overall traffic safety. In a vehicle with faulty injectors, the driver may experience serious difficulties when overtaking, on steep hills, etc.
Procedure for cleaning and replacing rubber seals
It is best to remove the injectors from the fuel rail and blow and clean each of them, and at the same time inspect them for wear on the rings. This method has a huge advantage over using an additive, since you can visually check how well the restoration work was carried out.
What tool can you use to make repairs?
To dismantle and replace seals you will need:
- diamond key 8;
- carburetor cleaner;
- a can of compressed air;
- rubber hose (you can use a vacuum cleaner);
- syringe with outlet diameter 10 mm;
- wire approximately 2 meters long;
- standard set of rings for injectors (includes eight products);
- rubber seals for fuel lines.
The repair and cleaning process is as follows:
- Remove the rubber seal from the nozzle.
- Place the rubber hose on the tail part of the nozzle.
- Connect the wire to the battery (you can choose any terminal).
- On the reverse side of the hose, connect an aerosol tube through a syringe to flush the carburetor.
- Holding the entire structure with your hands, spray the cleaner several times until the jets emitted become uniform.
- After cleaning, it is recommended to use the same principle to blow out the injectors with air from a can.
- Next, it is recommended to immediately put new rings on the product, after moistening them with gasoline.
In the photo the nozzle is in critical condition
The injector repair procedure can be considered accessible to beginners and inexperienced drivers. The only difficulty is dismantling the fuel rail, since you will have to first relieve the pressure in the system. Cleaning and replacing the rings on the injectors with your own hands gives the driver the opportunity to carry out the highest quality repairs of these elements and be confident that repeating the procedure will not be necessary for a long time.
Self-check of injectors
Let's start with the fact that automobile injectors are divided into several types, of which two types have found widespread use at different times: mechanical injectors and electromagnetic (electromechanical) injectors.
Electromagnetic injectors are based on a special valve that opens and closes the injector to supply fuel under the influence of a control pulse from the engine ECU. Mechanical injectors open as a result of increased fuel pressure in the injector. Let us add that modern cars often have electromagnetic devices installed.
To check the injectors with your own hands without removing them from the car, you can use several methods. The simplest and most affordable way to quickly check injection nozzles without removing them from the car is to analyze the noise emitted by the engine during operation.
How to remove the upper part of the windshield
So:
- Using a 10mm socket, unscrew the two nuts located along the edges of the cladding.
- Next, unscrew the four self-tapping screws that secure the cladding. The screws are located under the plugs.
- Then you need to disconnect the sound insulation, which is attached to the wind window trim with six self-tapping screws.
- Carefully remove the top part of the windshield.
Having thus gained access to the washer nozzles, we proceed directly to dismantling them. To dismantle the injectors you must:
- Disconnect the washer tube from the tee.
- Unscrew the screws securing the injectors, as shown in the photo above.
- Remove the injectors.
Now you can perform all further operations with the injectors. Assembly is carried out in reverse order.
How to check the power supply to the injectors
This check is carried out if the injectors themselves are working, but any of the injectors do not work when the ignition is turned on.
- for diagnostics, the connector is disconnected from the injector, after which two wires need to be connected to the battery;
- the other ends of the wires are attached to the injector contacts;
- then you need to turn on the ignition and record the presence or absence of fuel leakage;
- if fuel flows, then this sign indicates problems in the electrical circuit;
Another diagnostic technique is to check the injector using a multimeter. This method allows you to measure the resistance on the injectors without removing them from the engine.
- Before starting work, you need to find out what impedance (resistance) the injectors installed on a particular vehicle have. The fact is that there are injection nozzles with both high and low resistance.
- The next step is to turn off the ignition and also reset the negative terminal from the battery.
- Next you will need to disconnect the electrical connector on the injector. To do this, you need to use a screwdriver with a thin tip, with which you need to unclip a special clip located on the block.
- After disconnecting the connector, switch the multimeter to the desired operating mode for measuring resistance (ohmmeter), connect the contacts of the multimeter to the corresponding contacts of the injector to measure impedance.
- The resistance between the outer and central contacts of a high-impedance injector should be between 11-12 and 15-17 ohms. If the car uses low resistance injectors, then the indicator should be from 2 to 5 Ohms.
Preparation for dismantling
Replacing injectors may not be necessary for much longer if you purchase special additives added to the fuel. Thanks to them, the injector stays clean longer. But you shouldn’t shift all the responsibility onto them, because with prolonged use, dirt and deposits formed create a kind of blockage for the passage of fuel, and this, in turn, causes irreparable damage to the engine.
Of course, you can contact a service center, where they will not only clean the injectors, but also check the machine. However, you can carry out the repairs yourself, because this way you can save a lot. Please keep in mind that the ramp on which the injectors are located is a kind of “center” in each machine. Any independent intervention, including cleaning the injectors, can result in significant damage.
To replace, you must purchase the goods that will be required for the job. First of all, this is a special product for cleaning the injector; it is sold in special aerosol cans. It is advisable to replace the rings on the injectors themselves. It would be useful to purchase any button, a light bulb whose power will not exceed 21 W, and a chip used to connect the wires to the injectors.
It is also necessary to pay attention to some features of dismantling. Before removing the injectors, be sure to ensure that the engine has cooled down. Then it is necessary to completely de-energize the fuel pump. To do this, all wires responsible for power will need to be disconnected. Next, you need to reduce the pressure in the motor as much as possible. They simply start the engine and wait for the engine to stall. Repeat several times until the engine stops starting.
Comprehensive diagnostics of the operation of injectors on the ramp
For such a check, the fuel rail will need to be removed from the engine along with the injectors attached to it. After this, you need to connect all electrical contacts to the ramp and injectors if they were disconnected before removal. It is also necessary to return the negative terminal of the battery to its place.
- The ramp must be placed in the engine compartment so that a measuring container with a scale can be placed under each of the injectors.
- It is necessary to connect the fuel supply pipes to the ramp and additionally check the reliability of their fastening.
- The next step is to turn on the ignition, after which you need to crank the engine a little with the starter. This operation is best performed with an assistant.
- While an assistant rotates the engine, check the efficiency of all injectors. The fuel supply must be the same on all injectors.
- The final step will be to turn off the ignition and check the fuel level in the containers. The specified level must be equal in each container.
In addition to self-checking, you can use the injector diagnostic service at a car service center. This operation is performed on a special testing stand. Testing an injector on a bench allows you to accurately determine not only the efficiency of fuel supply, but also the shape of the torch during fuel spraying.
Removing parts
The injectors can be removed and replaced after the fuel rail has been removed.
Compress the retaining spring and disconnect the electrical connector for each injector.
Slide and remove the parts lock on the fuel rail.
While rocking, pull out the nozzle. Remove any parts that require replacement.
Install new injectors, fuel rail and other dismantled parts in the reverse order.
Do not use used injector rubbers; install new ones, first lubricating them with engine oil.
If necessary, replace the fuel pipe O-rings.
