The element of the camshaft that is very often subjected to constant loads and most often fails is the oil seal, or as it is also called the cuff. On a VAZ-2112, you can replace the oil seal with your own hands, since no special skills are required for this.
The video describes the replacement of oil seals on a 124 engine when replacing the timing belt.
Step-by-step work order
Before you begin, make sure that the car is on a level surface, the handbrake is on, and the negative cable on the battery is removed.
Removing the seals
- First of all, open the hood and remove all the plastic elements. This applies to protecting the timing belt and engine lining.
If the bolts are not corroded, they will unscrew easily
Next, a dilemma may arise about whether to carry out the replacement without removing the cylinder head and dismantling the cylinder head. If you chose the second option, then the procedure for removing the cylinder head is written in great detail in this article.
If the first option is still closer to you, then we perform the following procedure:
- Since the oil seals on the engine are located directly behind the camshaft pulleys, there is no escape from dismantling them.
- Next, you need to arm yourself with a special puller, but if you don’t have one, then a regular flat-blade screwdriver will do.
- Using a screwdriver, slowly remove the special key from the groove on the shaft.
The location of the key is indicated by the arrow
Please note that the key must be put in a safe place so as not to lose it.
- Then, we carefully remove the oil seal, first from one side and then from the other.
Be careful not to damage the shaft itself
Installing camshaft seals
Before you begin installing new cuffs, check its condition by inspecting its working edge, which should not have any defects; it should be smooth without visible damage to the rubber. This also applies to the oil seal spring; it must be intact and there must be no signs of stretching or other visible damage.
The edge under the number is 1. and the spring under the number is 2.
Installation procedure
- Before installing the oil seal on the camshaft, lubricate its lip with engine oil.
The edge is oiled
When the oil seal is on, it will easily pass through the body
Tapping should not be strong, but frequent
When installing the belt, follow all rules and requirements for aligning all marks.
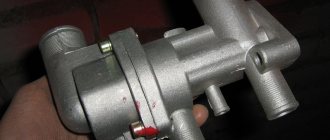
How to check the pump on a VAZ 2110/2112
The driver, if there is a suspicion of a malfunction of the water pump, can check this unit without going to a car repair shop. In this case, there is no need to remove the pump from the car; the entire verification procedure is completed within 10 minutes:
- Warm up the engine to normal operating temperature (on a VAZ of the tenth family - 91 degrees).
- Put a glove on your right hand.
- Pinch the fluid supply pipe that comes from the radiator with your hand. If the pump is working normally, you will immediately be able to feel the pressure of the antifreeze inside the pipe. If, when pressed, the hose easily compresses, then the circulation of coolant is severely inhibited, which indicates a breakdown of the pump.
When performing the check, you must be careful, since the antifreeze gets very hot during engine operation: you can get burned on the hot pipes and surfaces of the engine.
Signs of a faulty water pump
On a VAZ of the tenth family, diagnosing problems with the water pump is quite simple: you need to constantly monitor the “behavior” of your car. There are only three signs of a pump malfunction:
- Unusual noise or grinding noise in the timing belt assembly while driving.
- Pump leaking due to loss of tightness.
- Severe damage to the timing belt (asymmetrical wear, delamination or cracking).
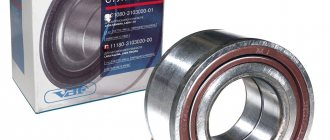
The main malfunction of the pump on the VAZ 2110/2112 is considered to be bearing wear - if the bearing is badly worn or the timing belt is not tensioned correctly, then it will not be possible to repair the pump.
Why is it necessary to replace on time?
On the left is the new seal, and on the right is the old one
It will be no secret to anyone that timely replacement of the camshaft oil seal will not harm the engine in any way, but will only increase its performance characteristics. The time period for replacing it is not determined in any way and depends only on the mileage and driving style. Since frequent and intensive use of the engine leads to rapid wear of all these parts.
Timely replacement of the oil seal will prevent oil leakage from the engine, which is its main task.
However, if this moment was missed, and a leak did occur, this will be accompanied by very unpleasant facts:
- Oil consumption will increase.
- The engine will be constantly dirty , since dust from the road will constantly stick to the oil that spills onto the engine.
- Also, oil that leaks from the engine will negatively affect the general condition of various electrical contacts and elements. First of all, this applies to electrical power supply blocks, where contact may be deteriorated.
see also
How to determine the knock of the connecting rod bearing?
- 0 2 5k
Is it possible to install the main crankshaft cover from another engine?
- 0 1 1k
Replacing the crankshaft VAZ 2110
- 9 1 10k
Is it possible to check the crankshaft liners with the VAZ 2110 oil pan removed?
- 0 1 773
Which is the best crankshaft pulley for VAZ 2110
- 0 1 2k
Oil stains under a car are quite a serious cause for concern. If the cause of the leaks is in the crankcase housing gasket or oil filter, then everything is not so bad - replacing them is relatively easy and they do not create additional problems.
The situation is different if there are oil stains under the hood, in particular on the generator belt. In addition to the fact that you will have to change the belt, this may indicate leaky crankshaft or camshaft seals, which are much more difficult to change.
This photo report demonstrates how crankshaft oil seals are replaced on a VAZ 2110.
conclusions
As you can see for yourself, there is nothing complicated about replacing the camshaft oil seal on a VAZ-2112. This work is not primitive, but does not require any special skills. You just need to carefully read this and all the supporting articles and then the repair will not become something unusual for you. After all, by doing such work yourself, you not only save your budget, but also significantly increase your experience in repairing your own car.
If you find traces of oil leakage through the camshaft seals, first check to see if the crankcase ventilation system is clogged and if its hoses are pinched, and if necessary, repair the faults.
If the oil leak does not stop, replace the seals.
Using a 10mm socket, unscrew the six bolts securing the front cover.
Removing the front cover
Using a 17mm spanner, loosen the bolt securing the exhaust camshaft toothed pulley.
By inserting a screwdriver into the pulley hole, we hold it from turning.
In the same way, loosen the bolt of the intake camshaft toothed pulley.
Oil seal catalog number – 2112-1006216
After unscrewing the fastening bolts, remove the camshaft pulleys.
Use a screwdriver to pry up the seals and remove them.
Lubricate the working edge of the oil seal with engine oil.
We press in new oil seals with a suitable piece of pipe
We assemble the timing drive in reverse order.
Dismantling
To replace the problematic oil seal, you will have to perform several disassembly steps. As a result, you will need to do the following:
- Remove the front protective cover, and then remove the timing belt;
- Remove the camshaft pulley mounting bolts. To do this, hold the element with a screwdriver to prevent it from turning, and perform the removal procedure itself using a 17 mm wrench;
- Remove the toothed pulley;
- Remove the oil seal. For this operation, you will need a flat-head screwdriver or needle-nose pliers.
This set of measures will allow you to remove and replace the oil seal. But we advise you to check the condition of the camshaft and, if necessary, replace it.
To get to the camshaft you need:
- Remove the oil pressure sensor completely. If you don’t want to dismantle it, then at least disconnect the wires from the device;
- Unscrew the camshaft bearing housing mounting bolts. There are as many as 20 of them there. After this you can easily remove the case;
- Do not forget about the plugs that are located in each technological hole. Take them out;
- Disassemble the potentially problematic camshaft and determine the need for repair or replacement.
Reassembly
When reassembling the assembly, be sure to take into account the position of each dismantled element. Be careful with the plugs. Make sure that each of them is strictly in its place.
Before installing the oil seal and additional elements, do not forget to lubricate them thoroughly. The seal can be pressed into place using a hammer. Just not metal, but rubber or plastic. Make sure the edges are flush with where the component will be installed.
As you know, replacing the camshaft oil seal on a VAZ 2110, or cuff, as it is called, is carried out quite often. The cuff is a component that is subject to constant loads. On a VAZ 2110, replacing the camshaft oil seal can be done with your own hands without much difficulty. This will be discussed in this article.
About the oil seal
The oil seal is one of the most common and long-invented sealing devices for moving mechanisms. This part is widely used due to its simple design.
It should be noted that the oil seals used in VAZ cars have a direction and need to be installed only in the designated direction of shaft rotation.
Device
The oil seal is made of special rubber, which does not lose its properties when in contact with oil. This kind of rubber is called oil-resistant .
Structurally, the oil seal is similar to a ring; inside the oil seal there is a so-called “box”. Which, under the influence of oil pressure, is pressed against the working part of the shaft and creates a tight seal.
The oil seal also has a spring that presses its working part against the shaft ensuring tightness.
Why is a second pump needed in a car's design?
On some modern car models, a second pump is already installed from the factory. This equipment allows for the most reliable engine cooling under any load.
An additional pump on the car is required to create better cooling. If we talk about the owners of the tenth family of VAZs, then most often a second pump is installed to optimize the operation of the stove in winter.
Installing an additional water pump
The main advantage of the VAZ 2110/2112 is that the cars have a simple cooling system structure. Therefore, you can install a second pump and organize a small circle of antifreeze circulation without any problems. To work you need to prepare in advance:
- new pump;
- two hoses (one long, the other short);
- sealant;
- fastening elements (depending on where it will be easier to attach the pump: metal clamps, bolts and nuts).
It is necessary to assemble a low circulation unit from a new pump and hoses. To do this, two hoses are connected to the pump fittings and secured with clamps.
It is important to follow the rule: the long pipe is responsible for supplying antifreeze to the pump, and the short pipe is responsible for draining it.
Before installing a new unit on the machine, you need to drain the coolant.
The installation procedure for the assembled unit is as follows:
- Find two hoses near the cooling radiator (one of them supplies antifreeze to the stove, and the other performs a discharge function).
- Disconnect the outlet pipe.
- In its place, attach the assembled unit with the second pump.
- Securely secure the new assembly with metal clamps.
- It is recommended to attach the pump itself to the gearbox housing. You can secure the pump with clamps or bolt it to the bracket.
- Fill with coolant and start the engine.
- Check the second antifreeze circulation circuit for leaks.
It should be noted that the additional pump will be started under the influence of the pressure created in the system by the first pump. Therefore, the second pump will last a long time and ensure thorough cooling of the engine even under the most aggressive operating conditions.
Thus, the whole difficulty of repairing and replacing the water pump on a VAZ 2110/2112 comes down to correctly removing the unit from the car and installing it back. Moreover, installing the pump takes much longer due to changing the timing belt and roller. The services of a specialist will cost approximately 1000–1500 rubles, so if you have doubts about your competence, it is better to pay the service station technicians and be confident that the water pump will be replaced correctly.
Sources
- https://spike.su/index.php/Replacement-pump-VAZ-2110-2111-2112-1.6-l.-16-cl.-without-removing-the-generator-drive.html
- https://vazweb.ru/desyatka/ohlazhdenie/zamena-pompyi-vaz-2110.html
Dimensions of the oil seal distributed by VAZ
The dimensions of the oil seal installed on the camshaft of VAZ cars are the same only for front-wheel drive Lada cars. It should also be noted that the dimensions of the oil seal do not differ depending on the type of engine, that is, if the engine has 16 valves, then the oil seals for each camshaft will be the same.
Oil seal size: 28*42*7
Applicability
| Brand | Model | Name according to auto catalog | Drawing |
| VAZ | VAZ-2110 | Bolt | Engine / Engine |
| VAZ | VAZ-2170 "Priora" | Bolt M6x36 | Engine / Engine |
| VAZ | VAZ-2110 | Bolt | Engine / Engine |
| VAZ | VAZ-2110 (2007) | Bolt | Engine / Engine |
| VAZ | LADA-1119 Sport | Bolt M6x36 | Engine / Main engine components |
| VAZ | VAZ-2170 "Priora" | Bolt M6x36 | Engine / Engine |
| VAZ | LADA Priora Coupe | Bolt M6x36 | Engine / Main engine components |
The parts data presented on this page is for informational purposes only.
Download price lists
To download price lists, you must log in. If this is your first time on the site, please fill out the registration form.
Where is
The oil seal is located under the timing belt boot, behind the camshaft gear.
The oil seal must be replaced if engine oil leaks through it. This leak can lead to oil getting onto the timing belt, which is strictly prohibited. Oil can damage the belt and lead to its breakage, which on 16-valve engines can lead to valve bending.
When is it time to change?
The car crankshaft has two oil seals: front and rear. They are dense elastic rings in a hard cage.
Their purpose is to prevent dust and dirt from entering the crankcase and to prevent oil leakage. The service life of the sealing rings is 150 thousand kilometers. But consumables may wear out sooner. The reason for this may be:
- poor quality product;
- work under increased loads;
- overheat;
- untimely replacement of oil and filter;
- use of oils that do not meet the recommended ones.
You can diagnose the replacement of oil seals by the oil stains that appear on the engine and gearbox. An oil leak can cause the timing belt to break, causing damage to the valves. In this case, it may be necessary not only to replace the valves, but also to overhaul the engine.
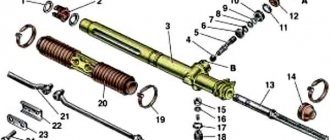
Replacing the oil seal
The replacement process is simple, but quite long. To carry out the work, it is necessary to remove the timing belt and camshaft gears, and in models with a 16-valve engine, it is necessary to remove the timing rollers and the rear part of the timing boot cover.
Required tool:
- Open-end wrench for 10, 15 and 17mm;
- Screwdriver;
- Mandrel to fit the oil seal;
- Hammer;
Step-by-step replacement instructions
- The first thing you need to do is remove the timing belt. How to do this can be studied in detail in our article “Replacing the Timing Belt”. It is first recommended to loosen the camshaft pulley mounting bolt with a 17mm wrench, since this will be much more difficult to do after removing the belt.
- Remove the timing belt and unscrew the camshaft pulley. Be careful not to lose the key.
- Then pry up the old oil seal with a screwdriver and remove it.
- We wipe the seat and shaft from debris.
- We install a new oil seal, lubricating the shaft with clean engine oil. This will ensure easier sliding and movement of the oil seal along the shaft.
As a mandrel, you can use the head from the tool kit; you need to select the head in such a way that part of it rests against the metal part of the oil seal, but not against the working part.
- Using a hammer, lightly install the oil seal into its place.
- The replacement is completed, we carry out the assembly process in reverse order.
Let's move on to the cylinder block
We remove the pallet. Rotating the crankshaft as it is convenient for us, unscrew two bolts on each connecting rod cap. We use a TORX E10 head for this.
We take out the pistons along with the connecting rods. To do this, use the wooden handle of a hammer to press the connecting rod from below and lightly tap it to knock it up. We remove the old liners and buy new ones of the same size according to the markings on them. Here is another stone in AvtoVAZ’s garden, the owner has never climbed into the car from the interior or into the engine, but three pistons were of group “B” and one was “C”. It turns out that at the factory they re-sharpened one cylinder a little and simply put an enlarged piston there, no words. There are no options, we take group “C”, don’t sharpen the engine because of this. We will not touch the main liners either.
We buy a new piston group that does not bend the valves, connecting rods and connecting rod bearings.
Eliminating longitudinal play of the crankshaft
It was noticed on this motor. To eliminate it, replace the thrust half-rings. Standard and repair sizes are available. We take the first repair size, if they are too tight we sand them down a little. We unscrew the middle main bearing and gently push it with a screwdriver and move the half rings. The mark on it is in the form of three serifs, shown below.
When the half ring comes out a little, turn the crankshaft, it will push it out. There are two types of half rings: white at the front and yellow at the rear; the grooves on them should point towards the crankshaft cheeks.
We install them as we removed the new half rings; if they go in with great effort, you can grind them a little on a small abrasive stone, but not from the side of the grooves. Checking the play. We tighten the main bearing with a torque of 8 kgf*m.
Assembling the piston
There is an arrow stamped on the top of the piston; it should be directed towards the front of the engine. And there are marks on the connecting rod that should look the same way. Don't get confused!
We insert one retaining ring into the groove on the piston. We insert the connecting rod into the piston and, having lubricated the connecting rod and the piston pin with oil, insert it into place. Insert the second retaining ring. Although this operation seems simple, it will take some pains. We inspect the assembled structure; all retaining rings must be clearly in their grooves, otherwise a ring that has jumped out while the engine is running can cause a lot of trouble.
After assembly, you need to break off the connecting rod bearing cap, since the connecting rod is made in one piece. It's like that on our cars. First, unscrew the bolts. We insert the connecting rod into the cleats at the level of the mark shown in the figure with the black arrow and lightly clamp it, then break it off with a slight movement of the hand. The first time is very scary. We put the cover in place and tighten the bolts so as not to mix it up in the future.
Checking the thermal gap in the piston rings
We lay out each set of rings for each cylinder. In the future we will not change their places. In turn, we insert each ring into its own cylinder and push it a little with the piston approximately to the middle.
We measure the gap with feeler gauges.
Nominal clearance: 0.25 - 0.45 mm.
The maximum clearance for all is 1 mm. But this already smacks of waste.
Video on replacing the camshaft oil seal VAZ
Camshaft oil seal VAZ
Replacing the camshaft oil seal on a VAZ 2112 is necessary if it is found to be leaking, which threatens lubricant getting onto the timing belt, resulting in “jumping” of the belt teeth, as well as its delamination under the influence of oil and premature breakage. A break and jumping of the timing belt in a car of our model and many others leads to a collision of pistons with valves, which damages the engine and then requires expensive major repairs. Therefore, replacing the camshaft oil seal on a VAZ 2112 should be done as quickly as possible in order to avoid disastrous consequences.
DIY pump repair VAZ 2110/2112
The driver does not always have the opportunity to replace a faulty pump. In some cases, it is possible to repair the device by restoring the operating functions of the pump. If the pump has not yet exhausted its service life (50 thousand kilometers), then you can repair it. However, the pump cannot be repaired without using a special repair kit. This is a set of rubber gaskets and parts that most often fail and need to be replaced.
In addition, you will have to thoroughly prepare for repairs: the place for disassembling and repairing the pump must be clean and level.
How to disassemble a water pump
Once the pump is removed from the machine, it will need to be disassembled. Only after disassembly and thorough cleaning will it be possible to replace the leaked parts of the pump.
To disassemble the pump, it is recommended to follow the following diagram:
- Wipe the product with a dry cloth.
- Unscrew the pump pulley.
- Pull out the thrust ring.
- Use a hammer to knock out the bearings from the shaft.
- Pull the shaft itself out of the housing.
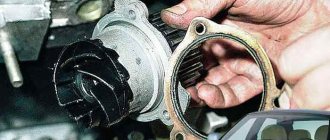
- Unfasten the impeller.
- If something remains from the oil seal, then remove the remaining rubber from the housing.
After this, the cavity of the pump itself must be thoroughly cleaned of dirt and old deposits - you can wash the pump with the same gasoline that is usually filled into the VAZ 2110/2112 tank.
A visual inspection of the pump parts will show which element needs to be replaced. Typically, a pump leak is caused by rotting of the oil seal, and a whistle when the engine is running or a grinding noise at high speeds is caused by wear of the shaft.
Possible consequences
Leakage of lubricant through the oil seal is not dangerous only for the time being:
- Don’t forget about the dangers to the engine of oil leakage from the lubrication system: firstly, increased wear due to the parts running dry, and secondly, oil consumption for topping up, the price of which is also a pretty penny
- The timing belt can jump over a pulley tooth and even several teeth at once, all due to oil getting on the belt teeth caused by leaking camshaft oil seal, which causes an oil film to form on the timing belt
- If lubricant gets in (lubricant is a chemical), the belt begins to spread and can break under load at full speed of the car, you can imagine the consequences
- Therefore, if even minor oil stains are detected on the timing belt casing, it is necessary to immediately determine the cause of the stain.
A little about what an oil seal is in general:
- An oil seal is a rubber-metal cuff that serves to seal the rotating parts of units and prevents liquids (lubricants) from leaking out of them
- The name “oil seal” comes from ancient cars, where felt lubricated with lard (fat) was used instead of a cuff.
- The cuff has a special edge, which, when rotated, creates a turbulence that prevents lubricant from leaking out of the unit
- It is important not to confuse the direction of rotation (there are left and right cuffs), otherwise the new perfectly installed cuff will leak
Nuances
When installing the bearing housing and cylinder head, do not apply sealant that contains silicone. This is due to the fact that the motor heats up, and accordingly the sealant heats up, which releases vapors that can get into the cylinders and further through the system. You should use a sealant whose instructions or packaging indicate that it is safe for the oxygen sensor. When applying sealant to cavities, you should not apply a lot of it, because when tightening the bolts, it can get inside and this will lead to clogging of the oil channels, and therefore there will be no lubrication. The lack of lubricant will lead to increased wear of parts that will quickly fail.
Replacing the cuff
Replacing camshaft seals on a VAZ 2112 begins with standard procedures:
- It is necessary to stop the car with the handbrake, engage first gear and put “shoes” under the wheels
- Then we de-energize the electrical circuits of the car by removing the terminals from the battery
We still have to get to the cuffs themselves, so we remove all the interfering components and parts in order:
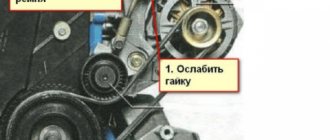
- The drive belt of the electric generator is in the way, so we loosen the tightening of the lower and upper nuts securing it
- Then, to loosen the drive belt, we bring the generator closer to the cylinder block, to do this we turn its adjusting bolt counterclockwise, as in the photo below
The adjusting bolt for tensioning the drive belt allows you to move the electric generator closer or further from the motor, while releasing or tightening the drive belt.
Adjusting bolt for tensioning the drive belt
- We use the “10” socket with a ratchet to unscrew the six bolts that secure the front cover of the timing case and remove it
Unscrew the mounting bolts of the timing casing and remove the casing
- Then you need to remove the right wheel, as well as the plastic shield from the engine compartment
- Take Head “17” with a knob and turn the crankshaft in the direction of the clock hand
- In this case, we place the head on the bolt that secures the electric generator drive pulley.
- Rotate until the marks on the camshaft toothed pulleys coincide with the marks on the rear timing belt cover.
- In this case, the engine flywheel mark should be opposite the slot in the clutch housing cover
- We insert a screwdriver between the flywheel teeth, through the hole in the clutch housing, to secure it from turning.
- Then you can safely unscrew the bolt that secures the generator drive pulley, and remove the pulley
- Now, using the “17” key, you need to loosen the nut of the timing belt tensioner roller
- We turn the roller and loosen the belt tension, then remove its rear branch from the exhaust camshaft pulley, then from the belt tension roller and the coolant pump pulley
Remove the timing belt after loosening the tension roller
- Then carefully remove the belt from the crankshaft and exhaust camshaft pulleys, as well as the support roller.
- We take a spanner “17” and unscrew the bolt that secures the camshaft pulley so that the camshaft does not rotate and the marks do not go astray, insert a screwdriver into the pulley hole and thus hold it
We unscrew the “17” key, the bolt that secures the pulley, and use a screwdriver to hold the camshaft from turning
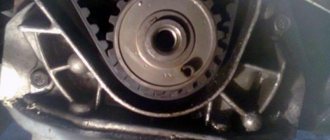
- You can remove the toothed pulley from the camshaft and at the same time pull out the key, if it sticks out, if the key is recessed, it will not interfere with removing the oil seal, then you can leave it in place
- We pull the oil seal out of the seat using curved pliers or a screwdriver
Pull out the oil seal using a screwdriver
Installing the oil seal
All that remains is to insert the new oil seal into place; for this you also need instructions:
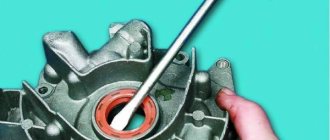
- Before installation, it is necessary to lubricate the working surface of the cuff; use engine oil for lubrication.
- Then we press the cuff into the seat
- Pressing should be done carefully so as not to “lift up” and damage the rubber of the oil seal rim
- To perform pressing, it is better to use a hammer with a plastic or rubber head.
- He will also use a mandrel or a piece of pipe of the required diameter.
Press the cuff into place with a hammer and mandrel
- In this case, the edges of the oil seal must be flush with the edges of its seat
- We do the same with the second camshaft oil seal, if necessary.
- Replacement of camshaft seals on a VAZ 2112 was completed successfully
- Then we install the pulleys, timing belt, generator drive pulley, timing case and generator drive belt
- The tension of all drive belts should be adjusted.
As you can see, the procedure can be done with your own hands, requiring a minimum of tools and no specific knowledge. Remember - replacing the cuffs in a timely manner will save you from more serious problems. Additionally, there is always the opportunity to study video materials.
Rear SC
The procedure for replacing the rear motor assembly is noticeably more complicated than the front one, so not everyone will decide to carry out such work on their own. We recommend that you consult first and watch training videos.
To replace the rear AC, you will have to spend a little more time and effort. The work is not easy, but with the right approach, a positive result can still be achieved.
Rear SC
- Disconnect the negative terminal from the battery. This will completely de-energize the car and avoid unpleasant situations.
- Remove the flywheel.
- Remove the rear protective cover from the engine crankcase.
- Next, we disconnect the fastening bolts from the oil seal retainer, after which it can be removed together with the seal outward.
- Be sure to arm yourself with a core or mandrel. Using these tools, you can press the crankshaft rear oil seal out of its seat - the race. The element itself is clamped in a vice, after which the problematic component is exposed to the tool.
- The holder is probably covered with dust and dirt. Be sure to delete it.
- Now carefully examine the condition of the surface. Even if there is even minor damage to the retainer, it will have to be replaced along with the oil seal itself.
- Now select a suitable mandrel so that its size matches the parameters of the new oil seal. Insert the spare part into its place. In this case, it is important that the working edge of the new oil seal is directed with the working edge inside the retainer, that is, the holder.
- Be sure to change the seal on the retainer. This is done regardless of the condition of the seal on the old crankshaft oil seal.
- Lubricate the crankshaft lips and flange with regular engine oil. This will make it easier to return the holder to its seat.
- To make it more comfortable for you, use a wooden stick to support the lip on the oil seal.
- Now all that remains is to perform the reassembly procedure, following the specified sequence of dismantling work.
The basis for successful replacement of front and rear joints is patience, attentiveness and perseverance. If you rush, rush, nothing good will come of it, and you will have to go to a service station and pay a lot of money.
What tools should I stock up on?
To replace the drive shaft on any side of the Renault Logan, you will need the following list of tools.
- A lifting device for hanging a Renault Logan car (in extreme cases, you can use a jack with a safety support).
- A set of ring and open-end wrenches, as well as heads with a handle (ratchet).
- You will also need an extended wrench that will allow you to overcome the high tightening torque of the hub nut.
- Pliers for removing the retaining ring from the shaft groove and a device for dismantling boot clamps.
- Medium sized hammer.
This is just a minimum list. Other instrumental components may be required at the discretion of the owner.