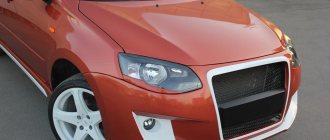
It's no secret that the Lada Kalina car is currently very popular among our compatriots. First of all, such popularity is explained by the objective advantages of this brainchild of the Russian automotive industry, as well as the relatively affordable price that the manufacturer set for the car.
Unfortunately, even the best car will sooner or later need repairs, and you just have to come to terms with it. This article will discuss how to remove and install the front wing of a Lada Kalina; in particular, a detailed algorithm of actions will be proposed that will allow the car owner to carry out this procedure independently.
Wing replacement work
Before changing the front fender on Kalina, study the vehicle's instruction manual to remember the location of the fasteners. The owner is required to prepare the site for repair work. It is advisable that this be a dry, clean room, protected from direct sunlight.
Before removing the front fender on a Kalina, a car enthusiast should prepare the following set of tools:
- open-end wrench set to “10”;
- open-end wrench set to “8”;
- jack;
- Phillips screwdriver;
- key set to “19” - to remove the front wheel;
- a small piece of clean rags;
- container for collecting fasteners of the front fender.
Before starting installation/dismantling work, it is necessary to “de-energize” the car by disconnecting the terminals from the battery.
Algorithm for removing the wing
- Hang your Kalina up, and then loosen the front wheel mounting bolts on the desired side. Remove the wheel;
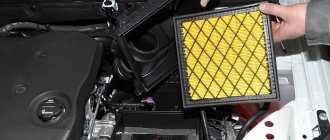
- Having removed the wheel, the car owner gains access to the front fender apron, which must be removed using a Phillips screwdriver, a wrench, and an “8” wrench;
- Unscrew the protective cover. To do this, unscrew the three screws that secure the casing to the bumper and the three screws that hold the casing to the body;
- Remove the right/left turn signal, having first disconnected the wiring from it;
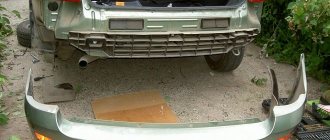
- Remove the front bumper (in the factory operating manual there is a section dedicated to the bumper and its installation. See the sequence of installation/disassembly steps there);
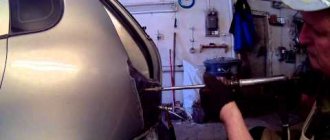
- Remove the front headlight from the desired side. Remove the two bolts from the headlight bracket. From there we additionally remove the mounting screw;
- Removing the front fender bracket. The bracket is removed by removing two bolts using an “8” wrench.
- Wing dismantling is complete.
If there is a need to hide traces of body repairs, then it is important not to damage the paint on the bolts: this is one of the points that expert appraisers carefully examine as part of car sales procedures. To avoid leaving marks, place a tiny soft cloth under the wrench or screwdriver when removing the fasteners - in this case, damage to the paintwork on the bolts will be minimal.
Recommendations for installing a new wing on Kalina
Before installing a new part, it is recommended to clean all surfaces adjacent to the wing. It is necessary to remove the remnants of insulating layers, sealants, and technical fluids in the place where the new wing will join the body. It is also recommended to remove all flange and spring fasteners and clean them.
Areas of body elements that have been stripped down to metal must be treated with a solvent to remove a layer of fat. After carrying out these manipulations, you can begin assembling the front part of the car. Return the flange and spring nuts to their original locations.
Areas of the body that have been cleaned to bare metal require application of a primer layer. Next, restoration of the layer of insulation gaskets is required. It is recommended to use compounds that improve vibroacoustic characteristics.
Next, the front fender is mounted on the body mudguard using standard fasteners. Next, the entire assembly is performed in the reverse order of the above algorithm. Installation requires more dexterity from the Kalina car owner than dismantling: this is primarily due to the adjustment of gaps, which cannot be adjusted to standard values in makeshift conditions.
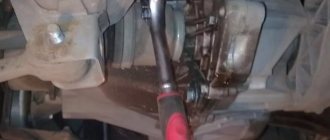
Disassembling the steering rack and repairing it when jammed
Lada Priora hatchback Logbook Steering rack repair
If steering rack repair is required, it begins with disassembling it. During repairs, a steering rack repair kit is used. Disassembly is carried out in a certain order. First, the adjusting nut is unscrewed, which sometimes requires considerable effort. Then the thrust bushing is removed.
If it is difficult to remove, you can use a mallet to lightly hit the rack body. The side plugs and boot are removed after cutting off the plastic fasteners. For preventative purposes, it is recommended to replace the boot with a new one in any case. The shaft is removed from the rack housing by hitting the body with a mallet.
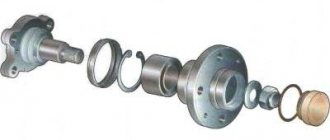
Steering rack parts: 1 – rack bushing ring; 2 – rack support sleeve; 3 – steering gear housing; 4 – roller bearing; 5 – drive gear; 6 – ball bearing; 7 – retaining ring; 8 – protective washer; 9 – sealing ring; 10 – bearing nut; 11 – lock washer; 12 – boot; 13 – rack; 14 – protective cap; 15 – rack stop; 16 – sealing ring; 17 – retaining ring; 18 – stop nut; 19 – clamp; 20 – protective cover; 21 – inner tie rod end; 22 – connecting plate; 23 – locking plate; 24 – bolt securing the rod to the rack; A - mark on the boot; B - mark on the crankcase
Inside the freed cavity of the housing, a plastic sleeve will become noticeable, which can be removed using a screwdriver. It must be replaced with a new one from the repair kit. All old grease is removed from the cavity of the steering rack housing; the surface is thoroughly cleaned, washed and blown.
New lubricant is applied both inside and outside the housing
Lithol is used for this purpose.
Particular attention should be paid to lubricating the gearing areas. All rack parts are inspected and, if necessary, replaced with new ones from the repair kit.
If the steering wheel is jammed, it must be removed
This operation for Lada Kalina is carried out as follows.
First, the airbags are disconnected from the battery, their locks and clamps are loosened. The cushions are released and moved to the side. The two horn wires are disconnected. On the steering wheel mounting shaft, in the place marked with an arrow, a mark is made on the location of the steering wheel before it is removed.
The steering wheel nut is loosened (but not completely unscrewed). When the steering wheel swings from side to side, it is tightened until it stops against the nut. Then you should align the car's wheels and ensure that the steering wheel is straight. The pin is removed and inserted into the switch block below the steering wheel.
DIY front fender replacement
Many car enthusiasts are accustomed to thinking that replacing a fender is a labor-intensive procedure that only qualified car service professionals can undertake. In fact, the procedure for removing and installing the front wing on Kalina will not be particularly difficult. At the same time, this will allow the car owner to save a lot of money, which can later be spent on other purposes. By following the algorithm of actions proposed in this article, the car owner will be able to replace the Kalina front fender with his own hands, even in his garage. In this case, it does not matter which fender needs to be replaced: the front left fender of the Lada Kalina or the front right fender of the VAZ Kalina, in each of these cases the sequence of actions will be the same.
Return to contents
Body and its replacement
In some cases, the body is so deformed that there is no need to talk about repairing or replacing certain elements. What should the owner of the Lada Kalina do in this case? Definitely, the body should be replaced, but here’s the problem - the latest amendments to the law prohibit this from being done at the official level.
Lada Kalina body replacement
Below is the standard algorithm of actions required to formalize a body replacement (was in force before the amendments to the law):
- First, the body needs to be properly diagnosed. Here it is better to use the services of a good specialist who will give an opinion - repair is possible only by replacing the body;
- The next step involves purchasing the body itself. It is recommended to do this either directly with AvtoVAZ or through official organizations involved in this. In this case, the LLC must issue a sales contract and other documents confirming the originality of the body;
- Replacement stage. It must be carried out at an official service station, where they will put all the required stamps regarding the replacement of the old body with a new one. In this case, it is desirable that the seal appears on each of the documents;
- Prepare a diagnostic chart after replacement. This is already a check of a car with a new body (it is usually carried out by the service station where the replacement was carried out). You should know that diagnostics are carried out in several positions. There may be 20, 50, 70, etc.;
- Next you need to go to NAMI or some similar organization to obtain official permission. If they give a conclusion that the car meets all standards and does not pose a threat, then everything should go like clockwork;
- The next stage is going to court with a package of all the documentation. Here you will have to work hard with appeals, etc., but success can be achieved.
Where is the body number on the Lada Kalina
There is little to explain the tightening of rules in the traffic police. There is no justifying logic. Those who converted numbers from the old body to the new continue to do so with impunity to this day.
Reasons for withdrawal
As mentioned above, replacing the front fender is an event that the average car owner can successfully carry out even in his own garage. Obviously, replacing a wing first of all involves removing it.
Removal of the part will also be necessary if:
- the wing has been dismantled and needs straightening;
- requires dismantling for painting;
- front fender needs to be replaced;
- access to vehicle components is required;
- there was a foreign object caught between the wheelbase spacers;
- rust has occurred.
Return to contents
Causes of wing corrosion
Among the causes of wing corrosion, the most common are the following:
- 1. There is no factory anti-corrosion treatment at all, or its insufficiency becomes obvious. We have to admit that nothing can be done about this, we can only accept it as a fact.
- 2. Accumulation of dirt in the lower segment of the wing. It is worth understanding that the cleaner the car (not only on the front side, but also in hard-to-see areas), the lower the likelihood of corrosion.
Return to contents
Private bussiness
I removed the doors, front fenders and bumper in one go in a couple of hours. It was quite easy to hang the new empty doors, and after that I believed that I could handle the rest quickly too. But throwing the door stuffing took an unexpectedly long time, although I have considerable experience in such work. Trivial advice: you need to take more photographs to record how and what is on the factory elements. I’ll also note a couple of nuances.
New glass can be installed on the front door at almost any stage before hanging the trim. But on the rear, this needs to be done until the lock, part of the rubber seals and the window lift mechanism are installed. The glass is not easy to insert into the door cavity, and it is necessary to choose the right angle so that it takes its place in the guides. By the way, all the stuffing on the damaged front door itself survived, which pleasantly surprised me. There were no difficulties with reassembling the bumper, as well as with setting the gaps along the wings.
I spent 20 hours on the work - despite the fact that I did not have a repair manual. The designs and fastenings are for the most part simple and intuitive, the only thing that infuriated me was the installation of glass in the rear door.
Before starting work
Obviously, before the dismantling procedure, it is necessary to familiarize yourself with the distinctive features of installing the front wing. So, before installing a new part, you should carefully study the operating instructions for the car, which are provided to the car owner when purchasing a vehicle. This is necessary in order to get an idea of the location of the fasteners. It is advisable to take the document with you so as not to get confused during the removal and installation process.
In addition, the car owner will need to take care of preparing the place for repairs. It is best if it is a dry room, protected from direct sunlight. Of course, you need to remove everything unnecessary.
It should also be noted that before starting work, it is necessary to “de-energize” the car, that is, disconnect the terminals from the battery.
Return to contents
LADA (VAZ) cars
Repair manual for VAZ 2110-2112, Lada Priora, Kalina
- Possible body malfunctions, their causes and solutions
- Design Features
- Removing and installing windshield frame trims
- Removing and installing soundproofing upholstery in the engine compartment
- Removing and installing bumpers
- Removing and installing fender liner and wing guard
- Removing and installing the front fender
- Removing and installing decorative sill trims
- Hood
- trunk lid
- Doors
- Seats
- Seat belts
- Rear view mirrors
- Interior fittings
- Dashboard
- Heater
- Replacement of fixed body glazing
- Installation of towing device
- Body care
- Table of contents
- 11. Body
Algorithm for dismantling the wing
Of course, first of all it is necessary to jack up the car body. Removal of individual spare parts is carried out using socket wrenches. The algorithm of actions is as follows:
- Use a screwdriver to loosen the mounting bolts.
- After this, access to the apron opens, which can be removed using a socket wrench size 8.
- Unscrew the car bumper to remove the wing. As soon as the bolts are unscrewed, you need to pull the left edge of the product, after which the right one will begin to come out of its grooves. First, remove the bumper, after which you will have access to the body element.
- Remove the dirt protection cover.
- Disconnect the headlight unit and the hood bumper.
- The area where the metal joins the body is cleaned of mastic using a knife.
- Using a 19mm wrench, unscrew the screws that secure the body element at the front and the bolts that secure it at the top. Then remove the screw that is hidden between the wing and the door. It is important to note that this procedure can only be carried out with the door open. Next, remove the bolt from the lower part of the structure.
Return to contents
Algorithm for installing the wing
Above we discussed how to properly remove the wing on a Kalina. Now the conversation will directly focus on installing the part on the car. The algorithm of actions is as follows:
- It is necessary to clean all adjacent areas around the perimeter of the surface, since traces of sealant or technical fluid may remain here. These marks are removed with a knife.
- The surface of the wing is degreased, after which a primer layer is applied and the insulating layer is restored. Professionals strongly recommend using mixtures that include vibroacoustic elements.
- The part is pressed against the opening, and the flange and spring fasteners are screwed into place.
- The wheel arch apron, mudguard and decorative trims are installed.
Return to contents
Wing cost
It should also be said about how much the wing costs for Kalina. Currently, the price for this car body element on average ranges from 4,000 to 5,000 rubles. Of course, you can find both more expensive and less expensive options.
Please note that the price will not include coloring of the product. Painted parts cost approximately RUB 1,000. expensive. The cost of products with anti-corrosion treatment, of course, will also be higher, but in this case you should definitely not skimp on quality. If you plan to install a new body part, then it is better to buy it painted, since handicraft anti-corrosion treatment or painting will most likely lead to the rapid appearance of corrosion spots on the new wing. Of course, it is better to avoid this scenario.
Return to contents
Types of PTFs and methods of installing them on Kalina
Stylish headlights for Kalina
There are a large number of fog lights that can be installed on a Lada Kalina car. PTF can be of the following types.
- Twin.
- Round.
- For outdoor installation.
- Square.
- Recessed.
- Oval.
However, in fact, not all of the above models can be installed instead of factory fog lights on Kalina. When making a thoughtless purchase, car owners have to redo the fastenings. If you want to avoid this, it is best to purchase one of the PTF kits produced by the following manufacturers.
- Bosch fog lights. A German copy, which is distinguished by high quality glass and light range. They are only sold as a pair.
- Fog lights “Luch”. One of the analogues of German products, the cost of which is significantly lower than the original. However, their quality is far from being the same as German foglights.
- ProSport fog lights from a Chinese manufacturer that produces spare parts for Russian cars.
- PTF “Kirzhach”. They have lens-shaped glasses that allow you to concentrate the range and brightness of the light stream.
It should be noted that all fog lights from the above manufacturers are ideal for Lada Kalina cars and will not require any additional manipulations. All you need to do is remove the old plugs and install new PTFs in their place. The new fog lights come with 4 plugs, which can be painted a different color if necessary to give the car more style.
PTF connection diagram
There are two common ways to install anti-fog lights.
- With the removal of the front bumper (a method that will be described).
- Without removing the bumper - the method is used by experienced craftsmen who have been repairing cars for many years.
Removing and installing the front wing of the Lada Granta
Tools:
- L-shaped socket wrench 8 mm
- L-shaped socket wrench 10 mm
- Medium Phillips screwdriver
- Torx key (asterisk) T20
Parts and consumables:
The wing is removed from the car during body repairs and when it is replaced. The front fender of the Lada Granta is mounted on dismountable joints, which allows you to replace the part without the use of welding.
1. Disconnect the wire from the negative terminal of the battery.
Required tools and materials
Before starting dismantling, you should choose a place for repair work and remove everything unnecessary. The room should be clean, dry, well lit. Inventory set:
- socket wrench 8, 10;
- jack;
- Phillips screwdriver;
- key to 19;
- rag;
- sharp knife.
Replacing the wing on Kalina involves intervention in the structure, so the wires from the battery are disconnected and a place is prepared for laying out the main fasteners.
Prices for replacing load-bearing body elements for LADA Granta
Car roof - replacement from 9,000 rubles Rear right or left fender - replacement from 8,600 rubles Rear or front spar - replacement from 8,000 rubles Threshold right or left - replacement from 5,000 rubles Car door pillar - replacement from 6,500 rubles
Slip works on LADA Granta: | |
| Installation on a slipway with measurement of base points for checking, as well as for restoring the geometry of the body | 2,000 rub. |
- Prices for car painting (Lada Granta)
- Prices for local repairs (Lada Granta)
Why should you trust only specialists?
1. Body repair requires experience that only professionals have. There is not enough knowledge of the technical features of car systems or a banal replacement of a spare part. In this case, you need real skills and practical experience, since ruining the appearance of the body can be much easier than it seems. Only the hands of service professionals will guarantee high-quality body repair of your LADA Granta.
2. Only real professionals can undertake body repairs after very severe accidents, when it is necessary to replace a large number of parts and level out extremely complex dents. Where amateurs will immediately refuse repairs or quote an exorbitant price for their work, professional service specialists are ready to offer reasonable prices even for complex types of repairs, taking into account slipway work.
For more detailed information, please call in Nizhny Novgorod 8,
Leave a request for repairs right now
The wing is removed from the car during body repairs and when it is replaced. The front fender of the Lada Granta car is mounted on dismountable joints, which allows you to replace the part without the use of welding.
You will need: a screwdriver with a Phillips blade, keys “8”, TORX T20, socket head “10”.
Note Removal of the front fender on the left side of the vehicle is shown. The front fender on the right side is removed in the same way.
Useful information about wheel arch repair
If you want the front and rear wheel arches on your car to look great and not show any defects, contact us. Our service specialists will perform high-quality repairs to arches, regardless of the degree of damage. We have at our disposal modern equipment, materials and tools for the complete restoration of the body and its components, and the craftsmen thoroughly know the nuances and features of this type of work.
Types of damage and ways to eliminate them
When operating a car, the arches receive different types of damage:
- Chips, peelings, cracks in paintwork;
- Surface corrosion;
- Severe damage to the metal by rust, up to the formation of holes;
- Dents, changes in geometry, surface breaks as a result of impacts;
These defects are equally inherent in both the front and rear wheel arches. But the complexity of restoration of arches varies. At the rear, the arch consists of two parts - external and internal, connected into a single structure by a permanent connection. At the same time, the rear wing itself with the arch is part of the rear part of the body and cannot be removed. The front fender can be removed from the car, which simplifies the process of restoring it.
Based on the degree of damage, a restoration technology is selected, of which several are used for arches:
- Cosmetic repairs (for damage to paintwork and surface corrosion);
- Straightening (dents and geometry changes are eliminated);
- Sealing holes;
When redecorating an arch, craftsmen clean its surface down to the metal, treat it with corrosion inhibitors, followed by putty, primer and painting.
Note that painting work is necessarily included in the process of restoring wheel arches. They are the final stage for any type of body repair.
Dent removal and straightening
In a garage environment, small dents are often repaired with fiberglass and putty. But this repair is incorrect, although in this way it is possible to restore the geometry of the surface. The essence of the work comes down to filling the dent with layers of fiberglass and putty, followed by sanding to give the required shape. And then the surface is painted over.
The disadvantage of this method is the need for thorough surface preparation, which is not always done. Therefore, corrosion often forms under the applied materials. Also, a layer of putty that is too thick eventually cracks along with the paintwork and the defect on the arch becomes noticeable again.
To restore the geometry of the arch surface, we straighten it. Using specialized equipment and tools, craftsmen level surfaces to an almost ideal state, regardless of the complexity of their shape and the number of creases.
To remove dents we use:
- slipway;
- Spotter;
- Reverse hammer;
- Hammers and extensions for straightening;
After straightening, the putty is used only to seal the smallest defects, so the thickness of the applied layer is insignificant and it will not crack in the future.
Filling holes
The most technologically complex operation is filling holes and replacing the arch in case of severe corrosion. Car enthusiasts often use fiberglass for this, which is also wrong. This method comes down to cleaning the surface, treating the edges of the holes with chemicals. means to prevent further spread of corrosion and fill the rotted area with fiberglass. After this, the surface is given the desired shape by puttying and sanding, followed by priming and painting.
It is better to remove holes on wheel arches by welding. We repair arches like this:
- We determine the size of the damaged area and make markings;
- We cut out replacement metal;
- Cut out the rusty part of the arch or its entirety (when replacing);
- We weld the prepared metal;
- We clean the welds;
- We treat the seams and adjacent areas with anti-corrosion agents;
- We putty and sand the arch to give the desired shape;
- We carry out painting work.
Note that this is a general algorithm for restoring arches by welding. Each specific case of repair has certain nuances and features that we take into account.
Whatever the condition of the arches on your car, we will fix them. You can evaluate the quality of arch restoration performed by our masters from the photos below.
Source
Step-by-step instructions on how to remove the front wing of a Lada Granta
Hi all. Today on vaz-remont.ru we’ll talk about how to remove the front wing of a Lada Granta with your own hands. You will learn what is needed to dismantle the wing, as well as in what sequence repair work should be carried out.
As a rule, the wing has to be removed for several reasons - either replacing the entire wing or straightening it. Also, the wing is often removed for body work and straightening of the elements located under it. The dismantling process is not complicated; more difficulties arise just in the process of installing the wing in place. It can be difficult for an inexperienced person to set all the gaps and maintain the correct proportions during the installation process.
Before replacing a wing, it is necessary to make a preliminary assessment of the cost-effectiveness of the work. I mean, what will be more profitable for you: a complete replacement of the wing or its repair (straightening, putty and painting). Also, when assessing your budget, you should take into account the fact that the part can be purchased either new or used, so weigh all possible options before making a decision.
To remove the wing on a Grant you need to have:
- A pair of screwdrivers (flat and Phillips);
- Key "8";
- TORX "T20";
- Head at "10";
- Jack;
- Key "19" for wheel removal.
Removing the front wing of a Lada Granta - step-by-step instructions
- The first step is to provide access to the mounting points; to do this, you need to remove the wheel and locker (fender liner). The process is familiar to most of you, so I won’t describe it. Everything is extremely simple, jack it up, hang the wheel, then unscrew the bolts and remove it. Next, remove the fender liner; to do this, unscrew the fastening screws using a key “8 and 10”, as well as TORX.
- Remove the turn signal repeater located on the wing by prying it off with a screwdriver.
- Then you need to remove the front bumper, you can find out how to do this in this article. Note: if you are replacing only one fender, it is not necessary to remove the entire bumper; you can only release one edge of the bumper, which interferes with the removal of the fender.
- Now you need to remove the headlight. To do this, turn off the power to the headlight by unclipping the wire block, then unscrew the four bolts securing the headlight. I note that many people get by without removing the headlight, but “the book” says that you need to remove the headlight. During the disassembly process, I think you will decide for yourself whether to carry out this step or not.
- Next, unscrew the three bolts securing the wing in its upper part, which secure it to the body.
Description of design
Clutch Surely, while in a driving school, everyone took a course on the design of transmission components, but it’s unlikely that everyone went into all the details and, I must say, in vain. Knowledge of the design and principles of operation will allow the owner to identify a breakdown at an early stage, take measures to eliminate it and avoid large costs for major repairs. Therefore, let’s briefly consider the components of the clutch of a Lada Kalina car:
- casing;
- release bearing;
- pressure disk;
- driven disk;
- drive cable;
- fork lever;
- cable length adjustment mechanism.
The type of friction clutch used on this model is single disc, dry with a diaphragm type spring. The aluminum casing is integral with the gearbox. Modifications involve the installation of two types of transmission components - with a diameter of 190 and 200 mm. You can determine which one is used in a particular car by the number of starter mounting bolts: two – 200 mm and, if there are three bolts, then – 190 mm. The clutch housing is secured to the flywheel with six screws. Three pins on the flywheel fit into corresponding holes in the housing, thereby centering it. As the linings wear out, the cable length changes automatically and does not require intervention from the owner.
labavto.com
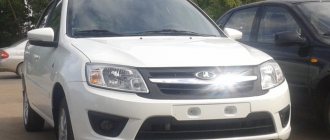
Lada Granta is a modern popular vehicle that was first released in 2011. The car enjoys a wide range of advantages and is in demand among buyers. This is due to the fact that it not only has an attractive aesthetic appearance and a moderate price range, but also has decent driving characteristics.
The operating experience of such a car suggests that it is a good option for traveling in an urban environment. At the same time, such a unit has high performance qualities, which allows the driver to feel comfortable and comfortable in any driving situation.
Special Features
Owners of the LADA Granta car highlight some criteria that attract special attention from both manufacturers and users. These criteria can hardly be called positive or negative sides of the vehicle. That is why a list of some special characteristics is presented, based on which each potential buyer or owner can draw their own conclusions:
- The car interior is designed in a minimalist style. It has a fairly simple appearance and is equipped with high-quality fabric upholstery. Many parts are made of high quality hard and dense plastic.
- An increased level of visibility, which allows the driver to see a fairly complete picture. Without much difficulty, you can adequately assess various situations during the movement.
- Unclear gearbox shifting. Car owners repeatedly notice that at various times the gear lever stops working, which makes driving difficult.
- Powerful high quality engine.
- The specific sound of the gearbox operating, which causes surprise from the first moments of using the unit.
- Affordable price category.
- Moderately priced components that can be purchased at any car market or store.
- Convenient spacious trunk.
Main parameters and characteristics of the engine
VAZ-21114-50; VAZ-21114-90:
- Modifications of Lada-Kalina: VAZ-11173, VAZ-11183, VAZ-11193;
- Engine type: four-stroke, gasoline, with spark ignition and fuel injection system;
- Number of cylinders - 4;
- The cylinder arrangement is in-line;
- Cylinder diameter - 82 mm;
- Piston stroke - 75.6 mm;
- Cylinder displacement - 1.596 l;
- Power system - multipoint injection;
- Ignition system - electronic distributed type;
- Rated power - 59.5 kW;
- Rated crankshaft rotation speed - 5100-5300 rpm;
- Maximum torque - 120 Nm (at 2800-3200 rpm);
- The minimum crankshaft rotation speed at idle is 800-850 rpm;
- Fuel - gasoline "Premium-95" GOST R 51105-97.
VAZ-11194:
- Modifications of Lada-Kalina: VAZ-11174, VAZ-11184, VAZ-11194, Lada-Kalina Sport (1.4);
- Engine type: four-stroke, gasoline, 16-valve with spark ignition and fuel injection system;
- Number of cylinders - 4;
- The cylinder arrangement is in-line;
- Cylinder diameter - 76.5 mm;
- Piston stroke - 75.6 mm;
- Cylinder displacement - 1,390 l;
- Power system - multipoint injection;
- Ignition system - electronic distributed type;
- Rated power - 65.5 kW;
- Rated crankshaft rotation speed - 5500-5700 rpm;
- Maximum torque - 127 Nm (at 4200-4800 rpm);
- The minimum crankshaft rotation speed at idle is 810-870 rpm;
- Fuel - gasoline "Premium-95" GOST R 51105-97.
VAZ-21126:
- Modifications of Lada-Kalina: Lada-Kalina Sport (1.6);
- Engine type: four-stroke, gasoline, 16-valve with spark ignition and fuel injection system;
- Number of cylinders - 4;
- The cylinder arrangement is in-line;
- Cylinder diameter - 82 mm;
- Piston stroke - 75.6 mm;
- Cylinder displacement - 1.597 l;
- Power system - multipoint injection;
- Ignition system - electronic distributed type;
- Rated power - 72 kW;
- Rated crankshaft speed - 5600 rpm;
- Maximum torque - 145 Nm (at 4000 rpm);
- The minimum crankshaft rotation speed at idle is 850 rpm;
- Fuel - gasoline "Premium-95" GOST R 51105-97.
Fuel consumption and dynamic characteristics: VAZ-11183, VAZ-11193
- Engine: VAZ-21114 (Euro-3);
- Fuel consumption (combined cycle) - 7.8 l/100 km;
- Maximum speed - 170 km/h;
- Acceleration time to 100 km/h is 13 s.
Fuel consumption and dynamic characteristics: VAZ-11184, VAZ-11194
- Engine: VAZ-11194 (Euro-3);
- Fuel consumption (combined cycle) - 7.0 l/100 km;
- Maximum speed - 165 km/h;
- Acceleration time to 100 km/h is 12.2 s.
Fuel consumption and dynamic characteristics: Lada-Kalina Sport (1.4):
- Engine: VAZ-11194 (Euro-3);
- Fuel consumption (combined cycle) - 7.0 l/100 km;
- Maximum speed - 165 km/h;
- Acceleration time to 100 km/h is 12.2 s.
Fuel consumption and dynamic characteristics: Lada-Kalina Sport (1.6):
- Engine: VAZ-21126 (Euro-3);
- Fuel consumption (combined cycle) - 7.8 l/100 km;
- Maximum speed - 170 km/h;
- Acceleration time to 100 km/h is 11 s.
Lada-Kalina refueling volumes:
- Fuel tank - 50l;
- Engine lubrication system - 3.5 l;
- Engine cooling system and interior heater (the use of mixtures of coolants of different brands is not allowed) - 7.84 l;
- Gearbox - 3.1l;
- Hydraulic brake system - 0.45l;
- Windshield washer reservoir - 5 l;
- Rear window washer reservoir - 5 l.
Top of page
The DPKV or crankshaft sensor for the Lada Granta is one of the most important measuring units in the entire car. Its purpose is to measure the rotation speed of the crankshaft, as well as its position. While reading the parameters, the sensor sends signals to the controller, which processes this data and issues the necessary impulses to the injectors.
The unit itself is quite reliable in operation and rarely fails. However, if its performance is impaired, this causes significant problems for the further operation of the engine. In addition, the product itself is non-repairable and therefore must be replaced with a new one.
There are several options to solve the problem:
- Replace the entire wing.
- Give the wing for repairs where they will make “candy” out of it for your money.
- Repair the wing yourself, saving on specialists and gaining a lot of invaluable experience.
If you chose the third option, then this article will be useful to you, because in it I will share my experience on how to repair a rotten wing of a Lada Kalina at home.
To work you must have:
- Metal brush, drill, sandpaper (various grain sizes from coarse to fine);
- Degreaser, rust converter;
- Three types of putty (start, finish, “Soft”), primer;
- Paint, varnish and spray gun;
- A polishing machine (if not, final polishing must be done at a service center);
- Bitumen mastic.
Lada Kalina sedan K-Line › Logbook › Repair of front wings. Getting rid of rust. Painting
7 years of operation of the car makes itself felt by “saffron milk caps” on the bottom of the front fenders.
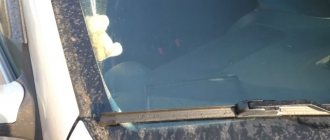
1. On one side, the paint is rubbing on the front mudguards. Nowadays, cars come from the factory with a film installed at the point where the mudguards come into contact with the paintwork. At least their brains worked in the right direction.
2. On the other side, a huge pile of dirt collects from the inside of the wing from below, you just can’t imagine what a pile it is, regardless of whether the front fender liners are installed or not. (I have front fender liners installed)
3. From the inside of the wing at the bottom there is a round zero anticorrosive in this place.
Well? I looked at this picture and suffered.
Patience has run out, we need to do something about it.
Option 1. Buy a new wing and have it painted.
Option 2. Buy a new wing and paint it yourself.
Option 3. Treat the existing wing. This is the option I chose
There were a lot of other options, like leaving it like that and others, which just don’t fit into my system.
Evening of the first day. Start
The main thing is to start, and whether you like it or not, you have to bring it to its logical conclusion. The wing was in trouble, it was rotten from the inside out. Sadness, sadness...
What to do? Take off your wings and think further. The front end was tossed around.
We evaluate the “cleanliness” of the wing. There is a huge pile of dirt. You also have this kind of crap collected in this place.
We pick it out and wash away the dirt. I feel like a doctor who saves a patient. And the less land in the wing, the more alive the “patient”.
On the second side of the wing the situation is less sad.
The evening was not wasted. I disassembled the front end, removed the wings, washed them and prepared them for further work. You can leave your car overnight with a clear conscience.
Second day. Continuation
We clean all the saffron milk caps. From inside, we pick out all the rust that could fall off. We go through the rust converter several times. Dry it.
Degrease with solvent and apply fiberglass putty.
We smooth it with 220-grade waterproof sandpaper, naturally with water, apply universal putty, and dry it.
We do the same with the second wing.
The wing is almost ready for primer application. I worked on both wings alternately, while the putty was drying on one wing, I sanded the second wing.
We dry the wing with a compressor, degrease it with a solvent and apply a primer from the inside of the wing
Now we apply the primer to the front side of the wing. An electric heater came to my aid to speed up drying. Apply the primer in several layers (2-4e) with drying between layers for 5-10 minutes (more is possible)
After the finishing layer of primer has dried, we go over it with 1000-grit waterproof sandpaper and water to make it even before applying paint. Paint in 3-4 layers, drying for about 10 minutes between layers.
After the last layer of paint has dried, apply colorless car varnish in several layers. My varnish turned out to be long-drying (since 2004, the jar had been in the bins, so that would be the varnish).
After drying, we put everything in its rightful place, except for the mudguards. First you need to apply a transparent film to the wing near the mudguard.
I bought 1.7 kg of bitumen mastic for 180 rubles. Half a can was enough for the front arches, left for the rear arches and grease the bottom where required.
For convenience, I removed the front wheels so that I could stick my head under the fender and assess the condition of the coating))) I applied mastic at lunchtime, and in the evening I put the fender liners in place.
How long will such manipulation last?
Time will show. Then it will be possible to change the wings. I'm satisfied with the work done) My conscience has calmed down a little, it's clear
PS: I used a brush to touch up the chips on the bumper while the bumper was removed and lay to the side, not bothering anyone.
Plans: paint the radiator grille in the color of the car)
Stages of partial arch replacement with your own hands
- Disconnect the wheel arch from the trunk floor, the bulkhead frame and the suspension spring support using a drill, pneumatic hammer, plumber's hammer, and chisels.
- Identify and mark the damaged area.
- Remove damaged metal according to the markings. This should be done using protective gloves and goggles.
- Cut an identical blank from a metal sheet.
- Prepare the surfaces for welding, remove the remaining pieces of metal from the ends with wire cutters or pliers, and set the minimum gap between the parts.
Wheel arch replacement technology
ATTENTION! A completely simple way to reduce fuel consumption has been found! Don't believe me? An auto mechanic with 15 years of experience also didn’t believe it until he tried it. And now he saves 35,000 rubles a year on gasoline! Read more"
First of all, a visual assessment of the degree of corrosion of the metal is made. The necessary measurements are taken. Depending on the level of damage, arches are replaced partially or completely. Everything will depend on how worn it is. For the most minor damage, you can get by by coating the inside of the arch with a protective anti-corrosion agent.