Advice from experienced motorists and repairmen on the topic of Lada Granta, replacing the rear wing - come in, we have become even more convenient. We have posted a video course on how to repair a car yourself. How to repair a car yourself at home. We will help you with repairs and repair the car yourself. We know how to restore a car with minimal investment. I have attached video instructions.
Category: Auto repair instructions
Laughter on topic: Usually, in every company there is always an asshole. If you think yours doesn't have it, then I have bad news for you.
Published by Admin: at the request of Abdullah
Reviews from a car owner: We all juggle three balls, which are called: “work”, “family” and “friends”. So, the work is a rubber ball. If you accidentally drop it, it will jump into your hands again. And all the other balls are made of glass. Remember this.
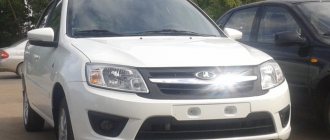
Contact the professionals! This will be the first step towards ensuring that your Lada Granta shines again and gives pleasure not only from fast and safe driving, but also from contemplating the beauty of your car.
Wheel arch replacement technology
ATTENTION! A completely simple way to reduce fuel consumption has been found! Don't believe me? An auto mechanic with 15 years of experience also didn’t believe it until he tried it. And now he saves 35,000 rubles a year on gasoline! Read more"
First of all, a visual assessment of the degree of corrosion of the metal is made. The necessary measurements are taken. Depending on the level of damage, arches are replaced partially or completely. Everything will depend on how worn it is. For the most minor damage, you can get by by coating the inside of the arch with a protective anti-corrosion agent.
vendor code
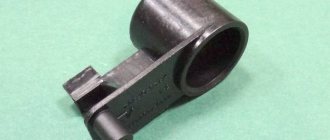
Part markings on the VAZ-2110 are divided into right and left parts. To select the correct wing, you must have the catalog number, as it can be confused with another model. Part numbers look like this:
- 2110-8404014 – rear right wing of VAZ-2110;
- 2110-8404015 – rear left fender of VAZ-2110.
There are also markings in which a zero is placed instead of a hyphen, and numbers are added at the end: -10 or 77.
1200 rub. for the photo report
We pay for photo reports on car repairs. Earnings from 10,000 rubles/month.
Write:
One of the unreliable places in the VAZ 2110 body is the car’s wings. Having turned to a car repair shop for help, many motorists, to their regret, discover that replacing the fender for their pet is quite expensive. For example, replacing a front fender at a service station costs 400 rubles, and replacing a rear fender costs 3,200 rubles. The question arises, how to change the wing on a VAZ 2110 with your own hands? This photo report will help you understand this issue.
Stages of partial arch replacement with your own hands
- Disconnect the wheel arch from the trunk floor, the bulkhead frame and the suspension spring support using a drill, pneumatic hammer, plumber's hammer, and chisels.
- Identify and mark the damaged area.
- Remove damaged metal according to the markings. This should be done using protective gloves and goggles.
- Cut an identical blank from a metal sheet.
- Prepare the surfaces for welding, remove the remaining pieces of metal from the ends with wire cutters or pliers, and set the minimum gap between the parts.
When the wing of a VAZ 2110 requires replacement
- The wings of the VAZ 2110 are susceptible to corrosion , as a result of which they rust and collapse. Mainly due to the fact that it is this part of the car that is exposed to moisture and other aggressive environmental factors, such as reagents and salt, which are sprinkled on roads during icy conditions.
In these cases, the need to change the wing becomes obvious. To perform this procedure you will need the following tool :
- wrench with 8 and 13 mm head;
- extension cord and ratchet;
- flat and Phillips screwdriver;
- new left wing of VAZ 2110.
By the way, the price from the VAZ manufacturer for the original front left fender with article number 21100840301500 or the front right fender with article number 21100840301400 will be about 1,550 rubles. The rear left fender with article number 21100840401500 or the rear right fender with article number 21100840401400 costs about 3080 rubles.
The average cost is indicated for spring 2022 in Moscow and the region.
Stages of a complete replacement of an arch with your own hands
- Pre-cut and form a new arch. Any turner can do this. Light alloys, such as aluminum, are suitable as materials.
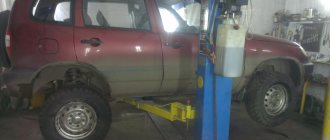
- For convenience, when carrying out work, you should lift the car with a jack and remove the wheel.
- A complete replacement of the rear arch, including the wing, is carried out, as with a partial replacement, after disconnecting it from the trunk, floor, partition and suspension.
- Remove the paintwork from the wing and arch down to the metal base.
- Try on the wheel arch being installed with your hands. Mark a line along which the old arch will be cut.
- The most important step when installing a new arch with your own hands is welding, which is performed with a special apparatus. It starts in the center of the arch and wing, then is welded along the edges. If the gaps coincide, welding is carried out along the entire contour circle. Particular attention is paid to fastening to the threshold; when moving, all the main load will be here. Finally, a welding primer is applied.
- All subsequent actions of a complete replacement of an arch are similar to those carried out during a partial replacement.
Forget about fines from cameras! An absolutely legal new product - Traffic Police Camera Jammer, hides your license plates from the cameras that are installed in all cities. More details at the link.
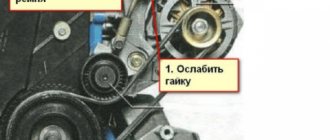
Before working with the welding machine, you need to disconnect the power supply, that is, the battery. The problem we have is this: we need to heal the corroded arch.
First of all, we clean everything with an emery machine and cut out the damaged area with a grinder.
Replacing the rear wing of the grant
Advice from experienced motorists and repairmen on the topic of Lada Granta, replacing the rear wing - come in, we have become even more convenient. We have posted a video course on how to repair a car yourself. How to repair a car yourself at home. We will help you with repairs and repair the car yourself. We know how to restore a car with minimal investment. I have attached video instructions.
Category: Auto repair instructions
Laughter on topic: Usually, in every company there is always an asshole. If you think yours doesn't have it, then I have bad news for you.
Published by Admin: at the request of Abdullah
Reviews from a car owner: We all juggle three balls, which are called: “work”, “family” and “friends”. So, the work is a rubber ball. If you accidentally drop it, it will jump into your hands again. And all the other balls are made of glass. Remember this.
Contact the professionals! This will be the first step towards ensuring that your Lada Granta shines again and gives pleasure not only from fast and safe driving, but also from contemplating the beauty of your car.
Wing arch repair using welding
I’ll show you the example of repairing the rear wing of a Golf 2. I’m showing an example, the quality is “4”, since the car is for sale, with clients everything is a little different. To begin with, all the plasticine was picked out, which the previous owner used to repair the hole in the arch :) After that, the rot was cut out with a grinder to the living metal, the edge was cleaned for welding. After the outer part of the arch was cut out, it turned out that the inner part was also slightly rotten.
Rotten areas cut out
After this, repair inserts were made; first, the inner part was welded.
Welded insert for the inner part of the wing arch
Prices for replacing load-bearing body elements for LADA Granta
| Hood replacement (removal and installation) | 1,000 RUB |
| Front left or right fender replacement (removal and installation) | 800 rub |
| Front door right or left replacement (removal and installation) | RUB 1,520 |
| Rear door right or left replacement (removal and installation) | 1,200 rub. |
| Front or rear bumper replacement (removal and installation) | 800 rub |
| Trunk lid replacement (removal and installation) | RUB 1,500 |
| Car roof - replacement | from 9,000 rub. |
| Rear fender right or left - replacement | from 8,600 rub. |
| Rear or front spar - replacement | from 8,000 rub. |
| Threshold right or left - replacement | from 5,000 rub. |
| Car door pillar - replacement | from 6,500 rub. |
Slip works on LADA Granta: | |
| Installation on a slipway with measurement of base points for checking, as well as for restoring the geometry of the body | 2,000 rub. |
- Prices for car painting (Lada Granta)
- Prices for local repairs (Lada Granta)
Why should you trust only specialists?
1. Body repair requires experience that only professionals have. There is not enough knowledge of the technical features of car systems or a banal replacement of a spare part. In this case, you need real skills and practical experience, since ruining the appearance of the body can be much easier than it seems. Only the hands of service professionals will guarantee high-quality body repair of your LADA Granta.
2. Only real professionals can undertake body repairs after very severe accidents, when it is necessary to replace a large number of parts and level out extremely complex dents. Where amateurs will immediately refuse repairs or quote an exorbitant price for their work, professional service specialists are ready to offer reasonable prices even for complex types of repairs, taking into account slipway work.
For more detailed information, please call in Nizhny Novgorod 8,
Leave a request for repairs right now
The wing is removed from the car during body repairs and when it is replaced. The front fender of the Lada Granta car is mounted on dismountable joints, which allows you to replace the part without the use of welding.
You will need: a screwdriver with a Phillips blade, keys “8”, TORX T20, socket head “10”.
Note Removal of the front fender on the left side of the vehicle is shown. The front fender on the right side is removed in the same way.
1. Disconnect the wire from the negative terminal of the battery.2. Remove the wheel arch liner (see “Removing and installing mudguards and wheel arch liners on the Lada Granta”)
3. Remove the bolt from the rear fender to the A-pillar located in the wheel arch.
4. Remove the front bumper (see “Removing and installing the front bumper of the Lada Granta”)
5. Remove the side turn signal (see “Replacing the side turn signal”).6. Remove the air supply duct linings (see “Removing and installing the air supply duct linings”).
7. Remove the bolt from the side securing the wing to the bracket.
8. Remove the headlight unit (see “Replacing the headlight unit of a Lada Granta”).
9. Remove the three bolts of the upper fender-to-body mounting.
10. Open the front door and remove the bolt from the rear upper fender to the front pillar.
11. Remove the bolt from the lower fender to the sill.
The wing can now be removed from the car. Installing the wing is done in reverse order
Causes of wing corrosion
Among the causes of wing corrosion, the most common are the following:
- 1. There is no factory anti-corrosion treatment at all, or its insufficiency becomes obvious. We have to admit that nothing can be done about this, we can only accept it as a fact.
- 2. Accumulation of dirt in the lower segment of the wing. It is worth understanding that the cleaner the car (not only on the front side, but also in hard-to-see areas), the lower the likelihood of corrosion.
How to change the rear wing (instructions)
Replacing a rear wing is a rather labor-intensive process, but if you have the necessary tools, you can do it by following the instructions:
- We empty the trunk of unnecessary and flammable items, as well as the trunk mat.
- Unscrew and remove the bumper.
- We remove the headlights.
- We dismantle the fuel tank.
- Using a thin chisel, gently press out the rear wing, but try not to damage the car body.
- We drill out the rivets at the junction of the wing and the transverse frame.
- We remove the rear wing.
- Using wire cutters and a chisel, we get rid of the strips of metal that remain on the wing.
- We straighten and polish the edges of the wing.
- Prime with reactive primer.
- Prime with regular primer.
- We clean the welding points down to metal.
- We attach the new wing by welding.
- We paint the new wing in the body color.
Remove the front bumper and, if present, the wheel arch liner.
Replacing the wing of a VAZ 2110
Remove the front bumper and, if present, the wheel arch liner.
Using a 10mm wrench, unscrew the rear (lower) wing mounting screw.
Then use the same head “10” to unscrew the front (bottom) screw to the bracket.
Move the side turn signal slightly forward and pull out its rear part.
Next, use a 10mm head to unscrew the two screws securing it to the front pillar (under the wing).
They are approximately here, only on the reverse side.
Using a 10mm wrench, unscrew the four upper screws securing the wing to the body.
We remove the side turn signal one hundred percent. By pulling, we disconnect the socket with the lamp from the turn signal lamp.
VAZ 2110 replacement of the rear wing, rear panel.
VAZ 2110 rear wing replacement
,
rear
panel. Painting will be done later. Sorry for the long video.
Replacing the rear wing 2110
Carefully bringing the wing out from behind the headlight groove.
We install the new wing and assemble everything in the reverse order.
One of the unreliable places in the VAZ 2110 body is the car’s wings. Having turned to a car repair shop for help, many motorists discover to their own chagrin that replacing the fender for their pet is expensive. For example, replacing a front fender with a 100 costs 400 rubles, and replacing a rear fender 3,200 rubles. The question arises, how to change the wing on a VAZ 2110 with your own hands? This photo report will help you understand this issue.
Before starting work
Obviously, before the dismantling procedure, it is necessary to familiarize yourself with the distinctive features of installing the front wing. So, before installing a new part, you should carefully study the operating instructions for the car, which are provided to the car owner when purchasing a vehicle. This is necessary in order to get an idea of the location of the fasteners. It is advisable to take the document with you so as not to get confused during the removal and installation process.
In addition, the car owner will need to take care of preparing the place for repairs. It is best if it is a dry room, protected from direct sunlight. Of course, you need to remove everything unnecessary.
It should also be noted that before starting work, it is necessary to “de-energize” the car, that is, disconnect the terminals from the battery.
Recommendations for installing a new element
We looked at how to remove the wing on Kalina, but before dismantling you should study the features of installing a new part. Step-by-step instruction:
- All adjacent fragments around the perimeter of the surface are cleaned. There may be traces of sealant, technical fluid, and remnants of insulating layers. Remove them with a sharp knife.
- The flange and spring fasteners are removed. Before reinstalling it, the parts are cleaned.
- The entire surface is degreased, then a primer layer is applied. The insulating layer is restored. Experts advise using compositions that contain vibroacoustic components.
- The new wing is leaned against the opening, and the flange and spring nuts are screwed into place.
- They install a mudguard, a mudguard and install decorated linings.
When the wing of a VAZ 2110 requires replacement
- The wings of the VAZ 2110 are susceptible to corrosion , as a result of which they rust and collapse. Mainly due to the fact that this very part of the car is exposed to water and other brutal environmental factors, such as reagents and salt, which are sprinkled on roads during icy conditions.
In these cases, the need to change the wing becomes trivial. To perform this procedure you will need the following tool :
- wrench with 8 and 13 mm head;
- extension cord and ratchet;
- flat and Phillips screwdriver;
- new left wing of VAZ 2110.
By the way, the price from the VAZ manufacturer for the original front left fender with article number 21100840301500 or the front right fender with article number 21100840301400 will be about 1,550 rubles. The rear left fender with article number 21100840401500 or the rear right fender with article number 21100840401400 costs about 3080 rubles.
The average cost is indicated for spring 2022 in Moscow and the region.