In the last article, I talked about choosing front suspension components for my Kalina. And here I will try to describe in more detail the entire procedure for replacing these parts, starting from struts and springs, and ending with supports and their bearings. All this can be done in three hours, if there are no special problems with rusted nuts. To perform this repair you will need the following tools:
- Balloon wrench
- Hammer and pry bar
- Jack
- Open-end wrench size 9 and socket wrench size 22 (for unscrewing the top nut of the strut and holding the rod)
- Socket wrenches 17, 19 or similar heads with a crank
- Pliers
- 13mm socket head with ratchet or wrench
- Penetrating lubricant
- Spring ties
What is the service life of support bearings on Kalina and how to check them
Depending on the operating conditions, the service life of the support bearings varies. On average, their service life ranges from 50 to 100 thousand kilometers. As a rule, a bearing malfunction can be recognized by characteristic suspension knocks and squeaks, especially on small irregularities.
How to check a support bearing
The easiest way to check the performance of a support bearing is with the help of an assistant. You need to remove the plastic cover from the strut cup, there you will see the bearing mounting nut. You need to put your hand on the support and ask an assistant to rock the car. As soon as the car starts to rock, you will immediately feel the bearing working.
If you hear a knocking or squeaking sound in the support, it is most likely faulty and needs to be replaced.
Upper front strut support for Kalina - features of choice
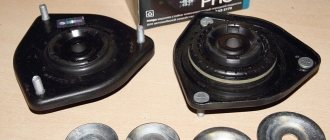
As practice shows in most cases, the upper support assembly is replaced. There are three models of “supports” on sale, which you should pay attention to when purchasing.
The photo below shows original sets of supports from three companies: SEVI. SS20 (SS20), ASOMI (ASOMI). The cost of products varies from 2000 rubles. up to 4000 rub. depending on the configuration.
Watch the video on spare parts review:
Comparison of Lada Granta support bearings with EUR
Replacement strut support for Lada Kalina
What supports to put on Kalina
The choice depends on you and your budget. Today, manufacturers offer us a large selection of support bearings from 300 rubles to 3000 rubles. Which ones to install is up to you to decide. You can purchase factory supports, or you can choose an option from another manufacturer. The most popular supports are:
- Rack support FENOX price from 500 rub.
- Rack support Balakovo price from 350 rub.
- Rack support TRACK price from 800 rub.
- Rack support BZAK price from 600 rub.
- ASOMI supports, Tolyatti price from 3000 set
- Supports SS-20 Togliatti price from 3500 rubles set
Some car enthusiasts, for the so-called suspension tuning, install ASOMI or SS20 supports.
How to replace support brackets on Kalina yourself
To replace the bearing, in addition to a standard set of keys, you will need special pullers to remove the support and spring tensioner.
Unscrew the support and remove the stand
So, in order to unscrew the support we need a special key. With its help, we can easily unscrew the fastening nut as shown in the photo below.
We put a special wrench on the support nut; for ease of unscrewing, we will need a larger lever (a regular one with a diameter will do). We begin to unscrew the support as shown in the photo.
If you don’t have a special wrench at hand, then take a regular 22mm socket wrench and put it on the nut, use a 9mm wrench to hold the rod from turning and unscrew the fastening nut. After we have unscrewed the nut, we proceed to remove the shock absorber strut.
Disconnect the brake hoses that are attached to the strut. Next, unscrew the two bolts securing the strut to the steering knuckle. To easily unscrew them, we recommend spraying them with penetrating lubricant or WD40 and letting them sit for a couple of minutes. After this, you can easily unscrew the bolts without fear of stripping the threads.
Next, unscrew the nut securing the steering end to the strut. This can be done either using a special puller as shown in the photo, or knocking the tip out of the rack with a hammer. Now all that remains is to unscrew the 3 upper bolts securing the strut with the support to the body and pull out the strut.
Removing the old and installing a new support bearing
After we have removed the strut, we take two spring ties, put them on the spring and begin to tighten them until we can unscrew the nut. After unscrewing the top fastening nut, you can easily remove the support along with the bearing, cup and rubber band. If the anther is intact, you can leave it alone.
We take a new support bearing, put it on the stand and assemble the stand in the reverse order. Instead of factory rubber bands, you can install sound insulators from SS20, which are said to prevent squeaking. After we have assembled the rack with the new support, we remove the spring ties and install the rack in place.
Replacement algorithm
The necessary tool for inspecting the front suspension: 1 – a wrench for removing the support bearing, 2 – a puller for the tips, 3 – ties for the springs.
- We tear off the bolts, jack up the front wheel and remove it.
- Using pliers, you need to unscrew the nut that secures the steering end to the strut. Next, unscrew it.
Unbend the antennae with a screwdriver (1) and pull out the cotter pin with pliers (2).
We put on the puller (2) and press out the tip by tightening the bolt (1).
We unscrew the nuts with a 17mm wrench, holding the bolts with a wrench of the same size.
The front support is secured in the body shell with three nuts.
We tighten the spring with ties, freeing the support.
To unscrew the nut, we use a special puller or two wrenches - a hexagon and a regular open-end wrench.
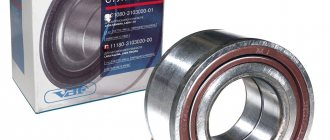
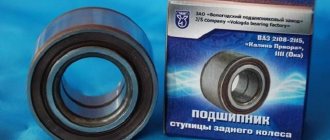
New support bearing SS20 Gold for Lada.
We assemble the shock absorber by performing the above steps in reverse order.
How to understand that the support bearings have failed
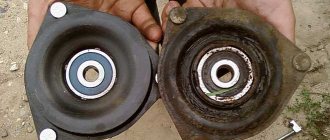
Traces of paint peeling are visible (rust around the cup). This happened due to increased load. Due to a faulty shock absorber mount or strut.
The minimum service life of support bearings is 50,000 km. With non-aggressive driving, the component can last twice as long. However, sooner or later it will fail.
The following signs indicate the need for replacement:
- Cracking noise from the engine compartment when turning.
- Knocks and clicks during shock absorber operation.
- Increased steering play.
- Deterioration of vehicle controllability.
- The steering wheel becomes too sharp, and road irregularities can be felt through it.
We do our own replacement of front suspension elements on Lada Kalina
The car suspension is one of the main elements. It is the suspension that creates ride comfort and also makes handling more responsive and enjoyable. If the operation of this element is disrupted, a number of unpleasant situations are possible that you can get into (ranging from unpleasant knocking and creaking up to an accident). In this regard, such close attention is paid to the suspension during inspection. This article will discuss the complete replacement of the front suspension elements of the Lada Kalina. The Lada Kalina suspension elements that require the most frequent replacement include: struts, springs, supports and support bearings. If there is no severe rust on them, then the replacement procedure can be completed in a few hours. To make replacements in the suspension, you must have the following tools: 1. Balloon; 2. Jack; 3. Hammer; 4. Mount; 5. Keys for 9, 17, 19 and 22; 6. Similar to keys in head size; 7. Pliers; 8. Head 13, equipped with a wrench or ratchet; 9. Lubricant that promotes corrosion and rust removal; 10. Devices for compressing springs.
Replacing the front wheel bearing without removing the strut, attempt 1
2) I will carry out all the work on site, so you MUST place a safety stop under the car. I used a removed wheel and a couple of wooden blocks as a stop.
At the same time, I decided to check how the jack was holding - that is, I left a distance of about a centimeter to the safety stop. 3) Unscrew the hub nut. I took the beard and, driving it into the groove in the shank of the CV joint, opened it with a hammer.
4) Now we have reached a difficult moment. To unscrew the nut, you need a 30mm wrench and a lever (a pipe at least 1 meter long). But that's not the problem. The tightening torque of the nut is very high (I can’t give the numbers). In order for the applied force to be used to unscrew the nut, and not to turn the hub, you can put a wheel on the hub with the decorative cap removed. Lower the car from the jack and then unscrew the nut. But even with the car lowered and the anti-roll stop, the wheel can slip on the floor (I had this happen.) Therefore, I use a device to fix the hub from turning. It is a faceplate (like a classic one) with fittings welded to it.
5) I put the clamp on the hub so that when the nut is unscrewed, it rests with a hook against the brake caliper bracket, resisting rotation. And tighten a couple (or all) of the wheel bolts.
6) I take a 30 socket wrench (I have a piece of pipe welded to it), put a lever on the shank - a pipe and unscrew the nut.
7) Now that the nut is unscrewed and the clamp does not need a bracket for the stop, I take an extended 17 socket, an extension and unscrew the two bolts that secure the caliper bracket.
 By inserting a stronger screwdriver between the back of the brake pad and the inside of the brake caliper, we push in the piston of the brake cylinder (We use the screwdriver as a lever) so that it does not interfere with removing the caliper from the brake disc.
9) unfasten the brake hose from the mounting to the rack. (I warn you right away, be sure to return the hose to its place after assembly, otherwise when you turn the steering wheel, the hose will rub against the wheel and become worn out)
Further disassembly of the front suspension into elements
To replace, for example, the front strut support bearing, the entire module must be disassembled. Initially, you need to compress the springs of the suspension element. To compress the springs, you need a tension device.
These devices can be purchased at almost any auto store. We install the tie elements on different sides of the spring onto the coils and then, using a wrench, begin to screw the bolt into the elements. The springs must be compressed symmetrically by turning the bolt on one side and performing the same operation on the other side.
After the spring releases the support, you can completely unscrew the nut from above.
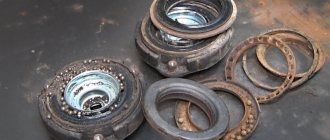
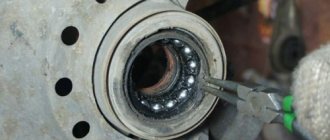
Now you can remove the strut support together with the support bearing. It is best to remove the bearing and support in one piece, since the bearing balls may fly apart in different directions, and then you will have to do unnecessary work.
By removing the support and bearing, you can easily dismantle the spring.
And at the very final stage, it is necessary to remove the bump stop boot from the rod. This is done by simply applying force and pulling upward.
Thus, the front suspension element is completely disassembled.
Selection of manufacturer
Below I will describe in more detail the agony of choice, since before purchasing I had to read probably more than 1000 posts on this topic on various forums and blogs, including lkforum and DRIVE2.
- SAAZ is a passed stage, to which you never want to return again. Of course, I understand that you need to save on the components that go on the assembly line, but not to the same extent? Take the same suspension, only on a VAZ 2110-2112, and I have never heard such symptoms there, including on my “twelfth”, which I drove for more than 3 years. I simply don’t understand why they couldn’t make a similar design on Kalina.
- Kayaba (KYB) is originally a Japanese brand that has a good position in this industry. But there is one important BUT - you will never get Japanese quality, since the lion's share of the goods that go to the domestic market from this manufacturer are produced in China. I'm not saying that the Chinese do their job poorly, but with a flow like theirs, the defect rate can be quite high. And the reviews online are quite mixed, so this confused me.
- ASOMI is our manufacturer that develops suspension parts for VAZ and GAZ cars. They make some pretty good components, but there is one significant drawback that put me off buying their parts. The fact is that this manufacturer provides a 12-month warranty, but only on the condition that you install the parts at a specialized service station. I don’t need this, I’ll do everything myself, and if something is wrong with the suspension, who will I complain to then?
- SS20 is a domestic manufacturer of suspension and steering parts. I think that 99% of all Kalina owners have heard about this company and a considerable part have experience in using components of this brand! Even here on the blog there are many positive reviews from many owners. As for personal experience, I rode on the SS20 suspension on some of my friends’ Kalinas, and compared to my car, this is heaven and earth! No knocks on the rebound, moderately stiff and at the same time excellent road holding, even with quite strong maneuvers at a decent speed (Comfort-Optima). In general, I was hooked on this particular suspension, especially since no manufacturer provides such a huge guarantee. For struts it is 2 years, for springs and supports 4 years. And the most important point is that you can install it yourself without fear of warranty problems! And one more thing - even if you don’t have a receipt or warranty card in your hands, the guarantee is still valid according to the number that is stamped on the parts!
Guide to assembling new parts into a suspension element
At the very beginning, you need to put a bump stop on the suspension rod, which comes with the boot.
If you are going to install new springs, then initially they need to be tightened in the same way as the old ones. After the springs are tightened, we put them in place. In this case, you need to make sure that the spring falls into a special recess.
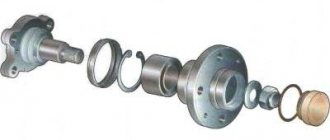
Having installed the spring, you need to prepare the support with the bearing. To do this, insert a bearing into the support.
A special flange is installed on top of the bearing and a rubber seal is installed on top of the flange.
We mount the assembled element onto the suspension rod and tighten the fixing nut.
When tightening the nut, you should control the rod so that it does not turn. It should turn out that the upper coil of the springs fits completely onto the sealing rubber. Thus, the front suspension of the Lada Kalina is assembled.
After completing the assembly, the tie elements should be removed from the spring. It is important to find the marking arrows on the spacer that indicate the direction of movement of the machine. Now we insert the entire stand assembly into the glass. After three bolts fall into the holes, screw the nuts on top. Next comes the most painstaking process of getting the strut into the steering knuckle. After that, we twist everything and tighten it to the end. Replacing Kalina front struts is not a very difficult process if you do everything correctly and in the right sequence. When you take on the suspension bulkhead from the second side, everything will work out much faster. And finally, after completion of work with the replacement of front suspension elements, it is necessary to carry out a procedure to regulate the alignment. This procedure will be carried out very quickly and efficiently in a car service center. Doing this yourself without skills is quite difficult and can only make things worse. It is best to go to a car service immediately after completing work on replacing the suspension elements. If you delay this, you will most likely have to change the tires as well. Tire wear is not the worst thing, but since all corners are broken when reinstalling the suspension strut, you can get into an accident when turning.
We detect bearing faults in Lada
Lada Kalina stove does not heat well
Steering rack Kalina with electric booster
Replacing antifreeze Kalina
To diagnose, you will need to carry out a number of manipulations:
- Open the hood.
- We dismantle the protective cap of the support.
- We place our palm on the support (preferably on the shock absorber rod) and perform a vertical swing of the body.
- If a knock is felt (kickback in the hand), then this indicates the presence of play, that is, failure of the support with the bearing.
In these cases, replacement is required without removing the rack.
How to identify a malfunction
Are you bothered by some strange sounds in the chassis? Can you clearly hear its knocking while driving? This means that you urgently need to assess the condition of the suspension, since it is possible that you had to deal with:
- bearing damage;
- damage to the gasket.
There can be many reasons for the failure of support bearings, and they are the same for the vast majority of cars, including the Lada Kalina. First of all, we are talking about problems such as:
- Wear of the element (as a rule, the service life of support bearings on the Lada Kalina is designed for 50,000 - 100,000 km).
- Getting dirt and dust inside, which is very important for most of our regions where there are practically no roads.
- Damage due to excessive load on the shock absorber.
- Failure due to damage to the shock absorber itself.
Determining whether a support bearing is damaged is quite simple. To do this, you need to open the hood of the car, remove the “glass” and slightly rock the front of the car. A characteristic sound and vibration will indicate that you urgently need to replace 1 or 2 front support bearings. Of course, it’s better not to let things go wrong and install new components at least once every 50,000 – 70,000 kilometers (depending on the intensity of use of your Kalina). If a knock does appear, you should under no circumstances ignore it, since a new strut will cost you 4 to 10 times more than replacing a bearing, the average price of which is 300 rubles. The cost of work at a service station will also cost no less than 500 rubles. If you make the replacement yourself and in a timely manner, you can save a lot of money, especially since there is nothing complicated in the procedure. Next, we’ll talk about how to change the support bearing on a Lada Kalina car without contacting specialists.
What is the danger of a breakdown and when is replacement needed?
Many car enthusiasts underestimate the importance of this unit and ignore the knocking noise of the support bearing. This, in turn, can end very badly.
For example, during the next collision with a hole, the support may break. As a result, the car pillar breaks through the hood. If this happened at low speed, then the only costs are material.
It will be necessary to straighten or change the hood, paint it, and so on. It is much worse if such a situation occurs while moving. In this case, the consequences can be more tragic.
If the support gear malfunctions, many motorists do not know what to do correctly and what to do in such a situation. Here the answer is clear - the front strut supports need to be replaced.
If there is an obvious knock, there can be no talk of any repairs (more expensive). Many beginners are afraid of such work, considering replacement to be too complicated a process.
In fact, all manipulations take a minimum of time. The main thing is to know exactly the sequence of actions.
Be careful and do not ignore the appearance of suspicious knocking noises. Remember that such problems can not only lead to additional costs, but also pose certain health hazards. Good luck on the roads.
We change bearings correctly!
Actually, there are no difficulties in changing the bearing on Kalina. The main thing is to follow the step-by-step instructions that we will give below, and you will be able to deal with this trouble without any problems. So, to replace these components you need:
- Place the car on a flat surface and put it in gear.
- Remove the wheel from the side from which the bearing will be replaced.
- Remove the tie rod end nut. To do this, you will need a 19 mm wrench and pliers for removing the cotter pins.
- Use a special puller to remove the tip pin from the stand. If you don’t have a puller at hand, you can knock it out by prying it from below with a small crowbar.
- We tighten the nuts securing the strut to the steering knuckle. To do this we will need a 19mm wrench and possibly a 17mm wrench to support the bolt heads.
- Remove the nuts securing the shock absorber to the body. To do this, use a 13 mm socket wrench.
- We remove the shock absorber, install it on the tie spring and compress it until its upper part appears.
- Remove the nut of the upper shock absorber support. To do this you will need keys for 9 and 22.
- We are replacing the bearing.
- We assemble and install the shock absorber in the reverse order.
As you can see, the procedure is absolutely elementary and will not take much time; the most important thing is to do everything in accordance with the steps indicated above. If any points remain unclear to you, it is advisable to watch the video instructions for replacing the support bearing with and without removing the strut. Remember, you should not delay in eliminating malfunctions of this kind, because they can lead to more serious consequences, and you will need to spend a lot of money to eliminate them.
Replacement
- jack;
- wheel wrench;
- open-end wrench 19;
- open-end wrench 17;
- socket wrench 13;
- pliers;
- ring wrench 22 and open-end wrench 9;
- special puller for tie rod ends;
- 2 special spring ties.
Execution order
- We park the car on a level surface and put it in gear.
- We jack up its front part on the desired side and remove the wheel.
- Using pliers, unscrew the nut securing the steering tip to the strut and unscrew it with a 19 mm wrench.
- Using a tip remover, remove the tip pin from the shock absorber strut. As a last resort, the finger can be knocked out by prying it up with a small pry bar and carefully tapping it from below.
- Using a 19mm wrench, unscrew the 2 nuts securing the strut to the steering knuckle. If necessary, hold the bolt heads with a 17 wrench.
- Using a 13 mm socket wrench, unscrew the 3 nuts securing the support to the body.
- We remove the entire shock absorber.
- We install two ties on the shock absorber spring and compress it until the upper part of the shock absorber is released.
- Using wrenches 22 and 9, unscrew the upper support nut on the upper side of the shock absorber.
- We remove the support, disassemble it, and remove the worn support bearing.
- We install a new one in its place.
- We install the shock absorber in the reverse order.
Removing the shock absorber strut and disassembling it
We remove and disassemble the shock absorber strut when it is necessary to replace the upper support, bearing, spring, and telescopic strut. The telescopic stand is non-removable and cannot be repaired. We carry out the work on an inspection ditch or overpass, but you can get by on a flat platform. There are two options for removing the shock absorber strut. The first allows you to avoid subsequent adjustment of the steering wheel alignment angles, the second method requires less work, but after it requires adjustment of the steering wheel alignment angles. We replace the telescopic stand according to the second option. In the first option, remove the strut together with the steering knuckle, without loosening the nuts of the lower and upper (adjusting) bolts securing the strut to the steering knuckle. At the same time, we disconnect the tie rod end from the swing arm of the shock absorber strut (see “Replacing the outer tie rod end”), the ball joint from the steering knuckle (see “Removing the ball joint”), and remove the outer CV joint from the wheel hub (see “Removing the drives”) front wheels"), and also remove the shoe guide with bracket (see “Replacing the front wheel brake disc”).
We tie the bracket to the brake hose bracket, making sure that the hose is not stretched. If the rack is to be disassembled.
. Use a 22 wrench to loosen the rod nut, holding the rod from turning with a 9 wrench.
Using a socket or a 13mm wrench, unscrew the three nuts securing the upper strut support to the body.
. and remove the shock absorber strut along with the steering knuckle. To remove the shock absorber strut using the second method, disconnect the tie rod end from the swing arm of the shock absorber strut (see “Replacing the outer tie rod end”) and the front wheel brake hose from the bracket on the strut (see “Replacing the front wheel brake hose”).
Let's sum it up
Having completed the repair procedure, we go to the service station to adjust the wheel alignment. We “listen” to new supports (bearings) on the road, initially choosing those that best suit your car, making sure that there are no extraneous sounds.
12. Telescopic stand GRANT (or equivalent).
The sleeve directly under the nut.
When attaching the support to the body, it is necessary to correctly orient it relative to the direction of movement of the car, guided by the arrows on the rubber element.
The support bearing is installed on the car strut and serves to provide a movable connection between the shock absorber and the car body. The support bearing is located at the point where the shock absorber strut is attached to the body. During movement, the support is subjected to heavy loads, and its service life depends on operating conditions.