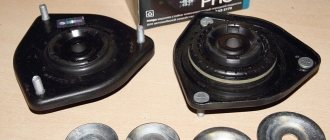
While driving, an unpleasant cracking noise may be heard in the area of the front or rear wheel. It usually disappears when turning. This behavior of the chassis indicates that the wheel bearing requires replacement. A malfunction occurs in almost every car that has already experienced a lot of mileage. The condition of the front or rear wheel bearing is also affected by driving style. The replacement is quite simple, but the driver will have to remove the strut and then take the Priora to a wheel alignment.
Don't want extra costs? Then read how to replace a wheel bearing without dismantling the strut and subsequent “camber” .
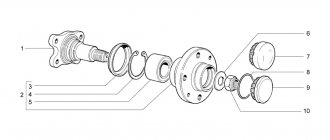
Priora hub design
These Priora parts are available both rear and front. Therefore, replacing the bearing bearing on them is somewhat different due to design features and differences. Therefore, it is first worth considering their differences before talking about replacing the rolling mechanism itself.
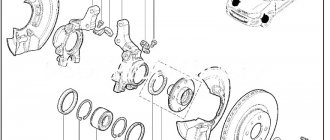
Front hub "Priors", device
The front hub of the Priora, like on other cars, has an independent suspension. That is, it is not tightly fixed to the body, but has a certain freedom of movement being in the steering knuckle. In addition, the front wheels are driven and swivel. This is what causes certain differences in design. Although it is quite simple, replacing the bearing on it is a rather complex procedure. The front hubs of the Priora are metal discs with a neck, inserted into the steering knuckle with devices and devices designed both for their movable connection with the body and for the free movement of the wheel in the direction of rotation. In addition, the drive shaft from the gearbox enters the center of the hub. Therefore, slots are cut inside it. A lever system and a shock absorber strut make this connection. And the ball joints of the steering mechanism control the steering knuckle, into which the hub is pressed.
Replacing the bearing on the front strut of a Priora
To carry out this operation you will need the following tools and devices:
- hammer;
- mandrels;
- screwdriver (large);
- retaining ring remover;
- core;
- chisel;
- two-jaw bearing puller;
- head at "30"
- wrench set to “17” (socket);
- pliers.
The most convenient way to replace a wheel bearing on a Priora is to use a lift. As a last resort, you can jack up the front part and hang the wheel.
First of all, having removed the decorative plug, remove the cap of the hub fastening nut. Under the nut there is a special locking washer, the edge of which is bent over the nut. Using a thin chisel, loosen the nut and loosen it a little.
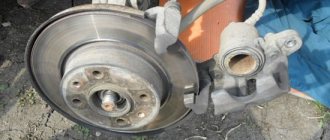
Now the Priora can be lifted and the wheel completely removed. Using a 17 key, loosen the fastening of the steering knuckle to the strut. Unscrew the ball joint mountings a couple of turns. Completely remove the hub mounting nut. Remove the caliper and brake disc one by one. Completely remove the mounting bolts and remove the steering knuckle and hub.
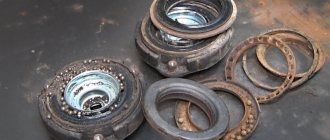
Removing the old bearing
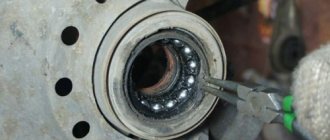
Using a special drift, knock the hub out of the fist. Often the inner race remains on the hub journal. It needs to be removed with a puller. Pull out the retaining rings on both sides of the bearing. Now it can be pressed out either with a special diameter drift or with a new bearing.
After inserting the new one, secure it with retaining rings. Apply lubricant generously and reassemble the Priora in reverse order. Replace the second bearing in the same way.
Rear hub "Priors", device
Unlike the front, the rear hub of the Priora is mounted on a fixed shaft attached to the supporting beam. And this beam is attached to the body by a system of levers and shock absorber struts. Its design is much simpler, however, as practice shows, removing and replacing the Priora wheel bearing at the rear is often much more difficult than at the front.
Working with rear bearings
So, for this job you will need a slightly smaller set of tools:
- thin chisel;
- hammer;
- head at “30”;
- pliers for removing retaining rings;
- pressing puller for rollers;
- universal three-jaw puller;
- metal brush for removing rust.
Remove the plugs in exactly the same way, unscrew the fastening nut at “30” and loosen it. Lift or jack up the Priora. Remove the wheel completely. Tapping gently with a hammer, remove the brake drum. It is advisable to remove the brake pads to avoid damage.
Completely unscrew the fastening nut. Using a three-jaw puller, remove the hub with the roller from the shaft. Sometimes it may happen that here, too, the inner race remains on the shaft. Well, in this case, again, a two-jaw puller is in hand. But again, it is advisable to pre-treat with anticorrosive. After the required part is removed, just like on the front steering knuckle, remove the retaining rings for replacement. Well, now, slowly, using a special puller (available for sale), press out the old bearing or outer race, if the inner race remains on the shaft. Wipe the hub and shaft thoroughly. Press in the new bearing and secure it with retaining rings. Before replacing the hub, thoroughly brush the brake pad seats while you can. Having seated the hub, put the washer and nut in place, not forgetting to secure the cotter pin. Apply CV joint grease generously.
Be sure to brush the brake drum, and after installing the pads, reassemble everything in the reverse order.
Preparing for work
This process is best carried out in the light if we are talking about the street. A bearing is a miniature component. It will be ideal if you drive Priora into the inspection hole. We will disassemble the front hub part, since this is more difficult than carrying out the same operation with the rear hub, especially without removing the strut. And now to the tools:
Lada Priora, like other passenger models of this brand, is a front-wheel drive vehicle. There are many more parts in the front, hence the more complex process of removing the bearing. The rear support component of the hub is removed in the same way; you will need less time to do it, so the instructions describe the rear support bearing.
How to check for bearing failure on a Priora
I suggest using the following self-diagnosis method:
— open the front windows of the car;
— accelerate to a speed of 40 km/h. Hear a whistle, howl, grinding, hum in the area of the front hub - the first sign of wear of the part;
— increase your speed and listen again. The howling has disappeared and is repeated periodically with renewed vigor.
— stop, carefully place your palm on the metal surface of the hub. If you feel an increased temperature, then you are right, the part needs to be replaced.
To finally make sure of your determination, place the car on a jack.
Spin the wheel manually. The sounds are the same as when driving - your diagnostic conclusion is correct. If there is any play, then it definitely needs to be changed.
How to diagnose the front wheel bearing on a Priora and the causes of failure
At the beginning of the article, signs of a malfunction were already mentioned, if they occur in the VAZ 2170, it is necessary to check the hub assembly. To diagnose a breakdown, it is enough to do several operations:
- Raise the car with a jack;
- Check the play of the suspended wheel with your hands;
- Rotate the wheel and listen for noise;
- Watch several videos on the principle of diagnosing the front wheel bearing of a Priora.
Why does the front wheel bearing of a VAZ 2170 (Priora) fail:
- Expiration of service life;
- Incorrect operation of the suspension, aggressive driving style, road quality;
- Poor quality ball bearing (defect, counterfeit, manufacturing defect);
- Depressurization (dust, moisture, dirt);
- Malfunction of adjacent components (brake disc imbalance, etc.);
- Road accidents, collisions with deep potholes in the asphalt or holes.
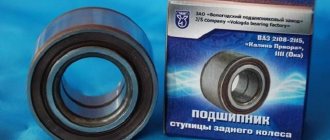
Deciding on the choice of wheel bearing
I advise you to purchase the bearing only from a specialized automotive store. Thus, exclude the purchase of defective or counterfeit goods.
Please ensure that the bearing is wrapped in oiled paper and is free of dents and rust.
According to the factory catalog, the bearing number is: No. 11180-3103020-00.
The state standard number is as follows: No. 6-256707A1KE12.
The best choice is the Vologda bearing plant VBF.
Among foreign analogues, I recommend the brands SWAG, SNR, SKF.
When choosing, be guided by the numbers: FAG No. 713614030, SKF No. VKBA1414.
Check the dimensions of the part. They should be like this:
- outer diameter - 68mm;
— internal diameter – 35mm;
— width — 37mm.
You have purchased the bearing.
Let's proceed directly to replacing it.
Comments
TOP materials of the week
TOP products in the store (more)
Your review of the sound insulation of the Lada Granta:
Lada.Online
Lada (“Lada”) is a brand of cars produced by JSC AVTOVAZ. Previously, it was used only for export cars, and for the domestic market, cars were produced under the Zhiguli brand. In 2004, the management of AVTOVAZ announced the transition to the Latin alphabet for the official spelling of the names of all cars produced by the plant: Lada - instead of "VAZ" and "Lada".
Lada.Online is the largest Russian-language automotive resource with a daily audience of thousands, which is dedicated primarily to cars of this brand, the domestic automotive industry and the automotive world in general.
This site is not the official LADA website.
© 2022 Lada.Online. Copying of material is permitted only with a link to the source.
Source
Detailed instructions for replacing the product
To begin work, you will need to place the car on a flat surface.
Loosen the wheel bolts. Place chocks under both sides of the wheels. If they are unavailable, you can use ordinary bricks.
Raise the car on a jack.
For insurance, place a stop under the side member, using the spare wheel.
Engage forward gear.
Unscrew the bolts and remove the wheel. Next, unscrew the hub nut.
It is necessary to unscrew the nuts on both sides of the brake caliper.
Use a screwdriver to push the brake pads apart.
Using wrench No. 17, unscrew the rear bolts.
Remove the caliper and move it to the side. We tie it with wire for convenience.
The hub nut has been removed. Remove the brake disc.
In order to remove the hub we will use a puller.
Unscrew the nuts securing the casing and dismantle it.
Unscrew the ball joint nuts.
Remove the fasteners that secure the pivot pin to the rack.
Disconnect the steering knuckle.
Using a vice, clamp the steering knuckle. The hub should be located at the bottom.
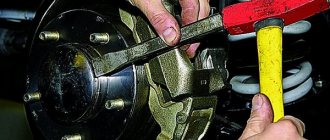
We install a metal mandrel with a diameter of 32 mm. We hit the mandrel with a hammer and knock out the hub. The inner bearing race will remain on it.
Using a chisel and hammer, we expand the clearance for the puller. Next, use a puller to remove the clip.
It could be easier. Using an angle grinder (grinder), we make a cut across the holder. Next, hit it hard with a hammer. The clip shatters into pieces.
We proceed to remove the other bearing race that remains in the fist.
Using round-nose pliers, remove the retaining ring.
We insert the mandrel and clamp everything together in a vice.
We tighten the vice and at the same time squeeze out the bearing ring.
We clean the bearing seat from dirt and oil. Wash with diesel fuel and wipe with a rag.
Lubricate the surface with lithol.
We insert the bearing into the hole and, using a mandrel, carefully drive it in 10mm. We make sure that there are no distortions.
The retaining ring needs to be installed.
Next, press the hub using a vice.
Then we mount it all on the rack. And we carry out installation in the same sequence as dismantling, but in reverse order.
So you have managed to replace the front wheel bearing for your VAZ 2170.
It's not that difficult.
What tools will you need?
Before you begin repair work, make sure you have the necessary tools and supplies:
- wheel chocks;
- jack;
- wheel bolt wrench;
- chisel (core);
- some object to fix the position of the car body when jacking up (a stump, several bricks, etc.);
- hammer;
- spacer made of wood (block);
- head at “30” with an extended handle;
- key to "7";
- vice;
- a piece of pipe for the outer diameter of the bearing;
- long nose pliers;
- special puller for the hub;
- special pliers for retaining rings;
- anti-rust liquid.
If you decide to change the rear wheel bearing on a VAZ-2108, also replace the hub nut. At least that's what the car manufacturer recommends. The fact is that the nut has a special edge that bends during installation and gets knocked down during disassembly.
Replacement
The work must be carried out using the necessary tools. There are two options for replacing the wheel bearing - with subsequent wheel geometry and without its need. The replacement is similar for all VAZ cars (front-wheel drive).
Tool you will need:
- Ratchet with head "7", "10", "13", "17", "19" or E30;
- A key for unscrewing the CV joint or a head at “30”;
- Powerful flat head screwdriver;
- Gas torch or wheel bearing puller;
- Hammer;
- Steering wheel end puller (may not be needed);
Replacement with subsequent wheel geometry
- You need to start by unscrewing the CV joint nut; the car should be installed on a horizontal plane with the steering wheel turned slightly to the side. Using a wrench, unscrew the grenade nut counterclockwise.
What is a CV joint?
CV joint is a Constant Velocity Joint (not to be confused with lubrication). Colloquially it is called a "grenade". It got its name because of the presence of a large number of balls inside and its appearance similar to a combat grenade. There is also CV joint grease -3 and 4, used to lubricate this joint.
- We jack up the car and secure it so that it does not roll or fall off the jack. Remove the wheel;
- Separate the brake pads using a flat screwdriver;
- We unscrew the caliper from the steering knuckle and hang it by the wire (under no circumstances hang the caliper by the brake hose).
- We dismantle the brake disc by unscrewing the guides.
- Unscrew the two bolts securing the strut to the steering knuckle.
- Unscrew the bolts securing the ball joint.
- We remove the steering knuckle from the car.
- We take out the retaining rings on both sides of the fist.
- Next we need to knock out the old bearing; for this you can use a punch of the required diameter or use a puller.
- Then, once the bearing is removed, a new one must be installed. Pre-install one retaining ring and press in a new one on the opposite side.
- If you have a puller, then carefully press in the new bearing, avoiding distortion.
- If you don’t have a puller, you first need to put the new bearing in the freezer for a couple of hours.
Why in the freezer?
According to the laws of physics from the school curriculum, cold bodies contract, and hot bodies expand. Therefore, a cold bearing will have a smaller diameter than a hot one, making installation easier.
- Next, use a torch to heat the steering knuckle and carefully lower the bearing into it, tapping a little. IMPORTANT, avoid distortion; the bearing should run smoothly without snagging.
You can use an old bearing as a mandrel.
- After the bearing is pressed in, install the second retaining ring and assemble everything in the reverse order.
Replacement without wheel geometry
In order to carry out a replacement without the need for wheel geometry, it is necessary to completely dismantle the steering knuckle assembly with the strut.
- Without removing the wheels from the car, we need to loosen the CV joint nut (grenade) to “30”. To do this, unscrew the grenade nut counterclockwise with a wrench.
- We tuck the car, which is fixed, so that it does not roll or fall off the jack. We remove the wheel.
- Separate the brake pads using a flat-head screwdriver.
- We unscrew the caliper from the steering knuckle and hang it by the wire (do not hang the caliper by the brake hose).
- Remove the brake disc by unscrewing the two guide wheels.
- We unscrew the steering tip mount and remove it from the strut bipod using a puller.
- Unscrew the two ball mounting bolts.
- Unscrew the three bolts securing the strut support to the side member.
- We remove the strut along with the steering knuckle from the car.
The next step is to remove the bearing from the knuckle and install a new one.
- We remove the retaining rings on both sides from the steering knuckle.
- Next, you need to knock out the old bearing; for this you can use a punch with a diameter smaller than the diameter of the bearing or use a puller.
- After the old bearing is removed, a new one must be installed. Pre-install one retaining ring and press in a new bearing on the opposite side. To do this, if you have a puller, carefully press the bearing into place, avoiding distortion. If you don’t have a puller, then you first need to put the new bearing in the freezer for a couple of hours (so that its diameter decreases slightly).
- Next, use a torch to heat the steering knuckle and carefully lower the bearing into it, tapping a little. IMPORTANT: avoid distortion; the bearing must run smoothly without snagging.
An old unnecessary bearing can be used as a mandrel for installing a new one.
- After the bearing is pressed in, install the second retaining ring and assemble everything in the reverse order.
The wheel bearing replacement process is complete.
Tips, tricks and repair videos from specialists
1. The parts of the front wheels wear out evenly, so when replacing one side, be sure to check or change the other.2. If you do not have a puller, as well as a vice (press), it is recommended to take the assembly to a car workshop for pressing / pressing.3. It is recommended to press-fit using non-impact methods.4. Life hack: heat the steering knuckle before inserting p/w.5. Be sure to lock the hub nut after tightening.6. When assembling, treat threaded connections with graphite lubricant.7. Before installation, check the amount of lubricant inside the unit by carefully opening the rubber seal.8. Buy spare parts from certified stores, ask for documents for original products.9. This video collection presents a detailed replacement process.
The Prior release bearing is an integral element of the clutch system, which is involved in the gear shifting process. The part is involved in the process of pressing the clutch pedal and changing gear, and is responsible for disconnecting the clutch discs.
If we talk about the service life of the bearing, in most cases it is quite long and amounts to at least 100 thousand kilometers of the vehicle. However, during operation in difficult conditions (off-road, constant switching in traffic jams, lack of lubrication), faults are diagnosed even after 15 thousand mileage.
What front wheel bearing is in Priora: dimensions, number, prices, characteristics
Before you begin the repair, you need to know which front wheel bearing is on the Priora, as well as which one is better in terms of price, reviews, quality, and manufacturer. The designers at the manufacturing plant included in the design an angular contact double-row sealed ball bearing with lubricant inside (LITOL-24).
According to reviews and statements from VAZ owners, the best option would be original products from VBF or foreign manufacturers: SKF, SNR, SWAG, FAG.
The dimensions of the front wheel bearing, as well as the catalog numbers of recommended manufacturers, are presented in the tables in a similar article on replacing the wheel bearing in a Lada Granta car; look for detailed information there.
Priora front wheel bearing number:
- GOST: 6-256707А1КЭ12
- ISO: 256707A1KE12.P6Q6/L2
- Factory article: 11180-3103020-00
- SKF: VKBA1414
- FAG: 713 6140 30
BEARING SIZE CHART 6-256707
| Characteristic | Unit | Value according to GOST (TU) |
| Hole diameter | mm | 35 |
| Outside diameter | mm | 68 |
| Installation height | mm | 37 |
| Dynamic load capacity | kH | 40,0 |
| Static load capacity | kH | 32,0 |
| Nominal speed | rpm | 3500 |
| Axial clearance | mm | 0,04-0,08 |
| Steel type | – | SHH-15 |
| Hardness of steel and rollers | H.R.C. | 61-65 |
| Contact angle | hail | – |
| Torque | kN*M | 190 |
| Ring roughness | Ra | 0.32 |
| Number of balls | PC. | 28 |
| Weight | G. | 295 |
What are the best bearings to install on Priora?
You have already figured out how the replacement takes place without dismantling the rack. But some owners of Lada Priora have a question: what is better to choose - a standard part or an alternative one. The most important thing is that it is a ball component; roller ones are not as durable. If there is no option for Lada Priora in the store, then it is better to take a part for Kalina. Some motorists recommend buying cheaper bearings for the “ten”, but it is better to look for more modern options.
Video on replacing the wheel bearing on a Priora is below.
- ✅ Contents of the article:
- 1. Checking the front wheel bearing on a Priora
- 2. Design of the unit and methods for replacing the wheel bearing
- 3. Instructions for removing the old ball bearing
- 4. Pressing in a new part, assembly and installation of the unit
- 5. How to choose a replacement bearing: price, number, dimensions
- 6. Tips, tricks and useful repair videos
The front wheel bearing on the Priora VAZ 2170, as on other VAZ cars, often fails, especially when the mileage exceeds 80,000 km. First there is noise from the wheel, which can increase during acceleration. Vibration also often occurs, wheel play increases, and in some cases the noise turns into a grinding sound - all these signs mean that the front wheel bearing of the Lada Priora requires immediate replacement. If you delay repairs, the consequences can lead to wheel jamming, which leads to unsafe situations on the road.
Recommendations
Comments 14
ANY priors have a bearing from Kalina. Of course, exceptions to the rules or alterations by previous owners are not excluded.
I have “tenth” bearings, Priora ’08. www.drive2.ru/l/536633418562142803/
The 10th does not fit on the Priora, they are identical to the Kalina!
When the front one began to hum, I came to the store, they gave me a Priora from Kalina, it was either from Kaldina or from 10K-I xs
All Priora have front step from Kalina
I changed the front hub in the fall. 2008, installed this:
This question also came up recently, 1 Kalinovsky - 68x35x37
2 Eight - 64x34x37. They told me to buy a Kalinovsky from a Yen Prior 2013, I bought it, I thought I would change it, but listening with a stethoscope said not to rush... everything is still going well. Maybe there is an opportunity to agree to take both, and return one based on the results? But I’m inclined that you also have a Kalinovsky, although I never found out which one on mine)), FAG is now in the stash)
And I didn’t encounter vibration at 110 km, I think it was the front hub or hardly
I wrote in a personal message
This question also came up recently, 1 Kalinovsky - 68x35x37
2 Eight - 64x34x37. They told me to buy a Kalinovsky from a Yen Prior 2013, I bought it, I thought I would change it, but listening with a stethoscope said not to rush... everything is still going well. Maybe there is an opportunity to agree to take both, and return one based on the results? But I’m inclined that you also have a Kalinovsky, although I never found out which one on mine)), FAG is now in the stash)
All have Prior from Kalina hubs
Well, it’s quite possible... it’s just a VAZ)))
It’s not possible and there’s no need for vases in foreign countries, too, there are jambs and the darkness is brewing
Well, it’s quite possible... it’s just a VAZ)))
There are almost no difficulties in selecting spare parts according to the principle “give me the pads for a Priora” - 99% of spare parts can be selected according to the car model, and if any changes occurred, then from a certain year of manufacture or a specific modification of the car. For foreign cars, an accurate selection is usually possible only by VIN due to the large number of modifications and the production of the model at different factories. For example, some Kangoo with seemingly the same engine may have different starter mounts depending on whether the car was assembled in France or Turkey. Logan sedan and Logan station wagon have different brake drums. VAG has so many modifications that only very experienced VAG drivers remember the nuances by heart. So in terms of selection at VAZ everything is quite simple. As for the applicability of spare parts from one model to another, this applies to everyone. Because there is no point in developing a new part for a model if the existing one satisfies all the requirements. Renoshniks actually built an entire crossover on a car platform - and no one seems to be complaining too much