Adjustment work and checking the clearance of the Chevrolet Niva wheel hub bearings are carried out when replacing them. As a rule, an increase in hub play indicates an imminent failure of its bearing. If you hear a hum in the wheel area while the car is moving, it is most likely a bearing that is humming and needs to be replaced. Preparation for adjustment work
1.
Using a chisel, separate the cap from the hub.
2.
After this, remove the brake pads and attach the dial indicator holder to the steering knuckle.
Place the indicator leg against the wheel hub, close to the adjustment nut. 3.
Place ring wrenches (“14”) on the studs and tighten them with nuts.
4.
Holding the keys, rotate and move the hub axially.
5.
We measure the amount of axial movement (clearance) of the hub using the indicator.
6.
If the gap is more than 0.15 mm, it must be adjusted.
Symptoms of a problem
Bearing wear manifests itself as the following symptoms:
- Vibration of the front wheels, which can be reflected in the steering wheel or felt in the cabin.
- Knocking or crackling sounds in the front of the car when driving;
- Heating of the front wheels in the axle area.
If such manifestations occur, you need to check the condition of the wheel bearings. To do this, jack up the car and rock the wheel in different directions. Play and knocking in the bearing area indicates the need for replacement and adjustment. The malfunction may also manifest itself in the form of noise when the wheel rotates.
1. The hubs get hot. It is important to understand that when braking, the kinetic energy of the car is converted into thermal energy. As a result, the brake discs and the hubs on which they are attached become very hot. Heating of the part during movement, and not during braking, indicates wear of the bearing or its incorrect adjustment.
The second option is typical for adjustable hubs. The adjusting nut must be tightened with a force of 2 kgf*m. If you tighten it further, the tapered bearings will be too tight.
Their rotation will be difficult. Prolonged operation of the machine in this condition leads to bearing failure and wheel jamming.
2. The adjusting nut is unscrewed while moving. Sometimes this happens literally after 20-50 kilometers. The phenomenon is observed in three cases: the master forgot to tighten the nut, there was a misalignment between the bearing races, or play appeared in the coupling of the CV joint with the hub.
How to choose a replacement part and bearing number
Video: “Replacement and installation using a press”
Video: “Removing and installing a unit with replacing parts”
Source
Adjusting the wheel bearing
To work, you will need an indicator and a torque wrench.
To prepare for adjusting the wheel bearing, you must perform the following operations:
- Secure the indicator by resting its leg on the hub near the adjusting nut.
- Place spanners on the studs and secure them with nuts.
- Rotate the hub and move it axially. (Screwed spanners are used as handles).
- Measure the amount of axial movement (clearance) of the hub, guided by the indicator readings.
- If the stroke exceeds 0.15 mm, adjust the play.
The adjustment is carried out as follows:
- Straighten the collar of the nut.
- Unscrew it with a spanner.
- Install a new nut and tighten with a force of 2 kgf*m.
- Loosen the nut and tighten again with a torque of 0.7 kgf*m.
- Loosen the tension by turning the key 20-25 degrees counterclockwise.
- Check hub play.
- Make sure that the indicator readings correspond to the norm (0.02-0.08 mm).
- Lock the nut by pressing its edge into the groove of the outer CV joint.
You can adjust the hub play without using a torque wrench. To do this you need:
- Tighten the nut tightly.
- Rotate the wheel a few turns.
- Check the play.
- If necessary, loosen or tighten the nut slightly.
- Continue until the free play of the hub is within 0.02-0.08 mm.
- Lock the nut collar.
Video instructions for adjusting the wheel bearing You can install non-adjustable IVECO bearings on the Chevy Niva. To do this, you need to buy the appropriate hubs or remake the old ones. For the rework you will need a jig boring machine. In addition to boring the mounting hole, you will have to make spacer rings. Drawings of parts are provided at the link.
Also interesting: Replacing the heater valve (heater valve) Niva VAZ 21213, 21214, 2131 lada 4×4
The design of the rear wheel mounting of the Chevrolet Niva is very different. However, they also use bearings that need periodic replacement. They are replaced either together with the axle shafts or separately. The second option is much cheaper, but requires good metalworking skills and a torch to heat the metal.
To work you will need:
- Jack, wheel wrench, chisel, hammer.
- Standard set of screwdrivers and wrenches.
- Axle puller.
- Gas (gasoline) burner or muffle furnace.
- Repair kit including bearing, oil seal and retaining ring.
- A pipe with a diameter of 40-45 mm, the length of which exceeds the size of the axle shaft.
Replacement of bearings is carried out as follows:
- Place the machine on a level surface.
- Place wheel chocks or bricks under the front wheels.
- Jack up the car.
- Remove the wheel.
- Place a support under the rear axle.
- Unscrew the brake drum mount.
- Dismantle the part.
- Unscrew the nuts holding the bearing.
- Load the rear axle by lowering it onto the stand.
- Pull out the axle shaft using a puller.
- Hang the brake mechanism on a wire.
- Knock down the retaining ring using a chisel, hammer and grinder.
- Crack the bearing races using a chisel.
- Remove rust and dirt from the seating surface.
- Put the new bearing in place.
- Heat the locking ring to 200-250 degrees (dark red color) and hammer it into the seat with a pipe
- Replace the oil seal.
Assembly is performed in the reverse order of disassembly. The bearing does not need adjustment.
A visual process of replacing a Niva Chevrolet axle bearing
- Hang up and unscrew the wheel;
- Using a chisel, knock the cap off the hub;
• Using pliers, remove the cotter pin located on the lower axis of the clamping lever;
• Carefully remove the axis of the clamping lever using a metalworker's drift and then remove it using pliers;
• Using a flat-head screwdriver, having previously removed the clamping lever and springs, remove the brake caliper from its seat and place it behind the steering knuckle in such a way as not to interfere with the further process (hang).
The steering knuckle is placed in a vice, then the seal (oil seal) is removed with a straight-slotted screwdriver.
Next, the ring with the separator as part of the inner ring is pulled out sequentially. The bearing components are removed from the inside in a similar manner.
Pay attention to the side of the outer bearing and remove the outer ring from there with a punch. The same manipulations are typical for the opposite outer ring.
Disassembly is complete. Parts are defective and then, if necessary, replaced with new ones, components are cleaned of old lubricant, and filled with a new compound. It is recommended to use Castrol LMX universal lubricant for bearing joints and spline assemblies. Assembly - in the reverse order using suitable pipe sections for pressing bearings, oil seals, etc.
Adjusting the bearings of the UAZ wheel hubs of the carriage layout, replacing the lubricant in the wheel hubs.
Wheel bearings should be periodically checked and adjusted if necessary. When the wheel hub bearings of UAZ-374195, UAZ-396295, UAZ-396255, UAZ-390995, UAZ-390945, UAZ-220695, UAZ-330395, UAZ-330365 are loosely tightened, impacts occur in them while driving, destroying the bearings, vibrations occur on the steering wheel, unevenly, in spots, tires wear out.
If the wheel is tightened too tightly, the wheel bearings become very hot, causing the lubricant to leak out and cause them to fail. In addition, large gaps in the front wheel hubs of UAZ wagon-mounted vehicles increase the brake pedal travel. The presence of clearance in the wheel hub bearings is checked by rocking the suspended wheels. Bearing adjustments should be carried out as carefully as possible.
The front wheel hub of UAZ car-type vehicles with front disc brakes.
Rear wheel hub of UAZ wagon-type vehicles with ABS anti-lock braking system.
Adjustment of wheel hub bearings for UAZ-374195, UAZ-396295, UAZ-396255, UAZ-390995, UAZ-390945, UAZ-220695, UAZ-330395, UAZ-330365.
Adjustment of wheel hub bearings on carriage-type vehicles UAZ-374195, UAZ-396295, UAZ-396255, UAZ-390995, UAZ-390945, UAZ-220695, UAZ-330395, UAZ-330365 is performed in the following sequence:
1. Hang the car or lift it with a jack from the side of the wheel whose hub bearings must be adjusted. 2. Remove the rear axle axle shaft or the hub flange at the front axle. 3. Unbend the lock washer, unscrew the lock nut and remove the lock washer. 4. Loosen the wheel bearing adjustment nut 1/6-1/3 of a turn, which is 1-2 edges.
5. Turn the wheel by hand and check that it rotates easily. The wheel should rotate freely without the brake pads touching the disc or drum. 6. Tighten the hub bearing adjustment nut using a wrench and a 300-350 mm long paddle with one hand until the wheel rotates tightly. When tightening the nut, press the wrench knob smoothly, without jerking, and turn the wheel to correctly position the rollers on the raceways of the hub bearing rings. 7. Loosen the hub bearing adjustment nut by 1/4-1/3 turn, which is 1.5-2 edges, install the lock washer, screw and tighten the lock nut.
The tightening torque of the locknut should be within 20-30 Nm (2.0-3.0 kgcm). When replacing the bearing, the tightening torque of the locknut should be within 30-40 Nm (3.0-4.0 kgcm). The lock washer is installed with an internal mustache in the groove of the trunnion. If there are even minor cracks on the lock washer whiskers, then the washer must be replaced.
8. Check the wheel bearing adjustment after tightening the locknut. When adjusted correctly, the wheel should rotate freely, without jamming, noticeable axial play or rolling. 9. Bend one shoulder of the lock washer onto the edge of the nut, and the second - onto the edge of the locknut until it is completely adjacent to the edges. Bend the lock washer tabs closest to the middle of the nut edges. 10. Install the rear axle axle shaft or install the front axle hub flange, clean the threaded part of the bolts from residual sealant, degrease and apply a new layer of sealant, tighten the bolts.
Finally, the correct adjustment of the wheel hub bearings is checked by observing the heating of the hubs after the vehicle is driven. If the hub gets very hot and your hand cannot tolerate the heat, then you need to loosen the hub bearing adjustment nut by 1/6 of a turn, which is 1 edge, following the sequence and rules outlined above. When checking the adjustment of wheel hub bearings for heating, you should not use the service brakes, since in this case the hubs may heat up from the discs and brake drums.
How to change the wheel bearing on a Chevrolet Niva with your own hands?
For repairs you will need:
- Powerful socket wrench 30.
- Puller for steering rod pin.
- A mandrel for pressing out a bearing or a piece of pipe of suitable diameter.
- A set of spanners or ratchet sockets.
- Balloon wrench.
- Hammer.
- Round nose pliers.
- Jack.
- Wheel chocks.
- Vise.
- Mount.
- Torque wrench.
- Boards or wooden block.
The replacement process is divided into five stages:
- Disconnecting the assembly (brake disc, hub and steering knuckle) from the CV joint strut.
- Pressing out old bearings.
- Installation of new parts.
- Assembling the unit and installing it in place.
- Tightening the adjusting nut.
Work is carried out on a level area. The presence of an inspection hole is not necessary.
To change bearings, you must perform the following steps:
- Place the car on the site and place wheel chocks under the rear wheels.
- Jack up the wheel.
- Unscrew the wheel rim mounting bolts.
- Build an improvised support under the side member from a wheel with boards or timber laid on it and lower the jack so that the car rests on it.
- Jack up the lower arm, compressing the suspension spring.
- Turn the steering wheel to the right or left (depending on the side from which the replacement is performed).
- Unscrew and remove the caliper, caliper and brake pads.
- Hang the caliper so that it does not put any weight on the brake hose.
- Turn the steering wheel in the opposite direction.
- Remove the ABS sensor.
- Unscrew and unscrew the tie rod nut.
- Remove the pin using a puller.
- Unscrew the hub nut.
- Remove the ball joint mounting bolts.
- Carefully remove the hub along with the steering knuckle, ball joints and brake disc.
- Remove the caliper protective screen.
- Remove the brake disc.
- Unscrew the steering arm.
- Clamp the steering knuckle in a vice.
- Remove the seals with a pry bar or a powerful screwdriver.
- Substituting the mandrel, knock out the outer races of the bearings.
- Wipe and clean the seat.
- Disassemble new bearings.
- Press the outer races into the hub using a mandrel or old parts.
- Apply lubricant, filling ⅔ of the space in the cage.
- Install the bearing race and inner race.
- Carefully press in the new oil seal.
- Repeat the installation operation for the bearing on the second side of the hub.
- Place the assembly on the CV joint splines.
- Tighten the hub nut.
- Screw on the ball joints and steering bipod.
- Install the protective cover and caliper bracket.
- Tighten the bolts securing the protective screen and lock.
- Put the caliper and brake pads in place.
- Jack up the car.
- Place and secure the wheel.
- Tighten the hub nut by tapping the wheel in the 6 and 12 o'clock directions.
Also interesting: Homemade ATV with an OKI engine - step-by-step assembly
Detailed video about replacing wheel bearings
Do you want to modify your Niva, but have a small budget? Then we’ll show you how to remake the front hubs on a Niva with your own hands. Required:
- double-row bearing from Moskvich 2141 (catalog number: 2141-3103020), or an analogue from Craft (article: CR4172370);
- two retaining rings from the same vehicle (part number 366553-15).
We take the drawings and seek the services of a turner. The master must bore the hub to fit new bearings, grind the steering knuckles and make parts according to the diagram. By the way, some Niva 4x4 owners also use an AUDI 74x40x74 wheel bearing, in this case only the steering knuckles are ground.
After the parts are manufactured, all that remains is to press in the double-row bearing and reassemble the already non-adjustable hubs. At the end of the work, tighten the hub nut with a large torque “from the heart”. Their adjustment is no longer required, you can forget about the hum and howl while driving!
Have you ever encountered a similar modification to the Niva hub? Leave recommendations and reviews about your options for upgrading the VAZ 2121, 2131. Let us remind you that the domestic SUV has other shortcomings, which are also eliminated by modifications. You can also find information about the car you are interested in by its content.
Key words: 4x4 front suspension
Found an error? Select it and press Ctrl Enter..
- What could Lada Largus be like after restyling?
- How much does it cost to repair a Jatco CVT?
- Official photos of the updated Lada 4×4 2022
- Modification of seats (height adjustment) of Lada cars
Bearing selection by manufacturer
Experienced car mechanics know that it is better to choose a bearing that is completely identical to what was before. It would be good if it was an item with the original box and logo. Such parts often correspond to their counterparts that were originally supplied to the assembly line. The price of the bearing is not always affordable, because they are produced in a limited batch for a batch of cars.
But there are other bearing models whose characteristics are in no way inferior to the original ones. And the cost of non-original bearings is lower only due to the use of a different brand. Here are just a few bearing suppliers that have become popular in today's automotive market.
- SNR – French company;
- SKF is one of the largest manufacturers in the world;
- FAG is a German manufacturer, one of the largest companies;
- NSK - from Japan;
- NTN is another representative of the Land of the Rising Sun.
Manufacturers from Japan often deliver their parts directly to the assembly line. That’s why practically nothing is known about them on the regular spare parts market.
You can ignore the country of origin in the case of the companies mentioned above. It often lists one of the many offices and branches around the world
If a bearing manufacturer is allowed onto the assembly line, this is already confirmation that a strict selection process has been passed in the first stages. This means that the quality system meets the stringent requirements for manufacturers and their parts.
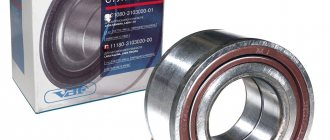
The most common and popular part numbers of Chevrolet Niva bearings
- The part number of the front wheel bearing is 2007108 (catalog number: 2121-3103020-10, foreign equivalent: 32008);
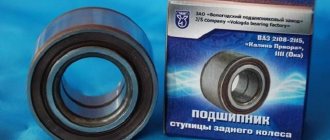
- The part number of the rear wheel bearing is 2403080 (catalog number: 6-180508AK2US9, foreign equivalent: 62208.2RS);
- Clutch release bearing number - 21230160118000;
- The part number of the gearbox input shaft bearing is 50706 (foreign equivalent: 750706);
- The generator bearing part number is 180201
(foreign equivalent:
6201-2RS
).
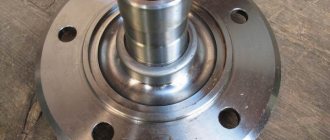
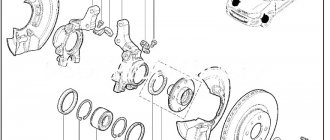
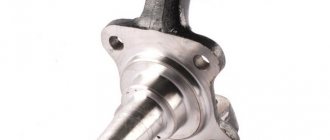
Removing the hub
To do this, dismantle the conical bushing.
Unlocking the nuts is done by gently tapping them through a chisel.
After which, using a size 19 wrench, the rear and front clamps of the lever to the knuckle are unscrewed sequentially,
not forgetting to get rid of the locking plate.
Then, using the keys “17” and “10”, as well as a flat screwdriver, the brake circuit hoses are removed from the steering knuckle.
Also interesting: Transfer case Niva 2121: principle of operation, repair
Having placed the stop under the lever from below, use two “13” keys to unscrew the nut located on the bolt that secures the ball mount to the upper lever. Unscrew 2 more nuts in the same way. And take the knot to the side.
The lower ball joint is also dismantled.
When the part is freed from the fastenings, holding the steering knuckle with both hands together with the hub, brake disc, upper and lower ball joints, it is removed.
When separating parts, it may be necessary to clamp the steering knuckle in a vice, after which the hub is knocked out without extra effort.
Next, the bolts securing the steering knuckle to the lever are removed.
The brake disc is knocked out by screwing the nuts onto the stud, followed by concentrated blows to the resulting structure.
The result of the work at this stage: the brake system disc and hub are separated from each other.
They hook up the ring that protects against dirt, after which, using a “10” key, remove the casing that protects the steering knuckle.
Replacing the oil seal on the drive gear drive, main steps
- it is necessary to unscrew the bolts holding the flange, remove the driveshaft from the gearbox
- disconnect the hinge housing from the drive.
- you need to connect a dynamometer and determine at what point the rotation begins. To do this, rotate the flange mount until the gears begin to move.
- bolts are screwed into adjacent holes
- Between the bolts there is a lifting bar, with the help of which the flange is kept from turning.
- then you can remove the flange along with the washer using a universal puller.
- The axle gear oil seal was replaced with a new original spare part. The sealing ring must be lubricated with grease or lithol.
- After this, you need to press on the ring using a pipe of the appropriate diameter.
- The flange fits onto the spline connection.
- The driveshaft is installed in place.
Adjustment
Having restored the structure until the calipers with pads are returned to their place, a dial indicator clamp is placed on the steering knuckle. The indicator is positioned so that its leg rests against the adjusting nut.
Having built a lever on studs, the mechanism smoothly rotates around its axis.
If the permissible gap exceeds 0.15 mm, the adjusting nut is replaced with a new one. By successively changing the degree of twisting, the clearance in the bearings is measured. At the end of the work, the nut is locked.
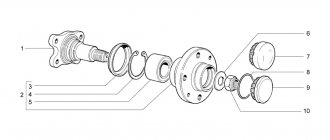
Installing new bearings in the steering knuckle
If there is no hydraulic press or puller, replace it using a hammer and a mandrel (or using an old ring). This option is not recommended, but is demonstrated in the video for your reference.
Video: “Method of replacing a wheel bearing without a press”
The procedure for adjusting the bearing clearance:
Video: “Adjusting wheel bearings”
Video: “Diagnostics of the gap in the hub assembly”
Is there an alternative to permanent repairs?
It must be admitted, but the wheel-bearing unit of the Niva 4x4, being one of the most loaded in the car, has never learned to be reliable. Whether the culprit is bad components or design errors is not easy to figure out. However, the experience of the owners suggests using alternative options, for example, replacing the “stock” with double-row bearings (IVECO, Moskvich, etc.).
- The unit does not require adjustment or lubrication - all settings are made from the factory.
- There is no possibility of rotation;
- Wear of seats is minimal;
- Has an extended service life.
The difficulty of implementation lies in the need to bore the hub for a double-row bearing, as well as the relatively high cost of the components. But there will most likely be no short-term attempts to change the wheel bearing again.
Read news about the new Niva
- All about non-adjustable hubs and double-row bearings for Niva 4x4 » Lada.Online
- How to remove a wheel bearing in a field. Replacing and adjusting the front wheel bearing Niva.
- Niva Chevrolet front hub repair
- How to remove a wheel bearing in a field. Replacing and adjusting the front wheel bearing Niva.
- Chevrolet Niva bolt pattern: diameter of the holes in the Chevy Niva, what is the bolt pattern of wheels and rims in the Chevrolet Niva, radius 15 and 16
- Chevrolet Niva hubs: front bearing, advantages of non-adjustable Iveko
- Non-adjustable wheel bearings for the field
- How to make reinforced hubs for Niva
Why is replacement necessary?
There are some signs indicating that the front wheel bearing on the Niva needs to be replaced. The very first sign is a strange sound, different from normal when moving on the road.
If it appears, you should pay attention to the following points:
- Wheel overheating.
- The front wheels send vibrations through the steering wheel and body.
- When driving at high speed, the car pulls to the sides.
- It is difficult for the driver to control the steering wheel when driving off-road.
- When you turn the steering wheel, you can hear the crunching of the wheels (even with the engine off).
Even the presence of one sign may indicate that the front hub of the Niva 2121 requires replacement. A damaged bearing will cause the suspension ball joint to fail and the axle shaft to break. This can cause the car to roll over when driving fast.
Most Niva 2121 bearings fail at 100,000 km. mileage, even with declared wear resistance. This is due to the poor condition of the roads and the constant use of the vehicle in difficult conditions. In addition to natural causes of failure, improper installation of the bearing, insufficient lubrication and excessive tension can affect it.
Car "Niva"
The presence under the cylinder boots of a small amount of crimson-colored lubricant, very expensive and specially developed for VAZ, is one of the signs of originality. After installing the camshafts from Iveco, be sure to check the heating above the described points of the hub assembly. If the hub nut and the cylindrical part of the knuckle are even a little colder than the brake disc, solve the problems of your brake system as described above. All these problems can be easily solved without removing the Iveco hub assembly from the suspension - just remove the wheel.
The installation instructions contain additional information with photos on these issues. After the starting test runs, be sure to check the tightening torque of the hub nut kg after a run of 1.5 tkm.
Remove the caliper and leave it hanging on the brake hose, put a thick, flat layer of hard rubber in it, like a hockey puck, start the car and operate the brake pedal very many times. Along with the rubber, flat objects of different thicknesses can be laid to perform running-in at different degrees of cylinder extension.
Like any part, they wear out, which leads to breakdowns. Having tried to fundamentally solve this problem, manufacturers of various brands of cars are installing non-adjustable wheel bearings.
Wheel hub for Niva and Niva CHEVROLET with IVECO bearing
Non-adjustable hubs for Niva Any car has weak points. In this case, these are the front hubs, which previously required periodic adjustment for normal operation, which, of course, could not but affect the reviews of car owners.
REINFORCED NON-ADJUSTABLE HUB FOR NIVA (LADA 4X4) AND CHEVROLET NIVA
That is why the designers created a non-adjustable hub for the Chevrolet Niva in order to avoid unnecessary fuss in terms of repairing the car. In general, independent adjustment of bearings is almost impossible, due to the very complex design. Also, do not tighten the bearings all the way. And, besides this, there is a whole bunch of difficulties that are difficult to solve without the intervention of experts.
It was precisely in order to make life easier for motorists that non-adjustable hubs were installed on the Niva. Check the condition of the rubber bushings of the anti-roll bar and the reliability of fastening the stabilizer brackets to the lower arms. In this case, the tires wear out unevenly, and the service life of the bearings themselves is sharply reduced.
The complete absence of clearance, at which tight rotation of the hub is observed, also leads to a decrease in service life.
Place the car on supports. If there is no indicator, swing the hanging wheel in a vertical plane. If you feel any play, the bearing clearance may need to be adjusted.
To make a final check of the bearing, have an assistant press and hold the brake pedal. Rock the wheel again in a vertical plane. The disappearance of wheel play during such a check confirms the need to adjust the clearance in the bearings.
In order to connect the wheel to the shaft, a hub is installed in the vehicle structure. While driving, this wheel assembly is most subject to loads and wear. Over time, the backlash increases and axial vibration of the wheel appears. The reason for this may be the Niva Chevrolet wheel bearing and this problem can be solved simply by tightening the wheel nut. But any part does not last forever, so over time, tightening may not help and the wheel will stop rotating and a complete replacement will be required.
Necessary tool
Before you start work, you need to prepare all the tools and assemble them in one place:
- Special puller for bearing removal.
- Collar.
- Head at "30".
- Keys or sockets for “17” and “19”.
- Mandrel for knocking out the hub.
- New wheel bearings.
The tool is assembled and ready to use
Preparatory work
Make sure that the workplace is well lit, and it is best if it is on a viewing hole or a lift. Because this is the only way to talk about high convenience when carrying out such work. It would also be a good idea to familiarize yourself with the detailed diagram of the location of the bearing on the front hub of the VAZ-2112.
Thanks to this illustration, the diagram becomes very clear.
Step-by-step work order
First of all, we place the car in a stationary state, put on the handbrake, and, if desired, install wheel chocks. And while the car is on the surface, we tear off all the bolts on the front wheels.
We unscrew the torn bolts and put them aside. We remove the wheel.
Next, we need to use a “30” wrench to unscrew the hub nut
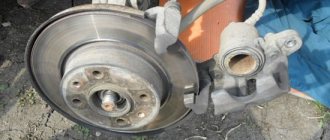
Please note that during its dismantling, you will have to press the brake pedal, and for this we will need an assistant. Then, using a screwdriver, press out the calipers. When this operation is completed, having the key at “17” at hand, unscrew the calipers from the steering knuckles.
Then, using a screwdriver, press out the calipers. When this operation is completed, having the key at hand at “17”, unscrew the calipers from the steering knuckles.
- Carefully unscrew the brake disc from the hub.
- Then, making gentle blows, we release the hub.
- And then the CV joint from the bearing.
Replacing the wheel bearing
Then, when access to the hub bearing is completely open, there are several ways to replace it.
First way
In this case, it is necessary to have a special puller to remove the bearing.
- First you need to take care of removing the stopper.
- Using this device, you simply remove the old bearing and install a new one in its place.
- After this, we carry out the entire assembly process in the same order as removal.
- The advantages of this method include the fact that during this work there is no need to touch the wheel alignment bolt, therefore, you will not have to add additional work.
- The disadvantages of this method include inconvenience during the process. Because you have to contrive and take an extremely uncomfortable position.
Second way
To carry out this work, it is necessary to carefully dismantle the steering knuckle and completely remove the hub.
- Moving to the workbench, we replace the wheel bearing.
- To do this, dismantle the retaining ring and knock the bearing out of its seat, or press it out.
- Next, we perform the installation in reverse order, having previously cleaned the surface of the hub.
Advice! Before you begin removing the alignment bolts, mark their position with a marker or chalk. In this case, the marks should indicate the current position of the bolt on the rack and the previous location of the knuckles. Thanks to such marks, during assembly it will be much easier to navigate the position of these bolts. Although it will not be possible to return to the previous state, it will still be possible to minimize it.
Putting marks
- We put marks.
- We knock out all the bolts from the fist.
- Remove the mounting bolts on the lower ball joint.
- This will knock the bearing out of the hub.
- Remove the retaining rings.
- Press out the bearing.
- We mount a new bearing, having previously cleaned the space of the hub and generously coated its surface.
This repair method will be very effective when not only the wheel bearing is subject to repair, but also most of the VAZ-2112 chassis. Such elements include the replacement of steering tips, silent blocks of levers and ball joints.
Third way
To perform work using this method, it is necessary to remove the entire rack completely.
The stand has been dismantled.
- Next, using a vice, we replace the wheel bearing.
- Because this is how the replacement will happen quickly and efficiently.
After dismantling the bearings, we install everything in the reverse order, assemble the rack and mount it on the car.
Do we make the puller ourselves or buy it?
If you do not want to knock out the bearing, you can purchase a special puller in stores, since the entire process of working with such a device becomes easier and the time required for work is reduced. This also applies to bearing installation work.
Hand-made hub puller