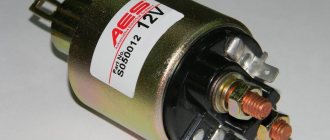
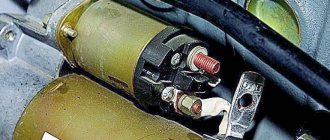
The starter solenoid relay supplies current to the starter motor and also pushes out the bendix. This means that the moment the starter starts to rotate, its bendix is pushed out. In fact, understanding the operation of the starter is not difficult. Today we will help you understand how the solenoid relay works, how to check this element and repair it.
Solenoid relay design and operating principle
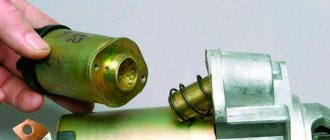
In the starter, the solenoid relay engages the flywheel crown with the bendix. All work is based on the principles of electromagnetism. The core, which is made as a hollow tube, inside which the armature is located, is equipped with a wire winding. The current in the coil creates an electromagnetic field, as a result of which the armature enters the core. After the current stops flowing, the armature can move freely.
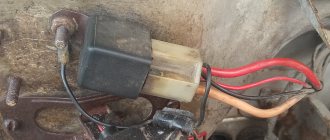
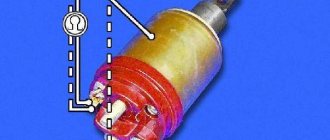
The starter retractor relay includes: housing; magnet with windings; anchor; contacts; return spring. The magnet in the relay is made in the form of a pair of coils - retracting and holding. The relay retractor coil is connected to the electric motor and the control terminal, but the holding coil is connected to the control terminal and is in contact with the housing. When power is applied to the control contact, magnetic induction occurs in the coil, which leads to the appearance of a magnetic field. As a result, the armature compresses the return spring. At the same moment, the bendix rotates, which connects the starter to the car battery. At the time when the contacts close, the retractor winding receives power from the “+” terminal, the production of current in the coil stops, but the armature is affected by the field of the holding coil, so it remains inside. When the vehicle's power unit starts, the power is cut off, causing the armature to return to its original position under the action of the return spring. The contacts open, which can cause the bendix to disengage.
Common solenoid relay failures
The main reasons for failure of the starter solenoid relay are as follows: Physical wear. Burnout of contact plates. Destruction of components. Winding combustion. How to determine that the solenoid relay has failed:
The engine starts, but the starter does not want to turn off, constantly rotating. At this time you hear a characteristic buzzing sound. The starter rotates after starting, but cannot start the engine. When the key in the ignition switch is turned to its original position, the starter click is heard, but it does not want to rotate. How to check the starter solenoid relay As mentioned above, the operation of the solenoid relay, as well as the starter itself, is based on the principle of electromagnetism. When voltage is applied to the windings, the relay acts on the armature. This, in turn, changes the position of the Bendix gear so that it engages with the flywheel ring. At the same time, the contacts close, providing voltage to the starter windings. In order for the car engine to start, all this must happen very quickly. The article was published in the Machines public page. If at least one of the elements does not work correctly, you will not be able to start the car. To check the starter relay, you do not need to remove this element from the car. Experts advise closing the contact bolts located on the back of the relay using a piece of wire or metal. As a result of this, you will ensure the supply of current to the starter windings. If this caused the starter to rotate, you can conclude that the starter is working normally, and the problem lies in the relay itself. If the retractor clicks and the starter does not turn, this indicates that the relay is probably working, and the cause of the breakdown must be looked for directly in the starter.
Repair of starter retractor relay
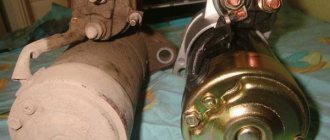
If you have come to the conclusion that the starter traction relay has failed, you need to repair it. We would like to note right away that in most cases it is much easier to replace this element than to restore its functionality. Many manufacturers produce non-separable relays in order to make this unit the most reliable. In such situations, you will simply have to replace the solenoid relay with a new one. If the starter in your car is equipped with a detachable relay, you can repair it yourself. Often the relay does not work for the following reasons: the mechanical drive has worn out and failed; a short circuit has occurred in the winding; “nickels” or contacts were burnt. Each of the above faults can be determined after disassembly. vk.com/cars.best True, to determine the integrity of the windings you will have to use an ohmmeter. When measuring the resistance between the ends of the wire and the body, this indicator should be at least 10 kOhm. Otherwise, the windings have shorted, so you will need to go to the store for a new relay.
Installation of a new or restored relay is carried out in the reverse order of dismantling. Many car enthusiasts at this stage have a problem, which is how to connect the starter relay. In order to avoid such troubles, we recommend that you first mark the disconnected terminals. Before installing the relay, be sure to thoroughly clean the contacts and degrease them.
Possible starter problems:
If you are trying to start the car, but there are no sounds, make sure that the battery is not discharged (check with a device, the voltage should be at least 12 V), and also check that there is good contact between the wires on the battery. Sometimes the wire landing spots become oxidized. If you see traces of oxidation, then clean the terminals and contacts on the battery. Use fine sandpaper or a knife to clean.
If you start the car, but again the engine does not start, but you hear clicks from the traction relay (the battery is well charged), then there are two options - a malfunction of the relay contacts, or a malfunction of the starter motor.
If you are trying to start the car and you cannot hear the clicks of the traction relay, then most likely there is a malfunction in the traction relay, or a break in the wiring.
If you hear that the starter is spinning, but very slowly, then again check the voltage that the battery produces. This can be done using the device. The voltage should not be less than 12 V.
And finally, if you are sure that the battery is charged and there are no problems with the wiring, then remove the starter along with the traction relay for a more detailed check.
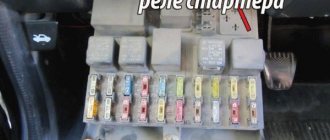
What tool is needed to check the VAZ 2110 starter? It’s quite simple, you will need a flat-head screwdriver and high-voltage wires with alligator clips (popularly called “lighting” wires).
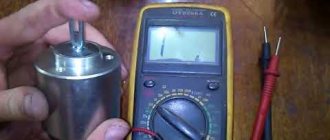
Diagnostics without removing the starter using a multimeter
To do this, use a multimeter (tester) to first sequentially measure the voltage at the terminals of the battery, disconnected from the vehicle’s on-board network. It is approximately 12.7 V. If the device readings are less than 12 V, the battery is considered to be severely discharged and is not suitable for further testing.
Next, restore the normal connection of the wires and measure the voltage at the battery terminals and relay contacts. Compared to the previous case, it changes by no more than 0.1 V and will be equal at both control points. Turn the key to the start position. The voltage at the relay contacts should not fall below 12 V. Otherwise, the connecting wires are most likely faulty; it is possible that one or more contacts in the current flow circuit have burnt out.
How to check the VAZ 2110 starter:
The first step is to check that the freewheel moves easily along the shaft. This can be checked using a screwdriver.
If it moves freely, then the next step is to check the gear movement. We also try to turn it using a screwdriver. The gear should rotate easily relative to the clutch hub in the direction of rotation of the armature. The gear should never turn in the opposite direction.
To check the functionality of the retractor (traction relay), you need to perform the following steps:
We take high-voltage wires with crocodiles. We connect one of the wires like this: one end to the negative of the battery, the other end to the starter housing. The second wire is connected at one end to the plus on the battery, and at the other end to the terminal of the control wire of the retractor. When connected in this way, a click will occur and the drive coupling will slide out. If this happens, then everything is fine with the retractor. If not, replace the solenoid relay.
Now let's check the operation of the starter motor. To do this, do not touch all the wires that were connected in the paragraph above. The only thing that needs to be changed is to remove the high-voltage wire from the control input of the traction relay and connect it to the lower contact bolt of the traction relay. With this connection, the starter armature will spin at a speed of 5000 rpm. If this does not happen, then the problem lies in the starter motor. Therefore, it needs to be repaired or replaced.
Verification Guide
The device can be checked without removing it from the car. Removal is carried out in case of serious damage. No special knowledge is required for diagnosis. The device is checked in several stages. The most important thing is to test with thick wires; it won’t work on thin ones.
Stages
Checking the starter assembly. To do this, you need to remove the device from the car and clamp it in a vice, securely, but not too tightly, so as not to break it. Then you need to close the contact bolts located on the back side using a metal object or a piece of wire. If the starter is working, it will start spinning. In this case, the cause of the malfunction may be in the traction relay.
Checking the operation of the traction relay. To do this you need to use wires with low resistance. One wire needs to connect the positive terminal on the battery and the relay to ground, and the second wire must connect the negative terminal on the battery and the starter housing. If the relay is working properly, a characteristic click will sound and the armature will push out the gear (video author - altevaa TV)
The tester should measure the resistance between the rotor housing and the windings; it should be several million Ohms. If the insulation resistance is from 0 to 2 ohms, the armature is faulty and requires replacement. Checking the inter-turn short circuit is done using a special stand for testing generators.
Checking the device on the stand
Checking the brushes is done using a 12 V light bulb, which is connected to the brush holder and the body of the device. A glowing light indicates a brush malfunction. In this case, they need to be replaced. The winding is also checked with a light bulb, only the winding and the housing are connected.
Call the electrical network. Using a tester, you can ring an electrical circuit to find breaks. To ring the electrical network, you must turn on the ignition.
Checking the Bendix. To check, you will need a soft gasket to protect the part from damage. The Bendix sprocket must be clamped in a vice and the clutch turned in one direction and the other. If the part is working properly, the coupling will only turn in one direction. If it turns in the other direction, this indicates that it is faulty and needs to be replaced. The teeth may be worn out, then the bendix just needs to be replaced.
Gouges in Bendix teeth
A visual inspection can reveal the following faults:
- winding breaks;
- insulation violation;
- wear of the collector plates;
- surface defects of the commutator and armature in the form of burrs, scratches, grooves, etc.
Small defects can be eliminated by sanding with fine-grained sandpaper. If as a result of these actions the anchor has decreased in diameter, spacers are installed. The same applies to the collector. If the parts are very worn, it is better to replace them. Replacement is required if the interturn insulation is faulty, brushes and bearings are worn out.
By learning to check the device that starts the engine with your own hands, you can save on visiting a service station.
If you don’t know how to check the starter without removing it from the car, diagnostics can be done at service stations that are equipped with a special stand for diagnosing generators.
Sorry, there are no surveys available at this time.
How to check the starter retractor relay of a VAZ 2110
Problems with starting the car, strange sounds or a “buzzing” sound after turning the key in the ignition switch are symptoms characteristic of a breakdown of the starter retractor relay. Failure does not always appear immediately. The device works normally for some time without showing any signs of malfunction. But at a certain moment everything changes, and the engine refuses to start.
In such a situation, the best way is to replace the solenoid relay. The question is how to do this on VAZ-2110 cars (watch the video on how to check and how to replace the solenoid relay below). The malfunction can manifest itself in different ways, namely: the absence of any action when trying to start the engine, the appearance of relay clicks, the inactivity of the starter, and so on.
Whatever the symptom, replacing the starter relay on a VAZ-2110 is not as difficult as it seems. At the same time, you don’t need to spend money on a service station - you can do all the work yourself, with your own hands.
What you need to know about the solenoid relay
The electric starter motor of the domestic “ten” is turned on remotely, through the clutch of the flywheel and the bendix. This is possible thanks to the action of the starter solenoid relay, consisting of the following components:
- Two coils. One of them is retracting (connected to the control element), and the second is holding (connected to the control terminal).
- Three systems (magnetic, contact and returning).
- Pipes with anchor. The device consists of a core containing a copper winding. The ends of the wire are brought out to the terminal block. One of the wires is connected to the electric motor and the control contact, and the second is connected to the control terminal and the housing.
This is interesting: How to get a medical certificate for a driver's license in 1 hour?
The best solution, if a malfunction is detected, is to replace the starter relay. The main thing here is to carefully approach the diagnosis and make sure that the reason is in the starter. This is logical, because starting problems are often associated with other troubles - discharge of the car battery, damage to the integrity of the wires, the appearance of scale, deterioration in the quality of contact connections, and so on.
How to check the starter
To verify whether the starter is working or not, you will need a battery and a pair of wires. The first step is to dismantle the starter, then take the first wire and connect it to the “plus” of the power source and one of the outputs of the solenoid relay. Attach the second wire to the negative terminal and connect it to the starter ground. The presence of a click indicates that the Bendix is working properly.
Pay attention to the nature of the sound. Ideally, the click should be quick and sharp. If it is tight and sluggish, we can confidently say that the mechanism is faulty.
Video: Checking the solenoid relay and starter contacts
If the video does not show, please refresh the page or » style=»color:#CC3333″>click here
If the checks show a breakdown of the starter, go to the store to select and purchase a suitable spare part. If the device has a non-separable body, replacing the solenoid relay will be sufficient. In a situation where a collapsible starter is installed on the machine, proceed as follows:
- Remove the screws that secure the relay housing cover. In some cases, use a soldering iron to disconnect the winding wires (if they do not allow you to remove the cover).
- Check the condition of the power contacts. Often they are the cause of the malfunction. The best solution is to establish a new contact group. In a situation where the damage to the contact is minor, treat the surface with fine-grain sandpaper.
- Assemble the product using the reverse algorithm.
How to choose a new solenoid relay
Please note that the retractor relay is located in the engine compartment and is mounted directly on the starter. Once you have found the device, all that remains is to change it. To eliminate mistakes when replacing the starter relay, remove the old assembly and take it with you to the store. This way you eliminate the risk of buying the wrong part. In addition, manufacturers put special markings on the solenoid relays, which simplifies the choice.
The part is fixed using 3 screws. To avoid complications in the future, buy four copper nuts and washers. The advantages of such products are resistance to burning, which simplifies subsequent twisting.
How to change the solenoid relay
To replace the solenoid relay on the “ten”, prepare a tool and do a number of preparatory measures.
To begin with, discard the mass (“minus”) of the car using the key to “ten”. After removing the contact, find the starter, which is mounted in the lower part of the engine compartment (in the space between the cooling system and the engine block). Next, proceed like this:
- Connect a couple of wires to the solenoid relay, then discard the red wire (coming from the male connector).
- At the back of the relay, tighten a couple of nuts using a thirteen wrench.
- Take a flathead screwdriver and use it to push the cord away from the front of the fastener.
- Release the relay and then move it to the side.
When doing this work, make sure that the core remains inside and the relay spring does not fall out. This moment, in the process of replacing the solenoid relay, causes the greatest difficulty for car owners. To install a new part, perform the same steps, but using the reverse algorithm. Please note that the old core remains in place, so the new relay is installed without it, but with a new spring.
- Now take a flathead screwdriver and screw the wires into the front of the relay.
- Next, connect to the wires and screw in the nuts using a “thirteen” wrench.
- At the final stage, tighten the nuts that secure the power wire and are connected to the male connector.
As you can see, replacing the starter relay is not difficult even for a beginner. To successfully complete the work, little is required - a tool, time and strict adherence to instructions. If difficulties arise, you can always use photo or video materials.
Video: Replacing the starter solenoid relay
If the video does not show, please refresh the page or » style=»color:#CC3333″>click here
List of reasons
This is mainly a consequence of the following breakdowns:
- nuts are not securely fastened. It is possible that they were completely unwinding. To eliminate it, you just need to strengthen the fasteners by tightening the nuts;
- connection points, wires have undergone oxidation. If this is minor, then such places simply need to be cleaned. If the process is significant, a complete replacement is required;
- there is a break in the power supply. This must be eliminated by replacing the wires;
- If the device responds too slowly, it needs to be replaced.
In order to check the winding turns, you must use an ohmmeter.
When checking the solenoid relay, the following algorithm is used:
- First, you need to provide access to the starter. It is located next to the gearbox and is located slightly lower than the battery.
- The voltage needs to be checked. It should not be higher than 8 V.
- The moment of operation is accompanied by a certain temperature. If it is above 25 degrees, then you cannot expect effective operation from the device.
Some deficiencies can be detected directly by visual inspection. Once detected, they must be eliminated.
Dismantling steps:
- First, the battery wire with the minus sign is disconnected;
- then the air filter must be removed;
- All wires are disconnected from the solenoid relay;
- the tip of the power cable is disconnected. To do this, you need to unscrew the nut using wrench No. 13;
- the nuts that serve to fix the trigger device are unscrewed. For this, wrench No. 15 is used. But it should be said that this nut is not so easy to get to;
- then the starter must be removed;
- wiring is disconnected;
- the relay is dismantled using key No. 8.
If someone has a desire to repair the relay, then from a theoretical point of view this is quite possible. But there is no economic feasibility. The part is very inexpensive and it is easier to simply replace it. Moreover, there is currently no shortage of spare parts. In any case, the new element will work much longer than the repaired part.
We can only hope that those who read this article have acquired new knowledge and now know where the starter relay is located on a VAZ 2110.
How to test the starter relay
The starter relay is an important part responsible for turning on the car engine, synchronizing the operation of all parts and distributing electricity. It is not difficult to check its functionality, but it requires following all the instructions.
When starting a car engine, not every driver thinks about where this difficult process begins. The starter relay plays an important role in this chain, and its breakdown often stops the car. The replacement process is not as complicated as it seems at first glance, but for this we will consider the components, the principle of operation and the repair process itself.
Concept and principle of operation of the starter relay
A starter solenoid or traction relay is a necessary attribute of every car. It works in conjunction with the engine starter and performs an important function. In addition to the starter relay, the engine starting mechanism contains a gear and a flywheel. It is through the starter relay that the gear and flywheel are engaged and disengaged at the moment of starting. This is necessary to ensure that the starter itself works correctly and lasts a long time.
The starter solenoid relay consists of such main components as a relay body, an armature, a spring, windings with an electromagnet and a pair of contacts.
The principle of operation of the starter relay is that when the ignition key is turned on, a magnetic field is formed, which moves the armature into the housing. Then the magnetic field ceases to act, but the coil creates its own field, which does not allow the armature to return to its original position. Then the bendix gear moves along with the armature, and finally it engages with the flywheel.
After this, the contact pairs close, resulting in the formation of a current that begins to rotate the rotor together with the flywheel. In order to unhook the gear together with the armature, the starter relay comes into action. With its help, the magnetic field is turned off, and thus the armature and the gear return to their original position.
How it works
The design of the “ten” starter is such that inside it there is a retractor relay, which is responsible for the rotation of the drive gears. When the gears engage the teeth of the crankshaft flywheel, starting occurs. Therefore, if the retractor does not work, then you will not be able to start the engine.
Plus, when the contacts on the traction winding are closed, the starter motor is supplied with power from the battery. The contacts are washed out, the blocking is activated, due to which the retractor winding is “cut out”.
The retractor is controlled directly from the ignition switch. Plus it plays the role of starter protection. The fact that the relay will require an impressive amount of current leads to gradual wear of the contacts in the contact group.
This can be noticed by the unclear start of the power unit; periodically the starter may not operate or may rotate the engine slowly. You can solve this problem on your own.
Basic starter relay faults
Like any other part, the starter relay may experience technical problems with its operation. They may appear as follows. The most obvious cause of the malfunction is that the starter simply does not engage and thus the engine does not start. The opposite problem is that the starter does not stop working after the engine starts.
This also indicates a problem in the mechanism. Also, often the starter does not have enough revolutions to spin the flywheel and thus turn it on. Another cause for concern is the absence of a click when the ignition key is activated, which signals that the armature has been pulled into the housing and the gear is engaged with the flywheel. If it is not there, then the mechanism did not work. However, there are times when the click is triggered, but the starter device still does not work. The problem most likely lies in burnout of contact pairs.
There can be many reasons for the above problems. First of all, obvious wear of parts that prevent the starter from working correctly may catch your eye. In this case, the solution to the problem is to replace parts. Contact pairs or windings may also burn out, as mentioned above. To troubleshoot, as in the first case, a complete replacement of parts is necessary. In addition, the anchor may move into the hull with some delay and difficulty.
What could indicate a malfunction?
Various “symptoms” can signal a problem.
If the winding wears out, it may simply burn out. At the same time, at the moment when the car is started, the driver will hear clicks. Despite this, the car still does not want to start. In addition, a breakdown may indicate the following symptoms:
- The driver does not hear the usual click.
- No contact.
- When you turn the ignition switch for the first time, the car does not want to start.
- The car starts running unintentionally.
How to test the starter relay
First of all, the problem with the engine not working may be due to damaged wiring. Therefore, the check should begin with it. If it is in perfect working order, you should check the starter relay. There is a high probability that it simply does not work.
If a click is heard, but the engine does not start, you should check the functionality of the contact pairs. To do this, use a screwdriver to remove the terminal and connect it to the starter terminal. In this case, current must flow and if the motor fires, then the contact pairs are not damaged, and the problem lies in other parts.
A complete check of the starter relay also includes a voltage check, since a lack of energy causes the flywheel to not rotate sufficiently, and thus the engine cannot be started. In this case, you will need a special multimeter. One probe must be connected to the positive terminal, and the other to ground. Then you should turn the ignition key and look at the multimeter readings. If they are below the available standard, it means there is not enough voltage to start the engine.
All these procedures can be carried out without removing the starter from the car, which makes the work easier. However, if a complete inspection of the relay with its removal is required, you should remember the safety rules. The torque is quite strong, so it is best to place the device on the ground at a safe distance. Parts must also be disassembled with caution, as incorrect inspection can cause serious injury.
How to replace the starter relay
You can replace the starter solenoid relay yourself, strictly following all the instructions. When working to replace parts or replace the starter relay itself, you should clean them of dirt, as they can impair further operation and lead to a short circuit. Replacing the starter relay begins with removing it from the vehicle. This procedure is quite difficult.
To do this, we place the car in a cautious pit. We begin the replacement procedure by disconnecting all wiring by unscrewing the nuts for safety reasons. Then the upper and lower bolts are unscrewed, with the help of which the starter and relay are attached.
Next, install the new device. This should be done in strict reverse order. Finally, you should connect the wiring and then check the functionality of the entire device.
Device Features
Before you think about how to disassemble the starter solenoid relay, you need to become familiar with the operating principle of this system. To begin with, it is worth understanding that the device runs on battery power. On the other hand, the device is capable of creating a parallel magnetic field, which affects the armature. The return spring is then compressed, which drives the bendix. At the end it connects to the splines that are on the flywheel.
The principle of operation of the element is based on the subsequent closure of the corresponding contacts. At the same time, due to the action of the magnetic field, the armature of the coil is constantly located inside.
When the engine is started, access to power is limited. At the same time, the spring begins to return to its original position, and the bendix disengages. If you are interested in more detail about the operation of the starter solenoid relay, the video on our page will help you figure it all out.
Car starter relay repair cost
You can do all the work of checking and replacing the starter relay at any car service center. This procedure will be more reliable, since it will be performed by qualified specialists. The cost of this service starts from $10 and above. The cost of the starter relay part itself ranges from $10 to $25, depending on the car model and the quality of the mechanism. If you take a foreign car, the price may be higher than $50.
This is interesting: What to do if the traffic police inspector is wrong?
Video of replacing the VAZ starter relay:
Operating principle of the starter solenoid relay, check, connection diagram
Any movement of a car begins with starting the engine. That is why for the entire system to function properly, it is necessary that the device that starts the engine is in perfect order.
If you believe the statistics, then most often the starter solenoid relay fails in the starting system. However, most drivers know about this. Despite this, when problems with starting the engine begin, many experience a real shock. The main embarrassment of the situation is that it will not be possible to take the car to a service center.
There are, of course, tow truck services. But, firstly, it is expensive, and secondly, in some places there are simply no companies providing such services. Therefore, knowledge of how to restore the starter solenoid relay and how it generally works will not be superfluous.
Instructions for replacing the unit yourself
If you decide to repair the unit, you should understand that most likely this will only help for a short time. The thing is that the constituent elements of the starter usually wear out evenly. Therefore, if you replace one part, you should understand that in the near future you may have to change other elements.
In VAZ 2110 cars, the procedure for dismantling and installing a new starter looks like this:
- First, turn off the ignition and open the hood of the car. Disconnect the terminals from the battery, otherwise you may accidentally short-circuit the mechanism when removing it.
- Next, if you have an injection engine, you will need to remove the air filter housing. Having done this, you need to unscrew the three nuts that secure the assembly.
- Before removing the device, the power cable should be disconnected from the relay. Also disconnect the thinner wire; having done this, the unit can be removed from the car.
- Actually, at this point the removal procedure can be considered complete. If you decide to carry out repairs, then all you have to do is disassemble the unit and identify the failed elements, and then replace them. Before assembling, clean the device and make sure that all its contacts are intact. If you are changing the unit, simply install a new one instead of the old starter; further assembly is carried out in the reverse order.
What is a starter solenoid relay?
So, let's start with the basics. Two relays are responsible for the starter. The first is installed in the engine compartment. The design can have its own housing or be installed in a common unit.
In this article, we will be much more interested in the second relay, which is responsible for the operation of the starter, namely the retractor. It performs the following functions:
- redistributes energy between the starter and the electromagnetic relay;
- feeds Bendix gears;
- synchronizes the starter components,
- returns the gears to their original position after you turn off the engine.
In the automotive world, this unit has two names: traction and retraction. The first is most often used in specialized literature, the second is popular.
To understand why a starter solenoid relay is needed, let’s look at the engine’s operation schematically. To start the engine, the crankshaft must begin to rotate. Only after this does the fuel-air mixture ignite in the combustion chamber.
Usually the engine starting process takes place within a second. The role of the relay in it is quite simple. Thanks to it, the gear elements engage with each other. It synchronizes the operation of the starter. This unit also removes the bendix from the flywheel.
How it all started
It is worth recognizing that the starter retractor relay is one of the oldest parts of the car. It was invented back in 1912. The authorship of the invention belongs to Charles Cuttering. This is the legendary founder of the Delco company, which continues to thrive to this day.
By the way, it was the invention of the starter retractor relay that allowed women to drive cars on an equal basis with men. The fact is that before this important discovery, cars were started using a handle that was inserted into a pulley. Then it was necessary to twist it, only after that the car could move. Of course, this required a lot of effort.
Principle of operation
To understand how the starter solenoid relay works, let’s remember a regular electromagnet. The basic principle is the same. The unit consists of two windings: retracting and holding. The design also includes a starter and core activation circuit.
The end of the starter traction relay armature is connected to the plug. The whole structure works on the principle of a lever. The fork is fixed in the central part. It is the end opposite the main unit that moves the bendix. This happens when the electromagnet of the core responsible for retraction is triggered.
The fork, fixed on the axis in the central part, with the end opposite to the retractor relay, moves the bendix when the electromagnet that retracts the core is activated.
When you turn the key in the ignition, voltage is applied to the winding. As a result, a magnetic field is formed. It moves the armature, which compresses the return spring.
The end of the fork moves towards the flywheel. The gear is pushed out and connected to the bendix. Moreover, this happens before the connection with the toothed flywheel occurs.
When engagement occurs, the contacts close. They are integrated into the design of the starter solenoid relay. Two circuits take part in this process, one more powerful and the other weaker.
The first is needed to overcome the spring resistance. During its operation, the retractor winding is deactivated. The anchor, in turn, is fixed. The corresponding winding is responsible for holding it.
When you remove the key from the ignition, the contacts open. The current supply stops. The windings are de-energized. As a result, the spring returns the armature to its place, and the bendix opens with the flywheel.
Comments and reviews
VAZ 2110 won't start, the starter won't even click
There is no power to the starter and when I turn the key the icon on the dashboard lights up. the round one is divided into a password.
No response to launch. The solenoid relay was replaced last month.
Ignition is on, the instrument lights up, the starter is on - the instrument goes out, the starter does not turn, the starter is off, the instrument lights up when the starter is connected directly to the retractor, the retractor clicks when it is connected to the starter, the starter does not turn
Quite often, car owners ask the question: why doesn’t the VAZ 2110 starter turn? Everyone faces this common problem every day. As they say, you won't go until you start it. It is necessary to find out the reason why the starter does not turn, and also to correct the malfunctions in the VAZ 2110.
Without a starter, the vehicle simply cannot be started, so it is recommended to treat this task with special attention. If you cannot save the component, you can always carry out the repair yourself. Moreover, in domestic transport this problem is solved much faster and easier.
Diagnostics and repair
Checking the system
Before checking the solenoid relay, you need to test the starter itself. This check will allow you to understand what exactly is not working in the system. Insert the key into the ignition and turn it.
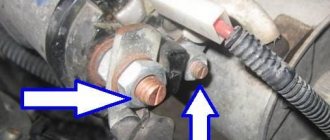
Next you will need to open the hood and get to the starter. You must make sure that this is the case. To do this, bridge the two contacts. They are made in the form of two copper bolts. These structural elements are attached to the rear of the solenoid relay (on the body). If, after the manipulations you have performed, the mechanism rotates, then the problem is in the solenoid relay.
In some cars, reaching the starter is very difficult, and sometimes even impossible. In this case, you will have to partially disassemble the system and dismantle the device itself.
After removing the starter, place it on the ground. Place the battery nearby. Connect the leads of the two devices. In this case, the battery ground is connected to the starter ground.
When the wires are connected, the starter solenoid relay will operate. At first there will be a rather loud click. If the mechanism operates too slowly, be sure to check the contacts. This situation may be caused by the fact that they are burnt.
What kind of damage can happen?
Usually the whole problem lies in burnt contacts or their sticking; other faults include:
- coil burnout,
- mechanical damage,
- natural wear and tear of parts.
In the latter case, the starter solenoid relay will need to be replaced. There are a number of signs that most likely indicate that the problem is in this particular node, these include:
- After the engine starts, the starter continues to operate. This is indicated by a clearly audible buzzing sound.
- When you turn the key in the lock, you can hear a distinct clicking sound. This means that the main system starts, but the starter does not work.
- When you turn the key, the starter idles. The engine remains inactive.
These signs most likely indicate that the malfunction is related to the starter solenoid relay.
How to connect
Many motorists are afraid that after they repair the solenoid relay, they will not be able to connect it. In reality, the connection diagram is quite simple. Moreover, you compose it yourself.
To carry out reverse dismantling, you must first mark the disconnected terminals. This will allow you to connect everything correctly after the repair is completed. Also, before installing the relay, you need to clean the contacts. For degreasing, use a modern liquid sold in automotive stores.
Repair
It is worth recognizing that on machines of the same series, the starter solenoid relays are very similar. The most striking in this context is the following automobile line:
In principle, all starter solenoid relays have the same design. Accordingly, their repair process is similar. The main differences lie in the fastening systems. Also, cores can have different designs. But the general scheme is very similar.
So, in order to repair the starter solenoid relay, you first need to dismantle and disassemble it. Here, in fact, lies the main problem. In most cars, these units are non-separable. All that remains for the driver in this case is to make a replacement.
It is very important to maintain a clear sequence during repairs. Otherwise, you risk not only damaging the part or other systems, but also getting injured. The process itself consists of the following stages:
- Disconnect power from the battery.
- Clean the part from dust and dirt. Otherwise, foreign particles may get inside the unit, causing damage to it.
- Unscrew the brush assembly nut.
- Remove the contact from the bolt.
- Unscrew the clamping screws. They are the ones that connect the relay to the ground of the car.
- Unscrew the ends of the nuts.
- Divide the device in half.
- Replace the core.
- Reassemble.
Before putting the device back into the car, start it. Reinstallation should only be carried out after preliminary testing. Once everything is assembled, do a few test runs. Only after this go on the road.
What else could break?
Most damage to the solenoid relay is associated with the burnout of certain of its elements. Most often, electromagnetic circuits burn out. Windings and contacts are also subject to similar destruction. In some cases, the cause of failure is metal fatigue.
However, ignition problems are not always associated with the starter or solenoid relay. If the repair does not give the desired results, check the electrical circuit. Also look at how much charge the battery has.
Why does the starter not respond to turning the ignition key?
After turning on the ignition, power from the battery is supplied to the on-board electrical systems and the computer (if equipped). If there is an immobilizer (standard or an installed security system), this occurs only after the tag is recognized. When the key is turned to the start position or the start button is pressed, the contacts of the solenoid relay are closed, resulting in power being supplied directly to the starter. At the same time, the starter overrunning clutch (Bendix) engages with the flywheel crown, setting it in motion and ensuring the engine starts. Often, switching is carried out through an additional starter control relay, which removes the load from the lock.
Ignition switching circuit
If a problem arises at any of the above stages, the car will not start: you turn the ignition key and the starter is silent. As a rule, the reasons for this behavior lie in:
- ignition switch contact group;
- alarm and immobilizer;
- control relay;
- wiring from the control relay to the starter;
- starter solenoid relay.
More information about why the starter does not work with the ignition key can be found in the table.
The starter does not work from the ignition key: reasons
| Problem | Cause of malfunction |
| Starter motor faulty | The electric motor fails due to overheating, short circuits in the windings, wear of the brush assembly, and jamming of the gearbox. |
| The circuit from the ignition switch to the starter solenoid relay is faulty | Wiring break or short circuit. Often occurs after repairs, installation of additional equipment, or as a result of mechanical wear during long-term use. |
| Damage to the ignition switch (deformation of the cylinder) | Deformation due to overheating, which in turn occurs due to poor contact. Damage is also possible due to the mistaken use of an inappropriate key. |
| Electrical malfunction of the ignition switch contact group | The layer of oxides formed on the contacts prevents the flow of current. Also, the contacts may move away due to deformation of the rotary sleeve on which the mating parts are attached. |
| Start blocking by installed alarm | A voltage surge in the on-board network or loss of power (disconnection of a terminal or discharge), failure of a transistor or microrelay responsible for turning on the start line in the base unit of the security system. |
| Immobilizer malfunction/decoding | Voltage drops and sudden loss of power (battery discharged or terminal removed), software failure, failure of microelements. If the immobilizer does not recognize the mark, the starter does not turn after turning the ignition key, and the immobilizer symbol usually lights up or flashes on the indicator panel - an image of a car with a key or lock. |
| Failure of the solenoid relay | Burnout or short circuit of the winding as a result of overheating due to the flow of increased current or being under load for an extended period. The root of all problems is usually oxidation of the internal and external contacts of the solenoid relay. |
| The limit switch for the automatic transmission selector position, the brake pedal for an automatic transmission or the clutch for a manual transmission is faulty | Sensors fail due to mechanical wear, and their wires and terminals can oxidize or fray. Because of this, the ECU does not allow the starter to start. |
| Starter relay failure | If the starter control relay is stuck or shorted, it cannot supply power to the control terminal of the solenoid relay. |
| Poor “+” contact from the battery on the starter | The power contact terminal oxidizes under the influence of moisture and heat. The nut that holds it to the starter stud can come loose due to vibrations. |
| Poor ground contact at the battery terminal, car body or engine | Due to oxidation, the contact of the ground wire deteriorates; the same thing happens when its nut is unscrewed under the influence of vibration. In this case, the passing current may be enough to turn on the on-board network and the ECU, but not enough to drive the starter electric motor. |