Hello, dear readers of the Kak-Kupit-Auto.ru . A couple of months ago, my five-year-old Kalina suddenly developed noticeable play in the steering wheel . Until that moment, the steering was fine with me, and therefore it never occurred to me to carry out maintenance on the steering rack , but play in the steering arose, and then I decided to figure out its reasons and find a way to eliminate this shortcoming.
Having studied the issue, I learned that loud drumming sounds from the front suspension when driving over small irregularities can also be caused by a faulty steering rack, and not by parts of the front suspension. And indeed, after repairing the rack, all the noise disappeared. It turns out that it wasn’t the balls, or the silent blocks, or even the racks that were drumming, it was just the rack dangling in the body like a pencil in a three-liter jar.
Having disassembled Kalina's steering rack , I realized that it was in vain that I had not carried out preventive maintenance earlier. If I knew what , how and why to do to keep the rack in working condition , I would do it after another 3-4 years of operation. But then I didn’t have this information yet, but now it has appeared, and I hasten to share it with you, dear readers!
Diagnostics of the Kalina steering rack (steering rack 2110)
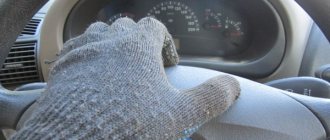
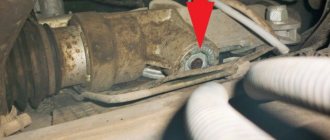
Steering rack repair should begin with diagnostics. Finding out whether the rack needs repair is as easy as shelling pears; to do this, open the hood and grab the steering rod with your hand in the area where it is attached to the rack.
Twitch the steering rod up and down, up and down. If the rack is in good working order, the rod will not move even a millimeter; in my case, the rack simply dangled in the body. Not surprisingly, when driving on gravel, a deafening rumble was heard in the cabin.
Here is a video that shows the difference in the operation of the old rack (after 164 t.km) and the new one (after 3 t.km)
Steering play is also very easy to diagnose. With the car parked (and the engine turned off, if the car is power-assisted), try to slightly turn the steering wheel with one finger, right-left, right-left. If there is no play, the steering wheel will elastically resist your influence and return to its original position. If there is play, then the steering wheel will “dangle” very freely within its limits.
For cars with power steering, so that it does not interfere with diagnostics, it must be turned off, that is, the engine must be turned off.
Unfortunately, I didn’t film what it looks like, but in my case the play on the steering wheel was about 10°. Every time I stopped at a traffic light, I rocked the steering wheel from side to side with my index finger, and this made me less and less happy.
While driving, the play manifests itself as empty rotation of the steering wheel in the zero zone (when the wheels are looking straight). To make a small course correction, you have to turn the steering wheel significantly, and the effect is initially absent, but appears suddenly when the steering wheel reaches the opposite edge of the play. Rocking the steering wheel within the range of play has no effect at all. On the highway it all looks very unpleasant and unsafe, especially at high speeds. In addition, with a backlash of more than 10°, it is unlikely that it will be possible to pass technical inspection, because such a car does not meet basic safety requirements.
Signs of breakdown
By means of steering racks, rotational movements from the steering wheel through a rack and pinion mechanism are transmitted to the rotary levers, which turn the front wheels with rods.
If you find one of the symptoms listed below on your car, be sure to conduct a full diagnosis of the condition of the unit, and then repair it.
Signs of a faulty steering rack include:
- A grinding noise is observed in the rack area when the steering wheel is rotated;
- The steering wheel periodically sticks;
- Lubricant begins to leak from the seals;
- The steering wheel has noticeable play.
These symptoms may also indicate problems in other components of the steering mechanism, but first you must check the condition of the rack, disassemble it and decide whether to replace or repair it.
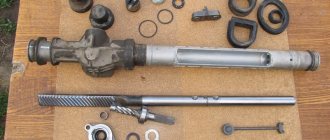
Node diagram
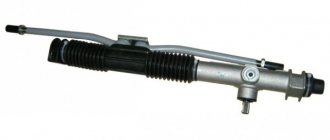
Kalina steering rack design (steering rack 2110)
I managed to find out that the Kalina is equipped with a steering rack from the “ten” , a new type, helical, which was used on the VAZ-2110, 2111, 2112 family. The steering rack of the 2108 family is significantly different, and therefore parts must be purchased specifically for the “ten” racks (steering rack from VAZ-2110).
Before repairing the steering rack yourself, I recommend that you familiarize yourself with the VAZ-2110 steering device and understand how it works, but I’ll tell you straight away that removing the rack alone is as easy as shelling pears, but putting it back on your own is unlikely to be possible. This must be done by two people: one will hold the rack from the engine compartment side, and the second will connect it to the steering shaft flange in the cabin.
The VAZ-2110 steering rack itself is quite simple in design, but, in my opinion, it contains three very weak points: the rack bushing, the rack stop and rubber protective covers .
Rubber covers can fray or tear, then road dust, which serves as an abrasive, will get into the rack body, and in such conditions the rack will not work for a long time.
The rack bushing serves as a guide for the right end of the rack. The rack must be tightly seated in the bushing and work under conditions of abundant lubrication, only then the bushing will not wear out and the rack will not start to hang out. A worn bushing is the main cause of knocking noises in the 2110 steering mechanism. In the absence of high-quality lubrication, as well as when dust gets into the body, the material of the bushing begins to wear out intensively, the rack dangles more and more inside the bushing, and then, when driving over small irregularities, we hear drumming.
The rack stop presses the left edge of the rack (teeth) against the steering shaft gear. Without sufficient lubrication, the rack stop wears out quite quickly, and the rack teeth no longer press tightly against the steering shaft gear and steering play occurs. The stop is pressed against the rack by a stop nut , which, theoretically, can be tightened, thus pressing the rack more firmly against the steering shaft gear. This temporarily reduces the noise level, but if the stop has already been worn down to metal, then this option can lead to increased wear of the steering mechanism itself - the gear teeth and rack, therefore, tightening the stop nut, if possible, is only a temporary measure.
AutoBushings
AutoBushes pinned post
Production and sale of caprolon bushings
Caprolon bushings have increased wear resistance, high strength and a low coefficient of friction on metal. Caprolon is widely used in mechanical engineering, automotive industry and other areas of production.
We produce and sell caprolon bushings of various shapes and sizes for cars, made from high-quality domestically produced material. Show in full.
Products made from caprolon replace bronze, brass, and work well in fuels and lubricants, in sea water, in organic solvents, in dilute acids and alkalis.
Density: 1150-1160 kg/m3 Melting point: 220…225°C. Operating temperature -40…+70°С. Average coefficient of linear thermal expansion per 1°C: - in the range from 0°C to 50°C - 0.000098 - in the range from -50°C to 0°C - 0.000066
Brinell hardness is not less than 130 MPa. Compressive strength of at least 90 MPa. Bending strength (sheet) is not less than 80 MPa. Elongation at break 10%. Modulus of elasticity in compression 2.0-4.0 MPa. Thermal conductivity coefficient at 20°C is 0.29. Electric strength, kV/mm 30-35. Friction coefficient for steel: - without lubrication - 0.2...0.3 - with water lubrication - 0.005...0.02 - graphite caprolon - 0.002...0.01
Should I repair it myself or at a car service?
Repairing Kalina's steering rack is not an easy operation, which is why the car service center charges about 2-3 thousand rubles for it. The removal process, and especially the installation process of the rack, is very labor-intensive; there are several difficult aspects that you need to know about in advance. In particular, connecting the rack to the steering column, when installing the rack on a car, is best done by two people, otherwise you can lose a lot of time and nerves.
In general, if you are not ready to spend the day in the most sophisticated poses, then it is better to immediately fork out the cash and entrust the repair of the rack to car service specialists. It makes sense to simply buy a new rack and replace it at a car service - this is the most expensive, but at the same time the simplest option.
to carry out rack repairs with your own hands only if you are not afraid of complex repairs and enjoy the fact that everything in your car is done to perfection, because no one will take care of your car as well as you can do it yourself. .
Correct fault determination
- The right edge of the rack should shine, otherwise a steering rack repair kit is needed.
- The presence of even the slightest traces of rust, which will act as an abrasive material, is not allowed.
- You should check the integrity of the bushing: if it knocks or shows signs of wear, it needs to be replaced.
- It is necessary to carefully inspect all the fasteners: if places with loose clamps are found, tighten them.
You need to be very careful with the last factor. Excessive physical force will only do harm here. If you decide to diagnose and replace it yourself, you must use lubricant and a wrench. A heavily threaded bolt or nut simply requires the use of oil. In some cases, it can be moved 1-3 divisions, but do not despair. This is enough for a visual inspection.
There shouldn’t be any difficulties, because information on how to tighten the part is contained in the vehicle’s operating instructions.
Required spare parts and materials
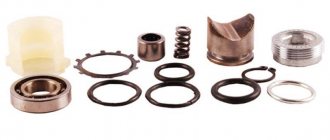
To repair the Kalina steering rack (steering rack 2110, 2111, 2112, etc.) I bought this repair kit for the 2110 steering rack . The main thing is to replace the bushing and stop of the rack, which will eliminate play in the rack and noise when driving over small irregularities.
On the price tag in the BBC it was indicated that the repair kit was “factory”, but in fact it turned out that the manufacturer was some kind of individual entrepreneur. I hope the quality of the bushing and stop is not inferior to the factory one. From the kit we used: a rack bushing, a rack stop, a rack stop O-ring (small) and a stop nut . The rings are medium and large, I left the old ones as they were in perfect condition.
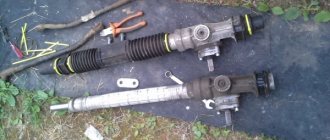
In addition, while preparing for the repair, I noticed a tear on the left (short) rack boot . The impulse arose thanks to the “fender liners” installed by the craftsmen of the car dealership when purchasing the car. The left front fender liner has been touching the protective cap of the steering rack all these years and as a result has worn it out. I don’t even know how long I drove like this, but eventually there was some play and I was ready to repair the rack. In the right photo, taken from the left wheel arch, the part of the fender liner protruding from above has already been cut off and it no longer rests against the boot:
Before repairing the rack, I bought this very left (short) boot of the steering rack 2110 (for 80 rubles), but I was not able to find it right away. There are anthers from 2108 on sale, but the “eight-foot” ones are not suitable for us, they are a centimeter smaller in diameter. Later, having already removed the rack from the car, I discovered that the central corrugation was also damaged. For 5 years and 140 thousand km. it rubbed against the body of the rack (photo will be a little lower), no wonder that dust got inside.
I still bought the corrugation, thank God, one of the nearest stores had it in stock, but for the future the conclusion is this: the central corrugation must be changed , and therefore it should be bought in advance. The side caps are not subject to friction; decide for yourself whether to change them or not by first inspecting them visually.
a set of Kalina steering rack boots looks like (steering rack 2110). The one on the left in the photo is my original one.
When assembling, it is best to secure the rubber covers with disposable plastic clamps ( nylon ties ), but 30 cm long (28 cm minimum). I bought a hundred zip ties for 75 rubles, but they sell them individually for 5 rubles. each. If everything is normal, then for repair you will need 4 such ties.
In order not to unscrew the studs that secure the rack to the body, their threads must be soaked with a wedge (WD-40) or kerosene before unscrewing, and it is advisable to do this a couple of days before unscrewing the nuts. The bitter experience of many car enthusiasts suggests that rolling the studs is as easy as shelling pears, and this leads to the need to drill the engine compartment shield and insert bolts of the appropriate size from the inside. Attention! Remember this danger and unscrew the rack fastening nuts very carefully! Don't put in much effort! It is very convenient to use a small Vedashka cylinder with a tube in the engine compartment, but if you are going to use kerosene, do not forget to prepare a small syringe, because the nuts securing the rack to the body are in very hard-to-reach places.
If the inside of the rack turns out to be dirty and rusty, then it will need to be washed (with the same kerosene, diesel fuel or gasoline), and then, to be on the safe side, it would be a good idea to blow out all the dirt with carburetor cleaner .
When assembling the rack, it will need to be generously lubricated. In theory, for this you need to use low-temperature lubricant FIOL, but it is quite difficult to find, and it is only sold in large jars, costing 600 rubles.
Litol-24 in severe frost reduces its plasticity, but at higher temperatures it successfully replaces FIOL. In addition, Litol-24 is sold on every corner and is inexpensive.
So, spare parts and materials used in the repair:
- Steering rack repair kit 2110 (RUR 210)
- Protective covers for steering rack 2110 (245 RUR + 80 RUR)
- Plastic clamps 30 cm (at least 4 pieces)
- Penetrating bolt lubricant (WD-40 or kerosene)
- Rail cleaner (carburetor cleaner, diesel fuel or gasoline)
- FIOL lubricant (as a last resort Litol-24)
Necessary tool
Now let’s look at what tools you will need to repair the rack yourself. This list is no less important than the list of spare parts, because if you do not have the correct key, then the repair may stop at the most interesting place.
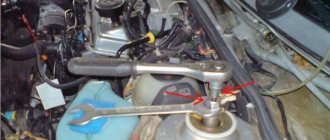
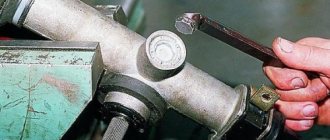
Let's start with the most exotic and most important key, on which the repair of the rack depends entirely. You will need it at the moment when the rack is already removed from the car and turning it over you will see the rack stop nut . In preparation for the repair, I stuck my camera under the rail and took a couple of pictures. And this is what I saw. the rack stop nut looks like (bottom view):
The steering rack key comes in two types: for rack 2108 and for rack 2110. For rack 2108 it is a simple 17 octagon, it is not suitable for us. Our option is a 24 octagon, with a recess in the center, this is exactly what the wrench for the rack stop nut 2110 looks like. I’ll say right away, do NOT buy this option under any circumstances:
The stop nut sits quite tightly in the body; in addition, its thread is jammed during assembly so that it does not unscrew. Such a wrench is not capable of unscrewing this nut; at the first attempt it falls apart:
To avoid running around looking for a solution when the rack is removed, immediately buy a more reliable wrench that does not have flimsy welded joints. I was lucky, and in the nearest store I bought this good-quality key, the handle of which is screwed into the head:
Now let's look at the second, no less important for rack repair, key. We will not disassemble the suspension parts and thereby violate its geometry. We simply unscrew the steering rods from the steering rack, and during assembly we will install them in place, so we will not need to adjust the camber after repair. However, the steering rods are attached to the rack with fairly powerful bolts, which you are unlikely to be able to unscrew with a regular wrench. To do this, you need a powerful 15 mm socket and a wrench with a long handle of about a meter.
I had at my disposal an articulated wrench with a 40 cm handle and a half-meter piece of steel pipe that served as an extension.
The third key, which, in my deep conviction, is mandatory for repairing the rack, is a ratchet wrench , which is incomparably more convenient for unscrewing and tightening the nuts securing the rack to the body. The fact is that the nut needs to be driven along almost the entire length of the stud, and you have to work “by touch” - there is very little space there. With a ratchet, you can unscrew and tighten all 4 nuts securing the rack to the body in 5 minutes, but without it you can carry it for an hour.
For the ratchet, it is necessary to prepare heads for 10 and 13, and the head for 15 must fit the wrench mentioned above. Also useful are spanners 10 and 13 (for removing the battery and the platform under it), a jack, a sharp knife (to cut off the clamps), a pair of gloves, a flashlight, a medium-sized flat-head and Phillips screwdriver for unscrewing steel clamps. To work in the area of the pedals, you will need a flashlight, and for removing and installing the rack, I found a large pry bar very useful.
A pry bar or something similar is a must if you install the rail without a partner. I wanted to call my neighbor in the garage, but I managed this operation myself. However, wiping the sweat from my forehead, I’ll say right away that this is not an easy task and it’s better to call your neighbor in advance.
Here is a list of tools used in the repair:
- Special wrench for steering rack stop nut 2110
- Large hinged knob (for head 15)
- Medium ratchet wrench (for heads 10 and 13)
- Heads for 10, 13 and 15
- Socket wrenches 10, 13 (optional).
- Knife
- Screwdriver flat and Phillips
- Jack
- Flashlight
- Large mount
Electric amplifier
It is better to adjust this unit in the Lada Kalina after the electric power steering rack has been removed. However, there is a way to carry out this action without resorting to removing the specified mechanism.
- We install the car above the pit to provide access to the fasteners of the frontal part of the amplifier.
- We tighten the clamping nut. If we do this from below, then we rotate in the direction of the arrow clockwise, and if we act from above, then, naturally, the opposite.
- For preventive purposes, we check the integrity of the oil seal. Note that strong and frequent turning of the steering wheel leads to premature wear of this sealing element.
Removing the Kalina steering rack
Before removing the steering rack from Kalina, I drove the car into the garage with the hood towards the doors, and slightly shifted the front part to the right, leaving free space on the left so that I could easily remove the rack through the opening in the left front wheel arch. Ideally, there should be at least a meter of free space to the left of the front left wheel.
Immediately place the steering wheel straight. The front left wheel can be lifted immediately, although this can be done later. It is only necessary to lift the left front wheel, and this is necessary in order to reach the rack through the opening between the wheel arch and the engine compartment. Now we open the hood, use a screwdriver to loosen the clamps of the air duct between the air filter and the engine, remove the air duct, and plug the now free holes with a clean rag for the duration of the repair. Next, remove the battery (10 and 13 mm spanners) and the platform under the battery (13 mm spanner).
Attention! To avoid breaking the ratchet wrench, it is not recommended to use it to remove tightly tightened bolts!
When the pad is unscrewed, it turns out that two wires are attached to it from below. They need to be released, and a 10 mm wrench will help us with this. This is what the mount looks like without wires:
In order not to damage the wires and connectors of the IAC and TPS, it is recommended to immediately disconnect them.
Now a very important point! Right now, treat the 4 studs attaching the rack to the body with a wedge or kerosene - let the threads soak. It may turn out that the nuts have become stuck (rusted) and then you can easily twist the stud, tearing it out of the body. In this case, you are guaranteed a real problem, compared to which ordinary rack repair is just a piece of cake. By the way, if possible, douse these nuts with Vedeshka or kerosene a couple of days before the repair.
For ease of operation, unscrew the top nut securing the thermal protection to the body, and slightly bend the thermal protection itself towards the engine.
Now you can remove the locking plate from the inner tie rod end bolts. This stopper prevents the bolts from coming loose. We insert a flat-head screwdriver between the stopper and the plate connecting the bolts and slide the plate off the bolt heads.
When the stopper is removed from the bolts, you can unscrew them; this is where a powerful wrench with a long handle and a 17 mm head comes in handy. Personally, I managed to move the bolts from their place only by reinforcing the handle with a half-meter steel pipe. After unscrewing, the bolts must be removed and the steering rods simply placed down on the thermal protection.
We continue to dismantle the rack from the car. First of all, go into the interior, under the pedals. While the steering wheel is straight, pay attention to where the flange bolt is located and how the groove is located on the shaft and steering rack. This is exactly how the bolt and groove are located when the steering wheel is in a straight position, this is exactly how they will need to be placed when installing the rack on the car. I recommend making marks on the shaft and flange, for example with a marker, and even photographing them. Later, all this will help you set the rack so that when driving in a straight line, the steering wheel is in the middle position.
Now turn the steering wheel a quarter turn to the right and, using a 13 mm spanner, completely unscrew and remove the steering rack flange bolt from the hole. Once again, pay attention to the position of the flange slot and groove on the steering rack shaft. When reassembling, you will need to return them to their original position.
Attention! Now is the most crucial moment. You must unscrew the nuts from the four studs that secure the steering rack to the partition between the passenger compartment and the engine compartment, but this must be done very carefully. Don't forget: the studs hold the body very weakly and can break off even with a little force.
Treat the threads again with kerosene or WD-40 and begin unscrewing the nuts with a ratchet wrench, holding the wrench with literally two fingers. I hope you will be able to move and then unscrew all the nuts without damaging any of the studs. If you overdo it, then you will have to find a bolt similar to a stud, but longer, drill a hole into the interior and insert it from the inside. We return to the cabin and use a powerful screwdriver to push the steering rack shaft out of the flange.
The rack should detach from the steering column and fall out into the engine compartment; if this does not happen, then it can be helped a little: in the engine compartment, using a pry bar, press the rack away from the engine shield.
We will reach the steering rack through the opening above the left wheel, so the left front part of the car must be jacked up. There is no need to unscrew the wheel, and there is no need to lift it high either, the main thing is that the opening is higher than the wheel. We pull out the steering rack like this:
Rail repair
Great! The steering rack is in your hands. Now you need to carefully cut off the plastic clamps from the anthers without damaging the rubber bands themselves if you plan to reuse them. The left clamp securing the rack to the body can be left untouched, but the right one must be removed along with the rubber band: this is necessary to replace the central corrugation.
You can also remove the gasket located at the point where the rack contacts the hole in the engine shield.
We remove the left and right anthers, and then the corrugation. Look at the picture I discovered when I removed the left steering rack boot. There was grease here, but mixed with dirt.
On the right side, on the contrary, there was no trace of lubricant, but a whole mountain of rust spilled out from there.
The central boot is reluctantly, but still removed from the steering rack housing.
The right end of the rack was covered with a thick layer of rust without the slightest hint of lubrication. Not surprisingly, it dangled loudly in the broken bushing.
Soak the stop nut with kerosene or WD-40, and in the meantime you can try to remove the worm shaft.
Having unscrewed two hexagon bolts, I found a bearing and a disc spring, but I could not remove the worm shaft, no matter how much I knocked the rack body against a piece of wood.
As a result, I realized that I didn’t need this, because I could wash and lubricate the insides of the rail without even completely disassembling it. Having thoroughly lubricated the bearing, I returned the cover to its place and began to unscrew the stop nut. To do this, you will need a very good key, I came across this one.
Having unscrewed the nut, I saw the same picture as in the rail itself. Everything was covered in grease mixed with dirt, or maybe the grease had become unusable over time.
We take out the spring and rubber band, turn it upside down and hit it against a wooden block until the stop pops out.
When I took out the stop, I discovered that it was covered in dirt, like everything else inside the rack housing.
Compare the new stop with the old one: the plastic lining has worn off, the rack has become less pressed against the worm shaft, and now it is clear how the play in the steering arose.
But the rumble when driving over small irregularities comes from the steering rack bushing. To get out the old broken bushing, you need to use a thin long screwdriver to bend inward each of the two protrusions that hold onto the recesses inside the rack body, and pull the bushing out of the body using a steel wire hook.
Here's what the old and new steering rack bushings look like:
So, we have disassembled the steering rack, and now it’s time to wash it properly. To do this, you can use gasoline, diesel fuel or kerosene, as well as dry rags and something long and thin to clean the insides of the steering rack housing. By moving the rack inside the case and cleaning out the remaining old grease and dust from it, I achieved almost perfect cleanliness of both the rack itself and the case, and also cleaned off the rust as much as possible.
But the worm shaft, which I couldn’t get, still didn’t look perfect:
If you want to bring the rack to a perfectly clean state, then right now you need to blow it with carburetor cleaner. Do not forget to rotate the worm shaft to blow out all the dirt from its reverse side. After such a wash, the rack looked almost like new, all internal surfaces shone with a dazzling shine and newness. This is the feeling for which we do it ourselves - the feeling of satisfaction from a renovation done in a way that no one else could do it.
Now we wipe everything down, lubricate it generously and assemble it. We turn the worm shaft and lubricate it.
We do not spare grease on the toothed part of the rack - it is here, between the worm and the rack, that the main friction occurs.
We also coat the right end of the rack with lubricant, which will not only play the role of a preservative here, but should also extend the life of the new bushing.
Having thickly lubricated the right end of the rack, check whether the bushing fits onto it. It must be put on with some effort, only in this case the repair will bring silence when driving over small irregularities.
The bushing must then be removed from the rack and carefully inserted into the pre-lubricated housing. The locking protrusions on the bushing must fit into their seats on the inner surface of the rack body.
Now screw in one of the bolts that secures the tie rods to the rack, and with the rack housing with the bushing facing down, being careful not to damage the bushing, insert the rack into it. The rack should fit tightly, but with a certain force applied to the bolt, it should still move.
Attention! The following actions will determine whether you will be able to assemble everything so that the steering wheel faces straight. First of all, you need to find the middle of the window in the frame body, mark it, for example with a file or marker, and set the frame to the middle position. In this case, the central hole should be opposite your mark.
Since the stop is not yet inserted and does not press the rack against the worm shaft, by turning the rack body over with the stop hole up, we can put the worm shaft in any position we need. Install the shaft as it was when you removed the rack from the car. My groove on the shaft was on the right and was almost vertical. Unlike you, dear readers, I was not armed with this experience at that time, and therefore assembled the rail at random. As a result, in order to install the steering wheel vertically, I had to disassemble the rack a second time.
Having installed the shaft in the desired position, make sure once again that the rack is in the middle position and then, through the hole in the rack stop, press the rack to the worm shaft. In this case, neither the worm nor the rack should change their position.
Now lubricate everything generously and install the new stop, spring and rubber sealing ring in place, and screw it all on top with the stop nut.
Next, use a special wrench to tighten the nut by hand, and then unscrew it back 2 notches, which will correspond to 24°, as indicated in the instructions.
When you install the rack on the car, the steering wheel may seem a little heavy to you, but after a couple of hundred kilometers the stop and rack will break in, and you will get perfect steering.
Now we assemble everything in the reverse order, and do not forget to put all the removed parts back in their places. Secure the anthers with nylon ties.
Installing the rack
Through the opening of the left wheel we return the steering rack to the engine compartment, install the seal in its place and begin the most difficult operation - installing the rack on the car.
Ideally, one person will hold the rack against the engine bay while another person connects it to the steering shaft flange. I did this without an assistant, so I lightly tightened the nuts securing the rack to the body and pressed the rack to the body with this lever:
Not without difficulty, I installed the steering rack shaft and flange in their original position (picture on the left), but this was the second time, and the first time I incorrectly aligned the rack and worm shaft (picture on the right).
After the first assembly of the rack, the flange bolt, with the steering wheel in a straight position, did not fit into the recess on the shaft, so when trying to tighten it, I also damaged the thread on it. I had to replace the bolt and rebuild the rack again.
Once the steering rack shaft axle and splines are aligned with the steering column flange, you can screw the rack to the body. Here the ratchet wrench will help us again, but remember that using excessive force is unacceptable. Hold the key literally with two fingers.
When the shaft is in place, with the steering wheel turned 45° to the right, it will all look something like this:
To ensure that the flange is completely seated on the steering rack shaft, you can grab the steering wheel and push it away from you. It will turn out like this:
After this, you need to tighten the flange coupling bolt , but this must be done by hand, without using keys, so as not to damage the threads of the bolt if for some reason it does not fit into the recess on the shaft.
The thread of the coupling bolt is very easy to damage, so it must be tightened without using a key - by hand
I admit, I myself did not foresee this, and therefore I ruined this bolt and went to buy a new one. In theory, you can’t drive without this bolt, but I replaced it with a thinner one with a nut and that’s how I got to the store, but in general, it’s better not to joke with the steering. If anything, buy a ball joint bolt from a classic - it will definitely fit.
So, if you push the steering wheel away from you, then there will be no gap left between the steering wheel and the steering column pad. You can’t leave it like that, because when you turn the steering wheel, all this stuff will creak.
Now the bolt should easily screw into the flange by hand, to approximately this state.
I remind you: there is no need to tighten it with a wrench yet . We do everything with our gloved hands. Now that the bolt is screwed in, but not yet tightened, pull the steering wheel towards you, it will extend about a centimeter and a gap will appear:
Great! Now you can tighten the bolt with a 13mm spanner - you won’t damage the thread.
So, at this point, your rail is already screwed to the body. I recommend that you lightly lubricate the protruding threads of the four studs securing the rail to the body with lithol. This will avoid problems during future possible dismantling of the steering mechanism.
If the steering wheel is turned, then return it to the “straight” position and screw the steering rods to the rack. the large 17mm bolts that secure the rods to the rack with the same “meter” wrench and quite firmly.
We put a locking plate on top. This must be done, otherwise the bolts may come loose.
Now is the time to check the rack again for knocks. To do this, you need to grab the steering rod and pull it up and down. If everything is good, then during such a check there should be no knocking, the steering rods should be absolutely motionless.
Next, we screw on the thermal protection, connect the IAC and TPS connectors, install a platform under the battery and fix two wires to it from below, and install the battery itself on the platform. Not forgetting to remove the rags (if there were any), install the air duct between the air filter and the engine, and tighten all the clamps with a screwdriver.
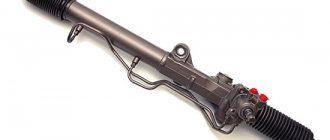
Design features
The structure of the Lada Kalina steering unit includes:
- electric amplifier;
- steering column, adjustable for reach and tilt;
- electric power steering rack with gear ratio change mechanism;
- rods with tips, as well as rotary levers.
In the mechanism housing there is a unit with mechanical gearing, where the main operating element is a helical gear, the pitch of the teeth of which varies depending on the length of the rack.
The figure shows the design of the Lada Kalina rack and pinion unit.