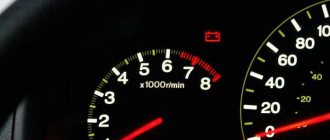
When you start the engine, many different lights come on on the dashboard, one of them is the battery charging light. Ideally, it lights up as soon as you start the engine and goes out after a while. This indicates that the generator and all its circuits are fully operational and the battery receives a charge of 13.7-14.3 Volts, that is, it is charging.
However, various breakdowns often occur due to which the light bulb continues to glow, glows dimly, or does not light at all. To deal with such malfunctions, you need to understand a little about the design of the generator and the principle of its interaction with the battery.
A little theory
On our website Vodi.su we have already described in detail the design of a car generator. Let's just say that electricity is generated in it by the rotation of the crankshaft. As the speed increases, the voltage also increases, but it must be within the limits indicated above, otherwise the battery will be overcharged, which threatens the electrolyte boiling and sulfation of the plates.
To prevent this from happening, a relay regulator is installed in the rotor excitation circuit, thanks to which a stable voltage is supplied to the battery.
The signal from the generator to the warning lamp is transmitted through a fuse, which is also located in the generator itself. Accordingly, the light stays on until the generator starts working and transmits voltage to the battery.
The charge from the generator passes through:
- diode;
- regulator;
- generator brush;
- slip rings;
- winding and wiring.
Thus, if at least one of these elements does not work correctly or fails, the readings of the light bulb cannot be trusted, although charging may be supplied to the battery.
Why is the battery charging light on?
There can be a lot of reasons. So, if after starting the engine the warning light continues to burn at full intensity, most likely the alternator belt has stretched and needs to be replaced. At the same time, you can hear characteristic sounds from the engine. On Vodi.su we have also already told you how to tighten or change a belt.
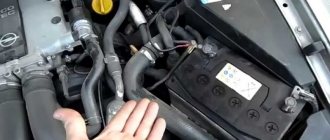
The second common cause is poor contact at the battery terminals or at the terminals from the generator. Contacts oxidize over time and need to be cleaned.
Failures in the mechanical part of the rotor: the bearing fell apart, the bushings flew off. You will have to completely remove the generator, disassemble it and replace broken parts. Fortunately, you can always find a repair kit of three bushings for a VAZ-2107 or other domestic cars on sale.
Failure of the diode bridge, relay regulator. In this case, you need to check them with a multimeter, or contact a specialist. Repairs often cost more than purchasing a new generator.
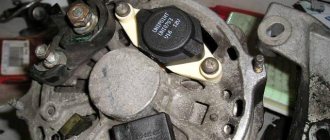
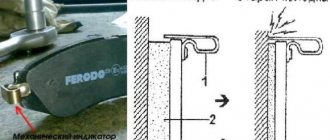
Over time, graphite brushes also wear out and need to be replaced regularly. When they are worn out, the charge is not transferred to the winding, and accordingly the light bulb begins to glow dimly, although the charge is transferred, but very weakly. Use a voltmeter as a guide. If the brushes are not changed in time, the battery will constantly be undercharged, which can lead to gradual shedding of the plates.
Generator diagnostics
First of all, the voltage is measured at the battery terminals. If it is lower than required, you need to check the entire circuit step by step:
- belt tension level;
- measure the voltage at each of the generator terminals - at each terminal it should be half as low as at the battery;
- check fuses, relays, diodes;
- check the resistance in the dashboard, the quality of soldering of wires.
If it turns out that the breakdown lies in the generator itself, it will have to be removed and also checked. In particular, they first check the relay regulator, then measure the resistance of the rotor field winding using an ohmmeter. It should not be lower than 4.5 ohms. Also, using the tester, you can determine whether the winding circuit is open.
It is clear that such malfunctions cannot be avoided. However, there are simple tips to help extend the life of the generator:
- first of all, regularly check the quality of its fastening - constant vibrations lead to mechanical damage;
- Clean external surfaces from time to time;
- check the belt tension, tighten if necessary;
- quality of the rotor bearing - remove the belt and spin the rotor, it should rotate smoothly, without play or clicks.
You also need to monitor the quality of the connection of the wires to the generator and voltage regulator.
Thus, a lit battery charging light while the engine is running is a serious reason to make a diagnosis. Please note that it can also light up if you have installed a lot of additional equipment - subwoofers, lights, lights.
Welcome, friends, to the DIY auto repair website. When you turn the ignition key, a number of warning lights come on on the dashboard. They signal that the system is working properly and the engine is ready to start.
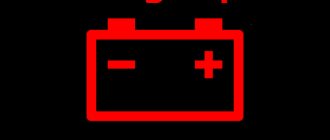
The battery charging light is on
One of these indicators has an image of a battery. When you turn on the ignition, it starts to light up, and after starting the engine, it goes out.
This indicates that the battery is charging. But what if this does not happen? Why does the battery charging light stay on even after starting?
Reasons why the battery charging light is on
In fact, there are many reasons why the battery light comes on and does not go out. These include:
- Loosening of the belt tension on the generator, its wear or damage;
- fuse blown or deterioration of contact quality in the connectors of the mounting block;
- breakdown of the relay regulator, diode bridge, additional diodes;
- the appearance of a break in the generator excitation circuit;
- decreased quality of contact at the battery terminals or generator output;
- generator brush wear;
- lack of high-quality contact of the ground wire.
What to do if the battery charging light is on?
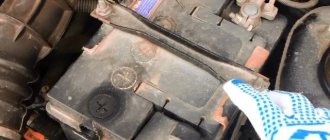
First of all, get out of the car and, with the engine running, measure the voltage at the battery terminals (do not remove the clamps under any circumstances).
If charging is in progress, the voltage should be at 13.6-14.2 Volts. In the absence of charge, the voltage level will be much lower - about 12 Volts.
To fix the problem, prepare the following tools:
- twelve volt indicator light,
- two screwdrivers (flat and Phillips),
- multimeter,
- pliers,
- knife,
- Use sandpaper to clean contacts.
So let's get started:
1. The readings of the on-board voltmeter indicate the presence of a charge, the charge signal lamp on the dashboard does not light up, there are about 12 Volts at the battery terminals, and the battery itself is almost discharged.
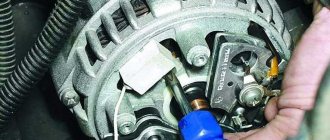
In such a situation, clean the wire connections on the power source itself. If these measures are useless, measure the voltage level at terminal “30” of the generator itself.
Place one multimeter probe on this terminal, and the other on ground. If the voltage here is much higher than at the battery, then strip the thirtieth terminal. If necessary, replace the wire from the generator to the battery.
2. The voltmeter on the dashboard and the lamp show the presence of a charge, but the battery is discharged.
The voltage on the battery is normal (about 14 Volts). Turning on a load (for example, headlights) causes the charge arrow to shift to the extreme left position.
The main reason is weak belt tension on the generator pulley (tension the belt, and if it is damaged, replace it).
This problem can also be caused by a breakdown of one of the diodes, as well as a break in the stator phase winding. Turn off the ignition and check the diodes with a multimeter. In case of breakdown, replace them.
Check the generator brushes. To do this, take them out and measure the length. If it is less than five millimeters, then it is better to replace the brushes.
3. When you turn the key in the ignition, the charge warning lamp does not light up, the charge sensor does not work, and there is no charge on the battery. The reason is a blown fuse.
Its designation is F10, rating is 10 Amperes. If installing a new fuse does not produce results, then the reason must be sought in the ignition relay or the lock itself.
4. After turning on the ignition, there is no charge, all devices work, the control warning lamp does not light up.
The check is simple - remove the wiring from terminal “sixty-one” of the generator and connect it directly to the “minus” (car body). If the light comes on, then the cause of the problem is the generator field winding.
The second option is bad contact in the connector. If after cleaning there is no result, then there is a risk of the lamp itself burning out.
5. When you turn the key in the ignition switch, the charge lamp lights up, and after starting it continues to light up. In this case, there is no charging or appears periodically. The reason is insufficient contact of the wire at the connector with the dashboard (it may oxidize).
Finally, check the relay regulator. To do this, apply voltage from the battery to its contacts. If there is 12 volts on the brushes, then the relay is working properly. If not, the device must be replaced.
If you have problems charging the battery (the warning light does not go out or does not light up at all), then check all versions.
But, as a rule, the problem is always on the surface, and the cause is poor contact, a burnt out light bulb or a faulty relay regulator. Good luck on the roads and of course no breakdowns.
A little theory: scheme of work
To solve the existing problem, you must understand the essence of the interaction between the vehicle generator and the power source (battery).
While driving, the battery is in constant charging mode with a voltage of 13.6-14.2 Volts. As engine speed increases, the voltage at the generator output increases. But this is unacceptable.
To limit the voltage, a small relay regulator is inserted into the rotor excitation circuit. Its task is to reduce the current to a normal level (even with a significant increase in the speed).
The result is maintaining the battery charge voltage at a stable level. If the battery light is on, this indicates a lack of charging from the generator.
How does the scheme work? After turning on the ignition, voltage through fuse No. 10 (for VAZ-2107) is supplied to the battery charge indicator lamp.
Next, the “+12V” voltage passes through the diode, the built-in relay-regulator (we mentioned it above), the brush, the slip ring and the winding.
As soon as the rotor speed increases, the phase voltage also increases. As a result, the voltage at the terminals of the battery warning light is equalized and it goes out. At the same time, the battery is charging.
Why does the ABS and ESC light come on?
ABS malfunction may be caused by:
- failure of wheel rotation sensors;
- malfunction of the hydraulic valve block;
- damage to the wiring.
If the ABS malfunction indicator light comes on, you must contact a service station as soon as possible for diagnostics (read error codes) and repairs.
The most common cause of ABS failure is damage to the wiring near the ABS sensor connector. It is located under the fender liner, but is still not well protected from moisture and dirt.
As a result, the wires oxidize and break, and the ABS lamp lights up.
Reasons why the battery charging light is on
In fact, there are many reasons why the battery light comes on and does not go out. These include:
- Loosening of the belt tension on the generator, its wear or damage;
- fuse blown or deterioration of contact quality in the connectors of the mounting block;
- breakdown of the relay regulator, diode bridge, additional diodes;
- the appearance of a break in the generator excitation circuit;
- decreased quality of contact at the battery terminals or generator output;
- generator brush wear;
- lack of high-quality contact of the ground wire.
What to do if the battery charging light is on?
First of all, get out of the car and, with the engine running, measure the voltage at the battery terminals (do not remove the clamps under any circumstances).
If charging is in progress, the voltage should be at 13.6-14.2 Volts. In the absence of charge, the voltage level will be much lower - about 12 Volts.
To fix the problem, prepare the following tools:
- twelve volt indicator light,
- two screwdrivers (flat and Phillips),
- multimeter,
- pliers,
- knife,
- Use sandpaper to clean contacts.
So let's get started:
- The readings of the on-board voltmeter indicate the presence of a charge, the charge signal lamp on the dashboard does not light up, there are about 12 volts at the battery terminals, and the battery itself is almost discharged. In such a situation, clean the wire connections on the power source itself. If these measures were useless, measure the voltage level at terminal “30” of the generator itself. Place one multimeter probe on this terminal, and the other on ground. If the voltage here is much higher than at the battery, then strip the thirtieth terminal. If necessary, replace the wire from the generator to the battery.
- The voltmeter on the dashboard and the lamp show the presence of a charge, but the battery is discharged. The voltage on the battery is normal (about 14 Volts). Turning on a load (for example, headlights) leads to a shift of the charge arrow to the extreme left position. The main reason is weak belt tension on the generator pulley (tension the belt, and if it is damaged, replace it). A breakdown of one of the diodes can also lead to this problem , as well as a break in the stator phase winding. Turn off the ignition and check the diodes with a multimeter. In case of breakdown, replace them. Check the generator brushes. To do this, take them out and measure the length. If it is less than five millimeters, then it is better to replace the brushes.
- When you turn the key in the ignition, the charge warning lamp does not light up, the charge sensor does not work, and there is no charge on the battery. The reason is a blown fuse. Its designation is F10, its rating is 10 Amperes. If installing a new fuse does not produce results, then the reason must be sought in the ignition relay or the lock itself.
- After turning on the ignition, there is no charge, all devices work, the control signal lamp does not light up. The check is simple - remove the wiring from the sixty-one terminal of the generator and connect it directly to the negative (car body). If the light comes on, then the cause of the problem is the generator excitation winding. The second option is poor contact in the connector. If after cleaning there is no result, then there is a risk of the lamp itself burning out.
- When you turn the key in the ignition, the charge lamp lights up, and after starting it continues to light up. In this case, there is no charging or appears periodically. The reason is insufficient contact of the wire on the connector with the dashboard (it may oxidize). Finally, check the relay regulator. To do this, apply voltage from the battery to its contacts. If there is 12 volts on the brushes, then the relay is working properly. If not, then the device must be replaced. If you have problems with charging the battery (the warning light does not go out or does not light up at all), then check all versions. But, as a rule, the problem is always on the surface, and the reason is poor contact, a burnt out light bulb or a faulty relay regulator. Good luck on the roads and of course no breakdowns.
General design
Since model 37.3701 is the most common, we will consider it in the future, but almost all the information is relevant for other types of generators.
The design of the generator is standard for this type of device; the unit consists of:
- Rotor (with slip rings);
- Stator;
- Covers (front, back);
- Pulley (with impeller);
- Voltage regulator (also includes a brush holder with brushes);
- Capacitor;
- Rectifier.
The design also includes rotor bearings and tie bolts, which assemble the unit into a single unit. In general, the generator circuit is standard and does not stand out in any way.
The unit belongs to the attached equipment of the power plant; it is installed on the left in the lower part of the engine compartment on the left in front of the engine. Fastening at the bottom of the unit is carried out by bolting through lugs, and at the top - using a strip.
The generator is driven from the crankshaft via a belt drive . The Oka generator belt is V-shaped, and it drives only this unit. The drive tension is adjusted by moving the device along the adjustment bar.
Troubleshooting - Battery
Often, failures that result in a lack of charge occur when the battery is faulty or there are problems with the generator.
To detect deviations in battery performance, it is enough to compare the performance of the power source installed in the car and the new one. If the light goes out when replacing this part, you can confidently conclude that the cause of the failure was a failed battery. This can happen as a result of sulfation of the plates or their short circuit. And if in the first case it is possible to revive the device by repair, then in the second it will have to be replaced.
It is also worth remembering that problems associated with the battery do not always indicate a breakdown. Quite often the power supply simply runs out of charge. It's quite easy to check. If the battery charge level is below the usual norm, the power source must be charged and installed in the vehicle. If after this you were able to start the car and the indicator went out, the problem has been resolved and you can continue to use this battery without fear. But if the required charge level cannot be restored even after recharging, you will need to purchase a new battery.
Replacing ABS sensors
If the cause of the malfunction is not in the wiring, but in the ABS sensor itself, we replace it. To do this, first unscrew the fastening screw with a Torx T30 key, and then remove the sensor wiring harness from the bracket. The photo shows a Lada Vesta car; on other Lada models the work is performed in a similar way.
Instructions for replacing the front wheel ABS sensor:
Instructions for replacing the rear wheel ABS sensor:
How to identify generator malfunctions
If, after replacing the battery with a new one, the charging indicator does not go out, the cause of the failure is a malfunction of the generator. To determine the lack of voltage supply, you will need to carry out manipulations in the order below. Be sure to use personal protective equipment - each manipulation must be performed with rubber gloves to avoid electric shock. So, to identify the breakdown you will need:
Turn off the engine and disconnect the wires from the battery. Measure the voltage at the terminals using a multimeter. The optimal value should be between 12.5-12.7 V. Connect the wires, turn on the ignition and repeat the voltage measurement procedure again. The indicator should not exceed 13.5-14 V, and increase with increasing speed. If the voltage drops as the speed increases, this often indicates that the generator “brushes” have worn out or the diodes in the diode bridge have failed. Also, the reason for stopping the charge supply may be a loose or broken belt. You can verify this by performing a visual inspection. Press the belt with your fingers, and if it bends less than 1.5 centimeters, this directly indicates a weakening of the tension.
Visually, the driver can independently determine the oxidation of the terminals. To do this, you need to pay attention to the generator wires. If they have oxidized, this will be indicated only by their appearance, but also by the characteristic burning smell.
But also quite often there are global problems that even an experienced car enthusiast cannot cope with without qualified assistance from a specialist. It is worth noting that defects such as worn “brushes” or diodes can be completely eliminated, and more serious problems (open circuit or wear of rotor spare parts) can only be solved by replacing the generator.
Types of devices installed on the VAZ-1111
A little about what kind of generator is used at Oka. The small car was equipped with several types of this unit. The most common and frequently encountered generator is type 37.3701, which was also installed on the VAZ models of the classic family (21010-2107), as well as the VAZ-2108. On some variants of the Oka, a device model 371.3701 was installed. Both of these options are identical in performance characteristics and differ only in minor design features.
The third version of the generator installed on the Oka is type 26.3771. In terms of performance characteristics, it is the same as 37.3701, but has a slightly different design, and the overall dimensions are smaller. It’s not difficult to visually recognize which generator is on the Oka. Model 26.3771 has internal ventilation (there are no impellers on the outside), while 37.3701 has external ventilation, so the latter has a pulley combined with the impeller.
All of these models provide a nominal voltage of 14 V, and a max. Their current output is 55 A.
Troubleshooting
If you have identified the reason for the activation of this indicator, it’s time to start eliminating it. Below are the main problems and methods for solving them:
- You can eliminate the weakening of the belt or its rupture by adjusting the degree of tension or resort to replacing it;
- in order to clean oxidized terminals, it is enough to clean them using fine-grained sandpaper;
- in the event that the battery is discharged as a result of prolonged operation of electrical appliances with the engine turned off, it is enough to recharge it;
- If there are various internal damages, you should contact a specialist.
Faults such as failed “brushes” and generator wires, as well as broken windings or broken relays cannot be eliminated by repair. In this case, it is advisable to replace the spare part.
conclusions
By carefully monitoring the dashboard readings, you will be able to independently identify problems in the operation of your vehicle at first and avoid serious consequences. We also draw your attention to the fact that you can always order the parts you need from our company. We offer competitive prices and will help you save not only money, but also time, because you will not need to look for the necessary spare part in stores. We guarantee high quality and excellent performance. To place an order, call the contact phone number.
Let's sum it up
Problems with ABS are not very pleasant incidents in any case. It is better to stay away from various problems and try to operate the car according to the requirements and advice of the manufacturer. But sometimes this turns out to be impossible, so it is necessary to have a good service in mind that can help in different situations. By contacting an official service center with this problem, you may become a victim of an overly scrupulous approach to diagnostics and incur huge repair costs.
However, sometimes the problem with the ABS sensor and the light on this system can be solved independently. Use the tips described above in the publication to understand all the features of a particular troubleshooting method. We warn you that it is impossible to completely disable ABS yourself. The on-board computer will either simply not allow the car to start, or will begin to behave inappropriately, producing new diagnostic system error codes each time. Have you encountered incorrect operation of ABS sensors and a constantly burning light?
Currently, all LADA models (Lada XRAY, Vesta, Largus, Granta, Kalina, Priora, Niva 4×4) without exception are equipped with ABS (anti-lock braking system). During the operation of the car, many owners notice that the ABS and ESC lamps (if this system is available) light up on the instrument panel. Let's figure out how to solve this problem and improve the design.