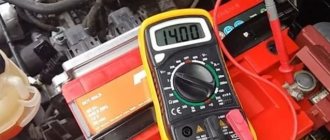
It's no secret that when you turn the ignition key, the car's dashboard greets us with a number of flashing indicators and warning lights. All of them, to one degree or another, tell us about the serviceability of the on-board systems and the readiness of the engine to start. One of the most noticeable indicators is the red battery icon. If there are no problems, the pictogram will light up when the ignition is turned on and will immediately go out when the engine starts. This moment indicates that the battery is being charged from the generator. But now we’ll talk about what to do and where to run if this indicator does not go out or suddenly lights up on the road.
A little technical educational program: why the problem occurs
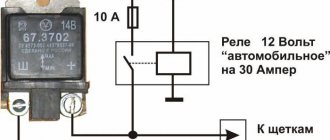
When the car is running, the battery is constantly recharged from the generator with a voltage of 13.6–14.2 volts. As the speed increases, the output voltage of the generator also increases, which can lead to negative consequences and damage to the battery. To solve the issue, a relay regulator or, more simply put, a voltage stabilizer is built into the circuit, reducing the current to the required values.
The battery is not charging light is on
As a result, we have a stable voltage charging of your car battery. And if the battery charge light comes on on the instrument panel, this means that the battery is not receiving charging from the generator.
After the ignition is started, voltage is first supplied through the fuse to the battery charge warning lamp. After which a voltage of 12 V passes through the diode, voltage stabilizer, brush, slip ring and winding. Further, the faster the rotor rotates, the more the phase voltage increases. This leads to equalization of the voltage at the contacts of the signal light, after which it goes out, thereby indicating that the battery is charging properly.
Generator connection diagram for VAZ 2105
Diode bridge faults
The electrical circuit is designed to convert alternating voltage to direct voltage. If a breakdown of at least one of the diodes occurs, the functional unit ceases to perform its duties. The consequence of this is the supply of voltage that does not correspond to the required indicators.
The rectifier needs to be checked when the battery charging light is on, but there is charging.
You can determine the breakdown by using a multimeter. Take a tester and connect the red probe to the positive of the bridge, and the black one to one of the contacts marked AC.
The throughput voltage for diodes (silicon) ranges from 400 to 1000 mV. If the tester shows different values, then the bridge needs to be changed. Such a unit cannot be repaired.
If the battery charge light comes on while on the road
You are driving quietly and not bothering anyone, when in the most unexpected way (as always, however), the battery icon on the panel lights up in red. This is a signal that your car’s generator is faulty and has stopped providing current for recharging, so that all electrics now “sit” only on the battery.
What we may encounter in this case:
- The generator belt has broken. Electricity is generated during the rotation of the generator axis. This axis is driven by a belt. So if the belt breaks, the generator shaft stops rotating and the generation of electricity stops. And this leads to the battery charge lamp on the dashboard coming on.
- The voltage stabilizer on the generator has failed. Everything is simple here. The part is covered with a copper basin, and again we are not receiving the required voltage to the battery. The issue is resolved by replacing the failed element.
- Severe wear on the generator brushes. The generator shaft is equipped with graphite brushes that help generate electricity. Over time, they can wear out greatly, which will lead to a decrease in the electricity generated and the red battery icon on the device will light up. It is also necessary to replace worn components with new ones.
The list of possible reasons is, of course, not entirely complete. The most critical ones are given. Sometimes there may also be problems with diodes, oxidized terminals and contacts, problems with the fuse or ground wire contact.
Design of generators on VAZ cars
How to identify generator malfunctions
If, after replacing the battery with a new one, the charging indicator does not go out, the cause of the failure is a malfunction of the generator. To determine the lack of voltage supply, you will need to carry out manipulations in the order below. Be sure to use personal protective equipment - each manipulation must be performed with rubber gloves to avoid electric shock. So, to identify the breakdown you will need:
Turn off the engine and disconnect the wires from the battery. Measure the voltage at the terminals using a multimeter. The optimal value should be between 12.5-12.7 V. Connect the wires, turn on the ignition and repeat the voltage measurement procedure again. The indicator should not exceed 13.5-14 V, and increase with increasing speed. If the voltage drops as the speed increases, this often indicates that the generator “brushes” have worn out or the diodes in the diode bridge have failed. Also, the reason for stopping the charge supply may be a loose or broken belt. You can verify this by performing a visual inspection. Press the belt with your fingers, and if it bends less than 1.5 centimeters, this directly indicates a weakening of the tension.
Visually, the driver can independently determine the oxidation of the terminals. To do this, you need to pay attention to the generator wires. If they have oxidized, this will be indicated only by their appearance, but also by the characteristic burning smell.
But also quite often there are global problems that even an experienced car enthusiast cannot cope with without qualified assistance from a specialist. It is worth noting that defects such as worn “brushes” or diodes can be completely eliminated, and more serious problems (open circuit or wear of rotor spare parts) can only be solved by replacing the generator.
What to do if the charging light is on
It will be quite difficult to cope with the above malfunctions somewhere along the way, except that the alternator belt can be changed if you suddenly always carry a spare one with you.
But not everything is so scary, and even with the battery charge lamp on, you are quite capable of continuing to move. The role of the power source will simply fall entirely on the shoulders of the battery. Nevertheless, even without recharging the battery, you can travel a sufficient distance if you follow these simple, but necessary in this case, recommendations:
- You shouldn’t turn off your car’s engine without a compelling reason. The fact is that when starting, the starter consumes quite a lot of electricity. So, in case of a forced stop, you should then start using the traditional method - “from the pusher”.
- It is better to refuse to include additional elements that consume electricity. Yes, without music, a heater, heated mirrors and rear window, driving will be noticeably less comfortable. But it’s better than getting stuck somewhere in the cold in the middle of the highway.
- It is also better to refuse to turn on fog lights and high beams at night.
- To prevent the battery from being powered by a faulty generator, it is better to immediately disconnect the wires coming from it and wrap them with insulation.
By following these simple tips, you can easily get to the nearest car service center or your home garage.
The battery lack of charge indicator lights up on the panel
Confronting attackers
Due to the fact that the battery is not cheap, the issue of protecting the VAZ 2107 battery from theft is quite acute. It’s not difficult to open the hood of a “classic,” which is why thieves are keeping a close eye on the “Sevens.”
Experts offer several options for preventing theft.
- Secure parking or secure garage.
- installation .
- Installation of the hood lock. Let’s be clear right away: few people take this step. Welding work is required, the appearance deteriorates, and it is quite easy for a professional to pick the lock.
- Take the battery with you. Labor-intensive, inconvenient, but effective. On the other hand, if the car is left for a short time, it is defenseless: they can even remove the battery in a supermarket parking lot.
- Reliable battery fixation. Almost the most popular method. The fasteners are secured with a secret that prevents dismantling and makes theft difficult. In combination with an alarm it is a very effective technique.
But all experts agree that the most reliable protection for the VAZ 2107 battery against theft is comprehensive. A combination of multidirectional measures will give the best results!
List of the most frequently asked questions about the problem
There are many additional questions related to the operation of the battery charge lamp. So, if the lamp:
“Lights up when the turn signal is turned on”
This point is mainly characteristic of VAZ classics. For the most part, people recommend not to bother and to continue driving calmly, since in general the system is working properly. But those who did not give up found the problem in a faulty diode bridge, some cleaned the contacts, some recommended checking the fuses, and some simply changed the lamps. No one can say for sure what will happen in your case.
"It's burning full"
Here, the first thing they recommend is to look at the diode bridge, then you can look at the generator brushes and check the ground. Although some people were even recommended to drop WD-40 into the ignition switch, the key allegedly does not return. And it helped!
“It lights up periodically at idle, low/high speeds”
First, you should check the generator belt and its tension, then you can blame the diode bridge and the voltage regulator. In the case of high speeds, the whole issue may also be due to the tired state of the generator brushes.
"Blinking"
In this case, the cause must be sought in oxidized or clogged contacts (including those on the battery) and connectors. So we look, search and clean. The voltage regulator may also be faulty. It is also worth checking the fuses and diode bridge.
"Comes on when the engine is cold"
This phenomenon often signals the need to replace the battery.
Here the cause may be the battery, because after a cold start it will consume more current than usual, therefore a voltage drop may occur, especially if the battery is “dead”. Or it could be a matter of poor contacts or even a tension belt, which may initially slip due to antifreeze or some other liquid getting on it.
“Starts to burn when the headlights are on”
We are looking for possible problems in the diode bridge and at the same time checking the generator brushes for wear.
"It stays on even though the ignition is off"
Perhaps a breakdown of the diodes, another reason could be a malfunction in the ignition contact group and even an installed abnormal alarm system.
“It’s on, but it’s charging!”
The reason here may be a breakdown of additional diodes on the diode bridge. It also happens that the reason is a faulty voltage regulator. These moments are especially characteristic of our classics. However, the problem may also be a bad mass due to oxidized and rusted contacts on the machine body. The solution in this case is to transfer the mass from the battery directly to the starter.
As is easy to see, in the vast majority of situations described, the problem is almost always on the surface. Either there is something wrong with the contacts, or the fuse is blown, or the diode is broken, or the voltage stabilizer is faulty.
Common reasons why the battery light is constantly on
These include the following cases:
- The alternator drive belt is loose, worn or torn;
- the fuse has blown in the section of the circuit from the ignition switch to the control light (in this case there is charging);
- contact is broken in the connector blocks of the mounting block;
- malfunction of the relay regulator;
- diode bridge malfunction;
- malfunction in the circuit of additional diodes;
- break in the current supply circuit to the rotor electromagnets;
- poor contact at the battery terminals;
- lack of supply current at the output of the generator;
- the generator brushes are worn out;
- there is no ground on the negative wire.
If the generator is not working on a strong battery, the car will be able to drive for about 2.5–3 hours during the daytime, if you do not turn on the headlights, air conditioning, wipers, or audio system.
The source of many faults in the battery charging system is the generator voltage regulator relay
The light may sometimes come on when the turn signal is turned on.
The most common reason is a malfunction of the diode bridge, poor contact in the rotation fuses, or poor contact in the ground wire of the instrument panel. It is necessary to check the contacts of all terminals on the wires coming from the generator. The problem must be fixed. Indeed, if the generator malfunctions (a break in one of the three diodes), the battery will no longer receive a full charge and after some time will be completely discharged every time the turn signals are turned on and/or off.
The light bulb goes out and burns at full intensity
A battery light that barely burns at half intensity while the engine is running indicates a generator malfunction: the diode bridge or insulation in one of the stator windings is broken. Less commonly, there is a problem with the ignition switch. The key cannot turn all the way due to accumulated dirt. A few drops of WD-40 “liquid key” into the ignition key hole will alleviate the situation. Sometimes it may be necessary to repair the car's electrical wiring and timely diagnose a decrease in the signal to the indicators.
Self-diagnosis of systems responsible for battery charging
Minimum required set of tools:
- 12 V indicator light;
- a pair of screwdrivers (both flat and Phillips);
- knife and pliers;
- sandpaper for possible cleaning of contacts;
- multimeter
Basic functions and capabilities of the multimeter
Below is a plan for self-diagnosis and identification of possible defects in the operation of the battery charging system. Along the way, attention will be focused on points indicating wear and failure of a particular component/part.
- First of all, we look at the generator fuse.
- The next step is to check the generator rotor windings for short circuits or breaks. To do this, we attach the clamps of a multimeter switched to measuring resistance to the slip rings. Acceptable numbers can be considered a range from 1.8 to 5 ohms. It shows less - you have a short circuit in the turns, a clear increase is visible - which means there is a direct break in the winding.
- Checking the belt for integrity and tension. Low output of the generator may well be due to weakened tension of the drive belt. A clear indication of this will be a clearly audible whistle when you sharply press the gas pedal or accelerate.
- Visual inspection of the wiring to identify insulation damage and burnout.
- You need to run your eyes over the body of the generator itself - suddenly there are cracks, damage and whatnot.
- Checking the slip rings and brushes of the generator. As you already know, brushes can wear out and even warp during use. Along with this, the grooves of the slip rings can become clogged with graphite dust over time. The evidence here would be excessive sparking.
- The bearings will also need to be checked. You will need to pay attention to them if your generator begins to whistle and hum noticeably loudly.
- Determining possible stator failure. To properly check the winding of the latter, it is necessary to disconnect it from the voltage stabilizer. If a multimeter switched to measuring resistance produces a value that goes to infinity, then we can say that the stator windings do not have proper contact with the body (ground).
- Checking the diodes in the voltage stabilizer. This operation also requires a multimeter. First, for example, the positive clamp clings to the “+” or “–” of the stabilizer, and the negative clamp to the phase output. Then you just need to swap the clamps. And if during these operations the readings on the multimeter differ noticeably, then the diode is not problematic, but if not, then it is faulty. Also, oxidized contacts indicate the imminent failure of the diode bridge.
Checking the operation of the generator with a multimeter (video)
Theory “on fingers”: how everything works
On the VAZ 2107, devices can receive power from 2 sources. The first is the battery, the second is the generator. The battery supplies energy when the engine is turned off. It has a certain charge, consumed as needed. The generator produces electricity, but only if the rotor is spinning. That is, with the engine running.
Battery operation diagram: 1. Battery, 2. Negative diode, 3. Additional diode, 4. Generator, 5. Positive diode, 6. Stator winding, 7. Regulator, 8. Rotor winding, 9. Capacitor, 10. Mounting block, 11. Control lamp, 12. Voltmeter, 13. Ignition relay, 14. Lock.
The battery charge is used to start the engine. When the engine starts running, the battery energy is not consumed: the generator supplies all devices with it. A charge is also supplied to it to restore wasted energy. But if the battery is not charging, its own energy will be enough for a limited number of starts. The battery will then be completely discharged. And the car owner will have to solve the problem of how to start a VAZ 2107 if the battery is dead. After all, not everyone has “crocodiles” in their trunk, and not everyone will agree to share electricity with their battery.
Useful tips
To prevent your car from having problems charging the battery, use the following tips:
- Don't ignore your car's dashboard signals. In this case, you will be able to solve the problem at the initial stage of its development.
- Inspect the alternator belt regularly. The correct operation of all electrical equipment on board directly depends on it. If there are any defects, replace it as soon as possible.
- Check the voltage from the generator to the battery. If you notice a discrepancy, diagnose the on-board network.
- Periodically pay attention to the condition of the battery terminals. If you notice oxidation, eliminate this defect. They can be treated with WD-40.
- Isolate the generator and battery from water to prevent short circuits. Leave engine washing to professionals.
- When repairing the battery charging circuit, do not use cheap spare parts.
To summarize, we note that the battery is the most important element in the car’s electrical network. Therefore, you should carry out timely maintenance of the charging circuit and, if necessary, change the necessary parts. In this case, you will ensure a proper system of work. In the article, we told you about the main malfunctions that can cause the battery charging lamp to light up and what to do about it. We hope our recommendations will help you in solving the problem at hand.
Source
Voltage regulator
A part with a direct connection to the generator, due to which incorrect operation of the alternating current device affects the condition of the part.
A visually small detail, malfunctions of which lead to many troubles. For example, overcharging or undercharging the battery. The relay often breaks on cars manufactured in the last 5 years. Main reasons:
- Interturn breakdown of the generator;
- Destruction of generator brushes;
- Diode breakdown;
- Changing the battery poles.
The problem is diagnosed by the battery charge level. Overcharging or undercharging indicates a defective regulator. If there is a malfunction, the part must be replaced as it is not repairable.
Indication signals of the most common laptops
Below are the main states of battery charging indicators for laptops from the most famous companies. Using them you can determine what condition the battery is in:
Different models of HP laptops use their own display system, so you can find out about the battery status using the Windows indicator. Additionally, you can install the HP Support Assistant utility.
If the battery is deemed unsuitable for further use, you can purchase original models for any modern laptops from us, as well as inexpensive compatible batteries from licensed manufacturers.
Source
The battery indicator on the laptop is blinking - the charger is not charging
Most laptops use a series of colored lights to indicate the state of the computer, which can tell you a lot.
Each indicator has several states, such as on, off, slow flashing or fast flashing.
They can also switch between different colors: green, blue, red, orange and purple (much depends on the model).
If you have problems with the charge indicator, the first thing I recommend is to calibrate the battery.
Each computer manufacturer uses its own codes to indicate the charging status of a laptop, but there are some common features.


