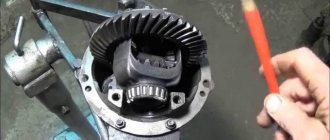
Driving at high speeds with broken universal joint crosspieces does not go without consequences. The rear axle gearbox on the classic and Niva is designed in such a way that when the car moves forward, the shank seems to be unscrewed from the engagement of the main pair. The drive gear of the main pair (also known as the shank) rotates on two bearings: front and rear. The distance between them is elastically fixed by the pretension created by the spacer sleeve when the shank nut is tightened. The vibration of the cardan, transmitted to the rear axle gearbox, gradually unscrews the shank nut. Radial play appears in the shank - especially on the front bearing, because When moving forward, the shank is unscrewed from the joint of the main pair and the front bearing is freed for play. Radial play wobbles the unfixed spacer sleeve and oil flinger washer, gnawing out metal fragments that fall into the tapered bearing. After the fragments cut “patterns” on the rollers and bearing race, noise begins, which continues even after the shank nut is tightened or the spacer is replaced. In theory, in such cases, repair of the rear axle gearbox is required. Repair with complete disassembly, troubleshooting and assembly. The last stage is not performed by anyone in a city of millions at a reasonable price. Everyone just replaces the gearbox with a new one and moves on.
Replacing the front shank bearing.
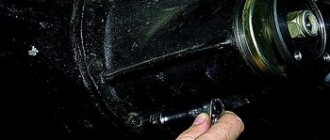
I decided to go a different route. Replace the front tapered shank bearing without disassembling the gearbox. I calculated the distance between the shank and the front bearing race, which was exactly 13 mm. It is necessary to select a puller into this distance, the clamping tab of which can squeeze through. We searched for a long time at the service station, but found a puller with a suitable jaw width size - 13 mm. Only the puller was external, but we managed to twist the legs for internal removal. We started working with this tool.
The flanges were uncoupled. We tightened the nut, took out the bearing, bushing and washer.
Now all that’s left to do is pull out the outer race of the front shank bearing.
We remove the gearbox to replace it, repair it, or replace the rear axle beam. We hang up the rear axle.
Drain the oil from the rear axle housing (see here).
We remove both axle shafts (see here).
We disconnect the rear propeller shaft from the rear axle gearbox flange (see here).
Holding the gearbox housing, use a 12mm head to unscrew the eight bolts securing it to the rear axle beam.
We remove the gearbox...
...and a sealing gasket. Install the gearbox in reverse order. Before installing the gearbox, clean the mating plane of the beam. Install a new sealing gasket. Before tightening the bolts securing the gearbox to the rear axle beam, apply sealant to the threads of the bolts.
Replacing a Chevrolet Niva bearing axle shaft
The Chevrolet Niva belongs to the class of SUVs with all-wheel drive. This is realized through the installation of a rear axle, through which torque is transmitted to the rear wheels. For this, a system of gears and axle shafts is used, which are located in the bridge.
One of the elements that is subject to excessive load, and therefore the one that most quickly fails, is the rear axle bearing. Therefore, it is necessary to diagnose its condition in a timely manner and, if necessary, replace it.
You can find out how to do this by reading this article.
Purpose of the bearing
This part is located in the rear axle of the Niva Chevrolet, closer to the outside of the car. Like any bearing, its main function is to smooth out the rotation coming from the rear axle.
The axle shaft extends from the gearbox, where it is driven by gears, and ends at a flange on which the brake drums and wheel are located.
In order for it to rotate smoothly inside the structure, a ball bearing is installed on it.
It is mounted in a special seat on the bridge, where an increased load on the axle shaft is provided. To prevent its movement inside the bridge, a special locking sleeve is used, which ensures double fixation of this element. An additionally installed oil seal ensures the tightness of the entire structure.
It is important to remember that if the seal is damaged, lubricant leaks, which leads to increased friction inside the bearing and rapid failure. Therefore, if damage is detected, the oil seal must be replaced.
These elements are among the most exposed to loads and therefore require periodic inspection and replacement.
These elements are among the most exposed to loads and therefore require periodic inspection and replacement.
Bearing device
Like most parts in a car, a bearing has several indicators based on which you can select the necessary part:
- number
- internal and external dimensions
- height
Knowing these parameters, you can select a replacement element that will be suitable for a given car and perform its functions correctly.
The number is the value in the catalog - 21212403080. In most cases, this data is enough to purchase a bearing model for a Chevrolet Niva in a store. If the required element is not available, you can find analogues, knowing the technical characteristics:
- internal diameter 40mm
- outer diameter 80mm
- height (meaning product thickness) 23mm
How to notice a malfunction in time
If you fail to pay attention to the failure of this element in time, the rear axle may jam while driving, which can lead to unpredictable consequences at high speed. Therefore, you need to periodically pay attention to the sound of the wheels in order to notice the characteristic hum in time
This usually occurs even at the lowest speed.
This usually occurs even at the lowest speed.
Therefore, you need to periodically pay attention to the sound of the wheels in order to notice the characteristic hum in time. This usually occurs even at the lowest speed.
After this, it is necessary to measure the wheel play, which should not exceed 0.7 mm
After this, it is necessary to measure the wheel play, which should not exceed 0.7 mm.
Replacement
To change a worn part, you need to remove the wheel, then unscrew the brake drum and axle shaft. To do this, you need to jack up the rear of the car.
Removal of the axle shaft is carried out in several stages:
- Using a jack, the axle is raised so that when the axle shaft is removed, oil does not leak out of it.
- By unscrewing the nuts to 17, the axle shaft is unscrewed
- If the repair is carried out on time and the axle is not jammed, then it can be knocked out with a hammer and a wooden board.
If an anti-lock braking system is installed on a Chevrolet Niva, then the work is carried out in a slightly different sequence. The difference is in the splined retaining ring, which is clearly visible when compared:
If the vehicle is equipped with an ABS system, the following procedure is necessary:
- checking the condition of the bearing
- the oil seal is removed
- The axle shaft is secured in a vice, after which the retaining ring is knocked out using a hammer.
- The bearing is removed.
- The new bearing is lubricated and replaced with a new one
- For better installation, the retaining ring is heated with a blowtorch and set in place.
- The axle shaft is pressed into place using a tube.
During work, it is necessary to carefully inspect the axle shaft for cracks and chips.
Main reasons for failure
The rear axle gearbox consists of a large number of spare parts, the failure of any of which can lead to its failure:
- One of the most common reasons for this is constant increased loads, for example, towing trailers and other heavy vehicles. This constantly creates a large load on all elements.
- One of the equally common problems that appears after 5–6 years of vehicle operation is the appearance of play in the crosspieces. This occurs due to constant impacts and shocks arising from unregulated ignition and increased engine detonation. Therefore, during repairs, attention is paid to all elements of the chassis. And it doesn’t end with replacing the transmission mechanism.
- And it should be remembered that if the rear axle gearbox is empty and there is no oil in it, this can lead to it jamming, the teeth on the gears may break, or steel parts may burst due to overheating. Therefore, to avoid such troubles, always check the presence of lubricant.
- There is another type of malfunction that can only appear after many years of operation. In this case, the whole point is in the production of bearings located in the so-called stockings, part of the bridge housing in which the shafts rotate. Which, as a result, can lead to bending of the shafts, then destruction of the gears. And this will thereby lead to the rear axle gearbox becoming unsuitable for repair.
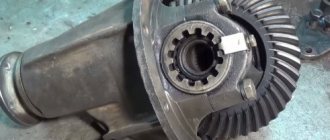
Rear axle gear parts
The rear axle gearbox installed on VAZ vehicles has two main elements:
The main gear can be of two types:
In turn, double transmission can be of two varieties:
The central one is a rather simple design with a large gear ratio, but at the same time high loads are created on all transmission elements. The spaced one is a more complex unit, but the load on all components of the device is evenly distributed, it is more compact and the vehicle’s ground clearance can be increased. Thanks to these advantages, their service life increases several times. But due to the reduced gear ratio, not all car enthusiasts prefer them, so they have to choose based on their priorities. If the car is equipped for fast driving, then it is better to use a rear gearbox with the first gear option. If the car will work as a tractor, then the second option is better. In turn, single gear is divided into the following types:
- Cylindrical, the gears are located in the same plane, which ensures a maximum transmission ratio that ranges from 3.5 to 4.2.
- Conical, perpendicular arrangement of gears relative to each other due to which the housing is enlarged, but at the same time a very high efficiency is achieved.
- Hypoid, a lightweight option with a convenient arrangement of components, has the lowest efficiency of all the above mentioned ones.
- Worm drives are the most complex mechanical units, which are difficult to manufacture and rent, and at the same time have the lowest efficiency.
So, having dealt with the main gear, let's move on to the second part that makes up the rear gearbox - the differential. It is a more complex mechanism that transmits and distributes torque between the drive wheels and drives the second axle via a cardan.
Tags
Useful tips (564)Tuning (329)Traffic police (307)Traffic rules (193)Pickup (163)crossover (156)Bus (151)Fines (149)Transportation (148)GAS (120)Rating (117)Truck (112)SUV (104)Trucks (98)UAZ (98)Bus (94)Car (89)Electric car (88)MOTORHOME (87)Toyota (86)CAMPER (86)History (86)KAMAZ (84)Prices (81)Volkswagen (79) )FORD (78)BMW (74)MAZ (71)Gasoline (71)Mercedes (67)Tesla (65)Van (63)Hyundai (62)Mercedes-Benz (58)Soviet (58)Minivan (58)Cars (57 )Tires (55)Porsche (53)Scania (52)hybrid (52)OSAGO (51)Technology (51)traffic police (49)Renault (48)ELECTRIC BUSES (47)Dump truck (45)Deception (45)Fine (45)MAN (44)Volvo (43)roads (43)Law (43)Repair (42)Electric car (42)Supercar (42)Lamborghini (41)Tractors (41)Ferrari (41)KIA (40)USSR (40)VANS (38 )Driver (38)Nissan (38)coupe (37)GAZELLE NEXT (37)Sedan (37)ELECTRIC VEHICLES (37)Cargo (37)DRONES (36)ZIL (36)VAZ (35)Accident (34)Engine (34) Public transport (34)Inspection (34)Convertible (33)Fuel (33)station wagon (33)Speed (32)ELECTRIC TRUCKS (32)Lexus (31)tractor (31)Hypercar (29)Safety (29)Lada (28)Taxi (27)UAV (27)All-terrain vehicle (27)Chevrolet (27)MOV HOMES (26)Dump trucks (26)Trucking (25)Car service (25)Licenses (25)Mitsubishi (25)Recording cameras (25)Minibus (25)Bugatti ( 24)Ford Mustang (24)
Signs of bearing damage
The primary marker of a problem is a characteristic sound that is difficult to distinguish from the sound of driving on asphalt. Therefore, you need to carefully check the condition of the wheel for characteristic signs:
- heating the wheel from the center without the smell of heated brake pads;
- strong vibrations in the steering column and body from the front wheels;
- pulling the car to the side at high speeds from the direct course;
- heavy steering control off-road;
- a clearly audible crunch when turning the wheel (audible even with the engine turned off, if the car is rolled by hand).
Even one of these signs is a reason to replace the front wheel bearing of Niva 21214. Complete destruction of the element at speed very often provokes the car to roll over. This is due to the short wheelbase of models 21213, 21214 and suspension features.
Without a special stand it is quite possible to diagnose the problem. The wheel hanging on the jack must be taken from both sides and rocked. A broken part will give significant play. Rolling and cracking sounds will also be heard. This is a clear reason for replacing the wheel bearing in Niva 21214 and 21213.
How to replace the rear axle gearbox seal of a VAZ 2107 with your own hands: step-by-step instructions.
- Secure the driveshaft using a screwdriver/spade identical to the photo and remove the 4 bolts securing the driveshaft.
- Carefully hang the disconnected shaft, for example, on a rope to the muffler.
- Determine the moment of resistance to turning the drive gear (it will help you avoid making mistakes during assembly), this can be done in different ways.
Method No. 1 - the most accurate - involves using a torque wrench or a dynamometer and a rope.
If using the latter tools, wind the rope around the flange a couple of turns, as shown in the photo, and attach a dynamometer to its free end. Then start winding the rope, gradually pulling back the device
As soon as the flange begins to rotate with the rope, pay attention to the readings of the device and write them down. After replacing the oil seal and installing everything in its place, this figure should remain unchanged
If you have chosen a torque wrench as an assistant, make sure that its measurement range (scale) is at least 147 Ncm (15 kgfcm), and start tightening the flange mounting nut with it. The force that you need to move it from its place is the required moment of resistance.
Method No. 2 is useful for those who do not have any measuring equipment at hand, but have a colored marker. All you need to do is make 2 marks with it: the first on the nut, the second on the flange itself - as shown in the photo.
Pay attention to the mark on the nut - it should be made on top, and not on the edges, otherwise when unscrewing it can simply be erased
- Using a wrench and a socket, unscrew the central fastening nut of the gearbox flange, but first you will have to lock the flange itself. The most convenient way to do this is with a homemade wrench made from a piece of pipe and two bolts (see photo).
IMPORTANT! If you use marker marks to determine the moment of resistance, be sure to count how many full turns the nut will make relative to the flange until the cavity is unscrewed. Suppose it made 15 such revolutions, which means that during the assembly of this element the nut will need to be tightened exactly 15 revolutions, and then simply align its mark with the mark on the flange.
- Remove the flange (indicated by a blue arrow in the photo) using a special puller (indicated by a red arrow in the photo) or a hammer and a wooden spacer (you can use a plank as it).
- Using any available tool (screwdriver, wrench, etc.), pry up the oil seal and remove it from the installation hole.
Wipe the area where the rubber cuff was installed thoroughly with a rag to remove dirt. So that you do everything correctly, we have indicated with arrows the places where you need to wipe. The oil seal in this photo has already been cleaned.
- Take a new rubber cuff and lubricate its working surface (shown by the arrow) - the one that will go into the hole - with Litol-24 lubricant.
- Install the rear axle gear oil seal in its seat using a mandrel (it can be an ordinary metal pipe, an old bearing, etc.) of a suitable diameter.
The mandrel should rest exactly on the edge of the oil seal: place the mandrel on the seal and start hitting it until the latter is “recessed” to a depth of 1.7-2 millimeters from the end of the gearbox.
In this case, it is most convenient to check yourself with a caliper, although in the absence of such a simple ruler will do.
- Lubricate the working surface of the rubber cuff from the inside with clean oil, and do the same with the flange. Firstly, additional lubrication in such parts is never superfluous, and secondly, this action will contribute to better pressing.
- Complete the replacement of the VAZ 2107 rear axle gearbox seal by installing all previously removed parts in reverse order, but do not forget about the correct moment of resistance, otherwise you risk very soon returning to repair, but not the rubber seal, but the gearbox, rear hub and the whole a number of details.
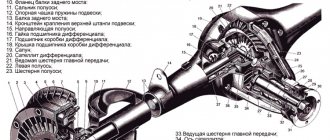
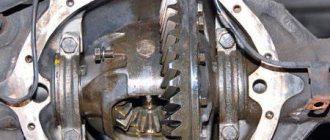
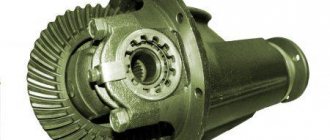
Device
The rear axle of the Niva is equipped with a gearbox with hypoid gears, which form the main gear. The driven gear secures the differential housing. All elements of the unit are protected by a sealed crankcase filled with transmission fluid.
Thanks to the hypoid connection, the axis rotates. Silent operation of the main gear is ensured by the smooth operation of teeth located at forty-five degrees. The decrease in angular velocity occurs due to the fact that the driven and driving gears have a different number of teeth.
The driven gear and the differential housing are interconnected and consist of a pair of satellites (thanks to them, force is transmitted to the axis that is least loaded), a housing, axle shafts and gears, thanks to all these parts the drive is provided. In order to provide the rotating parts with support points and reduce the friction force, a special rolling bearing is installed in the gearbox. The gearbox is also equipped with axle shaft bearings and a pair of differential housing bearings, as well as the main drive. The crankcase consists of two parts that are attached to each other, and to prevent lubricating fluid from leaking through the connection, a special gasket is installed.
If you do not monitor the condition of the transmission and do not service it in a timely manner, it may fail. The main signs that there is a problem are oil leaks and the appearance of extraneous noise while driving. In the first case, the problem is solved by replacing the seals and gaskets; in the latter case, it is necessary to carry out diagnostics and, based on this, solve the problem. It is recommended to change the transmission oil every 40,000 kilometers; this is the only way to guarantee the normal operation of all the key elements of this system.
Possible faults
The need to adjust the elements of the front axle is assessed by the presence of noise and vibrations that occur in various operating modes of the VAZ 21214. Thus, conditionally acoustic signs can be divided into two groups: • Constantly recorded; • Fixed during braking with the help of an internal combustion engine or acceleration.
The nature of the sounds may resemble: • Howling (wear of the main pair); • Crunching, “trolleybus” hum (destruction or overtightening of the shank bearings, unscrewed drive shaft nut, axle bearings, incorrect adjustment of the gearbox gears); • Intermittent “shuffling” (differential bearing). The difficulty of diagnosis lies in the abundance of extraneous noise produced by other components of the car.
Definition of failure
A broken gearbox, like any other component, has specific signs of a defect. A competent auto mechanic can easily determine even the specific type of problem. An ordinary car owner should also know these signs so as not to spend money on car services. An audible way to determine gearbox damage:
- You should choose a road with the highest quality surface without traffic. You need to gradually accelerate to 90 km/h and brake smoothly. At this time, record the appearance of extraneous noise. Repeat the acceleration to 90 km/h, turn off the engine and listen while rolling. If the sound is different, then a breakdown is quite possible.
- Put the car on the hand (parking) brake, start the engine and gradually increase the speed in neutral gear. If the noises match the first test, then the gearbox is most likely normal.
A more accurate determination of the malfunction is possible on the lift when the wheels rotate freely. This method is best known to specialists from services. Using it requires experience and an understanding of what you need to hear.
How to change?
If the mechanism is seriously damaged, it makes sense to replace it with a new one. To do this you will need a new gearbox and a small set of tools:
- wheel wrench;
- jack (if the work is done in an inspection hole);
- chisel:
- hammer;
- hex wrench 12;
- ring or open-end wrenches for 13, 17 and 27;
- syringe for filling transmission oil;
- container for processing.
Important: replacement or repair of the gearbox cannot be performed without a lift, inspection ditch or overpass
Operating procedure
- Place a waste container under the gearbox.
- Unscrew the drain plug, then the filler plug.
- Wait until the entire transmission flows out of the gearbox.
- Unscrew and remove the front wheels.
- Unscrew the cardan shaft from the flange on the shank.
- Undocking and hanging the cardan.
- Unscrew the fastening of the right cover from the suspension cross member.
- Unscrew the fastening nuts and disconnect the shock absorbers from the front control arms.
- Unscrew the threaded connections holding the wheel drive bearing caps.
- Unscrew the nuts securing the brackets holding the gearbox.
- Unscrew the nut securing the left gearbox cover to the cross member.
- Remove the hub cap and unscrew the right wheel hub nut.
- Remove the centering sleeve.
- Compress the suspension spring and unscrew the ball joints.
- Move the steering knuckle to the side.
- Disconnect the exhaust pipe from the exhaust manifold.
- Pull the gearbox back.
- Remove the right wheel drive.
- Remove the gearbox from the machine
To install the new unit in place, you must perform the operations in reverse order.
Important: after installing the gearbox, do not forget to fill it with transmission oil. Otherwise, you will soon have to change it again with another one
Preparation
The main stage is preceded by preparation, which includes: 1. Draining the oil from the RPM through the drain hole;
2. Disconnecting the driveshaft with a 13 key
3. Removing the right wheel drive.
4. Dismantling the lower ball joint on the left side.
5. Removing the suspension extension.
6. Removing the gearbox from the brackets on the right and left, using a stop.
This is followed by disassembling the gearbox, thoroughly cleaning the surfaces from dirt and grease, and troubleshooting the components.
Engine
Cylinder head, Valve, Valve springs, Valve rocker (rocker arm), Valve retainer, Intake valve, Exhaust valve, Hydraulic lifters, Valve seals, Valve lifter, Valve cover, Oil filler cap, Valve cover gasket, Cylinder head gasket, Camshaft, Camshaft oil seal , Camshaft gear, Intermediate shaft, Cylinder head bolt, Valve guide, Vtec valve, Vtec valve gasket, Oil pipe, Cylinder block, Crankshaft, Crankshaft pulley, Pulley bolt, Crankshaft bolt, Main bearings, Crankshaft cover (yoke), Oil deflector, Half rings , Crankshaft oil seal, Crankshaft hub, Crankshaft gear, Piston, Piston rings, Piston pin, Connecting rod, Connecting rod bolt, Connecting rod bearings, Connecting rod bushing, Engine sump, Pan gasket, Drain plug, Cylinder liner, Oil pump, Oil pump chain, Oil gasket pump, Oil receiver, Oil separator, Oil nozzle, Balance shaft, Filter housing, Engine cover, Engine timing belt, Timing belt, Timing kit, Timing belt roller, Timing tensioner, Timing tensioner roller, Timing chain, Chain kit, Chain tensioner, Chain tensioner , Phase adjuster, Timing gear, Timing belt cover, Timing cover gasket, Engine mount, Engine bracket, Engine bump stop, Engine mount (support), Engine assembly, Engine gaskets, Engine sensors, Engine oil cooler, Oil filter mount, Oil filter gasket , Engine cover, Engine protection, Engine pipe, Oil dipstick
Procedure
- The thickness is measured by B and G. To do this, you need to use the formula d1 = B - (111, 960 G), calculation accuracy is 0.025 mm. Install the ring.
- Place the shaft in the front axle housing. It is necessary to check the torque of the shaft (1-2 N per cm).
- When installing the differential together with the driven gear, measure dimension E by pressing it with a force of 5000 N. The gear must be turned several revolutions so that the bearing is installed properly. It is necessary to measure size B in the crankcase. Based on the actual dimensions B and E, and the installation size of 50 mm, select the adjusting ring using the expression d 2 = B - (E 50 X), d 2 - ring thickness, X = 50 mm.
- Place the differential in the housing and secure it.
- Adjust the bearings by tightening nut 23, turning the differential, to ensure the correct location of the rollers. Check the rotation torque of the gear. The clearance of the newly installed gear must be kept under control after adjustment operations with the indicator.
The test is carried out on several teeth. The difference in gaps is not allowed more than 0.05 mm. The nominal side clearance is 0.2 mm. If it is smaller, the ring is changed to the smallest thickness. When checking the size of the gap, there is no need to tighten the tension.
Disabling the bridge
Some people have a passion for innovations in cars, including craftsmen who can change the front axle; Niva 2121 is the most common victim of this experiment. Disabling the front axle is done for many reasons, for example, to reduce tire wear, but the miraculousness of this method is questionable. In fact, the shutdown is carried out to reduce the fuel consumption of the SUV, while the car loses its increased cross-country ability. For this reason, the shutdown is used only on smooth and dry roads, otherwise a tall car can easily roll over when skidding.
Modernizing important elements has always been a very expensive pleasure. An important element is the front axle - the Niva can be equipped with the ability to disable it for an amount slightly less than seven thousand rubles. It is noteworthy that the amount paid for the purchase and installation of a shutdown may never be recouped - fuel consumption decreases slightly, and the Niva is rarely driven on a dry and level road.
Chassis features
The VAZ Niva 2121 (21213, etc.) has both drive axles, which allows the car to efficiently overcome off-road conditions or muddy roads. Engine power is transmitted to each wheel through gearboxes. Niva has two of them: rear driven and front driven/steered.
These nodes are considered one of the most “painful”. If the car is actively used in extreme conditions, the first breakdown will occur at approximately 100,000 km. The modern market and service offer to immediately buy a new node. However, repairs are quite accessible with your own hands.
Replacing the oil seal in the steering gear
If an oil leak occurs in the steering gear, it is most likely necessary to replace the oil seals of the VAZ 2107 steering gear.
Removing the cuffs
Begin:
- Oil is drained from the gearbox housing. To do this, unscrew the adjusting nut and remove the lock washer.
- Unscrew the bolts holding the top cover of the gearbox using a key set to “13”.
- The head of the adjusting screw is removed from the groove on the bipod shaft and the cover is removed.
- The bipod shaft with the roller installed on it is removed from the crankcase.
- Use a 13mm wrench to turn the bolts securing the worm shaft cover.
- Together with the gaskets for adjusting the ball bearings, the thickness of which is 0.1 - 0.15 mm, the cover is removed.
- The worm shaft and bearing are knocked out of the gearbox housing with light blows of a hammer made of soft metal. There are special tracks at the ends of the worm for the bearing balls.
- Carefully pry up and remove the worm shaft cuff using a screwdriver.
- The cuff of the bipod shaft is removed in a similar way.
- The outer ring on the second bearing is knocked out using a punch.
- All parts are washed in diesel fuel or kerosene.
- The working surfaces of the worm and rollers are carefully checked for signs of wear, damage or scuffing. The gap between the bronze bushings and the bipod shaft should be no more than 0.1 mm.
The surfaces of the cages, rings and balls must be free of any damage or signs of wear. Bearings must rotate freely without seizing. Any cracks on the crankcase are not allowed. Damaged or worn parts are replaced with new ones. Replacing gearbox seals on a VAZ 2107 is always done.
Steering assembly
So:
- All internal parts are lubricated with transmission oil.
- The inner bearing ring is pressed into the crankcase using a piece of pipe of a suitable diameter or a special device, which is used when replacing rubber-metal hinges in the front suspension.
- A cage with balls is inserted into the bearing ring.
- The worm shaft is installed.
- The outer bearing cage is placed on the shaft.
- The outer ring is pressed in.
- The cover with gaskets is installed.
- The cuffs of the bipod and the worm shaft are pressed in, the working edges of which are first lubricated with Litol-24 lubricant.
- A worm is installed in the crankcase.
- Using a set of adjusting shims, the turning moment of the worm is set to 2 - 5 kgf/cm.
- The bipod shaft is installed and the engagement gap is adjusted. The shaft turning torque should be 7 - 9 kgf/cm when the worm shaft rotates left and right by 30 degrees. When turned all the way, it gradually decreases to 5 kgf/cm.
- Conducted. Transmission oil is poured into the crankcase up to the lower edge of the filling hole.
The VAZ 2107 gearbox seal has been replaced. In more detail, all the work to prevent leaks in oil seals can be viewed in the video. With timely diagnostics of the operation of the components of the VAZ 2107 car, the use of high-quality parts and lubricants, the car will be used for a long time without major repairs, the price of which is much higher than constant preventive maintenance.
Adjusting the Niva Chevrolet gearbox
Install two adjusting nuts 4 (Fig. 1) so that they come into contact with the bearing rings.
Install the bearing caps and tighten the mounting bolts with a torque wrench.
Preloading the differential box bearings and adjusting the lateral clearance in the meshing of the final drive gears
These operations are performed simultaneously using the device A.95688/R and the key A.55085.
Secure the device (Fig. 1) to the gearbox housing with screws 1 and 6, screwing them into the holes for the bolts securing the locking plates of the adjusting nuts.
Rice. 2. Checking the lateral clearance in the meshing of the main gear gears using tool A.95688/R
Move bracket 7 along the guide of the device until lever 5 touches the outer side surface of the cover and tighten screw 8.
Loosen screws 1 and 3 (Fig. 2), and install bracket 4 so that indicator leg 2 rests on the side surface of the driven gear tooth at the edge of the tooth, then tighten screws 1 and 3.
By turning the adjusting nuts, pre-adjust the lateral clearance between the teeth of the drive and driven gears within the range of 0.08–0.13 mm.
The gap is checked using indicator 2 when rocking gear 6.
In this case, the bearings should not have preload.
The adjusting nuts must only be in contact with the bearings, otherwise the correct preload measurement will be affected.
Rice. 3. Diagram for checking the preload of the differential box bearings
Tighten the two bearing adjusting nuts sequentially and evenly, causing the differential bearing caps to diverge and therefore increasing the distance “D” (Fig. 3).
This discrepancy is noted by indicator 9 (Fig. 1), on the leg of which lever 5 acts.
The nuts for adjusting the bearings of the differential box are tightened until the distance “D” (Fig. 3) increases by 0.14–0.18 mm.
Having set the exact preload of the differential box bearings, finally check the lateral clearance in the meshing of the final drive gears, which should not change.
If the gap in the gear mesh is more than 0.08–0.13 mm, then move the driven gear closer to the drive gear or move it away if the gap is smaller.
To maintain the bearing preload set, move the driven gear by tightening one of the bearing adjusting nuts and loosening the other by the same angle.
To accurately perform this operation, monitor indicator 9 (Fig. 1), which shows the value of the previously installed preload of the bearings.
After tightening one of the nuts, the indicator reading will change, as the divergence “D” (Fig. 3) of the covers and the preload of the bearings will increase.
Lateral clearance in GP and differential bearing preload
In accordance with the instructions, the lateral clearance and preload of the bearings are adjusted using tool A.95688/R.
In its absence, a caliper of a suitable size will perform the specified role.
To ensure the required preload, fix the distance relative to the bearing caps at the beginning of tightening and at the end. The required difference between the values is 0.2 mm.
The side clearance is adjusted by bringing the driven gear closer to the drive gear until it disappears. Initially, one of the nuts is in a loose position, the other (working) is tightened. After eliminating the gap, gradually tighten the attached nut until the jaws of the caliper move apart by 0.1 mm. The backlash adjustment stops when a slight knocking sound of the teeth appears. Next, both nuts are tightened evenly to a distance of 0.2 mm. The correctness of the work is indicated by uniform play in any position of the gears.
Drive gear adjustment
To carry out the operation, use the original device A.95690, mandrel A.70184 or an analogue made according to the drawing.
The crankcase mating plane is positioned so that it assumes a horizontal position. Then an absolutely flat metal rod is installed on the bearing bed. The distance from the bar to the mandrel is measured by inserting the adjusting rings from the set into the gap under the bar in increments of 0.05. The measured value (crankcase base) is consistent with the correction applied to the drive gear. When assembling the unit, it is recommended to abandon the standard spacer sleeve to prevent repeated repairs. Instead, a non-deformable steel bushing 48 mm long is suitable (with a margin, shorten if necessary).
How do you understand that the rubber cuff of the rear axle gearbox of the “seven” needs to be replaced?
Recognizing the wear of the rear axle gearbox seal can, by and large, be done only visually and tactilely - by smudges (precisely smudges, not fogging) of oil on the gearbox in the place where the rubber cuff is located. However, as practice shows, a fairly small number of car owners notice such a breakdown in a timely manner (before the oil completely drains out of the gearbox), therefore, most likely, minor vibrations and/or a strong hum in the VAZ 2107 rear axle gearbox will need to be replaced. rear of the car while driving.
Be that as it may, if you find oil leaks on the gearbox, do not rush to immediately go to the oil seal; in addition, a poorly tightened drain plug can lead to oil leakage, so first of all you should check its condition, and a clogged breather. You will be alerted to the latest breakdown by replacing the rubber seal of the rear axle gearbox too often. However, in order not to wait for these replacements and, accordingly, waste money, we recommend checking the breather for functionality even before starting to deal with the oil seal, so that if necessary, clean or replace it at the same time as the cuff.
This is quite simple to do: grab the breather, or rather its cover, as shown in the photo, press and rotate it in different directions. This should come out easily, without any jamming, otherwise the breather also needs to be replaced. If the cover moves easily, but oil in the oil seal area still oozes, remove the breather (to do this, twist the thread indicated by the arrow in photo 2 with a wrench) and thoroughly rinse it with carburetor cleaning liquid or gasoline, and then blow it with compressed air. Reinstall the removed element, run the repair for 30 kilometers, and then check the rear axle gearbox again for leaks. If it occurs, change the oil seal, and if such a replacement happens again soon, change the breather.
Types of differential lock
In the standard configuration of the Chevrolet Niva, only a center differential lock is provided.
To improve the car’s off-road performance, owners install a rear axle with two types of differentials:
- With forced locking, which is actuated by a mechanical, pneumatic or electromagnetic system.
- Self-locking. Various units are used, the differential in which is locked when there is a large difference in the speed of rotation of the axles, or is locked by default, and unlocked when the speed increases.
Universal wrench for flanges and hubs
If tightening the nut is a “one-time event” and there is no special wrench, you can get by with two M8 bolts and a wrench (metal rod). The bolts are inserted into the flange holes, and the knob is placed between the bolts in front of the flange. If the knob is placed behind the flange, you may accidentally press on the dirt deflector, after which it will need to be secured to the flange.
After unscrewing the nut, it is necessary to remove oil from the threads of the nut and the gear shank, which will significantly increase the coefficient of friction and, consequently, the moment of resistance to unscrewing the nut. It is better to install a new nut, since the thread of the gear shank is imprinted in the nylon of the insert, which reduces the resistance to self-loosening of the nut.
The nut must be tightened, as noted above, with a torque of 12-26 kgcm; tightening is controlled by the moment of resistance to rotation of the drive gear - 4-6 kgcm. Since this moment cannot be measured “in its pure form” (the gearbox has not been removed), we measure it with the nut loosened and, adding 4-6 kgcm to the resulting value, we obtain a controlled moment of total resistance.
The easiest way to measure torque is with a spring scale (steelyard). So, if the moment of resistance is 4-6 kgf, and the hook of the scale is hooked onto the flange hole, then the force on the scale should be 1.1-1.7 kgf. Let us remember that the moment of resistance to rotation is measured, and not the starting moment, which is much higher. All these measurements may seem complicated, but they are necessary for reliable operation of the gearbox.
Diagnostics of the condition of the gearbox (bearings, gearing) of VAZ and Lada Niva cars.
Now let's look at cases where tightening the nut alone is not enough. We will also talk about diagnosing the condition of the gearbox (bearings, gearing).
Rotating the drive gear by the flange, we feel a uniform periodic increase and decrease in the moment of resistance - “roller busting”. This phenomenon is the stronger, the greater the preload, if both wheels are raised and, of course, in the case when the gearbox is removed and the differential box with the driven gear is removed from its housing.
“Roller busting” is a violation of the geometry of the raceways and bearing rollers, a sign that if the gearbox has not yet “hummed,” then this is about to happen. In the latter case, the matter may be aggravated by the appearance of waves on the gear teeth. Then the hum will turn into a howl - and the defect (waves on the teeth) cannot be eliminated.
If, while rotating the drive gear, you notice an increase and decrease in the moment of resistance in only one place along the angle of rotation, this means that pitting has begun on the outer tracks of the bearing (or bearings) - “pitting” has appeared. This also requires disassembling the gearbox.
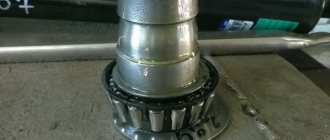
The shank nut is already tightened to the maximum torque (26 kgcm), but there is still no preload in the bearings. Moreover, there may be axial play. The fact is that the preload of the bearings is “metered” by their spacer sleeve.
As the bearings wear out, the bushing may turn out to be too long, and it is impossible to “settle” it by tightening the nut with a torque of more than 26 kgcm - it will take the form shown in the figure below, i.e. will fail completely. There is only one way out - after disassembling the gearbox and assessing the condition of the drive gear bearings, make the bushing shorter.
Repair of the Niva front axle and strengthening of the Niva rear axle
The rear axle axle seal of a fellow Shniva leaked, hence the loss of brakes, constant dirt in the drum and water in the axle
Removal is a separate scribe! First, he somehow unscrewed four nuts and broke the key on one. Then I hammered it with a hammer, but without a puller it was useless to remove this thing. We are Engineers! A puller was assembled from improvised means, two almost parallel fittings, at the end of which there was an angle on one side and a CV joint on the other side, put on the axle shaft through the front wheel disc! And voila! We knocked this thing out with a 4.5 kg sledgehammer! eee.
This did not make the difficulty any less. How to remove the retaining ring? it puts you on the hot seat and hugs you the way any girl dreams. The solution is simple. Cut the old bearing with a grinder and knock out the ring. Then knock out the remaining bearings. It is convenient to install a new bearing through the old bearing ring, and the same retaining ring) simply put on top of each other and hit in a circle with a hammer!
Enjoy watching! These are the cool keys we make, you piece of powdered shit
Unfortunately, it didn’t get to the point of putting it back together; there was no new retaining ring. But I think it’s not difficult to put it back
P.S. Thinking out loud. Since we were getting the axle shaft, I suggested that he install rear disc ones, but alas, there was no money, otherwise it would have been completely cool!
We remove the gearbox to replace it, repair it, or replace the rear axle beam. We hang up the rear axle.
Drain the oil from the rear axle housing (see here).
We remove both axle shafts (see here).
We disconnect the rear propeller shaft from the rear axle gearbox flange (see here).
Holding the gearbox housing, use a 12mm head to unscrew the eight bolts securing it to the rear axle beam.
...and a sealing gasket. Install the gearbox in reverse order. Before installing the gearbox, clean the mating plane of the beam. Install a new sealing gasket. Before tightening the bolts securing the gearbox to the rear axle beam, apply sealant to the threads of the bolts.
Self-replacement of a damaged element
Do-it-yourself hub repair will require an inspection hole or a lift. You need to hang the front of the car to provide full access to the components. Further dismantling after removing the wheel occurs exclusively in strict sequence. Repair diagram for dismantling the front hub of Niva 2121:
- Remove the guide block and caliper. Secure it with something under the bottom of the car so as not to completely dismantle the brake.
- Remove the wheel bearing nut and take out the tapered bushing.
- Using a chisel, bend the locking nut of the front knuckle arm.
- Repeat the procedure on the rear fastener.
- Remove both nuts and the stopper plate (you will need a 19 mm wrench).
- Move the lever away from the knuckle and disconnect the brake hoses.
- Remove the fasteners and the entire fist.
- Disconnect the hub base (brake disc) from the knuckle.
- Pull out the oil seal using a screwdriver.
- Remove the lower ring, the inner sector of the outer bearing and the cage
- Repeat the procedure with the second bearing.
- The outer ring of the second element is removed in a similar way.
Next, the destroyed element is removed and the used lubricant is completely removed. The cavity for the new part is treated with a new compound and assembly is carried out in the reverse order. To press in parts, it is worth choosing a pipe section of suitable diameter.
Design
Like many parts, the axle bearing
has its own design, which is characterized by important indicators:
- number;
- internal and external size;
- height.
This data is necessary not only so that the bearing can be installed in the seat of the axle shaft and axle, but also so that it performs its intended functions. But it is worth noting that if one of these data is known, then the second need not be calculated. So, for example, a bearing
the axle shaft has catalog number 2121-2403080. If the product number is known, then this is enough to purchase it at a car dealership. Replacement of bearing width 23. Auto Nivag axle shaft seals for 2121, 21213,. If you need to know the dimensions, then there is data on the Internet: height and size.
If the catalog number is unknown, then after removing the axle shaft, complete measurements of the product can be taken. After the measurement you should get the following data:
- D internal = 40 mm;
- D outer = 80 mm;
- Height (thickness) = 23 mm.