The location of the mounting fuse block in the Lada Samara family car is different from previous modifications.
Where is it located: the main board is installed in the engine compartment, the additional module is in the central channel on the right.
ATTENTION! A completely simple way to reduce fuel consumption has been found! Don't believe me? An auto mechanic with 15 years of experience also didn’t believe it until he tried it. And now he saves 35,000 rubles a year on gasoline! Read more"
The process of replacing fuses (hereinafter referred to as modules) is not at all complicated, similar to the VAZ 2110, 2112, but it requires attentiveness on the part of the technician. Violation of the installation technology, incorrect selection of the module leads to its overheating and short circuit.
If you encounter difficulties with replacement, contact a specialist service station.
Where is the Starter Relay for VAZ 2115 Injector?
where is the ignition relay on the VAZ 2115 and how to find it
After the first unsuccessful attempts to start the car engine using the ignition key, without hearing the usual sounds of the starter, most car owners look for the cause of the malfunction in its breakdown. But most often the cause is the ignition relay.
Why do I need an ignition relay
This item was installed on previous VAZ car models. With all this, this may not be the case for earlier modifications of 2115. It is located in the starter circuit on VAZ-2115-01, 20, 21, 22 (injector, carburetor).
This section has different names: ignition relay, starter start, starter disable, ignition off or ignition switch, main relay.
But in any case, its purpose is the same - to make it easier to start the engine and protect the starter from wear, it turns off the power to the electric starter after starting the engine, limits the currents flowing through it, protects the contacts in the ignition switch or turning the key from caking while the engine is running.
In addition, it allows you to start the starter when the vehicle's electrical equipment is turned on and the battery charge is low.
There are no fuses in the ignition circuit of this model.
Thus, this cheap part saves you from expensive repairs and makes starting the engine easier.
This part should not be confused with the repeater, located specifically on the starter and designed to control (extend or push) the starter clutch mechanism and the flywheel teeth.
install relay
to the starter
Until 2110.
Signs of breakdown
If the electric starter does not turn when you turn the ignition key, but you hear soft clicking sounds from the relay contacts, the problem with the vehicle is the starter. You can test this by attaching it specifically to the battery, bypassing this electrical relay. If you can't hear the clicks and the starter works, it's time to change it.
Where
Where is the relay? ignition of VAZ-2115? It is located in the cabin, to the left of the steering column, under the dashboard. To see this you need to remove the instrument panel. Next to it, to the left of it, is a relay for turning on the rear fog lights. They are bolted to the body stud using a “10” nut and located in a special trim.
The relay also controls the washer, auto heater, rear window heating and some other low-current circuits. If these parts of the car are not working properly, you need to check the condition of that part.
The type of electric ignition relay is 90.3777-10, it has four contacts, the control voltage is 12 volts. When purchasing a new relay, be careful: the five-pin 24-volt counterparts have a similar appearance. Self-repair of this part is not profitable due to its low cost.
Video: “Ignition relay VAZ-2115: Where is it located? "
If installed independently
The previous owner of the car, in the absence of such a standard part, could install it himself. These installation kits are sold at car dealerships. In this case, the electrical relay can be located not only in the “usual” place. Finding it without calling the previous owner will not be easy.
If this part breaks On the way, you can start the car by closing contacts 87 and 30 (the layout and layout are based on the upper part of the relay housing diagram). In this case, the use of the machine is permitted without any restrictions. But at the first opportunity, be sure to remove the damage. The operation of the VAZ-2115 ignition system directly depends on the relay.
There is a special offer on our website. You can get a free consultation with our corporate lawyer by simply submitting your question in the form below.
Electrical diagram of VAZ 2115 – 20 cars (left half):
1 – headlights; 2 – fog lights; 3 – air temperature sensor; 4 – electric motor of the engine cooling system fan; 5 – blocks connected to the wiring harness of the ignition system; 6 – engine compartment lamp switch; 7 – block for connection to a single-wire type audio signal; 8 – sound signal; 9 – washer fluid level sensor; 10 – front brake pad wear sensors; 11 – oil level sensor; 12 – generator; 13 – engine compartment lamp; 14 – coolant temperature indicator sensor; 15 – starter; 16 – battery; 17 – relay for turning on fog lights; 18 – coolant level sensor; 19 – brake fluid level sensor; 20 – reverse light switch; 21 – windshield wiper gearmotor; 22 – oil pressure warning lamp sensor; 23 – block for connecting to the rear window washer electric motor; 24 – windshield washer electric motor; 25 – instrument cluster; 26 – mounting block. Conventional numbering of plugs in blocks: A - block headlights; B — electric fuel pump block; C — blocks of the mounting block, ignition switch, windshield wiper gearmotor; D — interior lamp
Signs of malfunction and causes of relay failure
You can find out that the VAZ 2114 starter relay has failed by the following number of signs:
- when trying to start the engine, the engine started, but the starter continued to spin, making unusually loud sounds;
- when you turn the key in the lock, the relay clicks, but the starter does not respond at all;
- When the ignition is turned on, the starter works, but the engine does not start.
The causes of failure of this device may be:
- core winding short circuit;
- burning of internal contacts;
- sticking of the moving core;
- mechanical damage.
Regardless of the reasons for the breakdown, a failed relay should be immediately replaced with a new one, so as not to cause damage to the starter or ignition switch in the event of unsuccessful attempts to start the engine.
Very often, the starter relay 2114 fails during long, protracted attempts to start the engine. That is why, if the car’s engine begins to start poorly, you should immediately find the reason for this and eliminate it, since otherwise there is a possibility of the relay breaking and damage to the starter itself.
How it works
The device works as follows:
- The battery supplies power to the starter coil;
- The coil acts on the armature due to the influence of the magnetic floor;
- The armature moves and compresses the return spring;
- This causes the bendix to mate with the splines located on the flywheel;
- When the contact elements close, the pull-in winding is deprived of power, and the armature is held inside the system due to the magnetic field;
- After closing the contacts and starting the engine, power stops going to the holder coil, and the armature returns to its place due to the action of the spring. As a result, the bendix disengages.
VAZ 2114 fuse box
On cars of the Samara 2 series, which include the VAZ 2114, there is a mounting block that is installed in the engine compartment under the windshield on the left side.
Location of the fuse box on the VAZ 2114
It houses various relays and fuses. Because of this, it is often called the fuse box. The cover of the mounting block is secured with clips made of plastic; they snap off quite easily and it is removed. On its inner side there is a diagram of the VAZ 2114 fuses. The rated current strength that is allowed in the circuit for each protective device is indicated there.
You cannot install a charger with a current exceeding the rated values indicated in the diagram. In this case, damage to the electrical device located in the circuit is possible.
On injection machines, the relays and chargers are located as follows.
Fuse box VAZ 2114
In the upper right corner you can see a small yellow tweezer; it is specially attached there for replacing the charger.
In total, this block contains 17 active memory units from F1 to F16 and 4 reserve ones - F17, F18, F19 and F20.
In addition, the car has another block where the fuses are located; it is located in the car interior under the glove compartment and an open shelf.
The interior is equipped with:
- Charger for the fuel pump, with a rated insert current of 15 A;
- protection (7.5 A) on the fan relay, speed sensor, oxygen sensor, mass air flow sensor;
- fuse with a current of 7.5 A to protect the ECU and ignition unit.
Fuses under the right screen of the VAZ 2114 console
In order to competently operate the electrical equipment of a car and promptly respond to emerging malfunctions or failures, you need to have a good understanding of which circuits include a particular protective device.
Recommendations for care and maintenance
- Buy original fuses. Domestic or foreign, it doesn’t matter;
- Install strictly in accordance with amperage ratings. Unacceptable with lower or higher current strength. In the first case, this will lead to damage to the module, in the second - to breakdown of the unit, which is attached to the fuse;
- Carefully check the quality of fixation of terminals and limit switches on the board. If loose, tighten and press with pliers. A spark can cause a fire and melting occurs;
- If moisture gets in or condensation forms inside the mounting block, remove the cover, dry it, and if necessary, blow it with a stream of compressed air.
PRICES AND MANUFACTURERS
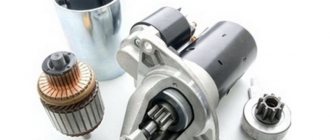
Prices for starting devices may vary depending on the manufacturer and the design of the device itself. Among the product manufacturers we can note such companies as Pramo Iskra (a Russian-Slovenian joint venture), STARTVOLT, LKD (China), BATE (Belarus), PEKAR (St. Petersburg), KZATE (Samara), Avtopribor (Vladimir). Nowadays, you can increasingly find a gear starter on sale - it has an additional gear mechanism that allows the device to operate under increased loads. Such devices are smaller in size and have a longer service life, but their price may be slightly higher.
Below are approximate prices for some types of devices:
Starter manufacturer price table
At the VAZ plant they install a KZATE 5712.3708 starter manufactured in Samara. It is difficult to say whether it is the best in quality, but you can always buy spare parts for it. Many people praise Belarusian products, but problems often arise with spare parts - most often in stores only Bendix is sold as spare parts for it. It should be noted that the starters of VAZ 2108, VAZ 2109, VAZ 2113, VAZ 2114 and VAZ 2115 are no different from each other and are completely interchangeable.
If the starter on a VAZ 2114 does not turn, it is not at all necessary to remove it immediately. The fact is that the relay may be to blame for the malfunction, but not the retractor, but the one that is unloading and is usually installed either under the hood closer to the windshield, or under the steering shaft in the cabin. The relay is included in the electrical circuit running from the ignition switch to the VR, and is designed to protect the starter from overload.
But the question of where the starter relay is located on a VAZ 2114 often confuses many motorists, and this question is often asked on forums. The simple fact is that, depending on the year of manufacture of the car, the manufacturer slightly modified the electrical circuit and changed the arrangement of its elements. Then, when installing an alarm system, auto electricians could move the starter relay on the VAZ 2114 to another location.
How to find this tricky relay if it is not clear where it is located? It is necessary to remember how the connection diagram for the starter on the VAZ 2114 is arranged. There are only two supply wires on the VR - a constant voltage of 12 volts from the battery and a supply wire to the VR coming from the ignition switch. It is along the circuit of this wire from the starter that you need to follow, in the end, the wire will lead to the desired relay, in the diagram it is indicated as a locking switch.
Signs of malfunction of the main relay and electric fuel pump relay circuits of the UAZ Hunter, their error codes.
In the previous material, we examined in detail where the main relay, the electric fuel pump relay and the fuses of the power circuits of the electronic engine control unit (ECU) in the UAZ Hunter are located, and also justified the need for their protection and periodic inspection with maintenance.
Now let’s look at why and for what reasons the UAZ Hunter engine may not start related to these relays or fuses, as well as signs of malfunction of the main relay and electric fuel pump relay circuits. At the end of the materials, analogues and options for replacing the main ECU relay and the electric fuel pump relay will be given.
Error codes for the engine management system with the Mikas 7.2 ECU associated with the main relay and the electric fuel pump relay.
If you have an on-board computer installed in your car with the ability to voice or digital error notification, then if there is a malfunction in the electrical circuits of the main computer relay or the electric fuel pump relay, it may display the following:
Error code 167 - short circuit in the electric fuel pump relay circuit. Error code 168 - open circuit in the electric fuel pump. Error code 169 - short circuit to ground in the electric fuel pump relay circuit. Error code 177 - short circuit of the main relay circuit. Error code 178 - main relay target open. Error code 179 - short circuit to ground in the main relay circuit.
Preliminary safety notes
- Voltage above 36 volts is considered dangerous to humans. Electric shock of 0.1 ampere is fatal. The situation is aggravated by high humidity and metal flooring.
- The starter is a DC electric motor capable of delivering 260 amps at maximum load.
- Interfering with bare hands or metal tools into the current circuits of a switched-on unit is dangerous to health. Dismantling, repairs, and installation must be performed with the battery power turned off.
- Testing windings for interturn short circuit and insulation breakdown to ground is performed with a megger. The generator of the measuring device produces voltage up to 2500 volts. It is prohibited to touch the contacts during the verification process.
- Electric motor equipment requires care and experience. Printed and electronic publications are not deprived of the right to errors or typos. An incorrect wrench size will quickly become apparent. A play on Russian words will sound, untranslatable into foreign languages. Things will go further. The inaccuracy of the diagram is hardly noticeable.
- At the first symptoms of uncertainty or lack of knowledge, you should contact a professional auto electrician. The safety of car wiring and on-board electronics is valued above personal ambitions.
Starter and additional relay VAZ 2114: why the starter does not turn
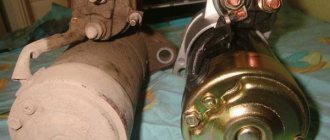
The starter on the VAZ 2114 is the engine starting device; without it, the engine can only be started from a pusher or in tow. Its failures cause a lot of trouble for car owners, but the reason for the inoperability does not always lie in the starting mechanism itself - there are other breakdowns, for example, a non-working relay.
Starter
Trigger device
The starter on a VAZ is an electric motor with a mechanical drive for engagement with the flywheel of an internal combustion engine (ICE). The device itself consists of the following parts:
- Main building. It is a metal hollow cylinder, inside of which the electric motor parts are located;
- Stator. The stator is a winding made of thick copper wire, between the turns of which steel cores are placed. The winding is located inside the housing along its walls;
- Rotor. The rotating part of the mechanism, steel plates made of electrical steel are assembled on the shaft, and a winding is located inside the plates. It is also called “anchor”. The armature rotates in the housing bushings - front and intermediate; the rear support of the entire shaft is a bushing in the gearbox housing. There is also a collector on the rotor, which is a set of plates. A magnetic field is created on the collector, which sets the armature in motion;
- Bendix. A gear device that meshes with the flywheel of an internal combustion engine and ensures engine rotation. Placed on the rear of the rotor shaft;
- Brush unit. In model 2114, there are 4 brushes in the assembly. The brushes interact with the rotor commutator, and it is they who create the electromagnetic field;
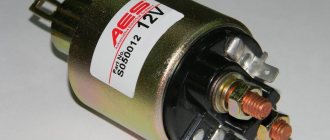
- Solenoid relay. Unlike a conventional relay, the solenoid relay performs two functions at once - it closes and opens the contacts of the electrical circuit, and with the help of the core it moves the bendix gear to engage with the flywheel of the internal combustion engine.
Malfunctions
There are various signs of a starter malfunction on a VAZ 2114:
- The starter does not work at all, that is, it does not show any signs of life. The stator or rotor winding may burn out and power may not be supplied to the electrical part of the device;
- The starter turns, but does not engage; often the Bendix idles, not engaging with the flywheel. Usually the cause is the bendix itself - it should only rotate in one direction on its axis;
- The starter does not operate when the VAZ 2114 key is turned. If dry, quiet clicks occur, then both the VR solenoid relay and the relay responsible for turning on the circuit by turning the key in the ignition switch may be faulty. If the VR is faulty, the clicks are usually louder;
- The starter turns slowly, but can stop quickly. The stator or armature winding is short-circuited, the rotor has play in the bushings. There may also be a bad weight of the internal combustion engine with the body or a weak battery, but this does not apply to the starter;
- The engine starts with a grinding or crunching sound. Most often, such a start indicates wear of the teeth on the Bendix gear or the teeth of the engine flywheel.
How to repair the traction relay on a VAZ 2114 car
A starter 5712.3708 is installed on a VAZ 2114 car. It differs significantly from similar devices on other VAZ car models in its smaller size and weight. This design feature is the reason why malfunctions in the device are not uncommon, so it is useful to know how to fix them.
What needs to be done to remove the starter?
This operation will require installing your VAZ 2114 car on an inspection hole or overpass, because all the necessary actions will have to be performed under the car. After the machine is installed, it is necessary to remove the protection from the engine. Then you need to open the hood and disconnect the battery, pull out the block with wires and remove the wire leading to the traction relay. Next, tighten the mounting bolts and remove the starter.
If it is impossible to install the car on the inspection hole, then the device can be removed through the top of the engine compartment. In order to do this, you will need to remove the air intake corrugation, and then the air filter. Before these steps, you must also disconnect the battery. Next, you also need to disconnect the wires of the traction relay, starter, and then remove the starter itself.
To carry out the work you will need 15, 14 and 13 mm wrenches.
The main reasons why the starter may not work
Not every case when the traction relay does not work requires the procedure of removing the starter from a VAZ 2114. If it does not work and the armature does not rotate, it is possible that the following simple manipulations will help:
- The cause may be a faulty or discharged battery, charge or replace it;
- The battery terminals and wire tips are heavily oxidized, clean them and treat them with Vaseline;
- A short circuit has occurred inside the winding turns, in which case it will need to be replaced;
- There has been a break in the power supply, you need to check their integrity;
- The contact part of the switch has broken down and will need to be replaced;
- The armature began to jam, and here repairs will still require dismantling the starter.
If the relay works but the armature does not rotate, try the following:
- Replace or charge the battery;
- Check the terminals and fastenings for possible oxidation or loosening;
- Clean the collector, it is likely to burn;
- Replace brushes if they become stuck or worn;
- Check the armature winding for open or short circuit.
If the armature rotates but the flywheel does not rotate:
- The clutch is slipping, you need to check the starter and replace the clutch;
- The gearbox gear is damaged and needs to be replaced.
The starter makes an unusual noise while turning the armature:
- The armature and drive shaft bearing shells are too worn and need to be replaced;
- The drive shaft bushing in the clutch housing is worn out and needs to be replaced;
- The fastening of the starter has become loose or its cover on the drive side is broken; it is necessary to tighten the nuts or replace the device;
- The starter has been secured skewed, check its fastening and make adjustments;
- The gears of the gearbox are damaged and need to be replaced;
- Damage to the drive gear or flywheel crown; damaged parts will need to be replaced;
- The clutch or armature is stuck, you need to clean the splines, lubricate them with oil, and replace the relay.
Location of the VAZ 2114 starter relay
Starter protection is designed to protect the circuit of the corresponding unit from overload or short circuit. In appearance, it is a standard four-pin device suspended on a bolt inside the engine compartment.
In this case, the injector or carburetor is designed in the same way - the block is suspended independently. The exact location of the element is impossible to describe. Thanks to the “special” approach of the designers, the hitch may differ depending on the year of manufacture. Therefore, it is best to start your search from the starter terminals and move along the wires to the device itself.
Locating the starter relay
The starter retractor is an electromechanical device installed directly inside the unit housing.
The part is responsible for the clutch of the engine flywheel with the electric motor gear. The search is carried out by visual inspection. The retractor is located in the same housing as the main unit and has two large contacts coming from the ignition switch and the battery.
Retractor design
The VAZ 2114 starter solenoid relay is located on the housing of the starting electric motor and is securely fastened to it. The device consists of separate windings and a contact group.
Mechanism of action
Operating principle of the device:
- when turning the ignition key, power is supplied to the retractor winding;
- the working plate, under the influence of current, is pressed against the contacts;
- power is supplied to the starter;
- the engine turns over and the engine starts.
Signs of malfunction of the retractor relay on the VAZ 2114
There are a number of symptoms that indicate a device failure. The symptoms are specific to this part and are difficult to confuse with other problems.
Typically, masters highlight:
- nothing happens after turning the ignition key;
- the starter fires, but does not turn off, which is accompanied by a characteristic sound.
No clicking of the solenoid relay
If there is no characteristic sound of the solenoid relay operating, the problem should be looked for further:
- the contacts of the working plate have oxidized;
- there is damage to the ground cable;
- The solenoid coil of the relay is burnt out.
There is a click, but the starter does not turn
If after turning the key there is a characteristic sound, but then nothing happens, the components are checked.
- Charging the battery. If there is no voltage on the windings, clicks may appear, but the current will not be enough to start the motor.
- Damage or wear to the commutator.
- Oxidation of the retractor element.
The relay is activated, the starter starts the engine, but does not turn off
The most common cause is a clogged starter armature. In this case, the bendix wedges and its working part does not disengage. In second place is a breakdown of the ignition cylinder - the key release may not work, or the contact group does not move easily enough.
Instructions for replacing the relay on a VAZ-2114
Replacing the starter solenoid relay, as well as the engine itself, is a responsible process that requires close attention and extreme care.
Starter relay installation diagram
The electrical circuit for connecting the starter relay is not complicated. Any car enthusiast can carry out installation work, provided he has sufficient experience and a minimum set of tools.
It is also useful to know about connecting an additional relay.
How to replace the starter relay
To replace a unit, you must follow a sequence of steps.
- Securely lock the machine in place.
- Remove the terminals from the battery.
- You will need to disconnect the red wire from the relay.
- Using an open-end wrench No. 8, unscrew the screw of the brush assembly and remove the wire connected to it.
- Loosen and remove the tie rods securing the device to the ground.
- Dismantle the power cable and remove the device.
- Assembly is carried out in reverse order.
Checking work
The most reliable way to check is the “scientific poke” method. After assembling the device, you will need to start the engine. If the procedure was successful, the module operates normally.
Starter Interlock Relay Location
The starter interlock device is a separate unit that prevents the rotation of the electric motor armature after starting the power unit of the machine. Thanks to a well-thought-out design, after turning the ignition key, a group of contacts is closed, passing current to the starter. After the motor spins up and the circuit opens, the diode closes and the excited windings are de-energized.
The exact location of the block differs depending on the year of manufacture. The type of power plant also affects the installation.
Relay and fuse block diagrams for VAZ 2115
The Lada 2115 was first released in 1997 and finished production in 2012. Over such a long period of time, the electronic components of the car have changed significantly. It is not surprising that modifications of the mounting blocks have changed more than once, and with them the fuses of the VAZ 2115.
An old-style car with a carburetor required one installer in the engine compartment. With the advent of a new 8-valve injector, a second unit was needed, installed in the cabin under the dashboard. Some of the new relays were placed under the steering wheel during the 2007 and 2008 upgrades.
The design of the mounting block box has become more modern over time. To make life easier for drivers, a diagram was placed on the lid and tweezers were attached for replacing elements.
Preliminary safety notes
- Voltage above 36 volts is considered dangerous to humans. Electric shock of 0.1 ampere is fatal. The situation is aggravated by high humidity and metal flooring.
- The starter is a DC electric motor capable of delivering 260 amps at maximum load.
- Interfering with bare hands or metal tools into the current circuits of a switched-on unit is dangerous to health. Dismantling, repairs, and installation must be performed with the battery power turned off.
- Testing windings for interturn short circuit and insulation breakdown to ground is performed with a megger. The generator of the measuring device produces voltage up to 2500 volts. It is prohibited to touch the contacts during the verification process.
- Electric motor equipment requires care and experience. Printed and electronic publications are not deprived of the right to errors or typos. An incorrect wrench size will quickly become apparent. A play on Russian words will sound, untranslatable into foreign languages. Things will go further. The inaccuracy of the diagram is hardly noticeable.
- At the first symptoms of uncertainty or lack of knowledge, you should contact a professional auto electrician. The safety of car wiring and on-board electronics is valued above personal ambitions.
REPLACEMENT
We figured out where the starter relay is located on the VAZ 2114, now all that remains is to find out how it can be changed. There are two options for replacing this part:
- With the removal and installation of the starting unit itself;
- Without removing the starter.
In any case, you should have the necessary tools:
- Combination key 13;
- A screwdriver (it would be better to have several of them - Phillips and slotted ones);
- Key for 10.
A set of keys is always necessary to have in stock. Let's look at how to replace the solenoid relay on a VAZ 2114 with removing and installing the starter (by the way, this is much easier to replace):
- Remove the battery terminals;
- Unscrew the two bolts securing the air filter housing (10mm wrench);
- Disconnect the connector of the air flow sensor (MAF);
- Unscrew the air pipe clamp and dismantle the housing;
- We pull off the wire chip of the solenoid relay (held on a plastic clip);
- Using a 13mm wrench, unscrew the nut securing the positive terminal;
- We unscrew the fastenings of the starter itself (it is secured with three 13 nuts);
- We take out the mechanism;
- With the starting device removed, use a 13mm wrench to unscrew the wire on the VR cover going to the stator winding;
- Using a screwdriver, remove the three screws securing the VR and dismantle this device.
Article on the topic: Installing rear disc brakes on a VAZ 2110
Now you need to install the new part and put everything back together in reverse order. That's it, the replacement of the retractor on the VAZ 2114 is completed. Of course, you can try to get to the relay mounting screws right in place without removing the starter, but it’s up to you to decide how easier it is to remove this device.
Dismantling and replacement
To make it more convenient to replace the relay, it is recommended not to be lazy and still remove the starter itself. This will allow you to simultaneously check the condition of the starter while replacing the relay.
The removal procedure described below concerns an assembled relay, which has the ability to replace individual structural elements.
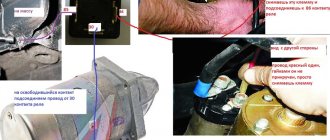
- Disconnect the negative terminal from the battery.
- Disconnect the red terminal from the relay. This is a red wire.
- Using an 8 mm wrench, unscrew the nut securing the brush assembly. You will find it behind the relay.
- Remove the contact that this nut held in place.
- Unscrew the fastening of the solenoid relay to ground. We are talking about coupling bolts.
- Next, you need to dismantle the power wire, after which the relay itself is pulled out.
- The fastening nuts are unscrewed from the end part, which allows you to remove the upper part of the relay.
- It is advisable to immediately replace the relay core with a new one.
- Install a new relay.
- Proceeding strictly in reverse order, reassemble the assembly, which will allow you to complete the replacement of the unit.
- When separating the relay into its two component parts, be sure to ensure that the core does not slip out and the spring does not jump out.
Therefore, in order to figure out whether the relay works or not, and also who is the real culprit for the violation of the functionality of the system, we will conduct several checks.
- Check the starter. Turn the ignition key. The starter should begin to turn, and the relay should make a characteristic click. If the starter is not doing its job, replace it. Relyukha has nothing to do with it in this case.
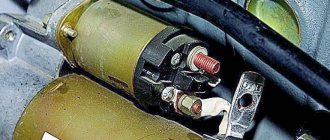
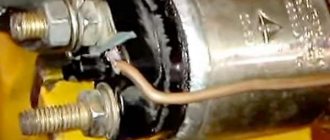
- Check the solenoid relay. To do this, there are two copper bolts on the back cover. Two contacts are attached to them. If the starter starts turning, then your relay has definitely failed and needs to be replaced. In this case, you should not remove the starter, which will allow you to get more accurate test results.
- If you have removed the starter, the check is performed slightly differently: Connect the contact wire of the retractor relay to the positive terminal of the battery;
- The second contact connects the starter ground and the battery charger;
- When the contacts are placed on the relay terminals, the relay should turn on with a characteristic click;
- If the operation is too slow, uncharacteristic, check the condition of the contacts. They often burn out or oxidize.
In order not to confuse what exactly has failed - the starter or the solenoid relay, there is an excellent method for recognizing the “culprit”.
- Remove the starter, connect the negative terminal of the battery to ground;
- The design of the device has copper bolts and a tongue-shaped element;
- The positive wire from the battery is connected to this “tongue”;
- If there is contact, the solenoid relay clicks and starts working;
- If not, then you will have to go to the store for a new relay.
But there is one more very important point. Even if all the facts indicate that the starter or retractor relay is not working, another unit - the ignition switch - may still be the cause of ignition problems. Take the time to check its serviceability before buying new parts.
Replacing fuses on a VAZ 2115
- Driver, head at “10”;
- Flat head screwdriver;
- A set of new modules;
- Plastic pliers for removing the relay block;
- Rags, additional lighting as needed.
- We turn off the engine, open the hood, remove the terminals from the battery;
- On the left side, closer to the windshield, there is a mounting block. Unscrew the two bolts around the perimeter;
- We disconnect two blocks with wires, remove the power supply assembly;
- We carry out troubleshooting and check the serviceability of all modules.
You can do this in two ways:
- Visually: checking each module for the integrity of the melting element;
- Using a multimeter: measuring the resistance at the end switches of the module without dismantling it.
Each method is applicable and effective.
After replacing the faulty fuses, we assemble the structure in the reverse order.
Some motorists practice the second method: without dismantling the mounting block. We remove the fuses one by one, check them for integrity, and replace them with new ones as necessary.
If you notice that a unit in your car has suddenly stopped working, do not rush to dismantle it and replace it with a new one. First of all, inspect the mounting block, check the modules for integrity. Most likely some kind of fuse has blown.
Only after replacing the module does not help eliminate the problem, proceed to diagnosing the equipment and checking the integrity of the electrical supply circuit.
Where is the starter relay located on the VAZ 2114?
The VAZ 2114 starter has two relays. The first is a retractor; it is mounted together with the starter in one housing. The second relay is an auxiliary one. Sometimes it is mistakenly called unloading. This relay is located under the instrument panel, next to the ignition relay and rear fog light relay. This little relyushka spoiled the blood of more than one car owner who was unaware of its existence. A four-contact relay, forced to withstand a serious load every time the car is started, fails quite often, and it is useless to repair it. It's better to change it right away. When this relay fails, the starter will no longer turn. In response to turning the key, only dry clicks are heard.
Solenoid relay
The solenoid relay consists of the following elements:
- housings,
- magnet with two coils: retracting and holding,
- anchors,
- return spring
- contacts.
The spring in the traction relay may break, the windings and contact plates may burn out. Most manufacturers produce non-separable traction relays, so trying to repair it means wasting effort and time. It's easier to buy a new unit and install it in the starter housing.
Unloading relay
This is what the auxiliary relay looks like. This is what the connection diagram for the auxiliary switching device looks like. On the device itself there is a diagram for connecting its legs.
What is the VAZ 2114 ignition relay responsible for?
Below watch the video about replacing the ignition relay in a VAZ 2114 and express your opinion about it in the reviews of the article.
Video quality: SATRip
The video was uploaded to the admin from the user Avigdor: for immediate viewing on the portal.
To give the correct answer to the question Replacing the ignition relay in a VAZ 2114, you need to watch the video. After viewing, you will not need to seek help from specialists. Detailed instructions will help you solve your problems. Enjoy watching.
Humor on topic: - Tell me, Borya, is your relationship with my Alla really serious? - Roza Markovna, I beg you, our relationship is so serious that we have never smiled.
The engine control system circuits are protected by three fuses.
Location of relays and fuses for the engine management system under the instrument panel console
Note. The right trim of the instrument panel console has been removed (see “Instrument panel - removal”).
Engine management system relays and fuses:
1,2 and 6 - fuses (see table 8.4.3); 3 - main relay; 4 — relay for turning on the electric fan of the engine cooling system; 5 - fuel pump activation relay