A DVR is a very convenient device for filming what is happening on the road. In our article we will tell you how to connect it in a car and hide all the wires.
The DVR is a convenient device and drivers often use other gadgets along with it. Most devices for cars work through the cigarette lighter and therefore the question often arises of connecting a DVR without using it.
A video recorder allows you to record everything that happens on the road, and therefore everyone tries to use it, because the video will be the best proof of correctness in the event of an accident. However, the wire is one of the significant disadvantages of the device, because it not only spoils the appearance, but can also block the view and simply get in the way.
Moreover, the cigarette lighter socket is not always in working condition, and there may already be something connected there. You can correct the situation using a splitter, but only then will the on-board network be heavily loaded. So, all that remains is to look for a more convenient way to connect.
How to connect a DVR in a car without using a cigarette lighter or wires
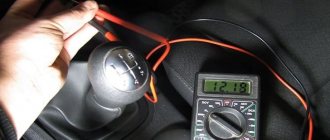
On the road, no one is immune from various situations, and to prove your innocence, you need to install a DVR that records video of what is happening in front of the car. It is possible to install the device yourself, and there are options to connect it in different places of the car, including without using a cigarette lighter. The installation process is simple, the main thing is to have at least a little understanding of the operation of the car’s electrical equipment and be able to use a multimeter.
What should a registrar user remember?
And finally, a few things that every DVR user should remember. In fact, these simple rules are no less important than proper placement of the registrar.
When leaving the car in an unguarded place, take both the recorder and the mount with you
There are often cases when the presence of a holder on the glass leads attackers to believe that the expensive gadget remains in the car and is simply hidden in the glove compartment. The result is broken glass.
Install the recorder and start shooting as soon as you start moving
Even in a parking lot or in your own yard, an emergency or a collision with a pedestrian may occur, in other words, a situation where the recorder will come in handy.
The presence of a battery in the recorder for autonomous operation is not essential
In some cases, a smartphone or a regular cell phone can handle shooting outside a car. But a backup battery is a necessary thing, because... it is this that guarantees that the recording will be saved correctly if the power cable is accidentally pulled out of the cigarette lighter or something happens to the car battery
It is the presence of a backup battery that you should pay attention to when choosing a recorder
voice
Article rating
Connecting a DVR without using USB
This method is suitable for those who want to leave the USB connector free. The following is a list of contacts to which you can connect the DVR. To be completely sure, we recommend rechecking the contacts with a multimeter.
1. Connection to the ERA-GLONASS lighting unit.
Details in the video:
2. To the ISO connector of the radio:
- +12V from the battery - contact A4;
- +12V when ACC is on - pin A7;
- "Ground" - pin A8.
3. To the block with wires for the front seat heating buttons:
- +12V - to the yellow and blue wires (pin 2), power supply after turning on the ignition;
- "Ground" - black wire (pin 6).
How did you install such accessories? Maybe the ignition switch or cigarette lighter was activated when connecting?
Let us remind you that you can buy additional equipment on AliExpress. By the way, to control the power of additional devices in the car, you can use the standard Vesta buttons.
Photo: logbook vlad21074
Key words: Lada Vesta glass
Found an error? Select it and press Ctrl+Enter..
- In Moscow they began to change to Lada Vesta and Lada Largus
- AvtoVAZ showed how Lada 4x4 is assembled at the factory
- Clubturbo is developing the Lada Vesta DFTZ (for drifting)
- Is it worth buying a used Lada Vesta? Study
Sho-Me G-475 STR
the computer does not see g475str drivers no thanks downloud lights up thanks
Answers 7
Drivers are available on the official website:
It looks like you have a problem with the archiver, download for example 7zip https://www.7-zip.org/download.html
Then go to the folder where you downloaded this archive, right-click -> 7zip -> unpack
The effectiveness of using a device such as a radar detector depends on the quality of the product itself, correct installation and accuracy of settings. To be sure of the quality when purchasing, it is worth checking the functionality of the device and all accompanying documents, including the presence of instructions that tell in detail how to set up the radar detector.
Where and how best to install?
Installation of the DVR is usually carried out in two places:
- On the windshield in the center near the mirror or behind it. Suitable for very light devices.
- If the device is heavier, then it is worth placing it on the front panel.
At the same time, you can attach the device to a suction cup holder, which will allow you to remove and replace the recorder if necessary, however, over time or in cold weather, such a mount becomes unreliable and can lead to the device falling and breaking. Or you can use adhesive tape. This type of fastening is more reliable. But you won’t be able to remove and put back the recorder. Therefore, if you have doubts about the alarm system or often leave your car unattended, outside a guarded parking lot and are afraid that it will be stolen, then this option is unacceptable to you.
Also, when installing in a car with airbags, it is worth taking into account that the recorder is located outside their coverage area, because if the airbag expands and catches the video recorder, it can cause injury to the driver or passengers.
Helpful Tips and Precautions
Be sure to turn off the power to the on-board network before starting work on connecting the DVR - just remove the terminal from the battery. You should also follow the recommendations for installation and further operation.
- Securely insulate connections.
- Supply power via fuse.
- First check that all connections are made correctly, and only then attach the terminal to the battery.
- Strictly observe polarity when connecting the gadget.
- Make sure that no moisture gets inside the case, otherwise the power must be turned off.
- Make sure to purchase a memory card with sufficient capacity.
- Always take the device with you if the car is not in use for a long time. It’s also better not to leave the fastener, otherwise the thief will notice it and decide that it’s worth looking for the rest in the glove box.
- Immediately turn off the DVR if you notice smoke or a strange smell in the cabin, otherwise a sudden fire may occur.
- Turn on the recording immediately after you get behind the wheel, because it’s not for nothing that unforeseen circumstances are called that way. An accident on the road can happen at any time.
- If the recorder fails, you can save yourself from trying to repair the gadget, since there is nothing inside it that the average user could fix on their own. Contact service.
You can read about how to connect an LED strip to a car in a detailed article by our specialist.
Additionally, we recommend reading the article, which describes how to install a rear view camera.
Security measures
There are several mandatory operating conditions for the DVR that the driver will have to strictly comply with.
- When installing the recorder and during its operation, you should carefully avoid getting moisture inside the case (this advice is especially relevant in winter, when condensation forms in the cabin). If water does get into the device, turn off the power immediately;
- If, after connecting the recorder, a strange smell or smoke appears in the cabin, the device must be turned off immediately, since further operation may lead to a fire;
- If the recorder fails due to incorrect connection or as a result of a fall, you should not try to repair it yourself. There are simply no parts that the average user can fix. All the owner can do is take the device for service to qualified specialists.
So, connecting the DVR is easy. This does not require complex circuits or deep knowledge of electrical engineering. All that is required is patience and the ability to use a soldering iron.
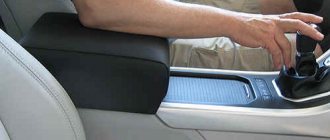
Fastening the wires
Before connecting the recorder, you need to decide how the wires will be attached. There are two installation options:
- hidden installation. The wires are hidden under decorative trim or the dashboard. It is necessary that there is a little wire left near the recorder, which will allow it to be rotated freely;
Using a radio
In this particular case, the wires from the camera and the player are connected and the junction points are isolated. If the car radio operates on a voltage of 5V, then the cable is attached directly to the plug. The block or transformer is hidden under the instrument panel. The wires are pulled through the installed chamber.
Modern car radios are usually equipped with USB connectors. In this case, the process of connecting the DVR is greatly simplified.
Basic methods
If the cigarette lighter is faulty or occupied by other devices, use non-standard methods for connecting the DVR. With their help, there will be no need to use extra connectors.
The DVR is connected in the following ways:
- through a lampshade located on the ceiling;
- to ignition;
- directly to the battery;
- to the radio power supply;
- to the inner surface of the cigarette lighter.
The most common methods used are connection through the lampshade and ignition.
Before installing the recorder in the car, you need to decide where to mount the device.
Let's consider two fastening options:
using a suction cup;
It is recommended to use the standard fastening method - with a suction cup, since the suction cup comes complete with the device and can be easily removed from the glass, unlike adhesive tape.
Lamp lighting
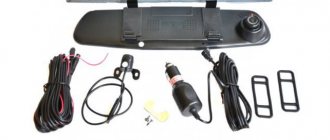
If the device is located on top, it is recommended to connect the DVR to the lampshade. This is the closest power supply point. To complete the task you will need the following tools:
- flat screwdriver and Phillips screwdriver;
- a set of cables with which the device will be connected to electricity;
- a set of fastening brackets with Velcro;
- insulating tape;
- soldering iron;
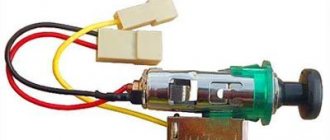
- female cigarette lighter socket (optional).
Wiring Guide:
- The upper lampshade is disassembled using a screwdriver with a Phillips or flat tip - depending on the type of fastener.
- The contacts of the lampshade and the recorder are connected plus to plus, minus to minus. You can connect the ends of the wiring to the lamp plug.
It is impossible to insulate wires; this is stated in all rules for using electrical equipment. A poor connection often causes interference in video recording and distorts the recording. To determine which wire to connect the lamp to the recorder using a multimeter, marking the wires will also help. Red is a plus. Black is a minus.
The standard plug for supplying power to the recorder does not fit - it is disassembled or an additional female cigarette lighter socket is purchased. It is recommended to entrust the analysis to a specialist with technical education or work experience. Safety when connected to the lampshade is ensured by the power module. It is sold in many stores.
To ensure maximum safety when connecting to a lighting device, a power module is used. It must be purchased separately from the set as it is not included in the package.
Example of installation on a Lada Granta
For example, consider installing a recorder through a lampshade on a Lada Grant. On this car, the lamp does not turn off immediately after turning off the ignition, but after 10-15 minutes.
In order not to cut the standard power cable of the recorder, we will buy a female cigarette lighter socket with wires.
Let's disassemble the lampshade. Attaches with two screws and one latch.
Turn off the power supply to the lamp.
Next you need a soldering iron. We solder the “mother” socket with the lampshade. Red wire to red, black to black.
Next, we insert the power supply of the recorder into the socket and put everything back together.
Installation of a navigator, video recorder or radar detector in Kalina 2
| In some trim levels, the Kalina 2 instrument panel includes a navigator, which is very practical. Along with this, you can also install a recorder or radar detector. Do you know how to do this correctly without using a cigarette lighter? |
Installation of the DVR in Kalina 2 most often occurs according to the instructions that come with the device itself, that is, through the cigarette lighter. Connecting the DVR this way has a number of disadvantages (the cigarette lighter is always busy, there is no automatic shutdown of the DVR, and also interfering wires on the panel). We suggest that you connect the Kalina 2 DVR correctly, without using the cigarette lighter. First, you need to disassemble the charger of our device and remove two wires (“minus” and “plus”) from the board. Now, if you decide to install a radar detector or video recorder near the mirror, then it makes sense to connect to the interior lamp (on a VAZ 2192 (2194) the first Kalina lighting unit is used, catalog number 11180-3714010). First, we remove the lampshade, and then make the connection according to the diagram: It is more convenient to install the navigator in Kalina 2 (or a radar detector) on the panel on top:
In this case, in order not to pull the wires to the ceiling light, it is more convenient to connect it to the ignition switch (“plus” after turning on the ignition appears on a thick blue wire with a black stripe, “15” is written next to the wire), or connect to the light control module ( blue wire of contact Xz). Don't forget to install the fuse. The ground can be taken from any point on the body, or on the black 31st contact of the lighting control module. By the way, do you know how to modify the standard radio of Kalina 2?
Similar materials
What you need to know when connecting a DVR
You can connect a recording device anywhere. Any flashlight, light bulb, or electrical appliance runs on electricity, which comes from the battery through the wiring. If you find the positive terminal, then connecting to it will not be difficult. The question is how it will work. For example, if it is a ceiling light, then voltage is supplied there constantly, unlike the cigarette lighter. Most devices only work with the ignition on, which is not exactly what the DVR prefers. Simply put, it will only work from the cigarette lighter when the car is running. Well, or you’ll have to keep the key in the lock when you go to the store or somewhere else.
The recorder works from the cigarette lighter only when the car is running
Tension is also an important point. The camera consumes only 5 Volts when the car network has 12. To prevent the device from burning out, you have to include a converter in the power circuit and have it. This adds additional hassle and care. If you are connecting to a radio, you do not need a power supply. But remember that not all audio systems operate on 5 Volts. There are many types that consume standard voltage. Then you will need a converter, which often comes with the recorder.
Rear view camera Lada Kalina (Lada Kalina sedan, hatchback, station wagon)
Rear view camera Lada Kalina (Lada Kalina sedan, hatchback, station wagon)
The rear view camera for the Lada Kalina car (Lada Kalina sedan, hatchback, station wagon) is installed instead of the standard license plate lamp. The camera has a wide-angle lens (170 degrees), which provides a maximum viewing angle. The high-quality CCD matrix provides good image quality even in cloudy weather or at night. Parking lines will allow you to park even in the smallest nook and will become an indispensable assistant for both beginners and experienced drivers. The camera will be an excellent replacement for traditional parking sensors or will be a good addition to it. It will allow you to avoid damage to your or someone else's car, collision with children or animals, as well as collision with other obstacles. The rear view camera is installed in the standard place of the Lada Kalina illumination (Lada Kalina sedan, hatchback, station wagon), no additional holes are required. The camera has a 1-year warranty and can be installed on new vehicles under warranty as it has the necessary certificates. The image can be displayed on any monitor, standard or additional.
Camera Specifications
| Photosensitive matrix | Color CCD |
| Moisture and dust protection | IP 67 |
| Video system | NTSC |
| Permission | 480 TVL |
| Viewing angle | 1700 |
| Min. illumination | 0.01 lux |
| Supply voltage | 12V |
| Operating temperature range | -300C to +700C |
| Manufacturer | ParkCam |
| Parking lines | There is |
Rear view camera Lada Kalina (Lada Kalina sedan, hatchback, station wagon)
The rear view camera for the Lada Kalina car (Lada Kalina sedan, hatchback, station wagon) is installed instead of the standard license plate lamp. The camera has a wide-angle lens (170 degrees), which provides a maximum viewing angle. The high-quality CCD matrix provides good image quality even in cloudy weather or at night. Parking lines will allow you to park even in the smallest nook and will become an indispensable assistant for both beginners and experienced drivers. The camera will be an excellent replacement for traditional parking sensors or will be a good addition to it. It will allow you to avoid damage to your or someone else's car, collision with children or animals, as well as collision with other obstacles. The rear view camera is installed in the standard place of the Lada Kalina illumination (Lada Kalina sedan, hatchback, station wagon), no additional holes are required. The camera has a 1-year warranty and can be installed on new vehicles under warranty as it has the necessary certificates. The image can be displayed on any monitor, standard or additional.
Where to install the DVR
Choosing a place to install the DVR is impossible without taking into account the following requirements:
The windshield is considered the traditional place to install the device in question, but another option is the torpedo.
Be sure to read our expert's very useful article in which he talks in detail about how to set up a DVR.
Another useful gadget is a memory card for the DVR. How to choose and install it correctly, read our author’s material.
We also recommend that you read an interesting review of the best 3-in-1 DVRs and a description of the principle of their operation.
So, here are the two best options for installing the device.
- The windshield behind the rearview mirror is ideal if the recorder is compact and lightweight. The camera's view is maximum, and nothing interferes with the driver. The disadvantage is the difficulty of quickly deploying the camera if necessary, for example, to film a conversation with a traffic police inspector. The view can be spoiled by a dangling wire, especially when the car performs sharp maneuvers.
- The area on the dashboard is suitable for heavier models of DVRs, which are fixed more securely on a horizontal plane. Among the advantages of this option, it is worth highlighting the ability to take the gadget with you when the car is stationary, as well as its stable fixation. Disadvantages include the fact that the car's hood limits the camera's lower view.
Connecting a car recorder to turn Kalina on and off from the ignition
Nowadays, many drivers buy and use car recorders on their trips. I also purchased this device, but one inconvenience bothered me - it was a constant operation of turning the camera on and off.
For the car recorder to work correctly from the ignition, it must have a function to turn on recording when power is applied and, of course, turn it off when there is no power through the cord; if your recorder does not have this function, then I see no point in connecting it to the system.
To connect the recorder, we need the recorder wire itself from the cigarette lighter with the microcircuit. I disassembled the housing of the cigarette lighter plug and simply brought out two wires + and - from it, which I later ran to the fuse block.
After searching with a tester where we might have a plus depending on the ignition position, I decided to connect to the light control unit, which is shown in the following picture. To access it, open the fuse box cover.
After checking the wires, I chose two main ones: black minus, blue-black plus (which appears only when the ignition is on).
I exposed these wires near the fuse block and connected the plug wires to them (naturally plus with plus, and minus with minus) and insulated them.
Now, when I turn on the ignition, power is supplied to the car recorder and it starts recording; when I turn off the ignition, the recorder automatically turns off after 5 seconds.
The wiring itself to the recorder was carried out from the indicated place to the left pillar, further along the pillar, under the ceiling and the exit near the rear view mirror.
How to install a DVR correctly
The installation location has been selected and the holder is installed. Now you need to connect the power wires. Most often, DVRs are powered from the cigarette lighter and most power cords come with a plug for this connector. This is all well and good, but wires hanging in the middle of the windshield can interfere with the driver's view and distract the driver. Therefore, it is advisable to bring the wire under the ceiling (leave a little free wire so that you can change the position of the camera if necessary), tuck the wire under the ceiling panel, moving it a little, then exposing the side stand, attach the wire to the harnesses already laid there using plastic clamps. It’s difficult to say exactly how to move the roof panel and side pillar: it varies from car to car.
Hidden DVR
There is a way to lay the wire that is not so secretive, but also good: use special plastic fasteners that are installed near the ceiling (on glass or panel), and then the wire is tucked into them.
Installing DVRs in a car
Now, again depending on the model or your desire, we run the wire either through the glove compartment (you will need to remove it) or under the rug. If you choose the “under the carpet” option, make sure that the wire does not get under the passenger’s feet (if you are running it on the passenger side) or do not get tangled in the pedals (if you are laying it on the driver’s side). You also need to lay it so that it does not fall into the range of moving parts (flaps, etc.). It is best to attach it with clamps to existing harnesses.
Then there are two options: remove the cord somewhere in the area of the cigarette lighter and, using the plug, turn on/off the power of the DVR, or connect “from the inside”. The second option is preferable from the point of view that there is only one cigarette lighter, but there are usually several devices. And so the nest will be free.
Installation
Due to the fact that there is no standard view of Kalina 2, the camera is positioned depending on its type so that it shows the situation behind the car without distortion. On Kalina hatchback it is most often installed instead of one of the room lamps. To do this, remove the trim from the trunk door and dismantle the saber. It is secured with 6 nuts. Then remove one of the lights, having previously disconnected the live wires.
Before installing the video device unit, it is necessary to drill out the standard mounting points for the lampshade, since the element being installed has a collar on the holes for self-tapping screws. For fastening, strips of durable plastic are placed on the inside of the saber, which will serve as the basis for screwing in the screws.
In most cases, a video camera with a pin is mounted on a lining under the trunk lock. The hole should be drilled away from the center, otherwise the pin of the device will interfere with the locking. The overhead camera can be mounted in the middle, since there is no need to drill anything. The pin of the device together with the wires is installed in the hole and secured with a nut. The video cable is passed into the trunk through the hole for the wires of the room lamps.
After this, you can install the overlay in place and begin connecting the traffic camera to the monitor or to the standard multimedia system (MMS). The video device is installed in the same way on the Kalina station wagon.
NET.Gadget
Methods for connecting a DVR without a cigarette lighter
A DVR is not so much considered a necessary accessory in a car during frequent trips. Now most car enthusiasts have begun to think about purchasing it. Now this is no longer a whim, but, rather, a necessity. It helps in controversial cases on the highway in the event of an accident, and serves as a confirmation record for the insurance company. Also, the registrar will save you if the patrolman passes the stop, especially when it is illegal or the police officer behaves inappropriately.
There are many advantages to installing a recording device, but virtually no disadvantages. And just besides the additional load on the battery.
However, choosing a good device with a good viewing angle is not all. It is of fundamental importance to install and connect it correctly.
Where and how best to install?
Installation of the DVR is usually carried out in 2 places:
- On the windshield in the center near the mirror or behind it. Suitable for very light devices.
- On the contrary, the device is heavier, so it is worth placing it on the front panel.
With all this, there is an option to attach the accessory to a suction cup holder, which allows you to remove and place the recorder in the area as needed, but over time or in cool weather, such a mount becomes unreliable and leads to the device falling and breaking. Or there is an option with adhesive tape. This type of fastening is more reliable. But it is impossible to remove and put back the recorder. Therefore, if you have doubts about the alarm system or often leave your car unattended, outside a guarded parking lot and are afraid that it will be stolen, then the myth option is unacceptable for you.
Also, for installation in a car with airbags, it is worth considering that the recorder is located outside the area of their operation, because if the airbag opens and catches the video recorder, then it can cause injuries to the driver or passengers.
More popular connection methods
If you have decided on the installation location, you should think about where and how to connect it. There are many options here. There are 5 popular and easy to implement: from the cigarette lighter, to the power supply of the tape recorder, directly to the battery, ignition or to the upper lamp. We do not consider connecting from the cigarette lighter. Everything, with the development of today's technology, usually the cigarette lighter socket is already occupied by something. Someone needs to charge their phone, or laptop, or some other device is connected to it. Secondly, this type of connection only works when the ignition is on, which is also a significant disadvantage.
Also, when selecting the object to which it will connect, you should be aware that a recorder installed in the top of the windshield is even simpler
to plug
in the ceiling lamp. He's closer.
CONNECTING A VIDEO RECORDER In other words, an IGNITION NAVIGATOR ON A VAZ 2110, 2111, 2112
CONNECTING THE VIDEO RECORDER
Or IGNITION NAVIGATOR FOR
VAZ 2110
, 2111, 2112.
How to connect
.
VAZ 2110. DVR on a button without wires. Circuit from cigarette lighter to relay. Tee
. link to video. There's a guy there who tells you about the connection
PTF, but also .
An accessory installed on the front panel will be easier to connect using any of the other methods outlined. This is due to the fact that the connection point is even closer, fewer wires will be needed and, accordingly, it will be easier to hide it. However, this is not a hindrance, because there is an option to hide the wires securely under the skin of the car.
What you need, let's take a closer look at the methods for connecting a DVR bypassing the cigarette lighter socket.
Connection through the ceiling lamp
One of the methods is to connect
A recorder without a cigarette lighter means powering the wires through the ceiling lamp.
At first we are fascinated by mounting the DVR. It is necessary to decide on the location of its installation, securely fasten it and stretch the wires to the lampshade. If you set a goal for the wires not to hang, it is better to hide them under the interior trim.
Next, remove the lampshade. To do this, you will have to carefully remove and disconnect the lighting device from the power supply. It is mounted differently on different cars. On one, it is enough to pry the latches using something flat. In another car you will need a screwdriver.
When everything is removed, we run to the wires. We need to find wires that receive power all the time, and not so much when the doors are open. We determine the polarity of the wires using a tester. We solder the wiring to the plus and minus of the lighting device.
Because of this, we will need an adapter. It is important to keep in mind that virtually everything in the car is powered by a voltage of 12 V. However, the DVR only requires 5. To be able to get 5 from a constant 12 V, take a power supply, which is usually inserted into the cigarette lighter
.
Or buy an adapter. the wiring of the adapter or power supply
with soldered wiring, and carefully wrap everything with electrical tape. After which there is an option to connect the recorder. If everything works, then we hide the wires in a niche that remains for our client to do and assemble the lighting fixture.
It is possible to do this without a soldering iron. For this purpose, an insulation cut is made on the suitable wires; wiring from
power supply
as it is also called the adapter, is isolated. And then everything follows the same scheme: connecting the DVR and installing a lighting device in the area.
Connecting to the power supply of the car radio
Here everything is connected even easier, this device is also powered by a voltage of 5 V. Therefore, for connection, no storage media or adapters are required. In order to connect, you need to secure
DVR
, power its wiring to the orange wire leading to the car radio (under the front panel).
Directly from the battery
It is a little more difficult to power the recorder directly from the battery. For this purpose you need a long wire, a fuse (15 A).
First, we install the recorder in the required location and connect the wire to it through an adapter. It is of great importance to observe the polarity of the wires when connecting, so as not to burn the recorder. Next, under the casing, we carefully bring the wire out to the engine compartment. You should also put a fuse on the wire.
Or the second option for laying the wiring is to route the wire to the engine compartment through the mounting block. There are spare fuse sockets there.
Further, under the hood, we power the plus from the battery, the minus - to any place in the negative wiring of the car.
To the ignition
The least common method in reality, because the recorder only works after turning the key.
The first step after installing the DVR and connecting it via an adapter is to lay the wires. They run along the top and bottom of the windshield to the ignition system. Next, use a tester to find the positive terminal and attach a wire of the same polarity to it. The minus option is to attach it to the negative contact of the radio or to the negative contacts of the car wiring.
Connecting the recorder to the lighting lamp and the cost of installation services
To perform independent installation, connection and configuration of a video recording device, certain technical and electromechanical knowledge is required. Not every driver or vehicle owner knows how to work with wiring. To avoid negative consequences, it is best to seek help from special car service stations or services. Any company that provides installation and configuration services for video recording devices must have an appropriate certificate.
It is impossible to determine the exact cost of providing installation and configuration services, since the price is determined by a number of factors, for example, the type of equipment, the number of video cameras, the make of the car, etc. The average price for installing and connecting a DVR in a car is 1,500 rubles. As practice shows, this price is set for connecting a recording device with one built-in camera, hidden laying of connecting lines (under the casing). When connecting the DVR to the vehicle’s on-board network, as well as installing additional equipment (GPS module, remote video cameras), the price varies from 2,000 to 5,000 rubles.
The video shows the operation of a DVR connected to the lamp.
Installation and connection to a power supply of video recording devices at a professional level costs from 9,000 to 30,000 rubles. The cost of connection and installation includes:
- Installation of individual fixing modules;
- Organization of remote control and viewing of video information;
- Connection of the “black box” complex.
When installing and configuring equipment of this type in cars that are under warranty, the company must provide the appropriate warranty and package of documents. The completed documentation is transferred to official representative offices and dealers of a specific car brand.
How to connect a recording device to a lighting fixture yourself? Before starting installation work, you need to purchase certain equipment:
- Screwdrivers;
- Tester;
- Connecting terminals (if necessary);
- Insulating tape;
- Knife;
- Hexagon;
- Plastic clips.
Power is supplied to the lampshade immediately after opening the lock on the door. The supply of energy stops approximately ten minutes after the car is set to alarm, since all devices are de-energized. The lighting device is considered the preferred method of hidden connection of video recording equipment, since the lampshade is located closest to the windshield. Before starting the connection, install the device on the windshield.
Next, the connecting cable lines are laid. In some car brands, sun visors must be removed to conceal wiring. This will not be difficult, since such actions are performed by pressing the fasteners on both sides, and then carefully pushing the devices down. In some cars, these visors are screwed on with screws, in which case they need to be unscrewed.
Next, remove the protective panel from the lampshade
You can carefully pry up the decorative trim with a screwdriver and, using your hands, remove it from the mount
Then you need to unscrew the two screws and smoothly remove the housing of the lighting shade. After this, the contact group is turned off and the wires are disconnected from the housing.
The ceiling trim is carefully detached and a connecting cable is pulled under it in the direction from the DVR to the lighting fixture. Next, the contacts from the adapter are displayed. Connecting cables must be stripped on both sides. The wires are then twisted and insulated. When connecting wires, polarity must be observed. To prevent the wires from sagging, they can be secured with special ties or madeleine.
After completing the connecting steps, you should check the operation of the DVR. If the connection is correct, an image will be displayed on the monitor or the indicator lamp will light up. The final step is to install the lampshade into the connector and secure it with bolts. The trim and sun visors are installed in place.
Main technical characteristics of standalone video recorders
Externally, a standalone video recorder resembles a video recorder. The device has an input for a surveillance camera and a connector for connecting a monitor. If we talk about control, it is carried out through a special panel located on the main side of the recorder. A stand-alone device can be either single-channel or multi-channel. The latter option is considered completely universal, as it makes it possible to connect from 2 to 64 cameras, it all depends on the number of channels of the device. Modern models have a rather convenient function, and are able to simultaneously record and reproduce ongoing events.
In the photo: 4-channel autonomous video recorder.
It will not be difficult to create an archive with recordings; in the device menu you can set the cyclic overwriting option, with old recordings being deleted automatically and new ones being saved on the memory card.
When choosing an autonomous video recorder, you should first of all take into account the recording speed; an important factor is also the form of resolution
If we talk directly about speed, then 25-30 frames per second is considered optimal. Most often, consumers pay attention to the HD or Full HD resolution format. It is worth noting that some manufacturers even offer additional functions, for example, recording begins when a motion detector is triggered, according to a set schedule
Often, an autonomous video recorder is used to organize an entire digital video surveillance system, most often used in small areas. The device performs a number of functions:
- Video surveillance of the facility.
- Monitoring specific areas.
- Creating an archive with recordings.
When installing, you should know that in the future, expanding such a complex is a difficult task, and you need to know the subtleties and nuances.