Chevrolet Niva (shniva). clutch problem!
THE CLUTCH PEDAL IS FAILING. REASON.
Replacing the clutch master cylinder for VAZ, NIVA, Chevrolet Niva. Bleeding the clutch. Detail in HD
Niva Chevrolet - Clutch Lost. Reason. Let's figure it out.
The clutch has disappeared, which is something to immediately pay attention to.
HOW TO CHECK HYDRO CLUTCH. THE PEDAL FAILS
The clutch pedal has failed. Bleed the clutch cylinder from air.
NIVA CHEVROLET clutch master cylinder replacement
WHY DOES THE CLUTCH PEDAL FALL?
Why does the brake fluid in the clutch master cylinder reservoir quickly darken on a Chevrolet Niva?
Owners of domestic cars often encounter the problem of a failed clutch pedal, but such a malfunction also occurs quite often in foreign cars. The reasons can be very different, but if your clutch pedal has failed, then the problem needs to be solved as quickly as possible, because driving the car will be impossible. From this material you will learn how to solve the problem and what is needed for this.
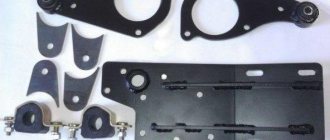
Manufacturing a three-point hitch
The hitch is used to connect additional equipment, such as a plow, to the tractor.
The hitch must be movable both in the horizontal and vertical planes. In the first case, mobility helps to reduce the overhang of the nozzle when taxiing. Vertical movement of the suspension is required to lower the equipment into a working position or raise it into a transport position.
The hitch on a mini tractor is made from various parts removed from old agricultural machinery. It is quite difficult to describe how to make a three-point hitch at home. Therefore, it would be more correct to use the following video, which shows the dimensions of all parts of the device.
Possible malfunctions of the clutch hydraulic drive
The following faults may occur in the hydraulic drive:
- Failure of the working cylinder means cuff failure.
- Violation of the tightness of the system - the presence of air in the system or leakage of working fluid.
- Clogged hydraulic drive.
Breakdown and wear of structural components of the clutch occurs, as a rule, as a result of violation of the rules of operation of the vehicle - your foot on the clutch while driving or a sharp start. One of the reasons for breakdown or wear may be the limiting life of the clutch components.
The cause of clutch failure may also be poor quality components. When purchasing spare parts, it is advisable to prefer original spare parts.
In addition, clutch malfunctions can be easily diagnosed by external symptoms. However, any specific symptom may indicate several clutch malfunctions at once. Therefore, a specific failure of the clutch is usually determined when disassembling it.
clutch master cylinder, malfunction
- If the level in the clutch reservoir has dropped significantly, it means there is a brake fluid leak somewhere (in the connecting pipes, worn cuffs or through a faulty master cylinder piston).
- If during a visual inspection you find a leak.
- If periodic dips occur when you press the pedal, this indicates the presence of air in the clutch drive.
- If, when changing gears, you hear a characteristic sound in the gearbox that resembles a crunching sound. The reason for this is either a broken master cylinder spring or a failed piston.
If the signs described above are present, you should not tighten it; you need to more carefully check all the elements that are responsible for the operation of the clutch hydraulic drive.
working cylinder, malfunction
The following symptoms indicate a malfunction of the working cylinder:
- A visual decrease in the level of brake fluid, which indicates a leak caused by wear of the working cylinder seal or a violation of the integrity of the hose, which will be clearly visible in spots under the vehicle.
- Periodic pedal failures or too soft travel, which indicates air has entered the system.
- If the clutch pedal drops lower and lower and there are problems with gear shifting, and adjusting the pedal height does not work, then the spring in the slave cylinder is broken and needs to be replaced.
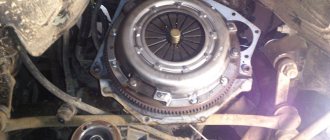
Driven disk
This element is located between the flywheel and the pressure plate. The hub mechanism of this part is secured to the input shaft of the gearbox using splined joints. And this disk can move along its surface. To ensure that the clutch engages as smoothly as possible, it has special springs. They soften shocks and vibrations. The clutch disc has special friction linings on each side. They are most often made from glass fibers, brass and copper wire. These components are pressed under pressure into a mixture of rubbers and resins. This composition can withstand high temperatures.
Replacing the clutch on a Niva Chevrolet with your own hands: photos and videos
All motorists who have cars with a manual transmission know the role of the clutch. And they also know what happens to a car when the clutch loses. In this case, to correct the situation, you will need to visit a service station and replace the clutch there. This work usually takes 1–2 hours. Although this method of repair is considered fast, it is expensive. To save money, you can try to do this work yourself in the garage.
What is clutch?
This is the unit through which torque from the engine is transmitted to the gearbox.
When the clutch does not work at the proper level, it will not only make it difficult to engage a particular gear, but will also negatively affect the operation of the engine and gearbox itself.
Clutch Niva Chevrolet VALEO.
On the Niva Chevrolet the clutch drive is hydraulic. And it also has automatic compensation for lining wear. The clutch drive is also of great importance, since it is with its help that the driver can control the clutch.
Clutch malfunctions on Niva Chevrolet
To accurately determine a clutch malfunction, it will not be enough to quickly list such points, since it is a fairly large unit. Therefore, only the main faults that occur with the clutch will be given below.
- The clutch does not fully engage (slips).
Here the reason may be severe wear of the linings. You'll have to change the disk. The clutch may slip due to wear or oiling of the friction linings of the driven disc. - Oil stains on the linings. This indicates that the sealing parts are worn out. This will require flushing the disc and completely replacing the sealing parts. This malfunction causes the clutch to heat up and not fully engage.
You can determine the malfunction of certain clutch elements by the characteristic sound when the gear is engaged.
Replacing the clutch yourself
When the cause of the malfunction is identified, it will be necessary to carry out repairs and take measures to eliminate the breakdown.
If you do such work yourself, then this is a long process that will take a lot of time. And also all activities should be carried out according to the instructions.
Sequencing:
- Prepare a set of keys and a mandrel for centering the driven disk.
Mandrel for centering the driven disk. - Remove the gearbox from the car.
- Mark the location of the flywheel relative to the motor casing using notches.
We mark the relative positions of the disc casing and the flywheel. - Using an “8” wrench, unscrew all the bolts that secure the disc to the flywheel (6 bolts).
We unscrew the six bolts securing the pressure plate to the flywheel. - Remove the driven and release plates.
If there are cracks or other damage on the driven disk, it should be completely replaced. Also, if the distance from the rivets to the top of the linings is less than 2 mm, then the disk will also have to be changed. Let's remove the pressure and driven discs and do a visual inspection. - Check the tightness of the damper springs.
If they are weakened, the disk must be replaced. We check the reliability of the damper springs. - The release petals should be located at the same level.
We evaluate the condition of the pressure plate diaphragm spring.
When all these indicators are missing, then the disk can be left as old, changing only the release disk. Assembly is carried out in reverse order.
Replacing the release bearing
This element is also important in the operation of the clutch. Using it, the clutch is engaged. If you hear noise when you press the clutch pedal, you will have to change the release lever.
Replacement sequence:
- Remove the bearing from engagement with the fork. We disengage the bearing from the fork.
- Clean the release seat and install a new part there, having previously lubricated it.
- Reassemble in reverse order.
After such work, there is no need to adjust the clutch, since this process is carried out automatically.
conclusions
Knowing what can be a sign of wear and damage to the clutch, as well as how to do this work yourself, you will not have to turn to the experts if the need arises.
Methods for solving the problem
If the clutch pedal fails while driving a car, then there are not many ways to solve the problem. We recommend that you familiarize yourself with all the methods so that in the event of a corresponding breakdown you know how to behave.
Replacing the cable
To replace the cable, you will need the cable itself, as well as wrenches and pliers. It is advisable to use a spanner or open-end wrench, this will be much more convenient.
But if you don’t have a box and open-end wrench on hand, you can also use a regular wrench:
- Open the hood of your car. In the engine compartment you need to find the very place where the cable is attached to the tip. Since a break occurred, most likely the tip remained in the installation location, and the cable itself was dangling. You need to remove the tip using a wrench.
- Then get inside the car and disconnect the cable directly from the clutch pedal. Remove the cable.
- Take the new cable and install it in place of the old one, the entire assembly occurs in the reverse order.
- You need to measure the free code of the pedal, and then adjust the installed element. The free play should be no more than 3 cm, and the total should be no more than 14.7 cm. The accelerator travel is adjusted using the nuts on the end of the cable in the engine compartment.
If the spring breaks
If the return spring bursts, the procedure will be different. To replace, you will need the spring itself; if you do not carry it with you, you will have to go to the nearest spare parts store.
How to change a spring:
- Open the hood and use a wrench (it’s more convenient to use a spanner) to unscrew the cable nut. You need to extract it.
- Carefully, so that the remains of the old return spring do not fall apart, remove them. Please follow all safety rules.
- Take the new part and install it in place of the old one. This also needs to be done carefully, since in this case it is very easy to damage your hand or fingers.
- Then reinstall the cable. Tighten the nut. After this, adjust the free and overall travel of the pedal. Start the engine and try to drive it.
Working principle of friction clutch
The operation of a dry single-plate friction clutch is very simple and boils down to the following. The clutch is always engaged - this is ensured by a diaphragm spring (or series of springs) that presses the pressure plate against the driven plate and the flywheel. In this position, the entire clutch assembly rotates as a single unit, and the torque is completely transmitted to the gearbox.
When changing gears, the clutch is disengaged: when you press the pedal, the spring is compressed (using the clutch drive, pressure fork, clutch and release bearing), its plates, fixed in the “basket,” act as levers and move the pressure plate away from the driven disk. At this moment, the transmission of torque from the engine to the box stops and you can change gear.
After engaging the desired gear, the clutch pedal is released, the spring returns to its original position, pressing the pressure plate against the drive plate and the flywheel - torque transmission resumes.
However, the main advantage and all the possibilities of traction appear at the moment the car starts to move. The clutch is designed in such a way that the discs can be pressed against each other with different forces, and therefore torque can be transmitted to the extent necessary. If you slightly release the clutch pedal, the discs will be pressed weakly against each other and slip, accordingly, and the torque will not be fully transmitted to the box and wheels - this makes it possible to start and smoothly accelerate the car.
How to check if the clutch is slipping?
There are three methods for checking whether the clutch is slipping on a manual transmission. Its operation is well controlled by the driver. But there are no effective methods for a robot or a variator. Their automation can partially mask the symptoms of the problem, so the techniques that are relevant to mechanics do not always work. How to determine that the clutch is slipping on different types of gearboxes is described in more detail below.
Clutch slips on manual transmission: how to determine?
The main reason why the clutch slips when the friction linings wear out is a decrease in the pressing force between the discs due to a decrease in their thickness. There are 3 main ways to check whether the manual transmission clutch is slipping:
- Start from high gear . To check whether the clutch is slipping on a manual transmission, you need to engage 4th or 5th gear and try to move off. If the engine stalls, everything is fine. If, even at relatively low (up to 3000 rpm) revolutions, the car starts to move, the disc slipping is obvious.
- Handbrake test . For this test, you need to lock the car's wheels with the parking brake and try to start in first gear. If the engine stalls or (on front-wheel drive) the wheel slips, then everything is fine. If the wheels are stationary, but the engine continues to work in gear, it means the clutch has begun to slip.
- Hard acceleration test . To do this check, you need to engage the highest (4th, 5th, 6th) gear while driving and give the gas sharply. If the car picks up speed synchronously with the increase in revolutions on the tachometer, there are no problems. If the revolutions fluctuate, they sharply increase without acceleration (the so-called variator effect) - obviously, the clutch or disc is slipping.
Before checking whether the new clutch is slipping or not, you need to make sure that the unit is assembled and configured correctly. Sometimes, if the reason is only insufficient running-in of new spare parts to each other, the symptoms of slipping themselves go away after a few hundred kilometers of driving.
How to diagnose whether the clutch is slipping on a robot?
To understand whether the “robot” clutch is slipping or not, you can put the box in manual mode, engage the highest gear and give the gas to the floor, but this does not always help. The same applies to starting with the handbrake.
The most effective way to determine clutch wear on a robotic gearbox is to connect to the ECU using an OBD-2 scanner and read the errors using a diagnostic application. Transmission-related faults are indicated by codes P07xx to P09xx, and excessive clutch slip is indicated by code P0811
Deciphering error P0811
Modern manual transmissions, such as DSG for VAG, Speedshift for Mercedes, DCT for BMW and other similar designs, are equipped with a double clutch. The latest generations use a self-supplying wet clutch, which does not require adjustment, as it automatically adjusts the gaps as it wears out. Older and simpler “robots” (such as the 2182 gearbox on a VAZ) have a conventional dry single-plate clutch.
Determining that a self-actuating clutch is slipping is most difficult, since the automatic system smoothes out the manifestations. Excessive clearance is eliminated by a self-feeding mechanism. Therefore, in this case, problems with adjustment can be eliminated. But if the clutch of a DSG 7 or similar manual transmission slips, you need to immediately check the oil in it, and only then do tests.
The clutch slips on an automatic transmission: what to do?
In classic torque converter automatic transmissions, the torque converter (“donut”) is responsible for transmitting torque from the engine to the box, so the question of what to do if the clutch slips is not worth it in this case. If it seems to you that the clutch is slipping on the machine, it is usually due to a malfunction of other components:
- Automatic transmission clutches slip . The clutches are a mini version of a wet multi-plate clutch, separate for each gear. It is when they wear out that it seems that the clutch on the automatic transmission has begun to slip, because the symptoms are similar: the speed fluctuates, the car accelerates sluggishly, and jerks occur in movement.
- The torque converter fails . A worn-out “donut”, which plays the role of the main clutch, can also slip. If the car sluggishly picks up speed, the engine begins to constantly maintain higher speeds (although the load has not increased), fuel consumption has increased - the torque converter is worn out.
If you experience symptoms of a slipping clutch on an automatic transmission, you need to diagnose the box. Errors (codes from P07xx to P09xx) read via OBD-2 will help you find out the general cause, and only troubleshooting at a car service will show the specific degree of the malfunction.
The clutch on the variator is slipping: how to determine and what to do?
If the clutch on a variator slips, it is difficult to identify the defect and the cause without diagnostics. You need to read the errors and, if you have the appropriate codes, go to the service center for detailed troubleshooting and repair. This feature is related to the operating principle of CVT gearboxes.
Diagnostics of the variator using the CVTz50 program
Continuously variable transmissions can be equipped with either a clutch or a torque converter. Multitronic gearboxes on Audi and Multimatic on Hondas are equipped with a wet clutch, Hyper on Nissans has an electromagnetic clutch, and ZF Transamtic CVTs are equipped with an automatic centrifugal clutch. These mechanisms are capable of slipping, just like with a manual one, but the variator masks the symptoms as much as possible.
How to bleed a hydraulic drive
Clutch for Niva
The reason that the clutch does not disengage completely when you press the pedal may be the presence of air in the hydraulic drive. Pumping will help get rid of airiness. It must also be carried out when the hydraulic drive is filled with liquid. For pumping you will need:
- key to 8;
- hose;
- container for liquid;
- brake fluid.
In addition, you will need an assistant. The liquid in the reservoir should reach the bottom edge of the filler neck. Top it up if necessary. After this, a hose is put on the valve of the clutch slave cylinder. The other end of this hose is lowered into the brake fluid reservoir. Have your assistant press the pedal hard and hold it down. This needs to be done five times with an interval of a couple of seconds.
After this, open the bleeder valve to release the air. It will come out of the hose along with the liquid. This procedure must be repeated until liquid without air begins to come out.
How to change the fork without removing the gearbox?
You can replace the part without removing the gearbox. To do this, you don’t even have to drive the car onto a pit or a lift. You will need:
- carrying or flashlight;
- pliers;
- hammer;
- screwdriver;
- sharpener
The latter will be required for minor modifications to the standard fork. Otherwise, it will not be possible to put it in place without removing the gearbox.
Operating procedure:
- Using pliers, remove the return spring.
- Unscrew the clutch slave cylinder mounting bolts.
- Unsplit the rod and remove it from the plug.
- Remove the protective cover.
- Pull out the old plug. This must be done carefully so as not to break. Otherwise, the operation will be complicated.
- Finish the new fork on a sharpener: grind off the rivets to a height of 1-1.5 mm, chamfer the ends.
- Light it with a flashlight or carry it into the hatch.
- Rotate the release bearing and set the faces of the coupling to a horizontal position.
- Turn the ends of the spring towards the hole.
- Guide the fork, insert it into the hatch and carefully drive it inside using a hammer.
Important: the spring must be supported with a screwdriver. The tendrils should fall strictly between the two ribs of the fork.
- Make sure that the part rests on the ball joint.
- Direct the spring tendrils. They should wrap around the support.
- Install the protective cover.
- Replace the rod and screw the working cylinder.
- Reinstall the return spring.
- If necessary, adjust the clutch free play.
Electromagnetic type
A separate type of friction clutch can be considered electromagnetic.
Structurally, it is very similar to a conventional single-plate “dry” clutch. But it does not have elements that press the drive disk - springs.
Instead, this disk was connected to an electromagnet, and an armature was mounted into its body.
The essence of the operation of this type of clutch is this: when voltage is applied to the electromagnet, a magnetic field is formed that attracts the magnet to the armature. And since it is rigidly connected to the drive disk, this attraction is accompanied by movement of the latter and clamping of the driven element.
This type of clutch has a so-called non-permanently closed engagement mode. That is, unlike conventional types, where the driven disks are constantly clamped, here it is in a free state and is clamped only after voltage is applied to the electromagnet.
Diaphragm spring
During operation, this disk is acted upon by a diaphragm component, which is designed to provide the required compression force. This is necessary to transmit torque. The outer diameter of this spring presses on the pressure plate with its edges. At the same time, the inner one is made in the form of metal petals. The release bearing acts on them. Together with the disc and diaphragm spring, as well as with the housing, a single unit is formed, which is called the clutch basket. It is rigidly fixed to the flywheel.
How to make a cabin for a mini tractor
If in the summer you can work on a mini tractor without a cab, then with the onset of the autumn-winter period, using the unit becomes quite uncomfortable or even impossible. Therefore, craftsmen are trying to assemble tractors with cabins in order to use this equipment all year round.
The cabin for homemade equipment is made of sheet steel according to a pre-prepared drawing. You can take the cabin from the MTZ tractor as the basis for the calculations. The following photo shows a drawing, based on which you can make a cabin yourself.
The cabin is manufactured as follows.
- First of all, you need to assemble a frame from wooden blocks according to the dimensions of the drawing.
- Next, a metal profile pipe is cut to the size of the wooden frame parts. All parts are connected by welding.
- The welded structure is placed with the roof on the ground and glass holders are welded inside the cabin.
- The roof is made of 1 mm sheet steel. The fragment can be cut out with a grinder and welded to the top of the cabin.
- The floor and side parts of the cabin are made of 2 mm thick sheet steel.
- The door frame is also welded from a profile pipe. To automatically close the doors, gas elevators can be installed on the frame.
- After installing the glass, the inside of the cabin can be lined with foam rubber and covered with leatherette.
- The cabin is installed on the frame, in a place prepared in advance for it.
In general, to better understand how to make a mini tractor with your own hands, you can watch this video, a kind of guide for beginners.
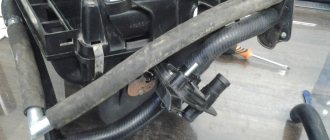
Replacement of related parts
Sometimes it is necessary to replace the hose that is included with the mechanism. To do this, use a key to hold the fitting. In the meantime, the pipeline is disconnected. The fitting mounting bracket is also dismantled. Next, you need to drain the fluid from the drive. The hose tip is then disconnected from the working cylinder. After installing a new one, the hydraulic drive should be bled.
Sometimes it is necessary to replace the tank if deposits have formed on it. To do this, remove the plug. Unscrew the fasteners and dismantle it. Then you should visually check the walls. If there are no deposits, then after thorough washing it can be used further. The driver may hear a loud noise when pressing the pedal. This is a signal that the release bearing is faulty. First, the gearbox is dismantled. Then disconnect the bearing from the clutch fork and remove it. Next, install a new one, lubricate the splines and put the gearbox in place.
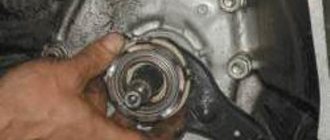
Replacing the clutch slave cylinder on Niva
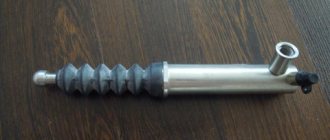
I recently had to change the clutch cylinder because... the slurry dropped to almost zero. I read on the Internet how to do this and thought that I could do it myself. It is inexpensive, about 400 rubles. This is what the new one looks like:
Rice. 1
Clutch slave cylinder for Chevrolet Niva
So, let's crawl under the car and see how to unscrew the old one.
As you can see, the cylinder is held in place by a clamp with two bolts: Fig.
2 Retaining clamp
We arm ourselves with keys and unscrew the bolts, I’ll tell you right away this may not be as easy as it seems, because... the bolts are soured and it takes a lot of force to move them from their place.
Rice. 3
Required Keys
Rice. 4
This is what an old cylinder looks like, covered in dirt and oil
Rice. 5
The clamp has a groove for fixing
Next, if you do not want to remove the hose from above, then you first need to screw it onto the cylinder and then put it in place.
Rice. 6
Trying it on
Rice. 7
Place it against the stop and tighten the clamp from above
Rice. 8
Add slurry to the tank to the level
That's all, all that remains is to bleed, there is a plug on the cylinder for this purpose. Good luck on the roads!
Problem with the clutch of the Chevrolet Niva. Recommend where to find the cause.
Because you are not authorized on the website. To come in.
Because you are not a trusted user. How to become a trustee.
Because The topic is archived.
Because you are not authorized on the website. To come in.
Because you are not a trusted user (phone number not verified). Enter and confirm your phone number. Read more about trusts.
Because The topic is archived.
Because you are not authorized on the website. To come in.
Because you are not a trusted user (phone number not verified). Enter and confirm your phone number. Read more about trusts.
Because The topic is archived.
Because you are not authorized on the website. To come in.
Because you are not a trusted user (phone number not verified). Enter and confirm your phone number. Read more about trusts.
Because The topic is archived.
Because you are not authorized on the website. To come in.
Because you are not a trusted user (phone number not verified). Enter and confirm your phone number. Read more about trusts.
Because The topic is archived.
Because you are not authorized on the website. To come in.
Because you are not a trusted user (phone number not verified). Enter and confirm your phone number. Read more about trusts.
Because The topic is archived.
Because you are not authorized on the website. To come in.
Because you are not a trusted user (phone number not verified). Enter and confirm your phone number. Read more about trusts.
Because The topic is archived.
Because you are not authorized on the website. To come in.
Because you are not a trusted user (phone number not verified). Enter and confirm your phone number. Read more about trusts.
Because The topic is archived.
Because you are not authorized on the website. To come in.
Because you are not a trusted user (phone number not verified). Enter and confirm your phone number. Read more about trusts.
Because The topic is archived.
Because you are not authorized on the website. To come in.
Because you are not a trusted user (phone number not verified). Enter and confirm your phone number. Read more about trusts.
Because The topic is archived.
Because you are not authorized on the website. To come in.
Because you are not a trusted user (phone number not verified). Enter and confirm your phone number. Read more about trusts.
Because The topic is archived.
Because you are not authorized on the website. To come in.
Because you are not a trusted user (phone number not verified). Enter and confirm your phone number. Read more about trusts.
Because The topic is archived.
Because you are not authorized on the website. To come in.
Because you are not a trusted user (phone number not verified). Enter and confirm your phone number. Read more about trusts.
Because The topic is archived.
Because you are not authorized on the website. To come in.
How long does it last and how to extend its service life?
The “life” of the unit greatly depends on the driving style and experience of the driver and can range from 30 to 100 thousand kilometers.
To extend the life of the clutch, you must adhere to the following rules:
- Drive smoothly but confidently. You cannot suddenly release the pedal - this harms the engine, driven disk and transmission of the car. In this case, you need to quickly release the clutch. You cannot keep the pedal in a half-pressed state for a long time, allowing the discs to slip.
- Take your foot off the pedal while driving. If you don't do this, the sole will press slightly on the traction. In this case, the wear of the release bearing will accelerate, the discs will begin to slip, and the friction linings will quickly wear out.
- Try to skid less often. Attempts to get out of mud or snow by “rocking” the car greatly damage the discs and release bearing.
- Do not tow heavy trailers. The clutch of passenger cars is not designed for use as a tractor.
- And avoid a sharp “sports” start - it overloads the discs, contributing to rapid wear of the friction linings.
Why does the clutch fail?
The clutch disc is a consumable item and sooner or later still needs to be replaced. It is impossible to repair a worn disk. The fact is that when it comes into contact with the flywheel, it begins to grind down for a while and only then the parts interlock with each other. Thus, the thickness of the clutch decreases and eventually the disc loses its function.
You can also “grind off” the clutch in a quick way. Many drivers, when starting to move, press the gas too hard and at the same moment quickly release the clutch pedal. At these moments, clutch wear increases significantly and then it will need to be replaced quite soon. Rapid disc wear is also achieved by driving quickly in low gears. At that moment, when the speed is high and the gear is selected too low, the clutch does not have time to transmit the required torque to the intermediate shaft and begins to slip. Thus, it receives additional “unnecessary” friction and wears out quickly.
Another reason is that engine oil gets on the working part of the disk. The problem is quite rare, but it also occurs. The fact is that when the rear crankshaft oil seal wears out, oil leaks to the engine flywheel. The oil remains on the clutch surface and friction is reduced, thus causing the disc to “slip.”
8.2. Clutch pedal adjustment
If there are any defects, replace the clutch housing with the pressure plate. Difference in the height of the ends of the diaphragm spring: When worn, its thickness decreases and the rivets can scratch the disc and cause beating. When installing, the hub must be directed towards the basket
It is important to align the hub hole and the main pin.
The driven disk with a riveted friction lining is located between the flywheel and the drive disk of the shaped cup. The disc splined bushing sits loosely on the input shaft.
Replaced when worn, if the thickness of the lining decreases to 0.2 mm and the rivets begin to leave scratches on the pressure plate. The cause may be axial runout, weakening of rivets, cracks, breakages, or scuffing on the friction material body. It is installed with the protruding part of the hub in the direction of the shaped basket. In this case, the centering pin should align with the hole in the hub.
The stamped shaped clutch release fork has a recess for a ball joint and its two ends rest against the release bearing clutch. The ends of the fork, periodically wearing out, are restored by welding pads on them to the thickness of the factory sample.
Replaced when worn, if the thickness of the lining decreases to 0.2 mm and the rivets begin to leave scratches on the pressure plate. The cause may be axial runout, weakening of rivets, cracks, breakages, or scuffing on the friction material body.
It is installed with the protruding part of the hub in the direction of the shaped basket. In this case, the centering pin should align with the hole in the hub.
The stamped shaped clutch release fork has a recess for a ball joint and its two ends rest against the release bearing clutch.
The ends of the fork, periodically wearing out, are restored by welding pads on them to the thickness of the factory sample.
The release bearing is sealed, maintenance-free, and requires no flushing. Moves along the cylindrical part of the sleeve.
The appearance of noise or whistling at the moment of squeezing indicates the need to replace the bearing. A reinforced clutch is also installed on this car, which has a large diameter and a powerful damper.
Checking clutch performance
In addition, this element has a large disk thickness. Over time, on a Chevrolet Niva this mechanism fails, requiring either adjustment or replacement.
You can check the performance in the following ways: Engage neutral gear and start the engine. Next, you need to wait a little until the engine warms up and depress the clutch pedal, engaging reverse gear.
If the transmission is easily engaged, this means that the system is working properly.
The clutch drive is hydraulic, backlash-free, with automatic compensation for wear of the friction linings of the driven disc. The clutch housing is connected to the flywheel with six bolts.
The flywheel is equipped with three pins, which, when installed, fit into the corresponding holes in the casing, centering it. The casing is connected to the pressure plate by three pairs of elastic steel plates with rivets.
The pressure plate assembly of the Chevrolet Niva clutch basket is balanced on a stand, so it should be replaced entirely. Perhaps you just need to bleed the hydraulic drive. How to bleed a hydraulic drive? When bleeding the hydraulic drive, the very first thing to do is put the hose on the valve of the working cylinder, and lower the other end into a container with brake fluid.
When does it make sense to repair and when to replace?
If the release bearing, as well as the main and working cylinders are faulty, the system is repaired . If noise occurs, the release bearing must be replaced. This part and the release fork are disengaged. The fork is moved to the side and the bearing is removed. Before installing a new bearing, it is recommended to clean the installation site. Before installation, the bearing and seat are lubricated with a special compound called Litol-24. Assembly is carried out in reverse order. Changing the bearing will ensure good clutch travel.
The purpose of the master cylinder is to transmit impulses from the pedal to the working parts of the clutch . If it does not turn on and off completely or fluid leaks out, then the cylinder must be repaired or replaced. Before repair, the part is removed and inspected. In the absence of major signs of wear and mechanical damage, the part is repaired. To do this, you need to flush the part with brake fluid. When cylinder components wear out, they are replaced with new parts.
The functionality of the clutch drive is ensured by the slave cylinder . To connect the master and working cylinders, a steel tube is used, on the lower edge of which a rubber hose is placed. Liquid periodically leaks through the rubber connection. After removing and repairing the part, bleeding is carried out. The clutch also needs to be adjusted.
To bleed the drive, put a hose on the working cylinder . One of the ends is placed on the valve of the part, and the second is lowered into the liquid. Depress and hold the clutch pedal. The procedure is carried out more than five times. After this, the valve is opened to release the air. The actuator adjustment will be successful if there is fluid leakage without air after opening the valve.
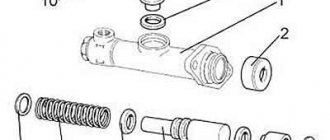
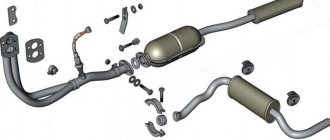
Purpose and design features of the working cylinder
There are two types of cylinders in the clutch mechanism: working and main. You can learn about the purpose of the main one from the corresponding article, and today we’ll look at the Chevrolet Niva clutch slave cylinder. The Chevrolet Niva clutch system is based on the operation of a hydraulic drive, which, in turn, is inoperative without a cylinder. The essence of its operation is to directly receive the force coming from the main cylinder and thereby move the clutch release fork.
The design of the working cylinder is absolutely identical for almost all car models, therefore the principle of operation of the device is the same. The product consists, first of all, of a base, that is, a body where the following parts are assembled in a certain order:
- retaining ring;
- piston;
- cap;
- union;
- plate;
- spring and washer;
- seal rings and boot.
All parts are assembled in a certain sequence, which allows the device to function correctly.
The photo below shows the working cylinder of a Niva Chevrolet.
How does the device function?
To understand the issue of purpose in more detail, let’s consider how the product’s workflow is carried out. So, when you press the main control lever (i.e. the clutch pedal), the pusher moves, which acts on the piston and it moves forward. When the piston moves under the influence of mechanical force, the pressure in the housing begins to increase. This is a process that occurs in the clutch master cylinder. After increasing the pressure, the liquid begins to be squeezed out through the discharge channel and enters the working cylinder. It contains a piston with a fork, which, under the influence of pressure, squeezes out the release bearing, thereby separating the engine and gearbox. At this moment, the corresponding gear is engaged, and then the driver releases the clutch pedal. After releasing the pedal, a return to its original position is observed: the engine engages with the transmission, which is due to the action of the pushing spring in the cylinder.
everything useful is here
Adjusting the clutch release drive
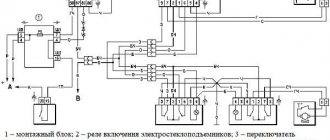
Pedal, master and slave cylinders of the clutch release drive
1 – adjusting nut; 2 – lock nut; 3 – tension spring; 4 – working cylinder body; 5 – housing plug; 6 – fitting for bleeding; 7 – piston; 8 – seal; 9 – pusher;
10 – clutch release fork; 11 – ball joint fork; 12 – main cylinder body; 13 – plug; 14 – piston of the main cylinder; 15 – master cylinder pusher; 16 – clutch pedal travel limiter; 17 – clutch pedal
EXECUTION ORDER
The gap between the pusher and the master cylinder piston required to completely disengage the clutch should be 0.1–0.5 mm. To adjust...
Purpose
In order to correctly understand where this cylinder is located, you need to have an idea of what the hydraulic drive consists of. It consists of the following nodes:
- Container for filling brake fluid
- The GSC is located under the barrel to which the pipes fit
- Tubes are connected to it and are attached to the return spring.
- The pedal is located under the entire mechanism
The process of operation is as follows: the pedal is pressed, the rod supplies forces to the GCS, and it, in turn, transmits this action to the RCS through a system of tubes, thereby turning the clutch on and off.
The clutch slave cylinder on the Chevrolet Niva on all models has almost the same design, with the same operating principle. It consists of a housing in which the following parts are located:
- Piston
- Retaining ring
- Cap
- Plate
- Union
- Washer with spring
- Boot with O-ring
Thanks to all these elements, the entire device operates correctly.
Over time, the GCS fails; you can understand that the device needs to be replaced by the following signs;
- Brake fluid starts leaking
- The clutch does not disengage completely
- Clutch does not engage fully
Replacing the head cylinder
Newest clutch master cylinder under the hood.
- Pumping out brake water from the reservoir with a rubber bulb
- Unscrewing the tube, removing the hose from the fitting and unscrewing the fastening nut and removing the cylinder.
- Installation of the newest one is carried out following the steps in reverse order.
Do not miss the moment of fixing the pedal pusher with a fillet (notch) on the cylinder piston, pumping the hydraulic drive.
Video about dilemmas with the clutch on a Chevrolet Niva
Source: expertniva.ru
Replacing the release bearing
In modern cars, the service life of all clutch components is approximately equal, so replacement is done as a set. The kits are sold as such; the package contains a basket, a disc and a release bearing.
An exception is the case of combining the release hydraulic drive with the working cylinder. This part is not included in the kit; it is purchased separately, but it should be replaced if there are any problems with the clutch.
To replace, the gearbox is removed. On some cars it is only moved away from the engine, working through the resulting gap. This technique saves time only if the specialist is highly qualified. But it is not recommended to do this, since there are places in the clutch housing that require visual inspection.
For example, the fork, its support, the input shaft oil seal, the support bearing at the end of the crankshaft and the flywheel.
It's always better to remove the box completely. After which replacing the release bearing will not be difficult; it is simply removed from the guide, and a new part takes its place.
The guide should be lightly lubricated unless the instructions for a particular kit clearly state that no lubrication is required.
Advertisements on NN.RU – Auto
The company allows you to upgrade the Fiat Ducato Fiat Ducato basic version for a solution.
With us you can not only extend the frame to fit a body of 5.1 m, 6.2 m, 7.5 m, 9 m for Maz Zubrenok, Maz, Kamaz, Ural, Zil, Mitsubishi, Nissan.
Lengthen Kamaz under a body 7.5 m Lengthen Maz Zubrenok, Maz under a body 9 m Re-equipment of the chassis of an extended cargo vehicle.
Manufacturing of a broken-type platform with retractable ramps on the GAZ-33023 Gazelle-farmer chassis. Technical properties of the tow truck.
Any child can become outstanding, anyone can fulfill their dream. The main thing is to truly find what he likes, and...
Source: www.nn.ru
Common clutch malfunctions and their symptoms
- Incomplete engagement of the clutch (with “slipping”) is a consequence of oiling or wear of the friction linings of the driven disk, broken springs, and incorrect amplitude of the pedal stroke (its small free play). To eliminate this malfunction, it is necessary to replace the driven disk, eliminate scuffs on the disks, and inspect the drive for malfunctions. When “slippage” occurs, when the clutch pedal is fully released, the disks slip one against the other. Due to prolonged slipping, the discs begin to heat up significantly, the steel driven disc may become warped, and the cast-iron flywheel and pressure plates (or pressure plates) may become cracked. Friction linings wear out and burn at an accelerated rate, and this burnt smell reaches the cabin. If not repaired, the process gradually progresses, first at high, then at low speeds. To the point where it becomes impossible to even move away in first gear.
- Incomplete disengagement of the clutch (when the clutch “drives”) is a consequence of large free play of the clutch, broken springs, a warped driven disk or an incorrectly installed pressure disk. This is also possible when the release levers are deformed; or the release bearing jams and does not move with the pressure clutch. It is possible that the clutch driven disc does not move along the splines (the lubricant has thickened or become dirty). To eliminate this malfunction, it is necessary to remove air from the hydraulic drive, adjust the free travel of the pedal, and replace inoperative disks and springs. Incomplete shutdown is manifested by the crunching sounds of gears when changing gears and, accordingly, leads to accelerated wear of gearbox parts.
- Jerks when engaging the clutch. When the car, despite the smooth release of the clutch pedal, starts jerking, this indicates the destruction of the friction linings, warping of the driven disk, or the breakdown of the damper springs, or wear of the friction washers. It is also possible that the driven disk may jam when moving along the splines of the gearbox input shaft, as well as jamming of the push clutch or destruction of the release bearing.
- Malfunctions of the hydraulic drive system. If air gets into the hydraulic clutch release drive, the pedal may “sink”, and as a result, the clutch may not be completely released. In this case, it is necessary to remove air bubbles with some of the fluid (bleed the clutch) and add fresh fluid. When in cable-driven mechanisms the clutch does not disengage at all, the cable may have broken. When the clutch pedal does not return to its original position, the return spring has become disconnected. If, when the clutch is disengaged, there is a strong noise generated by the release bearing, this indicates its wear.
If the clutch drive is mechanical (lever or cable), then as the friction linings wear out, the clutch pedal will gradually rise, but with a hydraulic drive, the pedal does not change its position, and the fluid level in the reservoir decreases.
So, the clutch mechanism plays a huge role in the functioning of any car or tractor. The technical condition of the entire vehicle largely depends on its serviceability and performance.
Therefore, to ensure long and reliable operation of all elements of the clutch mechanism, it is important to use it smoothly, and without the need to practice excessively long presses on the pedal. Under such gentle operating conditions, the clutch will last a long time
When should it be adjusted?
It is necessary to adjust the pedal free play and pump the hydraulic drive in the following cases:
- Pedal travel is too long. In this case, the clutch does not disengage completely (“drives”). This leads to difficult gear shifting and intense wear of the friction lining on the driven disk.
- Small clutch travel. In this case, the disc slips, especially under heavy load on the transmission (driving uphill, in high gear).
- Jerking, knocking or squeaking noises when changing gears or when the car starts moving.
Important: operating a car with an incorrectly adjusted or “aired” clutch drive leads to accelerated wear of gearbox parts.
The design of the Chevrolet Niva clutch coincides with a similar unit of the “classic” AvtoVAZ. The only difference is in the different dimensions of the working cylinder and, accordingly, in a larger and easier pedal stroke.
Types of clutch mechanisms
Clutch mechanisms can be classified:
- by control method - clutch with mechanical, hydraulic, electric or combined drive (for example, hydromechanical);
- by type of friction - dry (when the friction linings operate in air) or wet (clutch operating in an oil bath);
- according to the switching mode – permanently closed and non-permanently closed;
- by the number of driven disks - single-, double-, or multi-disk;
- by type and location of pressure springs - with the arrangement of several cylindrical springs along the periphery of the pressure disk and with a central diaphragm spring;
- according to the number of torque transmission streams - single- or double-stream.
The mechanical version is the simplest in design and principle of operation. When using it, the driver or machine operator, pressing the pedal, transfers force directly to the clutch fork through rods and cables. The hydraulic clutch version also uses a piston with hydraulic fluid. As a rule, this option is used on heavy vehicles to make the driver’s work easier. When using a hydraulic clutch drive, the full pedal travel remains constant (this is ensured by the presence of a return spring at the clutch pedal). However, the magnitude of its working stroke changes, compensating for the decrease in the thickness of the driven disk as a result of wear: the thinner the disk thickness becomes, the larger its working stroke turns out to be, with the same full stroke of the clutch pedal, and the “higher” (closer to the end of the reverse stroke of the clutch pedal) when it is released) the clutch engages.
For a clutch pedal with a mechanical cable drive, the full stroke increases as the driven disk wears (the clutch pedal rises up relative to the floor level), and at the same time its working stroke increases. The free play of the pedal is set by adjusting the length of the cable. In the normal position it is about 30...40 mm.
According to its design, the clutch is of electromagnetic, friction or hydraulic type. The friction version of the clutch ensures the transmission of torque using friction force. The electromagnetic type clutch is controlled by a magnetic field. In the hydraulic clutch version, communication is ensured by the flow of hydraulic fluid.
The clutch is electromagnetic if the compression of the driving and driven elements of the mechanism is carried out through electromagnetic forces. The electromagnetic clutch is always open. This rare type of clutch was installed on some modifications of manually operated cars. Between the driving and driven disks there was ferromagnetic powder that did not interfere with the separate rotation of the shafts. But after applying electric current to the electromagnet winding, the powder “hardened” and transmitted torque.
For heavy-duty applications such as trucks and sports cars, a high-friction ceramic clutch is also used, but it grips harshly and is therefore not suitable for use in standard cars.
The most common type is friction. Depending on the number of disks used, it can be single-disk, double-disk or multi-disk.
Adjustment procedure
- Adjusting the Chevrolet Niva clutch is performed with the engine turned off. It is also better to disconnect the battery so as not to accidentally start the motor when the shaft rotates.
- The gearbox is moved to neutral. The main cylinder is installed with a gap of half a millimeter from the pusher. This distance is sufficient to disengage the clutch disc. Next, the pedal travel is adjusted.
- The pedal stroke should not exceed 3 mm. Adjustment must be made by changing the position of the locknut and bolt. By tightening them you can adjust the stroke amount.
- The pusher should move freely no more than 4-5 mm. To adjust it, you need to adjust the limiter nut.
- Also, to adjust the pusher, you can change the position of the lock nut.
The total free travel of the pedal should be within the range of 25-35 mm. In order to most literally adjust the clutch pedal, you need to do work on the inspection hole or lift.
Has the clutch become difficult to squeeze out? - To the engine bulkhead)
Good day everyone! I haven’t written a post for a long time because there was no reason) But sooner or later with VZA, he was obliged to appear) Under the cut It all started with the fact that the clutch pedal began to be squeezed very hard, I decided to start saving money for a new clutch. Over time, the process of shifting gears became unbearably difficult. And so, having driven to Yuzhka, I bought a Sax clutch kit, a short-throw rocker, a timing belt with a roller and a head cover gasket because the engine was eating oil and pissing from all the cracks. I got up early on Saturday morning until my uncle arrived. to work and decided to install a slide with a Kalinovsky cardan, by the way it’s with an old one
took off the handle and disconnected the old slide
Well, and accordingly I installed a short-shot (unfortunately there are no photos (the camera is new and I didn’t want to constantly dirty it)) but in principle I liked the result, the only thing is that it’s a little hard to throw from the first to the second, I often miss... But most likely you can find fault and everything will be ok) Next we started removing the box
the old basket and release lever were dead, but the clutch disc would still be ok (I put it aside until worse times))
after which we took up the belt, deciding that we would not remove the cylinder head cover, citing the fact that my oil was filled to zero (this explains why only I could get into -30, start without problems and drive)) and it’s worth trying to first change it to 10/ 40 shells and changing the camshaft seal. And that’s it, I dropped the daily mileage and went to take the girl, came home, and immediately drove into the garage, because it seemed to me that there was an incomprehensible hum coming from under the hood... Yes, there really was a hum, but it was there was just a tightened alternator belt (by the way, they also changed it), but then it got worse.....while I was listening to what was humming, I heard an incomprehensible knock from the head ((called my father, who made a verdict that it was necessary to remove the cylinder head cover and see what had blown off there((( On The next day, when we removed the cover, we found a broken camshaft bed ((
Apparently the first step was to replace the timing belt, which was also tightened well. And off we go... rummaging around on the second floor of the garage we found several heads, the most recent one was injection 1.3
well, fuck it)) they pulled the switchgear and bed from it, took the head from the second one, also 1.3 engineer. They removed the old one
and after thinking a little, we decided that since the rings were so close, then......why not))) in general, the engine’s capital was full. Oh, how the adjustment of the valves frayed our nerves!!!!
Having collected everything, they began to start it, it began to gurgle, and after a while it started up)) That’s all it seems... I won’t write a full list of what was bought because I don’t remember everything (and half of it was found on the 2nd floor) I remember that oil seals, ring gaskets, etc. d Sachs kit cost 1800. It didn’t roll better, but the ride became more pleasant and smoother, and the pedal now fails like on foreign cars)) Sorry for the grammar and the small number of photos, I didn’t have a friend on hand who would run around and take pictures of every fart) )Thank you for your attention!!
smotra.ru