Principle of operation
The node works as follows:
- When you press the pedal, the force is transmitted through the hydraulic clutch to the pressure fork. It puts pressure on the release bearing, displacing it towards the engine.
- The latter compresses the petals of the springs mounted on the clutch basket.
- The driving and driven disks begin to rotate independently of each other, breaking the connection between the engine and the gearbox.
- When the pedal is released, the clutch parts return to their original position under spring pressure.
- The discs connect and again transmit torque from the engine to the transmission input shaft.
Friction linings, release bearings and other clutch parts gradually wear out. In this case, you have to change individual parts or the entire assembly.
Common faults
- Knocking or vibration when releasing the pedal. The problem occurs when the driven disk is deformed or its splines are worn out. The malfunction also appears if the engine is poorly secured to the supports or the diaphragm spring of the basket is deformed.
- The pedal sinks when pressed. This happens when the main or working cylinders break down, the hydraulic drive becomes airy, or the return spring or pressure fork breaks.
- The clutch does not disengage when the driver presses the pedal. The reason for this may be clogging or damage to the pipeline and cylinders of the hydraulic drive, deformation of the driven disk, the presence of scoring on its splines, breakage or change in the shape of the pressure fork, or diaphragm spring.
- The clutch is slipping. The problem appears when the friction linings attached to the driven disk are oiled or worn, the hydraulic drive is clogged, the pressure fork is jammed or incorrectly adjusted.
- Noise when pressing the pedal. A grinding, howling or whistling sound when the discs open is due to a faulty release bearing.
To eliminate most breakdowns, it is necessary to replace individual parts or the clutch as a whole.
Approximate prices
Russian car services offer to change the clutch in a Chevrolet Niva for approximately the same cost:
- Clutch replacement, diesel – from 4,000 rubles .
- Clutch replacement, gasoline - from 3500 .
- Adaptation of the installed kit – from 2000 .
- Removing/installing a subframe - from 3000 rubles .
How to change the fork without removing the gearbox?
You can replace the part without removing the gearbox. To do this, you don’t even have to drive the car onto a pit or a lift. You will need:
The latter will be required for minor modifications to the standard fork. Otherwise, it will not be possible to put it in place without removing the gearbox.
- Using pliers, remove the return spring.
- Unscrew the clutch slave cylinder mounting bolts.
- Unsplit the rod and remove it from the plug.
- Remove the protective cover.
Pull out the old plug. This must be done carefully so as not to break. Otherwise, the operation will be complicated.
Important: the spring must be supported with a screwdriver. The tendrils should fall strictly between the two ribs of the fork.
When does it make sense to repair and when to replace?
If the release bearing, as well as the main and working cylinders are faulty, the system is repaired . If noise occurs, the release bearing must be replaced. This part and the release fork are disengaged. The fork is moved to the side and the bearing is removed. Before installing a new bearing, it is recommended to clean the installation site. Before installation, the bearing and seat are lubricated with a special compound called Litol-24. Assembly is carried out in reverse order. Changing the bearing will ensure good clutch travel.
The purpose of the master cylinder is to transmit impulses from the pedal to the working parts of the clutch . If it does not turn on and off completely or fluid leaks out, then the cylinder must be repaired or replaced. Before repair, the part is removed and inspected. In the absence of major signs of wear and mechanical damage, the part is repaired. To do this, you need to flush the part with brake fluid. When cylinder components wear out, they are replaced with new parts.
The functionality of the clutch drive is ensured by the slave cylinder . To connect the master and working cylinders, a steel tube is used, on the lower edge of which a rubber hose is placed. Liquid periodically leaks through the rubber connection. After removing and repairing the part, bleeding is carried out. The clutch also needs to be adjusted.
To bleed the drive, put a hose on the working cylinder . One of the ends is placed on the valve of the part, and the second is lowered into the liquid. Depress and hold the clutch pedal. The procedure is carried out more than five times. After this, the valve is opened to release the air. The actuator adjustment will be successful if there is fluid leakage without air after opening the valve.
If the fork breaks, you do not need to remove the gearbox to replace it . Replacement is done using pliers, a carrier or flashlight, a hammer, a sharpener and a screwdriver. Pliers are used to remove the return spring.
The bolts on the clutch slave cylinder are unscrewed and the rod is uncoiled , which needs to be pulled out of the fork. After removing the protective glass, the plug is removed. Using a sharpener, the new fork is refined. The ends are chamfered and the rivets are ground down to a height of 0.5 millimeters. The release bearing is rotated in the hatch. In this case, make sure that the edges of the coupling are in a horizontal position.
The tips of the spring are directed towards the hole and a fork is inserted . She is carefully driven into the hatch using a hammer. It is recommended to check whether the spare part is adjacent to the ball joint. The antennae of the support are directed so that they cover the support. All other manipulations are performed in reverse order.
Clutch replacement
First you need to provide access to the machine from below. It is not possible to replace the clutch mechanism without dismantling the gearbox.
In addition to the standard set of keys and screwdrivers, you will need a edit for centering the driven disk and a marker. This can be the gearbox input shaft or a tube (rod) of the appropriate diameter.
- Install the Niva on a viewing hole, overpass or lift.
- Remove the gearbox.
- Remove the release bearing and check its condition. It should rotate easily and have no signs of lubricant leakage.
- Use a marker to mark the position of the basket relative to the engine flywheel. This should only be done if you do not plan to replace the pressure plate.
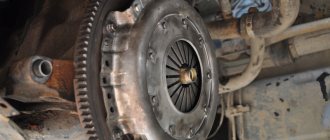
Using an open-end or socket wrench size 8, unscrew the bolts securing the basket to the flywheel. To do this, you need to fix the latter, preventing it from turning.
Remove the driven and pressure plates.
Important: inspect the condition of the friction linings. If chips or cracks are visible on them, the depth of the rivets (distance from the heads to the surface) does not exceed 0.2 mm - the driven disk must be replaced.
Based on the results of the inspection of each clutch part, a decision is made: leave the old one or install a new one. After this, all that remains is to assemble the unit and install the gearbox. When installing the basket, the driven disk should be centered using a mandrel. Next, you need to set the pressure bearing so that the edges of the coupling are positioned strictly horizontally.
After replacing the driven disc, as well as after installing a new fork, it is necessary to adjust the clutch.
Replacing the clutch on a Chevrolet Niva
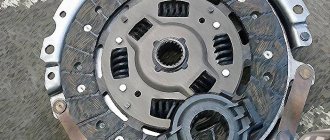
The domestic SUV is equipped with a dry-type single-plate clutch, the operation of which is ensured by a diaphragm spring.
According to the instructions, its service life is 30-40 thousand km, but during extreme driving, clutch replacement may be required earlier.
What does the price depend on?
Auto service centers set different prices for the clutch replacement service in a Chevrolet Niva. The cost depends on the influence of such factors:
- The need to remove the subframe and gearbox.
- Car condition.
- Attempts to repair the car yourself.
- Urgency of work.
- Pricing policy of the service company.
- The need to change the oil and some other parts.
- The cost of calling a technician to the location of the car.
- Type of spare parts used (original, non-original, new, used).
- Brand of clutch kit (the most common are LUK, AISIN, SACHS and VALEO).
When replacing the clutch in a Chevrolet Niva, experts recommend also changing the rear crankshaft oil seal and axle shaft seals. This will prevent future breakdowns and additional expenses. The service is paid additionally. You will have to pay a certain amount of money to have a technician come to the site. Rush orders will cost more.
For what faults does the clutch need to be replaced?
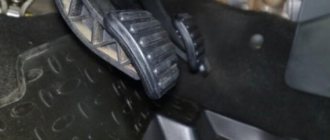
The task of the clutch is to transfer rotation from the engine to the input shaft of the gearbox, ensuring smooth driving and starting. When squeezing the dial, you can smoothly engage the speed or shift without jerking.
To extend the life of the clutch, do not constantly keep your foot on the pedal; this greatly reduces the life of the driven disk and release bearing.
The clutch can have two faults:
- Slippage – when the driven disk is not tightly pressed against the drive disk due to wear. In this case, when you release the pedal, the car will not move. The malfunction can also be detected when driving fast, when when you sharply press the gas pedal, the speed first increases and then drops slightly.
- The clutch drives - when you depress the pedal while driving, the car continues to move. If the breakdown is serious, you simply will not be able to turn off the speed.
The first signs of clutch wear are increased noise, jerking and difficulty shifting gears. If these “symptoms” appear, repair work is necessary.
Principle of operation
The node works as follows:
- When you press the pedal, the force is transmitted through the hydraulic clutch to the pressure fork. It puts pressure on the release bearing, displacing it towards the engine.
- The latter compresses the petals of the springs mounted on the clutch basket.
- The driving and driven disks begin to rotate independently of each other, breaking the connection between the engine and the gearbox.
- When the pedal is released, the clutch parts return to their original position under spring pressure.
- The discs connect and again transmit torque from the engine to the transmission input shaft.
Friction linings, release bearings and other clutch parts gradually wear out. In this case, you have to change individual parts or the entire assembly.
Removal and installation of the Niva Chevrolet engine
The engine is removed from the car upwards. To remove the engine, a lifting device with a lifting capacity of at least 300 kg is required. The car must be installed on a lift, inspection ditch or overpass. Before removing the engine, it is necessary to prepare a reliable stand on which the engine must stand steadily. It is easier to remove the engine if you remove the hood.
Before disconnecting hoses and electrical wires, we recommend that you mark them so as not to mix them up during assembly. The manufacturer recommends removing the engine by first disconnecting the components of the power unit: the gearbox with the clutch housing remains on the car, and when removing the engine, the front bearing of the gearbox input shaft and the clutch driven disc hub are removed from the input shaft. You will need: keys “10”, “13”, “17” and “19” (or a head with extensions and a universal joint), screwdrivers (two), a mandrel for centering the clutch driven disc, pliers, a hoist or other lifting device, slings (strong rope).
1. Remove the hood.
2. Disconnect the wires from the battery.
3. Remove the decorative engine cover.
4. Remove the oil sump protection and engine splash guard.
5. Drain the liquid from the engine cooling system (see “Replacing the coolant”).
6. Remove the cooling system radiator.
How to replace the clutch on a Chevrolet Niva yourself
Every motorist who has a manual transmission knows what a clutch is, and sooner or later is faced with the fact that it simply disappears, and when it starts to move, it does not disengage, thereby creating some kind of inconvenience. The only option in such a situation is to contact the nearest car service center, where the clutch on your Chevrolet Niva will be replaced within two to three hours. This option is not cheap, so if your budget does not allow this replacement procedure, you can do it yourself in the wild.
You will learn from this article how replacement, adjustment, and repairs occur, and you will also find out which one is best to install.
What is clutch
Thanks to it, torque is transmitted from the engine to the gearbox itself, making it possible to change gears on the gearbox. If this work is not done properly, it will negatively affect other mechanical components. This drive is hydraulic, there are no gaps in it, and has automated compensation, so there is no wear on the functional linings. This drive is one of the important parts, as it sends a signal to the working elements to the driver himself.
What kind of malfunctions are there?
This is a whole mechanism, and there can be a lot of reasons why it fails. Let's look at the most common ones:
When you press the clutch pedal on a Niva Chevrolet, slipping occurs, that is, the engagement is not complete, this can be caused by:
- If the friction linings are worn out or they are burnt out, this problem can be solved by completely replacing the disc.
- Oil appears on the surface of the driven disk, which indicates that the parts have faulty seals. You can fix the problem by washing the discs, removing the causes of the leak.
It happens that, on the contrary, it does not turn off completely; it starts to behave, this could be for the following reasons:
- Warping or beating occurs on the driven disk; this problem can be solved by repair, unless, of course, it has minor damage. But as a rule, if this malfunction occurs, it can be solved only by completely replacing the disk.
- The rivets on the fixed pads have become loose. The driven disk set will need to be replaced
- The presence of air in the system itself. This can be solved by bleeding the system.
- Warping and distortion of the disk. You can solve it by replacing this part.
A malfunction may occur where some parts need to be replaced. This is determined by the following characteristics:
- Noises are heard when pressing the clutch
- The same noise is heard when the pedal is released
This suggests that it is necessary to remove and disassemble this system, and eliminate the damage that has appeared.
How to make a replacement
When the cause of the breakdown is clear, you need to move on to eliminating it. The replacement process is very long and labor-intensive, so you need to be patient and follow everything strictly according to the instructions, which includes the following steps:
- Installing the car in the pit
- Prepare the necessary tools
- We remove the gearbox, this is necessary to have access to the device
- After the box is removed, you need to mark with marks where the flywheel and housing are located.
- Using an eight-mm wrench, we unscrew several mounting bolts; they secure the clutch disc itself to the flywheel.
- We remove two disks, pressure and driven
- We inspect them and if there are various chips and cracks, then it must be urgently changed.
- Check the condition of the release spring
- After inspection and elimination of all faults, installation occurs in the reverse order in which removal was carried out.
At this point, all stages of replacing the clutch on a Niva Chevrolet car are completed. During the replacement process, it is very important to look at the condition of the release bearing, and if it is in a worn state, it is better to replace it with a new one, since in a couple of months if you do not replace it, you will have to disassemble the device again. Now you have an idea of how to remove and replace the disk yourself, and you can carry out the entire procedure yourself at any time, without contacting a specialist.
Promval 21213 and its alternative
The trophy raid ended with a technical failure for us. Breakage of the intermediate shaft of our Niva. The technical meeting took place on May 3. We got home in the evening, and it was just brutal. We realized about the leak later, but it looked like this: you’re driving along, and suddenly the traction disappears. In general, the gear is engaged, the engine is running, everything is as usual, but you are standing still. It's like the transfer case is in neutral. So it is, the moment from the box to the RK goes through the groove, and at the junction of the donut and the flange it began to turn. Somehow we got out of the forest onto the highway, 170 km to the city. We started, drove more or less 4th gear for 100 km, trying not to breathe. After 100 km the connection began to disappear. Stop, play with gears, drive slowly. Until at some point they were no longer able to go. The house is 60-70 kilometers away. The navigator, but in fact an excellent pilot, and a friend suggested an option. The steering wheel was loosened on the mounts and pushed forward as far as possible towards the checkpoint. Somehow the wash-out caught a snag, and we quietly paddled home at 50 km/h. And about the trophy raid itself. The breakdown resulted in a study of the device and a debriefing of the flight. It turned out that 21213 uses a CV joint shaft. The CV joint is practically the same grenade as on the wheel drives. The advantage of a CV joint shaft is reduced vibration and greater comfort. At the same time, the 21213 industrial shaft has a stated disadvantage - less reliability compared to the industrial shaft based on crosses as in the 2121 fields. I will remember this for the rest of my life
Common faults
- Knocking or vibration when releasing the pedal. The problem occurs when the driven disk is deformed or its splines are worn out. The malfunction also appears if the engine is poorly secured to the supports or the diaphragm spring of the basket is deformed.
- The pedal sinks when pressed. This happens when the main or working cylinders break down, the hydraulic drive becomes airy, or the return spring or pressure fork breaks.
- The clutch does not disengage when the driver presses the pedal. The reason for this may be clogging or damage to the pipeline and cylinders of the hydraulic drive, deformation of the driven disk, the presence of scoring on its splines, breakage or change in the shape of the pressure fork, or diaphragm spring.
- The clutch is slipping. The problem appears when the friction linings attached to the driven disk are oiled or worn, the hydraulic drive is clogged, the pressure fork is jammed or incorrectly adjusted.
- Noise when pressing the pedal. A grinding, howling or whistling sound when the discs open is due to a faulty release bearing.
To eliminate most breakdowns, it is necessary to replace individual parts or the clutch as a whole.
How to replace the clutch on a Chevrolet Niva with your own hands
All motorists know the role of the clutch in cars with a manual transmission. Also, every car owner knows such unpleasant moments when the clutch simply disappears. When you try to start, the clutch pedal is pressed idle, which causes a lot of inconvenience. In this case, the only option to correct the situation is to get to the service station and literally pick up the car from repair within 2-3 hours. Although this method can be called fast, it is still considered the most expensive. The only way to save money and get to know your iron horse a little more is to repair and replace the clutch in your garage.
This material will tell you exactly how to replace the clutch on a Niva Chevrolet car, as well as its repair and adjustment of components. Thanks to this material, you can also find out which clutch is best to install on a Chevrolet Niva SUV.
First, let's remember what a clutch is. So, this is a device through which torque is transmitted from the car engine to the gearbox. That is, the clutch changes gears on the box. If the clutch operation does not meet the required level, then this will negatively affect other mechanical components (gearbox, engine). The clutch drive on the Chevrolet Niva is hydraulic, without gaps and has automatic compensation for friction lining wear. The drive is an equally important part, since it supplies a signal from the driver to the working elements.
Types of clutch faults
The clutch drive is a whole mechanism, so there are many reasons for the malfunction of this part. We will not consider all the malfunctions, since this information is already available on the global network, but we will pay attention only to the main reasons.
So, the main malfunctions when the clutch drive in a Niva Chevrolet slips, that is, it is incompletely engaged:
- The friction linings are too worn or have burned out. In such a situation, you can solve the problem by replacing the disk.
- The presence of oil on the surface of the friction linings of the driven disk, which indicates a malfunction of the sealing parts. In this case, you can get by by washing the discs with the obligatory removal of the cause of oil leakage.
There are also malfunctions that lead to the clutch starting to move, that is, it is not completely disengaged. The reasons for this phenomenon are as follows:
- End runout or warping of the driven disk. In such a situation, repairs can correct the problem, provided that the damage is minor. But most often, the presence of such a malfunction indicates the need to replace the disk.
- Friction lining rivets are loose. The driven disk will need to be replaced with a set.
- Air in the system. To do this, it is necessary to bleed the system.
- Distortion and warping of the pressure plate. Malfunctions of this kind can be resolved by replacing this part.
There are still malfunctions that will require replacement of some parts and components. Malfunctions can be identified by characteristic signs:
- You hear characteristic noises when you press the clutch pedal;
- Similarly, noises are heard, only when the clutch pedal is released.
All these malfunctions indicate one thing - you need to disassemble the clutch system and repair the breakdown.
Clutch replacement
Having found out the cause of the malfunction, it is necessary to take appropriate measures to eliminate it. Let's look at how to replace the clutch on a Chevrolet Niva together with the release bearing.
So, repairing or replacing the clutch is a fairly long process, so first you need to be patient and carry out all the steps according to the instructions. Replacement includes the following sequence of actions:
- Install the Niva Chevrolet SUV on the inspection hole for ease of repair work.
- Stock up on the necessary set of tools: screwdrivers, wrenches and a mandrel in order to be able to center the driven disk.
- Replacing the clutch requires removing the transmission to get to the unit itself.
- After removing the gearbox, you need to make marks for the location of the casing and flywheel. But this is only necessary if the old pressure plate will be used after replacement.
- Next, using the “8” key, you will need to unscrew all six mounting bolts. These bolts secure the clutch disc to the flywheel itself. To carry out the unscrewing procedure, it is necessary to keep the flywheel stationary.
- Now you can carry out the process of dismantling both disks: driven and pressure.
- It is important to inspect the driven disk. If there are cracks, chips, signs of wear, etc., then such a disk must be replaced.
It is necessary to measure the distance from the rivets to the surface of the lining; if it is less than 0.2 mm, then this disc cannot be used.
At this stage, the process of replacing the main clutch parts is complete. When replacing clutch discs, it is very important to pay attention to the release bearing. It is better to replace it immediately, so as not to have to disassemble the device again in a month.
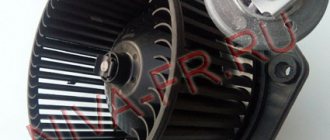
Replacing the release bearing
The release bearing is also an important element of this device. With its help, the process of disengaging the clutch is carried out. If noise is heard at the moment of switching off, then this is a signal that the bearing needs replacement. The replacement process consists of the following steps:
- The bearing is disengaged from the release fork.
- The fork must be moved to the side and the bearing removed.
- Now, before installing a new one, you will need to clean the seat and thoroughly lubricate it with Litol-24. The bearing itself also needs to be lubricated before installation.
- Reassemble in the reverse order of removal.
When replacing the bearing, clutch adjustment is not required, since the process is automated. You can read more about its replacement in a separate article.
Clutch master and slave cylinders
The main cylinder is designed to transmit impulse from the pedal to the working parts of the device. If there is a fluid leak, as well as incomplete engagement or disengagement of the clutch, the master cylinder will need to be repaired or replaced. In order to make repairs, you must first remove the master cylinder. After removal, you can carry out an inspection, and then decide what is necessary - repair or replacement of the product.
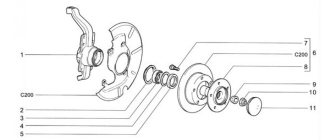
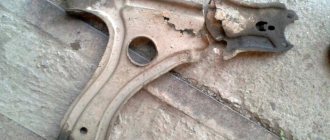
Features of the design and repair of the VAZ-2121 intermediate shaft
The intermediate shaft transmits torque from the transmission output shaft to the transfer case drive shaft.
It consists of an elastic coupling, a flange and a constant velocity joint.
The intermediate shaft is centered on the transmission output shaft by a rubber bushing.
An elastic coupling allows transmission of torque with minor changes in the angle between the shafts of the gearbox and transfer case, protects transmission parts from dynamic shocks and reduces noise and vibration of the driveline during operation.
The elastic coupling consists of six steel liners connected by rubber bridges.
Due to its elasticity, the clutch dampens jerks in the vehicle transmission.
The elastic coupling is attached to the secondary shaft flange with three bolts passed through the holes in the liners.
The other three holes are used to secure the coupling to the flange on the intermediate shaft. There are balancing washers located under the bolt nuts.
When disassembling, we mark their location so that later we can install them in their original places.
In order not to disturb the balancing, we note the relative positions of other parts of the intermediate shaft.
A constant velocity joint is placed on the splined end of the elastic coupling flange. Its structure is similar to the external joint of the front wheel drive.
The hinge is secured from displacement by a retaining ring located in a groove on the flange shaft.
The hinge is protected from dirt by a rubber corrugated cover and a plastic plug in the rear end of the hinge body.
The cover is secured to the flange shaft and the hinge body with special clamps with locks.
Under the large clamp (on the hinge body) there is a protective plastic casing.
On the first VAZ-2121 models, a cross was installed instead of a constant velocity joint.
Removing the intermediate shaft
Remove the transfer case assembly with the intermediate shaft (see Removing the transfer case).
While holding the shaft from turning with a screwdriver, use a 13mm wrench to unscrew the four nuts securing the intermediate shaft to the transfer case flange.
2. Remove the intermediate shaft.
Install the intermediate shaft on the transfer case in reverse order.
3. Before installing the intermediate shaft assembly with the transfer case, we check the condition of the rubber centering sleeve located on the flange of the secondary shaft of the gearbox.
Disassembling the intermediate shaft
We disassemble the intermediate shaft to replace the elastic (rubber) coupling or constant velocity joint.
1. Mark the location of the coupling relative to the flange, as well as the number and location of balancing washers relative to the coupling.
2. While holding the bolts from turning with a 19mm wrench, use a head of the same size to unscrew the three nuts.
3. Disconnect the coupling and flange.
4. By turning the hinge, remove the bolts from the holes in the elastic coupling flange.
5. Using a screwdriver, remove the plastic plug.
6. Squeeze the clamp with sliding pliers and remove it.
7. Use a screwdriver to move the plastic casing
8. Remove the rubber protective cover from the constant velocity joint housing
9. We place the hinge body on the open jaws of the vice and, striking through a soft metal drift at the end of the elastic coupling flange, knock out the flange.
10. Separate the hinge and flange.
11. Pull the plastic casing off the rubber boot.
12. Having pulled out the rubber boot, squeeze the clamp with sliding pliers and remove it
13. Remove the rubber protective cover
14. Using a screwdriver, remove the hinge retaining ring
Disassembling and assessing the condition of the hinge parts are similar to the corresponding operations described in the article - “Repair of front wheel drives”.
We assemble the intermediate shaft in the reverse order.
In the rebuilt or new hinge we put 20 cm 3 of CV joint-4 lubricant.
Before connecting the hinge to the flange of the elastic coupling, install a small clamp of the rubber protective cover.
15. Press the hinge onto the flange, striking through a piece of pipe onto the hinge holder
16. Before installing the rubber coupling, compress it with a clamp
We place the used coupling according to the marks relative to the flange.
We place the previous balancing washers according to the marks relative to the coupling.
When installing a new coupling, the shaft assembly may need to be balanced.
Intermediate shaft tightening torques
Nut of the bolt securing the elastic coupling to the flanges M12×1.25 - 57.8-71.5 Nm (5.9-7.3 kgf m)
Nut securing the hinge housing to the drive shaft flange of the transfer case M8 - 27.4-34.3 Nm (2.8-3.5 kgf m)
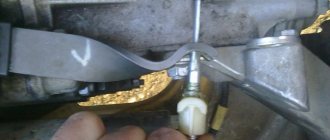
How to change the fork without removing the gearbox?
You can replace the part without removing the gearbox. To do this, you don’t even have to drive the car onto a pit or a lift. You will need:
The latter will be required for minor modifications to the standard fork. Otherwise, it will not be possible to put it in place without removing the gearbox.
- Using pliers, remove the return spring.
- Unscrew the clutch slave cylinder mounting bolts.
- Unsplit the rod and remove it from the plug.
- Remove the protective cover.
- Pull out the old plug. This must be done carefully so as not to break. Otherwise, the operation will be complicated.
- Finish the new fork on a sharpener: grind off the rivets to a height of 1-1.5 mm, chamfer the ends.
- Light it with a flashlight or carry it into the hatch.
- Rotate the release bearing and set the faces of the coupling to a horizontal position.
- Turn the ends of the spring towards the hole.
- Guide the fork, insert it into the hatch and carefully drive it inside using a hammer.
Important: the spring must be supported with a screwdriver. The tendrils should fall strictly between the two ribs of the fork.
- Make sure that the part rests on the ball joint.
- Direct the spring tendrils. They should wrap around the support.
- Install the protective cover.
- Replace the rod and screw the working cylinder.
- Reinstall the return spring.
- If necessary, adjust the clutch free play.
Clutch replacement
First you need to provide access to the machine from below. It is not possible to replace the clutch mechanism without dismantling the gearbox.
In addition to the standard set of keys and screwdrivers, you will need a edit for centering the driven disk and a marker. This can be the gearbox input shaft or a tube (rod) of the appropriate diameter.
- Install the Niva on a viewing hole, overpass or lift.
- Remove the gearbox.
- Remove the release bearing and check its condition. It should rotate easily and have no signs of lubricant leakage.
- Use a marker to mark the position of the basket relative to the engine flywheel. This should only be done if you do not plan to replace the pressure plate.
- Using an open-end or socket wrench size 8, unscrew the bolts securing the basket to the flywheel. To do this, you need to fix the latter, preventing it from turning.
- Remove the driven and pressure plates.
Important: inspect the condition of the friction linings. If chips or cracks are visible on them, the depth of the rivets (distance from the heads to the surface) does not exceed 0.2 mm - the driven disk must be replaced.
Based on the results of the inspection of each clutch part, a decision is made: leave the old one or install a new one. After this, all that remains is to assemble the unit and install the gearbox. When installing the basket, the driven disk should be centered using a mandrel. Next, you need to set the pressure bearing so that the edges of the coupling are positioned strictly horizontally.
After replacing the driven disc, as well as after installing a new fork, it is necessary to adjust the clutch.
Video instructions for replacing the shnivy industrial shaft
Remove the transfer case assembly with the intermediate shaft (see Removing the transfer case).
While holding the shaft from turning with a screwdriver, use a 13mm wrench to unscrew the four nuts securing the intermediate shaft to the transfer case flange.
2. Remove the intermediate shaft.
3. Before installing the intermediate shaft assembly with the transfer case, we check the condition of the rubber centering sleeve located on the flange of the secondary shaft of the gearbox.
We disassemble the intermediate shaft to replace the elastic (rubber) coupling or constant velocity joint.
1. Mark the location of the coupling relative to the flange, as well as the number and location of balancing washers relative to the coupling.
2. While holding the bolts from turning with a 19mm wrench, use a head of the same size to unscrew the three nuts.
3. Disconnect the coupling and flange.
4. By turning the hinge, remove the bolts from the holes in the elastic coupling flange.
5. Using a screwdriver, remove the plastic plug.
6. Squeeze the clamp with sliding pliers and remove it.
7. Use a screwdriver to move the plastic casing
8. Remove the rubber protective cover from the constant velocity joint housing
9. We place the hinge body on the open jaws of the vice and, striking through a soft metal drift at the end of the elastic coupling flange, knock out the flange.
10. Separate the hinge and flange.
11. Pull the plastic casing off the rubber boot.
12. Having pulled out the rubber boot, squeeze the clamp with sliding pliers and remove it
13. Remove the rubber protective cover
14. Using a screwdriver, remove the hinge retaining ring
Disassembling and assessing the condition of the hinge parts are similar to the corresponding operations described in the article - “Repair of front wheel drives”.
We assemble the intermediate shaft in the reverse order.
In the rebuilt or new hinge we put 20 cm 3 of CV joint-4 lubricant.
Before connecting the hinge to the flange of the elastic coupling, install a small clamp of the rubber protective cover.
15. Press the hinge onto the flange, striking through a piece of pipe onto the hinge holder
16. Before installing the rubber coupling, compress it with a clamp
We place the used coupling according to the marks relative to the flange.
We place the previous balancing washers according to the marks relative to the coupling.
When installing a new coupling, the shaft assembly may need to be balanced.
Nut of the bolt securing the elastic coupling to the flanges M12×1.25 - 57.8-71.5 Nm (5.9-7.3 kgf m)
Nut securing the hinge housing to the drive shaft flange of the transfer case M8 - 27.4-34.3 Nm (2.8-3.5 kgf m)
The work is carried out using an inspection pit, overpass or lift. To replace the washer you will need the following tool:
- one socket wrench for 13 and two for 19;
- flat screwdriver;
- small hammer;
- scrap;
- chisel;
- goatee
You will also need to stock up on the following items:
- centering sleeve;
- four self-locking nuts;
- O-ring for flange mounting;
- worm clamp with a diameter of 150 mm.
To remove the intermediate shaft, you must:
- Using a 13mm wrench, unscrew the 4 nuts that secure the shaft joint housing to the transfer case flange.
- Place a 150mm diameter worm clamp onto the rubber coupling and tighten it.
- Make marks on the CV joint and the transfer case flange housing to remember their relative positions.
- Loosen the nuts holding the power unit and move it forward 15-20 mm (a crowbar will come in handy here).
- Using 19mm spanners, unscrew the nut and remove the bolt securing the coupling to the gearbox flange.
- Unscrew and remove the other three bolts.
- Move the intermediate shaft towards the gearbox and remove the hinge housing studs from the holes on the transfer case flange.
- Do the same operation with the hinge.
- Remove the intermediate shaft from the vehicle.