If, when releasing the clutch pedal, the VAZ 2114 begins to slip or shake, then it is time to repair the VAZ 2114 clutch. The appearance of crackling noises and various noises can also indicate a malfunction of the mechanism. Typically, such problems are caused by wear of the driven disk or the formation of cracks in its surface.
Clutch for VAZ in working condition.
The first step is to visually examine the mechanism. Even if one or two elements are damaged, it is recommended to replace the clutch assembly. But if there is no extra money, you can change individual parts. For example, a driven disk. It needs to be changed in the following cases:
- The rubbing surface has cracks and significant wear;
- Damper springs dangle in their sockets. This means they are broken.
- The seating depth of the rivets is less than 0.2 mm.
The transmission does not start
If the engine was turned off, and everything was working, the gears would engage, but when the engine was started, the gearbox crunched, the lever rested, but the gears did not engage. Congratulations, most likely something to do with the clutch drive. If when the engine is not running all the parts are stationary, then when the engine is working, half of the parts rotate (flywheel, clutch and input shaft of the box), then the second half of the parts stand still, and in order to somehow synchronize them, you need to open the clutch. Then you can put it into gear.
Why might the clutch not open? The clutch drive may be damaged. The clutch drive can be either a cable or a hydraulic drive (clutch master and slave cylinders). Each of these mechanisms has its own settings and typical malfunctions.
First of all, adjust the clutch drive - tighten the cable, cable or rod of the working cylinder (piglet), if the drive is hydraulic
If nothing happens, it means the cable is torn/stretched (to be replaced). In a hydraulic clutch, this may be a malfunction of the master or slave cylinder, when the rod does not press enough, bypassing the fluid. This could be either a simple lack of fluid that will need to be added to the tank, or worn out seals. This problem is solved by replacing the repair kit, or replacing the cylinder, if it is completely rotten and the repair kit will no longer help, only complete replacement of the unit. It's easier with a cable - it's either broken or it's hard to move. If after pulling up there is no result, most likely it is something else.
Vibration
A faulty clutch can cause vibration, this is not surprising, because the assembly undergoes a rotational movement and imbalance causes vibration.
It happens that after replacing the clutch with a new one, vibration appears. It would seem that everything seems to be new, but when starting off there is some kind of vibration and jerking. Most likely, you came across a restored basket, the so-called refurbished, that is, the clutch is changed at a car service center, the old set is sent to the factory for restoration, and sometimes such imperfections happen. Such a set usually costs less than a new one, but it’s not a fact that they won’t push it on you under the guise of a new one. The box should say refurbished
.
On an old, battered clutch, if when starting off, the damper springs have become loose, or the basket begins to fall apart; if vibration occurs while driving, the basket is most likely torn; a slight vibration may indicate slight wear of the basket, especially if only the disk was replaced at the last time. In general, the clutch is a part that must be dynamically balanced; if the center of mass is suddenly disturbed, then in any case vibration will result at certain engine speeds. The flywheel will not give such a vibration for no reason, it just comes off and punches everything in its path if it is not screwed on properly.
Required spare parts
Depending on the type of repair, you may need:
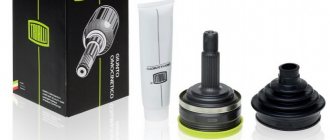
- disk (article - 2109-1601-085);
- rivet (article - 2108-1601-295);
- bolt (article - 2108-1601-207);
- overlay (article: 2109-1601-138-04, 2109-1601-138-03, 2109-1601-138-01 or 2109-1601-138);
- driven disk (article - 2109-1601-130);
- pressure bearing (article: 2109-1601-182 or 1111-1601-182);
- coupling assembly (article - 2110-1601-180);
- spring (article - 2108-1601-188).
Good to know
After all, at this stage the replacement of the clutch ends. Such instructions can be used on all passenger cars of this brand, the only difference is that the elements themselves may differ. The disc, clutch or basket will be reliable if the engine is very powerful. The more powerful it is, the more reliably all the parts of the mechanism will work.
But in any case, you need to try not to give the car high speeds in order to increase its resource.
It is possible to replace the clutch without removing the box. The replacement is almost identical to the first, but the difference is that the box can simply be moved to the left side, the disk is changed through the gap formed between the engine block and the crankcase.
Replacing the clutch yourself not only saves your resources, but also gives you a wealth of experience in such a difficult task. You should know that when replacing the clutch, the release bearing must be replaced.
Take care of your iron horse, promptly replace all parts that have become unusable, and your swallow will serve you for many more years.
Basic faults
The clutch is an essential part of a car using a manual transmission. In addition to knowledge about how the clutch works, it is important to have an understanding of malfunctions.
The most common of them:
- The clutch does not disengage completely. Air entering the release drive creates the feeling of a sinking pedal, as a result of which the driver cannot completely disengage the clutch;
- the clutch does not engage. Common cause: cable break;
- The clutch pedal refuses to return to its original position. Cause: the return spring has failed or is disconnected;
- loud noise when disengaging the clutch. The noise indicates wear of the release bearing;
- The clutch is not fully engaged. There are many reasons: wear of the drive disk linings, faulty springs, small pedal travel.
Improper operation and late replacement
Frequent causes of the above malfunctions are:
- untimely clutch adjustment;
- frequent and sharp jerks when the car starts to move;
- high engine speeds when the pedal is not fully released;
- towing a car;
- manufacturing defect;
- Typically, replacement involves installing a new release bearing, which is part of the clutch mechanism.
Observing clear signs of a malfunction, drivers are often in no hurry to replace it. This attitude leads to complete destruction of the elements and the car’s unsuitability for use.
Clutch replacement price
You need to decide whether you will trust the services or make the replacement yourself.
Estimated cost for replacing the clutch and adjacent parts in service centers:
These prices include the cost of specialist work. Replacing it yourself allows you to save a lot: the average price of a clutch kit is 3,000 rubles.
Important points
- When replacing the clutch, it is necessary to pay close attention not only to the condition of the discs, but also to the condition of the release bearing, which was mentioned above. After removing it, you need to turn it several times by hand. If rotation is difficult or a creaking or crackling sound is heard during scrolling, then the bearing needs to be replaced. If this is not done, all the work on replacing the clutch discs will be useless, since they will again become unusable.
- The gearbox shaft and adjacent parts should be cleaned of dirt very carefully; it is best to wash everything with kerosene and wipe dry with a clean rag.
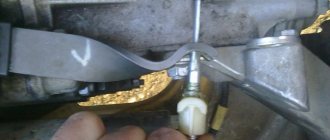
- The above is a method for replacing the clutch with complete removal of the gearbox. But sometimes car enthusiasts do without removal. To do this, the bolts that secure the box to the engine are carefully unscrewed (one at a time). In their place, studs are installed, which are slightly thinner and at least three times longer than the mounting bolts. These pins serve as guides along which the box can be moved slightly to the side. This creates a gap between the engine and the gearbox, through which the clutch discs are removed. This method is less labor-intensive, but it has its drawbacks: it will be impossible to get to the release bearing and it will not be possible to thoroughly clean the gearbox shaft from dirt.
As you can see from this article, replacing a clutch is a very labor-intensive operation. Therefore, it is necessary to follow the proposed instructions exactly. You should also not forget about safety precautions, especially when it comes to removing the gearbox. This is a very heavy unit and you should be extremely careful when handling it.
This is interesting: A new charged version of the Renault Megane RS 265 has been prepared in the UK
Copywriter with five years of experience.
Tools you will need for your work
To perform the work you may need the following tools:
- two jacks;
- hub key;
- metal brush;
- a set of open-end and ring wrenches;
- set of heads;
- installation guide and other tools that every driver has.
For an experienced technician, replacing a VAZ 2113, 2114 or 2115 clutch with your own hands takes about 4 hours. A beginner will have to tinker longer. But the expenditure of effort and time will be fully justified, since in a car service center the price for replacing a VAZ 2113, 2114 or 2115 clutch is from 3 thousand rubles as of 12/01/2018. U
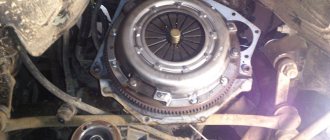
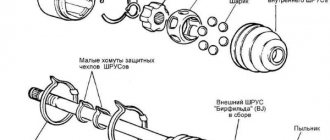
ABOUT THE CLUTCH DEVICE
Its design on this car is similar to mechanisms 2113 and 2115. It is made of a dry, single-disc mechanism. It is produced with a device that dampens torsional vibrations, and also has a pressure spring. The VAZ 2114 clutch device is shown in the figure.
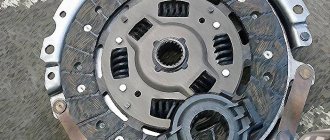
Clutch components
The VAZ 2114 clutch consists of (see picture):
- Cable with a casing;
- Cable tip (lower);
- Adjusting nut;
- Housing for attaching the shell to the gearbox;
- Separating washers;
- Nut for adjustments;
- Rubber protective shell;
- Cable lead;
- Shutdown plug;
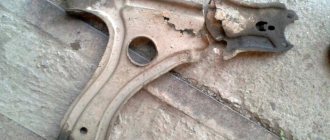
- Basket;
- Bolts securing the basket to the flywheel;
- Pressure disk;
- Flywheel;
- Driven disk;
- Gearbox input shaft;
- Shield;
- casing;
- Spring (pressure);
- "Squeeze";
- Pad;
- Release housing;
- Cable end;
- Cable thrust washer;
- Cable fastening unit;
- Pedal axle;
- Release spring;
- Off pedal.
As can be seen from the mechanism diagram, there are two working units, one of them will be the master, and the second will be the slave. The second includes a disk with linings riveted on both sides and damper springs installed. It is installed and moves along the splines that are present on all gearbox input shafts. When the pedal is pressed, the driven disk is pressed against the flywheel by the pressure disk.
The drive unit includes a pressure disc with a clutch housing, which is attached to the flywheel with six bolts. To center it, there are pins on the flywheel and guide holes in the housing. The clutch has a backlash-free design and is operated by a cable.
To turn it off, a clutch drive is installed, which operates by pressing the pedal. The cable is hingedly attached to it with its upper tip. The lower end of the cable also has a hinged connection with the shutdown fork. With its movement, the “cable” turns it, and it moves the “releaser”.