After replacing the struts, supports, steering and ball bearings, the knocking noise when driving on rough roads did not disappear. And then the other day I crawled under the car and noticed the damaged silent blocks.
I went online to see how this whole thing is changing and someone on Drive found a post about replacing silent blocks and rubber bands, or popularly known as “Daisies.” After studying the material, I finally decided to change them.
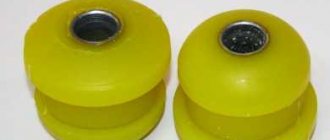
We bought silent blocks, front suspension extension joints (“Daisies”), as well as stabilizer bushings and anti-roll bar struts (popularly “Eggs”).
We drive the car into the pit and fix it. Safety comes first. First, I recommend filling all the bolts and nuts with WD-40 and letting them sit.
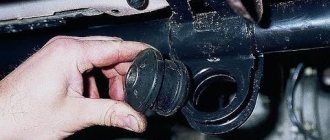
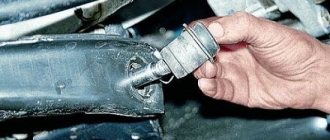
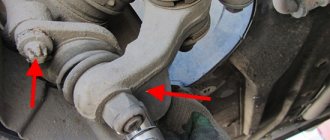
Next, we tear off the nuts of the lever, brace and “eggs”. If you can’t unscrew the nut of the extension, you can unscrew the crab and unscrew the extension later, in more convenient conditions. Next, we raise the car, remove the wheel, unscrew the 2 ball bolts, unscrew and remove the “egg”, unscrew the extension nut, the lever bolt and remove the lever.
So, now you need to get rid of the old silent block. There are several options: 1. Burn it with a torch. 2. Drill out. 3. Use a special puller. 4. Be smart.
Since I didn’t have a drill, a torch, or a puller, I chose the 4th point. I cut off one side of the silent block with a knife and knocked it out with a hammer.
Afterwards, it is necessary to clean the seat from rust and dirt, otherwise the new silent block will not be pressed into place.
Here. Now you need to press the new silent block into place. There are also several options here: 1. Use a special puller. 2. Using a vice. 3. Be smart.
Here, too, I chose the 3rd point. Using my ingenuity, I assembled this puller.
Next we look at how to use it in the photo:
Before assembly, lubricate the lever eye and silent block with liquid soap or detergent. You cannot use grease, lithol or oil, because... The rubber is not oil resistant and will quickly become rough and crack. To press the silent block in, use a screwdriver to push the collar into the hole. It may not work out the first time, you will have to suffer.
By tightening the bolt, we press the silent block in and somewhere halfway it will rest against the puller washer. And then the puller was modified:
Consequences of consumables malfunction
It should be noted that silent blocks and bushings are consumables.
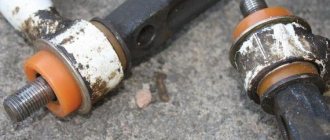
Due to heavy loads, it is possible that the rubber part of the silent block may be pressed through, detached from the metal bushing, and the rubber itself may delaminate. As a result, they are no longer able to work properly.
This results in knocking from the suspension, the appearance of creaks, when driving, especially over uneven surfaces, the car can throw from side to side, and the more wear on the silent blocks, the stronger the tossing will be.
Also, due to worn silent blocks, the angles of the wheel position - camber and toe - change, because of which the car will no longer hold the road, it will begin to drift in any direction, the tires will quickly wear out due to incorrect angles.
So, the condition of all rubber elements of the car suspension must be constantly monitored, and if signs of malfunction appear, they must be promptly replaced.
With certain knowledge and the availability of tools, you can replace silent blocks yourself without contacting a service center.
It should be noted right away that even if damage to one or two silent blocks is detected, it is better to completely replace all rubber parts of the suspension, and not just the damaged ones.
Also, all elements are replaced immediately on the left and right sides of the car.
PayAnyWay payment:
1. Payment/transfer to Sberbank VISA card № ( 4276 1633 1094 5170 )
Payment transfer methods:
A. The simplest and most proven method, transfer from any bank card to a VISA illva.ru store through the online service of Alfa Bank, Commission is only 1.95%.
b. Through payment terminals: QIWI Instructions or Cyberplat Instructions
d. Many other methods are described on the VISA portal.
2. After payment is received in the bank account, the order is delivered to the client. When sending goods through a transport company, they are delivered to the transport company and sent for further transportation to the client’s city. The Client is provided with a bill of lading number via SMS notification or to the specified e-mail, to track the cargo on the transport company’s website;
Shock absorber
This element is a damping device. The shock absorber serves to reduce the range of vibrations of the car body. In other words, the element prevents spontaneous rocking. The work of the shock absorber is based on hydraulic resistance. Inside it there is a liquid of a certain viscosity. It moves through a special valve. Thus, the device absorbs sharp impacts while preserving vulnerable suspension parts. Therefore, the shock absorber is one of the most important components in the chassis. On our roads, this element lasts about 60-80 thousand kilometers. But this period may be shorter, even with careful driving. It is enough just to damage the protective boot, and all the dirt will accumulate in the rod seal.
Also note that the damping element changes in pairs. That is, in the event of a breakdown of the rear left shock absorber, the rear right shock absorber also changes. As for the front struts, they are more durable. Often they are replaced already assembled with a spring, since they fail no earlier than after 150-200 thousand kilometers.
Replacement of silent blocks of front levers of VAZ 2110
Some car owners are afraid to replace the silent blocks of the front beam on a VAZ 2110 on their own. But in vain. Contacting a service station entails serious financial costs. Plus, it’s far from a fact that the service station will do your job better than you would have done yourself.
Zapisovka
The only thing is that you may need the help of a car service friend. All service stations have a special puller in their tool arsenal. There is no point in purchasing it, since it is expensive and is rarely needed by a car owner. Some craftsmen even make their own puller using a homemade method. There are many drawings and diagrams according to which it is made. So you can try it if you have free time.
There are two silent blocks in the front beam - in the front upper and front lower arm. The procedure for replacing them is somewhat different from each other, so we will consider the processes separately.
Front upper control arm silent block
Broken
Let us immediately note that it is easier to work with it than with the second element. The entire procedure involves performing several sequential operations.
- Raise the car on a jack and secure it in a stationary position. Turn on the handbrake, put stoppers under the wheels.
- Remove the front wheel.
- Unscrew and remove the support. To do this, you will need to turn the wheel out and hit the bipod with a hammer. It is better to do this through some kind of insert.
- By knocking out the support, you can remove the upper front control arm without serious problems.
- There is a bolt on the side, it is quite long. Unscrew it. Inspect the end play. Most likely, it is quite serious and is easily felt when checking. Therefore, you absolutely correctly decided to change the silent blocks.
- You can remove the silent block with a hammer and chisel. Just don't hit it too hard, or you'll damage other suspension components.
- In some cases, the silent block sits very firmly, so you can’t do without a drill and drilling it. After making the holes, you can safely remove the element.
- Now use the smaller bushing to press the new silent block into place. The part must fit firmly and securely into the socket.
We should also talk about axial play. To eliminate it, you can go in two ways:
- The first is to replace the entire pillar. The option is so-so, since its cost is very high, but the quality is quite low;
- The second is to tighten a couple of washers from the sides. They will not allow the mounting bolt to dangle.
The disadvantage of the second option is that installing washers sometimes leads to a situation where the silent block does not fit on the lever. Therefore, you have to reduce it with a hacksaw. Unfortunately, this leads to a reduction in the service life of the silent block.
Front lower control arm silent block
This procedure is rightly considered more complicated. Although even every motorist can handle it on his own.
Recording method
- Remove the stabilizer. This will give you the ability to move the lever laterally.
- Next, remove all the nuts holding the silent block stationary.
- Remove the lower arm silent blocks. To do this, you will have to carry out all the activities that we described in the previous section when we removed the parts of the upper arm.
- After this, new elements are pressed in.
- Please note that the new silent blocks of the lower arm are fixed when the car is loaded. If you do this while the suspension is hanging, after a fairly short period of time the new components will break and you will have to do the whole job again.
As you can see, the work is difficult, but relatively so. If you first study our instructions, be sure to look at the instruction manual for your VAZ 2110, and also watch some visual videos, for example, the task will not be as difficult to complete as you thought at first glance.
That's why it's so useful to have good friends at the service station. They will not deceive and will do everything efficiently, as if for themselves. If there are no such comrades, there is always a certain risk of becoming a victim of deception. They have more than enough schemes. This is one of the good reasons why 10 owners try to do the repairs themselves.
Today we will talk about how to replace silent blocks on a VAZ 2110.
The suspension is one of the most loaded devices of a car, since it constantly absorbs all the oscillatory movements of the wheel that are transmitted to it from the road surface.
Removing the gearbox
To gain access to the clutch on a VAZ 2110, you need to remove the battery and air filter (completely, along with the mass air flow sensor).
Unscrew the drive (the so-called cable).
Unscrew the top bolts securing the gearbox to the engine.
- Do-it-yourself replacement of rear beam silent blocks on a VAZ 2110
Disconnect the speed sensor “chip” and remove the wiring harness fastening.
Now you need to “hang” (raise) the front wheels of the car. Let me clarify - we removed the gearbox only to repair the VAZ 2110 clutch, and the method that I describe and present in the photo allows us not to pull the drives out of the “box” and not to drain the oil from it. Loosen the drive nut on the right side of the gearbox almost to the end of the thread, and on the left, tighten it completely (from here we will pull out the drive).
Unscrew the suspension arm.
Now the ball joint.
- Do-it-yourself pressing and pressing of silent blocks
As well as suspension arm bolts (two pieces).
The front suspension arm has been removed.
Remove the “mudguard” (lower engine protection). Disconnect the reverse light switch.
Unscrew the torque rod from the gearbox and remove the lower crankcase cover.
Loosen the nut on the collar of the rocker link (transmission control drive) and disconnect it. Note that after the repair of the VAZ 2110 clutch is completed and the box is installed in place, the link will need to be adjusted.
Unscrew the lower bolt and nut securing the box to the engine. Finding and unscrewing a bolt is not a problem, but finding a nut can be difficult. It can be “closed” by the drive located in the box.
Place the jack under the engine, being careful not to damage the sump.
Unscrew the gearbox from the “cushion”.
Lower the engine slightly on the jack and remove the gearbox.
As for my case, a complete replacement of the VAZ 2110 clutch was not required. The cause of the malfunction was the breakdown of the release bearing, and only the basket, disc and, naturally, the release bearing itself had to be changed.
Repair and Improvement" on DRIVE2
After replacing the struts, supports, steering and ball bearings, the knocking noise when driving on uneven roads did not disappear
And then the other day I crawled under the car and noticed the damaged silent blocks
I went online to see how this whole thing is changing and someone on Drive found a post about replacing silent blocks and rubber bands, or popularly known as “Daisies.” After studying the material, I finally decided to change them.
We bought silent blocks, front suspension extension joints (“Daisies”), as well as stabilizer bushings and anti-roll bar struts (popularly “Eggs”).
Daisies
Eggs
Let's begin.
We drive the car into the pit and fix it. Safety comes first. First, I recommend filling all the bolts and nuts with WD-40 and letting them sit.
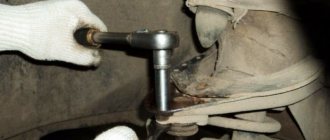
Next, we tear off the nuts of the lever, brace and “eggs”. If you can’t unscrew the nut of the extension, you can unscrew the crab and unscrew the extension later, in more convenient conditions. Next, we raise the car, remove the wheel, unscrew the 2 ball bolts, unscrew and remove the “egg”, unscrew the extension nut, the lever bolt and remove the lever.
So, now you need to get rid of the old silent block. There are several options: 1. Burn it with a torch. 2. Drill out. 3. Use a special puller. 4. Be smart.
Since I didn’t have a drill, a torch, or a puller, I chose the 4th point. I cut off one side of the silent block with a knife and knocked it out with a hammer.
Afterwards, it is necessary to clean the seat from rust and dirt, otherwise the new silent block will not be pressed into place.
Here. Now you need to press the new silent block into place. There are also several options here: 1. Use a special puller. 2. Using a vice. 3. Be smart.
Here, too, I chose the 3rd point. Using my ingenuity, I assembled this puller.
Next we look at how to use it in the photo:
Before assembly, lubricate the lever eye and silent block with liquid soap or detergent. You cannot use grease, lithol or oil, because... The rubber is not oil resistant and will quickly become rough and crack. To press the silent block in, use a screwdriver to push the collar into the hole. It may not work out the first time, you will have to suffer.
By tightening the bolt, we press the silent block in and somewhere halfway it will rest against the puller washer. And then the puller was modified:
To put the silent block in place you need to use some kind of thread and tube. The inner ring of the wheel bearing caught my eye (see photo above). It fits just right. We press the silent block in completely, not forgetting to lubricate it with soap.
Now we change the daisies. We knock out the old ones with a chisel. For me they fell apart into 2 parts.
We clean the seat, lubricate it with lithol and hammer new ones into place.
We put the lever in place. We tighten all the bolts, tighten the ball bolts at once.
ATTENTION! IT IS STRICTLY PROHIBITED TO TIGHTEN THE BOLTS WITH THE MACHINE RAISED. OTHERWISE, WHEN LOWERING THE CAR, THE BUSHING BLOCKS MAY TEAR
We put the wheel on, lower the car and tighten all the bolts. Along the way, we change the stabilizer bushings and install the “eggs”.
After repair, it is recommended to do a wheel alignment.
I think this post will be useful to someone
Thank you for your attention_))
www.drive2.ru
Replacement of silent blocks of front levers of VAZ 2110
Some car owners are afraid to replace the silent blocks of the front beam on a VAZ 2110 on their own. But in vain. Contacting a service station entails serious financial costs. Plus, it’s far from a fact that the service station will do your job better than you would have done yourself.
Zapisovka
The only thing is that you may need the help of a car service friend. All service stations have a special puller in their tool arsenal. There is no point in purchasing it, since it is expensive and is rarely needed by a car owner. Some craftsmen even make their own puller using a homemade method. There are many drawings and diagrams according to which it is made. So you can try it if you have free time.
There are two silent blocks in the front beam - in the front upper and front lower arm. The procedure for replacing them is somewhat different from each other, so we will consider the processes separately.
Front upper control arm silent block
Broken
Let us immediately note that it is easier to work with it than with the second element. The entire procedure involves performing several sequential operations.
- Raise the car on a jack and secure it in a stationary position. Turn on the handbrake, put stoppers under the wheels.
- Remove the front wheel.
- Unscrew and remove the support. To do this, you will need to turn the wheel out and hit the bipod with a hammer. It is better to do this through some kind of insert.
- By knocking out the support, you can remove the upper front control arm without serious problems.
- There is a bolt on the side, it is quite long. Unscrew it. Inspect the end play. Most likely, it is quite serious and is easily felt when checking. Therefore, you absolutely correctly decided to change the silent blocks.
- You can remove the silent block with a hammer and chisel. Just don't hit it too hard, or you'll damage other suspension components.
- In some cases, the silent block sits very firmly, so you can’t do without a drill and drilling it. After making the holes, you can safely remove the element.
- Now use the smaller bushing to press the new silent block into place. The part must fit firmly and securely into the socket.
We should also talk about axial play. To eliminate it, you can go in two ways:
- The first is to replace the entire pillar. The option is so-so, since its cost is very high, but the quality is quite low;
- The second is to tighten a couple of washers from the sides. They will not allow the mounting bolt to dangle.
The disadvantage of the second option is that installing washers sometimes leads to a situation where the silent block does not fit on the lever. Therefore, you have to reduce it with a hacksaw. Unfortunately, this leads to a reduction in the service life of the silent block.
Front lower control arm silent block
This procedure is rightly considered more complicated. Although even every motorist can handle it on his own.
Recording method
- Remove the stabilizer. This will give you the ability to move the lever laterally.
- Next, remove all the nuts holding the silent block stationary.
- Remove the lower arm silent blocks. To do this, you will have to carry out all the activities that we described in the previous section when we removed the parts of the upper arm.
- After this, new elements are pressed in.
- Please note that the new silent blocks of the lower arm are fixed when the car is loaded. If you do this while the suspension is hanging, after a fairly short period of time the new components will break and you will have to do the whole job again.
Garage or service station
All car owners can be divided into two categories:
- Those who carry out most of the repairs themselves in their garage, and only in emergency cases turn to a car service;
- Those who prefer not to touch anything with their own hands, but completely entrust repairs and maintenance to the masters of service stations.
Each of them is right in their own way. Therefore, we have no right to reproach those who do not want to carry out repairs themselves. After all, garage and professional repair of silent blocks, like other components, has its advantages.
STO has the following advantages:
- A high-quality, responsible car service provides a guarantee for repairs performed;
- In the event of a repeated breakdown covered by the warranty, repairs will be carried out free of charge;
- Professionals are professionals; they have extensive experience and knowledge, which allows them to competently perform their work.
But first you need to find such a car service, which, alas, is not an easy matter. Many provide a guarantee, but when you re-apply, they do everything possible to prove that the breakdown does not comply with the terms of the guarantee. A banal trick.
Repairing your garage will provide the following advantages:
- Significant financial savings, since you only have to spend money on consumables;
- The quality of the work performed by a master is always in doubt if you do not know this person personally. So self-repair may be much better than at a service station;
- You purchase the silent block, and the master only installs it. Why pay money for work that you can do yourself?!;
- Guarantee that a new one will be installed instead of the old silent block. Questionable service stations can easily install an old, more or less usable silent block instead of the one you gave them. You know what the result is.
Replacing daisies on a VAZ 2110 with your own hands
Unclear behavior of the car in motion, the appearance of noise in the suspension indicates that you need to replace the daisies on the VAZ 2110 with your own hands. We can say that due to the understandable design and accessibility of diagnostics, such work can be performed with minimal skills and conditions for repairs.
Malfunction manifestation and diagnostics The suspension silent block is a rubber product designed to connect individual elements of a vehicle’s suspension. The loss of rubber's strength and elastic properties leads to mutual movement of the parts being connected.
This affects the behavior of the car, and is expressed as follows:
• when maneuvering, metallic impacts appear in the lower part of the car; • the movement of the vehicle is accompanied by yaw movements in the transverse plane; • rubber squeaking and other similar sounds appear.
Further operation when suspension parts wear out leads to increased load on shock absorbers and steering parts, and accelerated tire wear. In this case, the seats are broken up. All together, this leads to subsequent expensive repairs. The procedure for performing repair work Before starting to replace the daisies on a VAZ 2110 in the garage with your own hands, you should take care of a special puller that will allow you to remove damaged silent blocks. As an alternative, you can take care of manufacturing such a device yourself. Work should be planned separately for the front and rear axles.
For the front upper arm, the order of work will be as follows: • jack up the axle and fix the front wheel; • release the wheel support; • remove the upper front arm; • remove the worn silent block from the lever using the necessary method; • after processing the seating surface, a new part is installed.
Assembly work is then carried out in the reverse order. The same is true for replacing daisies on a VAZ 2110 with your own hands for the lower control arms.
A more difficult task of replacing silent blocks is the operation performed for the rear beam. A more convenient and correct option is to first dismantle the rear beam. For replacement, you should purchase high-quality parts. The original number of the rear beam silent block is 2110-2914054.
When dismantling a damaged element, you need to be prepared that it will not be easy to remove the silent block. Long-term operation in a place accessible to dirt and water does not always allow this work to be done even with the help of a puller. It may be necessary to remove the part by destroying it.
After removing the part and cleaning the seat, you should additionally treat the eyelet and the new part with a soap solution. Synthetic lubricants should not be used to facilitate seating. They destroy rubber. At the final stage, assembly operations are carried out in the reverse order.
Chamomile silent blocks
VAZ 2110Chamomile silent blocks
Daisies, or scientifically called silent blocks, are a car part that is located on the front suspension arm and consists of two components (an external and an internal element). Wear of this part involves delamination of the rubber material due to use. So, replacing silent blocks on a VAZ-2114 car is a fairly simple process and even a novice motorist can cope with it.
on replacing the front arm silent blocks on a front-wheel drive car of the VAZ family
The material will tell you how to replace daisies on a car, and will also tell you about the nuances and subtleties of the process.
Silent blocks of front levers, popularly called “daisies”
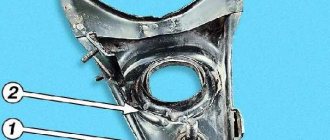
Before proceeding directly to the process of replacing daisies, it is necessary to disassemble the lever structure. We will not disassemble the structure of the entire suspension, but simply indicate the location of the silent blocks.
In the picture below, at number 23, there are daisies that need to be replaced.
Schematic design of the front suspension
Location of the daisy in the lever
Now that the location is clear, you can proceed directly to the process itself:
- The first step is to dismantle the lower engine crankcase protection. Removing the crankcase protection
- The next step is to clean the threads. In order for the bolts to unscrew normally, they must be sprayed with WD-40.
- Using a 24mm socket, we dismantle the extension nut from the lever side.
Unscrew the fastening nut of the extension to the lever. Removing the nut. If it doesn’t work, then it’s stuck. Need a lever and special treatment. liquid, such as WD-40 - Using a 17mm wrench, unscrew the extension bracket. Unscrew the extension bracket
- We dismantle the element. Removing the brace with bracket
- Using a chisel, knock the silent block out of its seat.
There is an alternative option - burning. The process of burning chamomile This silent block is much easier to remove from its seat - We press the new part with a hammer.
Simply put, we hammer the chamomile into the seat. We press new silent blocks The pressing process - We carry out the assembly in the reverse order.
THIS IS INTERESTING: How to install a thermostat on a UAZ
Part selection
New daisy in the lever
When the replacement process is considered, we proceed directly to the selection of the part. So, in addition to the original part, there are a number of substitutes that can be installed on a car.
Some manufacturers offer a part whose quality is much better than the standard factory spare part.
Original
2108-2904046 – original catalog number of the silent block manufactured by AvtoVAZ. This part is of average quality, but is still recommended by the manufacturer for installation on a car. The average cost is 500 rubles.
In addition to the silent block itself, there are a number of consumables:
- 2108-2904045 – thrust washer for securing the silent block.
- 2108-2904225 – silent block adjusting washer.
These two parts can be included with the spare part, but as practice shows, they must be purchased separately.
Analogues of silent blocks
In addition to the original part, there is a list of analogues that can be installed on the VAZ-2114.
Chamomile produced by Stellox
Let's consider which spare parts are suitable from which manufacturers:
Manufacturer's name Catalog number Cost, in rubles
| Ruville | 987201 | 120 |
| TRACK | SBST-104 | 400 |
| Patron |
Preparing for work
So, first you need to prepare the appropriate set of tools. In addition to new silent blocks (polyurethane or rubber-metal, it doesn’t matter), a standard set of heads with a ratchet, a soap solution, and universal lubricant VD-40 are required. As an alternative, you can use an analogue from. The product costs several times less, but the effect is the same, as noted by reviews from car owners.
Also, in order for the replacement of silent blocks on a VAZ-2110 car to be successful, we will need an inspection hole, overpass or lift. Of course, you can use a jack, but it will be very difficult. Among the special tools for replacement, you will need a puller for pressing out rubber-metal products. You can use tubes with washers and a vice. The main thing is that the washers and tube match the diameter.
Selection of parts and necessary tools
Before you start directly replacing silent blocks, it is important to properly prepare for it. There are few recommendations specifically for choosing new parts.
The auto parts market is simply filled with silent blocks from different manufacturers, mostly they are all quite good. The only thing you can do to make a better choice of new parts is to consult with auto mechanics in your area. The main thing is that the new vibration isolators fit completely.
For repair work you will need the following things:
Set of new silent blocks
Replacing suspension silent blocks with your own hands
The suspension silent blocks on the VAZ-2112 are located in the arms of both the rear beam and the front one. It is advisable to replace them comprehensively. The replacement process is approximately the same on both the rear and front parts of the suspension. Below are instructions for both cases.
Front control arms
Replacing front control arm silent blocks on a VAZ-2112 is the following process:
- First of all, the car must be placed above the inspection hole or use a lift. Then remove the engine compartment protection represented by the casing.
Removing the engine protection
Unscrew the nut of the stabilizer bar mounting bolt.
Unscrew the nut on the extension
Unscrew the nut of the bolt securing the lever to the body
A long bolt, a couple of washers and a nut are all sold in hardware stores and can be used to make a puller
“Let’s spritz”, it’s better to heat it up some more. Next, we use our puller to press out the silent block.
We clean the socket from rust and dirt, lubricate
We press new silent blocks into the mounting groove
New silent block installed
Replacing silent blocks in the rear beam
Replacing the rear silent blocks is done as follows:
- Again, the car must be driven into a viewing hole or raised on a lift.
- Then, taking a 19mm wrench, you need to disconnect the rear beam from the bracket by unscrewing the nuts securing it.
Unscrew the nut of the bolt securing the lever to the bracket
Press the silent block towards the car threshold
Press in the silent block using a puller
Also check out
- You can begin installing new front suspension silent blocks. You need to treat the seat with soapy water and press it into the hole with a screwdriver (if you lubricate the hole with undiluted liquid soap, the resistance will also decrease). When everything is ready, you can start replacing the front suspension silent blocks with new ones.
- After the silent block enters 50%, remove the tube and press everything to the end. There is no need to rush so that the part is not installed crookedly. You can add soap to make the process easier.
- Check the protrusions of the silent block on all sides (should look like in the photo).
- Replace the silent block of the "daisy" lever. The old ones need to be cut down with a chisel, and new ones installed in this place. Using a vice, press them into the mounting hole. Finish with a hammer and a pointer.
Replacing rear suspension silent blocks
Now let's look at how to replace silent blocks on the rear suspension of a VAZ-2110.
Although there are only two of them, replacing them is not very easy, since the rear beam on which they are installed will not be removed from the car.
You won't need a lot of tools:
- A set of keys;
- New silent blocks;
- Device for pressing-pressing;
- Soap solution;
- Hammer and wooden spacer.
The car is placed on a pit and its rear is jacked up. First, replace on one side.
To begin, remove the hand brake cable from the beam. Then the nut securing the beam to the body bracket is unscrewed and the bolt is removed.
The beam is pulled down so that it is possible to reach the silent block.
To fix the beam in this position, a wooden spacer is driven between it and the body.
Next, the worn-out consumable is removed from the beam using a device, and a new element is installed in its place using the same device.
By the way, axial play may also occur in this connection, so it is important to ensure that there is no play after assembly and, if necessary, eliminate it using washers. Next, the beam is put in place and tightened with a bolt and nut.
Replacing the second silent block is done in the same way
Next, the beam is put in place and tightened with a bolt and nut. Replacing the second silent block is done in the same way.
Using these methods, the silent blocks of the suspension of a VAZ-2110 car are replaced.
After the work is completed, the car will regain smooth running.
However, these consumables cannot serve long on our roads, so it is advisable to replace them approximately every 20 thousand km.
Well, I installed everything I wanted. There were no difficulties, everything was spinning well (even without swearing)
Then I got rid of the standard silent blocks and started pressing in the bushings (www.drive2.ru/l/9605793/, www.drive2.ru/l/9404839/)
Scalded for safety
Then I cleaned the whole thing with a grinder and pressed in the “daisies”
First, I pressed one “daisy”, then threw the manufactured washer (so that there would be no gap between the daisies) I wrote about this here www.drive2.ru/l/9404839/. In order for the washer to be clearly in the center, an M16 bolt with a large washer was taken and the second daisy was pressed through it.
Well, a couple of photos from the pit, sorry the light is not very good in the pit as it is
I read somewhere that long bolts are needed for the stabilizer struts, so I took them just in case. But everything just spun on the old bolts very miraculously. They also say that the stabilizer struts are becoming skewed. They became very even, even better than on stock))) )What else is there... Oh, yes, the drives rest on the levers. I didn’t notice)))) there was even a decent gap there. The boot needs to be cut, yes, it is necessary... but there’s literally a small piece (which, by the way, it’s not clear what it’s needed for)))
Thank you for your attention! Maybe I forgot something - I’ll add it. We’ll do the alignment, set the castor (by the way, what do you recommend?) and describe your impressions
Installation
When installing the clutch basket and disc, it is necessary to use a simulator of the input shaft. This is necessary so that the parts fit straight. Such an alignment can be bought in a store for 100 rubles. It will also work for a penny.
It will be useful: Infinity QX50 configurations: technical specifications, description of appearance and interior, pros and cons of the model, functionality and safety, prices and reviews from owners
When installing the box, it is important to get the pin that is on it into the engine hole. It is located in the right drive area. When we installed the gearbox, we didn’t take this fact into account and spent a long time trying to turn the gearbox.
When the box is engaged with the engine, tighten the mounting bolts, but not completely. They need to be stretched when the box sits on the pillows to prevent displacement.
There should be no problems in further stages of assembly.
Don't forget to tighten the hub nut, adjust the clutch pedal and rocker.
I hope this material will help someone when replacing a gearbox. There is practically no difference in repairing VAZ 2110 or 2114 cars. They are all fine)). Frankly, I thought it would be more difficult to change the clutch, but the main thing is to get started, and there’s nowhere to go). If possible, try to repair your car yourself. This is both saving money and gaining experience. Good luck to all.
Stretch joint (daisy) “CS-20” for VAZ 2108,2110,2170,1118,2190 (4pcs)
Description Polyurethane
is a unique synthetic polymer material with unlimited possibilities. It consists mainly of two types of raw materials, isocyanate and polyol, which are obtained from crude oil. When two ready-to-process liquid system components that contain various auxiliaries (catalysts, blowing agent, stabilizers, etc.) are mixed, a reactive mixture is formed. Depending on the formulation and ratio of components, with the appropriate technology it is possible to adjust the range of properties of the resulting polyurethane - we can obtain hard, soft, integral, cellular (foamed) or monolithic. Polyurethanes can be viscous liquids or solid products - from highly elastic soft rubbers to hard plastics and are processed by almost all existing technological methods: extrusion, pressing, casting, pouring. Red polyurethane “DRIVE” series
For drivers who enjoy driving, red polyurethane auto components are ideal, as they will maximize the car's handling and also have a high wear resistance. The suspension and body parts are red and are made from 2-component polyurethane produced abroad.
The tension joint (CAMOMILE) consists of two metal bushings, between which there is an elastic insert. They serve to connect suspension parts and, due to the elastic insert between the bushings (rubber or polyurethane), dampen vibrations transmitted from one unit to another.
Advantages of polyurethane “CS20”:
● improved handling ● improved wear resistance and strength ● durability is 2-3 times higher than rubber suspension parts ● preservation of properties both in winter and summer at temperatures from -60C to +140C
Recommendations for installing products made of polyurethane “CS20”:
● When installing new polyurethane parts with metal elements, it is necessary to remove rust and rubber residues from the fastening area. If there are large shells and abrasions on the fasteners, they should be replaced with new ones. If there are burrs, remove. In case of significant deviations in geometry and damage to the metal elements of the suspension, we recommend replacing the damaged parts with new ones, for the correct operation of the new polyurethane parts.
● Before installing polyurethane parts, lubricate the contact points between the polyurethane and the metal parts of the suspension or car body with lithium grease.
● To avoid damage to the polyurethane product and to facilitate the installation of parts that require pressing, it is necessary to use special cones or mandrels.
● Installation of parts into the seat must be carried out taking into account the exclusion of distortions and mechanical damage.
● Tightening of suspension elements should only be carried out in a “loaded” state (the wheels of the car should not be suspended).
● Do not wipe or wash polyurethane parts with substances based on acetone and acids.
Do-it-yourself replacement of VAZ 2110 daisies, video instructions
We have a VAZ 2110 car under repair, on which the daisies and silent blocks need to be replaced. We will show you how to do this repair yourself, in the form of photo and video instructions.
Before starting work, clean the threads from dirt and dust, soak them in Wd40. Remove the wheel, use a 24mm wrench to unscrew the nut:
Using keys 17, unscrew the stabilizer:
Using a 19mm wrench, unscrew the fastenings of the lever to the body:
Using a 17mm socket, unscrew the two ball joint bolts:
The lever can be removed, we fix it in a vice, insert a bolt so that it does not go down and take out the daisies, they came out without much effort. We knock down the clip with a chisel and hammer:
We knock out from both sides. Using sandpaper, we lightly remove rust from the seats of the daisies and clips. We insert the daisies and press them in using a medium-force hammer blow.
To press out the silent block, use a finger from the steering rod, on the other hand, insert a mandrel of a suitable size into a vice:
When pressing in a new silent block at home, it is recommended to remove a small chamfer on the emery; this will not affect its further operation in any way, but will simplify the pressing task.
Then we lubricate its body and seat with soap to make entry easier. Now it can be pressed in using a regular vice:
At the same time, we try to center it so that the silent block runs smoothly. We bring it to half, then reinsert the tie rod pin and the mandrel and make the final fixation. We carry out assembly in reverse order. Fully tighten all nuts with the machine lowered.
How to renew?
The main factor influencing clutch life is driving style. To save the disk, you need to avoid high loads. Do not start driving at high speeds (with slipping) and do not overload the vehicle itself. The last factor also applies to those who like to drive with a trailer. Remember that every kilogram from the trailer loads the gearbox and clutch components. Do not tow vehicles that exceed your curb weight. These factors directly affect the life of the clutch disc. Using a careful driving style, you can increase the capabilities of this element to 150 thousand kilometers or more. In sports driving mode and other loads, even the highest quality VAZ 2110 clutch, the price of which is quite high, will not last even 40 thousand kilometers.
In order for the transmission system to operate without breakdowns, it is necessary to monitor the serviceability of all its components. One of these elements is the clutch fork. It is important to be able to perform repairs yourself. The article describes the function of the clutch fork and how to change it on a VAZ 2110.
conclusions
As you can see, replacing the VAZ-2112 silent blocks is quite simple if you follow the recommendations presented above. By replacing vibration isolators in a timely manner, you will significantly extend the service life of all vehicle suspension components. Good luck on the roads!
1200 rub. for the photo report
We pay for photo reports on car repairs. Earnings from 10,000 rubles/month.
Write:
The reason for replacing the silent parts was due to signs of wear and tear: shocks can be felt in the suspension.
Driving on torn off silent blocks is, firstly, uncomfortable (noises, shocks, yaw of the car), and secondly, harmful (fastenings and connections break, backlashes appear, which do not lead to any good).
Replacement at a service station will not be cheap, so the decision was made to replace the silent blocks in a garage yourself.