Priora wiper trapezoid installation
Required: 10mm spanner, 10mm socket, flat blade screwdriver.
1. Disconnect the wire from the negative terminal of the battery.
2. Use a screwdriver to pry off the decorative plugs on the nuts securing the windshield wiper arms of the Lada Priora...
3. ...and remove the plugs.
4. Unscrew the nuts securing the levers a few turns.
5. Close the hood and carefully, lifting the levers up and rocking them up and down so as not to damage the paintwork of the hood, tear the lever off the slots.
6. Lower the levers to their original position, open the hood, finally unscrew the fastening nuts and remove the levers along with the brushes.
- The driver and passenger side windshield wiper arms differ in length and are therefore not interchangeable. Do not mix up the levers when installing them on the car.
- 7. Remove the linings of the windshield frame of the VAZ 2170 (see “Removing and installing the linings of the windshield frame”).
8. Press the latch...
9. ...and disconnect the wiring harness block of the VAZ 2172 windshield wiper and the front wiring harness.
10. Unscrew the two nuts securing the windshield wiper trapezoid...
11. ...bolt securing the gearmotor bracket to the body of the VAZ 2170 priora...
12. ...and remove the windshield wiper by turning it slightly upward.
This is what the assembled windshield wiper looks like.
13. fastening nut...
14. ...and pull out the leash from the gearmotor shaft.
15. Three bolts securing the Lada Priora gearmotor...
16. ...and remove it from the bracket.
The windshield wiper motor, removed from the mounting bracket.
17. Rod from the crank ball joint on one side...
18. ...prying with a screwdriver if there is not enough manual effort...
19. ...and remove the linkage on the other side of the crank.
20. Replace the seals of the VAZ 2171 ball joints that are cracked or have lost their elasticity.
- 21. Apply new grease to the wiper trapezoid hinges.
- 22. Assemble and install the Lada Priora windshield wiper in the reverse order of removal.
Removing the trapezium wipers of the Priora
Procedure:
- Unscrew the 2 nuts of the lower fastening of the expansion tank bracket (in the front left wheel arch) using a 10mm socket.
- Unscrew the 2 bolts of the upper fastening of the reservoir bracket (in the engine compartment), using a 10′ socket.
- Remove the bracket.
- Disconnect the block from the wiring harness of the Priora wiper motor by pressing the latch.
- Unscrew the screw of the upper heater mounting using a Phillips screwdriver.
- Unscrew two nuts No. 1 and bolt No. 2 securing the purifier using a 10mm socket.
- Remove the Priora windshield wiper by squeezing the top part of the heater by hand.
- If you plan to further remove the wiper motor from the bracket, then do not forget to mark the position of the crank relative to the wiper bracket.
Installation of windshield cleaner VAZ 2170
We assemble and install the Priora windshield wiper trapeze in the reverse order. After this, we turn on the gear motor using the steering column switch, then turn it off and wait until the electric motor shaft stops. In this position of the gear motor shaft, we install the crank along the previously applied mark.
By the way, do you know how to install the Priora rear wiper vertically?
1200 rub. for the photo report
We pay for photo reports on car repairs. Earnings from 10,000 rubles/month.
Write:
Removing the Priora windshield wiper trapezoid, as well as dismantling and replacing the motor that drives this windshield wiper trapezoid, is slightly different from cars of the tenth family (VAZ 2110-12), since on the Priora the fastening of the frill is different, and the fastening of the sound insulation is also slightly different, so performing this procedure will be a little more difficult . So if you are the owner of a Lada Priora and need to remove the windshield wiper drive trapezoid to repair or replace the motor, then you should still use the visual video instructions so that unexpected difficulties do not arise when removing and installing the windshield wiper trapezoid on your Priora.
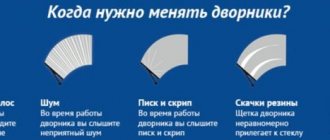
How to change rubber bands
You can replace the rubber bands yourself, which will save you money on buying new brushes. You will need pliers and a wide blade screwdriver. First of all, to replace the wiper blades on a Priora, you need to install them perpendicular to the arms, press the locking brackets and then pull them out. After removing the wipers, carefully bend the rubber band clamps located at the edges of the pressure plate to a minimum angle. This is done so that the rubber can easily come out of the wiper. It is better to bend the clamps with pliers, as there is a risk of damaging the clamps.
After the rubber band is removed from the clamps, you need to pull out the metal plates that hold the curved shape. You should immediately remember the directions of the bends of the plates so as not to confuse them and not to do the work again, since the elastic band will not be pressed tightly against the windshield. The plates have recesses where the rubber grooves should fit. There are situations when the thickness of the groove is greater than the width of the opening. In this case, it can be expanded with a thin file.
The rubber band is easily inserted into the latches until it clicks. At the same time, it should not play, otherwise it will quickly wear out. If the installed rubber band leaves uncleaned areas on the glass, it must be replaced again. However, it is worth considering that the cost of several tapes damaged during installation may be more than the cost of the assembled wiper.
Replacing the trapezoidal wiper motor on a Priora
Removing the Priora windshield wiper trapezoid, as well as dismantling and replacing the motor that drives this windshield wiper trapezoid, is slightly different from cars of the tenth family (VAZ 2110-12), since on the Priora the fastening of the frill is different, and the fastening of the sound insulation is also slightly different, so performing this procedure will be a little more difficult . So if you are the owner of a Lada Priora and need to remove the windshield wiper drive trapezoid to repair or replace the motor, then you should still use the visual video instructions so that unexpected difficulties do not arise when removing and installing the windshield wiper trapezoid on your Priora.
And so, to remove the Priora trapezium, first of all we remove the windshield wipers themselves, then unscrew the fastenings of the frill and the fastenings of the sound insulation in the hood compartment. You also need to remove the expansion tank. Afterwards it will be possible to remove the sound insulation to gain access to the trapezium of the Priora wipers. But in order to dismantle the trapezoid with the motor assembly, you will have to remove the barrel platform.
We clearly see the entire procedure in the video.
Subscribe
to our channel in
Index.Zen
Even more useful tips in a convenient format
Priora's wipers don't work
The wiper stopped working after a bird strike while driving on a VAZ Priora
The entire list of manipulations will take no more than 1 hour
In cases where the central bushing breaks, the entire mechanism will have to be replaced. This work is not capable of creating difficulties, so we unscrew the previously indicated list of fasteners and dismantle the assembly, and install a new mechanism in its place. Such a replacement will be more expensive compared to the usual replacement of bushings, but this option is more reliable. The owners of LADA Kalina assure that after replacing the bushings, the mechanism is able to provide a service life of at least two years. Here the choice remains with the owner, which method to lean towards in a given situation.
Replacing the trapezoidal wiper motor on a Priora
Removing the Priora windshield wiper trapezoid, as well as dismantling and replacing the motor that drives this windshield wiper trapezoid, is slightly different from cars of the tenth family (VAZ 2110-12), since on the Priora the fastening of the frill is different, and the fastening of the sound insulation is also slightly different, so performing this procedure will be a little more difficult . So if you are the owner of a Lada Priora and need to remove the windshield wiper drive trapezoid to repair or replace the motor, then you should still use the visual video instructions so that unexpected difficulties do not arise when removing and installing the windshield wiper trapezoid on your Priora.
And so, to remove the Priora trapezium, first of all we remove the windshield wipers themselves, then unscrew the fastenings of the frill and the fastenings of the sound insulation in the hood compartment. You also need to remove the expansion tank. Afterwards it will be possible to remove the sound insulation to gain access to the trapezium of the Priora wipers. But in order to dismantle the trapezoid with the motor assembly, you will have to remove the barrel platform.
We clearly see the entire procedure in the video.
Subscribe
to our channel in
Index.Zen
Even more useful tips in a convenient format
Priora's wipers don't work
The wiper stopped working after a bird strike while driving on a VAZ Priora
Description of Lada Priora windshield wipers, selection, maintenance and repair of wipers
The purpose of windshield wipers is to clean the windshield and rear window for better visibility. The car owner should always monitor the condition of the wipers, as they largely ensure traffic safety. From this material you can find out what types of windshield wipers are available on the Lada Priora and what types can be found on sale today.
Size
To begin with, we suggest finding out what sizes of windshield wiper blades are used in Priora. The size of the wiper installed in front of the driver's seat is 20 inches or 50.8 cm. As for the length of the passenger wiper, its dimensions are similar. To install the devices, a hook-type mount is used. The windshield wiper system is activated by activating the wiper motor.
It should be noted that when using standard size windshield wipers, a gap will be left on the windshield. To get rid of this, you can use longer wipers. For example, the size of the windshield wiper blades can be 51, 53 or 55 cm.
How to choose wipers?
If the glass is heavily worn (cut), then any brushes will not last long.
Before changing your windshield wiper blades, we suggest you familiarize yourself with the types of devices. A detailed description is given below (the author of the video is the Simple Opinion channel).
Frame
The frame view is currently the most common. In this case, a good seal of the cleaners is achieved thanks to the so-called rocker arms. The axles and bushings of this type of cleaner are made of plastic. That is why there is a high probability of icing of the structure frame itself, however, this type is the most popular due to its cost. However, you also need to understand that the shelf life of such cleaners is shorter. In practice, when using this type of device in winter, squeaking often occurs, and the wipers themselves may not fit so tightly to the glass over time.
Frameless
In appearance, such brushes are similar to a spoiler made of plastic and rubber, and inside them there are two metal plates, the purpose of which is to fix the rubberized blade. There may be plastic plugs at the ends of the brushes, and a lock is located in the center of the structure. Due to the absence of a frame, such wipers cannot freeze in cold weather. The frameless type is also quite popular among consumers, since such brushes operate with less noise. In addition, if necessary, the car owner will be able to independently replace the brushes of the device.
Frameless purifier design
Hybrid
As for the hybrid wipers on Priora, they have an original design that ensures optimal repetition of the shape of the windshield. Thus, the hybrid brushes adhere perfectly to the glass, which ensures excellent cleaning. The spoiler in this case is made of plastic, and such devices are also equipped with a hinge system with a rocker arm. The frame itself can be mounted into the fairing casing, and its height, when compared with the frame version, is lower.
It should also be noted that the hybrid version has multiple advantages that frameless and frame brushes cannot boast of:
- the devices are equipped with a rubberized or silicone sealing element, so that the brushes adhere well to the surface of the glass;
- long service life;
- improved quality of glass cleaning.
Such advantages are achieved as a result of the use of good materials in manufacturing. In practice, hybrid windshield wipers can operate for at least a year. For comparison, frame wipers can lose their functional features after 2-3 months. Of course, excellent quality comes with a higher price.
Lubricating the trapezoid of the Priora wipers
The front windshield wiper on the Lada Priora has a design similar to the tenth family, so this repair will be similar. But still, some points will be different. So, repair or replacement of some parts usually occurs for the following reasons:
- Windshield wiper motor failure
- Trapezoid failure
- The occurrence of increased play in the operation of the trapezoid
To make repairs or replacements yourself, you will need the following tools:
- Ratchet handles
- Extension
- Head for 10 and 13 mm
- Sharp knife or screwdriver
- Phillips screwdriver
parking lights
For example, the electrical circuit of a Lada Priora station wagon has the function of both automatic and manual activation of side lights. The activation itself occurs after turning the handle for the side lights and headlights on the dashboard. The contact is triggered and the lights turn on.
The circuit contains fuses that serve to protect against overvoltages and short circuits. Power is supplied to a lamp located on the dashboard. To adjust the brightness of the lights, a special regulator located on the lighting control module is used.
The headlight design of the Priora differs from other cars. The electrical circuit of the VAZ Priora contains a light sensor, as well as a lighting control unit. After turning on the ignition and the lighting control button, the electronic unit responsible for lighting control is activated.
If there is not enough light outside, the unit receives a signal from a sensor located on the windshield. There is also a rain sensor there. After receiving such a signal, the electronic control unit supplies power to the electromagnetic relay coil. Power is supplied to the headlights.
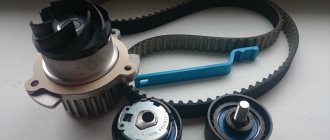
Replacing the windshield wiper motor on a Priora
To replace the wiper motor itself, you must first note the position of the trapezoid bar relative to its body, so that later you can install everything in the same order.
Unscrew the three motor mounting bolts:
And the central nut using a 13 mm wrench. We remove the motor and replace it with a new one if necessary.
Installation occurs in reverse order. The price of a new trapezoid is from 1000 rubles for the original one produced by AvtoVAZ. You will have to pay at least 2000 rubles for the motor.
Manufacturers and prices of analogues
Analogs include frame, frameless, and hybrid brushes. There are several options on the market. Choose the one that suits you best - no matter whether it has a frame or not. The main thing is not to let the old windshield wiper start to scratch the windshield or rear window.
When replacing cleaning brushes, use the following dimensions in millimeters (driver - passenger side):
- 630 – 480;
- 530 – 510;
- 510 – 500.
Other layouts are considered by car owners to be not as effective. Among the well-known analogs of windshield wiper blades are:
- Bosch Aerotwin - frameless, made in Belgium. Full name: Bosch aerotwin retrofitar 532 s. Price – 1200-1300 rubles. The length of the driver's seat is 53 cm, the passenger's length is 50 cm. Sold as a set.
- Bosch Twin is a simpler model. They have the same dimensions, but despite the lower price they are famous for their reliability. The cost is about 800 rubles.
- Bosch Eco is the most economical option. They are inexpensive and sold individually. Price – 300 rubles for one brush. Length – 50 cm.
- Denso Hybrid is recognized as almost the best model on the market. Withstands cold and heat. Price per piece – 500 rubles. Length 50 cm.
- Alca - simple, 500 rubles apiece. The length is 50 cm, but on the passenger side an area of approximately 5 cm wide is left uncovered.
GUIDE: Reanimating the windshield wiper trapezoid
One day, in the vastness of the mysterious country of the USSR, Yu.M. was born. Luzhkov. And after 73 years, my windshield wipers squeaked.
It all started in winter. At temperatures below -10 degrees, a wild knocking sound began from the area of the right axis of the wipers when driving over the slightest irregularities. As soon as spring came to Moscow, the windshield wipers began to creak SO much during their work that after 20 minutes of driving I wanted to kill everyone around me with my bare hands. At first I sinned on the HORS wipers, which are like real silicone. But a simple test of bending the leashes showed that the squeak does not go away. The creaking itself is heard much more from the interior than from the street.
Having experience in solving a similar problem in a previous car, it was useful to figure it out.
So: - open the hood - use a 12 mm socket wrench to unscrew the nuts that hold the arms on the axles. The nuts are located under rubber plugs. -to remove the leash, you need to press on the place where it bends when you usually bend it. -you need to remove the decorative black panel that goes from one rack to another. In fact, we don’t need to remove it, we just need to lift it. To do this, starting from the right corner, we begin to pull it up, from the side of the glass, with rocking movements. It is held on by plastic latches. As a result, if you work without fanaticism, you can unlatch all the latches without breaking a single one (I succeeded). As a result, we get the following picture: the panel is holding something on the sides (this doesn’t bother us), it moves up and down easily, some of the latches remain on the panel, some on the body. Those on the body must be carefully snapped off and transferred to the panel. -with a 10mm head we begin to unscrew 2 bolts that hold the axle housings. I thought I would loosen the bolts, but everything turned out fine. -in the area of the engine we feel for the place where the rod is attached and snap it off with a large screwdriver. The main thing in working with deadlifts is GENTLENESS! -we take out the entire structure assembled (2 rods + 2 axles) and drag it home in half. -First of all, we need to unclip the rods from the ball joints. To do this, fix the rod parallel to the lever and snap it off with a screwdriver. DO NOT BEND MORE THAN 45 DEGREES OF TRASH RELATIVE TO THE LEVER! Break the protrusion in the center of the ball on the rod. Which is what I did with one pull. -we start at the top of the axles, from the side of the leads, to look for retaining rings. THEY ARE THERE :) 30 minutes of searching and you will find them. Look for a break and carefully remove it with a small flathead screwdriver. Do not bend or break. It is most convenient to push the axle as high as possible. On the passenger side, my axle was so boiling that I couldn’t turn it with my hands! And I don't have much strength. -now we begin to knock the axle out of the bushing. To do this, screw the nut onto the thread and begin to gently hit the nut with a hammer. Sooner or later she will go. When the axle is aligned with the bushing, take a bolt slightly smaller in diameter than the bushing and begin to knock it out. I managed to get out without losses. Something similar to this will appear:
Glass types
Previously, the Volzhsky Automobile Plant installed two types of windshields. This is about:
- hardened;
- triplex.
How are they different from each other? The latter is made, in fact, from two layers of glass and a film located between them. Its disadvantage is less transparency. The hardened one does not have this defect, but it is single, and therefore it is easier to manufacture, therefore, the price of this option is lower, as well as the quality.
As practice shows, most car owners still prefer triplex, and at the first opportunity they try to install it instead of hardened ones. Why is this happening? The thing is that the cheaper option has an extremely unpleasant property - when destroyed, such glass simply disintegrates into many tiny fragments. If this happens while the car is moving, then they all end up in the cabin and often cause injuries to both the driver and passengers.
At the same time, thanks to the film, the triplex retains its integrity, even if a fairly large object gets into it. Fortunately, VAZ currently supplies vehicles exclusively with this type of glass.
When purchasing a new windshield at the market or in a store, you should make sure that they sold you exactly triplex. Cheap options, as a rule, are still found in car markets. How to distinguish them? It’s quite simple - multilayer, if you look at it from the side, it has a characteristic structure - the installed film clearly shows through.
parking lights
For example, the electrical circuit of a Lada Priora station wagon has the function of both automatic and manual activation of side lights. The activation itself occurs after turning the handle for the side lights and headlights on the dashboard. The contact is triggered and the lights turn on.
The circuit contains fuses that serve to protect against overvoltages and short circuits. Power is supplied to a lamp located on the dashboard. To adjust the brightness of the lights, a special regulator located on the lighting control module is used.
The headlight design of the Priora differs from other cars. The electrical circuit of the VAZ Priora contains a light sensor, as well as a lighting control unit. After turning on the ignition and the lighting control button, the electronic unit responsible for lighting control is activated.