In this article we will talk about how to make sound insulation on a VAZ-2109 with your own hands. “Nine” is rightfully considered the most popular model. It was desirable in the 80s as soon as it appeared on the meager Soviet market, so either party officials or no one could own such a car. In the 90s, the market situation became simpler, queues became a thing of the past, but only those who had money bought cars. As a rule, these were bandits and businessmen (however, in those years these words were synonymous).
Features of the "nine"
Today, the “nine” has not lost its popularity - it is a pretty good alternative to old foreign cars, and it is much cheaper to maintain. Very often this car is used as a “platform” for installing music - a subwoofer, speakers. And the sound quality depends on how tightly all the casing elements are installed.
And with this, everything is bad in the VAZ-2109 - all elements made of plastic are fitted extremely poorly. Literally everything creaks and rattles - the trunk shelf, door panels and dashboard. And if you install even not very powerful speakers in the car, unpleasant extraneous sounds will constantly irritate your ears. It is unlikely that you will be able to achieve perfect sound.
Materials for work
Of course, even if you spend tens of thousands of rubles on purchasing soundproofing materials, as well as on the services of specialists, you will not be able to bring the car closer to even a budget modern foreign car, for example, a Hyundai Solaris. But you will still be able to significantly reduce the noise level in the cabin from the engine, gearbox, and wheels.
As a rule, the following materials are used when carrying out noise insulation work on a VAZ-2109 car:
- Vizomat.
- Vibroplast.
- Bitoplast.
- Splen.
But to choose a material, it is recommended to study the features of each of the listed ones. This is what we will do now.
Practical observations
Since the back of the “long” Niva is noticeably lighter than the front, the source of noise in the rear of the car always appears a little more noticeably than from the front. Now the situation is completely opposite. How is it shown?
Soundproofing arches (required).
It appears as follows. Previously, when driving through holes and potholes, the sound of the front wheels was first heard (impact). A second later - a similar sound from the rear wheels.
Now, in a similar situation, you can hear noise from the operation of the front suspension, and... silence when driving the rear wheels. Unusual - yes, but clearly and specifically.
Heat and sound insulation of doors (required).
- Differences in door operation. The front ones clap. The rear ones are closed. Additionally, if the windows are not fully closed, the glass of the front doors (when driving over bumps) can rattle, the rear ones stand like a glove, no matter what position they are in.
- The wind protection of the rear doors, in my opinion, couldn’t be better.
- There is practically no creaking from the plastic panels of the rear doors, but the rear plastic shelves cause trouble; they rattled before, but after the work was completed, their sound became simply impossible. The solution was to install plywood shelves, purchased but modified.
General impression. Even partial heat and sound insulation of the cabin significantly improved the comfort and climate in the cabin.
Main conclusions
- Work on noise and heat insulation of cars is justified. In the case of a used car, you can additionally identify and eliminate possible defects (rust, anti-corrosion, etc.).
- These works can be done independently, since no complex or expensive equipment is required (except for a construction hair dryer).
- Independent, step-by-step execution of work allows you to clearly and specifically evaluate the correctness and quality of the work in the process of its implementation and, if necessary, correct, strengthen, or supplement something.
Vibroplast
This material is based on a composition of bitumen and a thin layer of foil (usually aluminum). Vibroplast is ideal for soundproofing VAZ-2109 doors, hood, trunk, and floor. Its main function is to absorb vibration, but it also performs well as a sound-proofing material.
You can find two types of vibroplast on sale - “Gold” and “Silver”. The only difference is in thickness - for “Gold” it is 2.3 mm, and for “Silver” it is 0.3 mm less. As a result, these types of vibration absorbers have different weights - 3 and 4 kg, one square meter weighs. If it is necessary to treat a large surface area, then it would be more rational to use the Silver absorber. The reason, as you can guess, is the cost - if you use Gold, you will spend a lot of money, and it has slightly better efficiency.
Vibroplast is a self-adhesive material, but if you want to do all the work efficiently, you need to warm up the surface on which you plan to apply it. In this only case you will get the most durable contact of the material with the body element.
Vizomat
This is a standard soundproofing material that has recently been used in cars such as Granta and Priora. The difference from the one discussed above is that the visomat has higher rigidity, so it covers the surface much better. Indeed, in some cases, soft materials can be pressed through (for example, in the trunk and on the floor). But rigidity is also a disadvantage of the material, since it is a little more difficult to work with.
Vizomat can be purchased on the market in the following series:
- PB with a thickness of 2 or 3.5 mm.
- MP (multilayer material with high strength).
- Q1 (material with increased elasticity).
Many car enthusiasts prefer Vizomat PB-3.5 materials. It has good characteristics (mechanical absorption coefficient 0.19), and most importantly, low cost.
Bitoplast
This material is ideal for soundproofing the hood of the VAZ-2109. It consists of foam rubber, which is impregnated with bitumen. A layer of self-adhesive is applied on top. This material allows for fairly effective noise reduction - approximately 90%. And most importantly, it has high elasticity and shrinks almost to zero.
On sale you can find material with a thickness of 5 and 10 mm. It is recommended to use it for soundproofing the VAZ-2109 panel, as well as other plastic elements. But if the surface has a large area (for example, a ceiling), then even a thick centimeter-long material will not be enough. In this case, experts recommend using an analogue of bitoplast - Accent. It has a higher density and also has a layer of aluminum foil.
Main difficulties
If you have already disassembled the interior of the car, you may have noticed that in the VAZ 2110 this is done quite simply. Even if you are new to this business, relying on the instruction manual, the work will be completed quickly enough. Additionally, we advise you to rely on video lessons. They can highlight a lot of useful and important things.
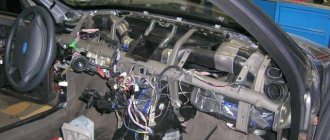
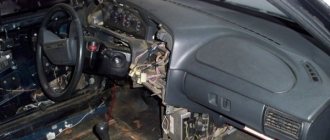
The main difficulty when disassembling the interior, without which it will not be possible to carry out full sound insulation, is dismantling the dashboard.
The same instruction manual contains recommendations regarding dismantling the dashboard, so rely on it. Under no circumstances should you pull out all the cords, otherwise you will have problems later.
Splen
It also belongs to universal soundproofing materials and is made of polyethylene foam. In addition, splen has very good thermal insulation properties. It has a closed cell structure, so it does not absorb liquid. It is convenient to work with the material, as it has a self-adhesive layer. On sale you can find two types of splen - with a thickness of 4 and 8 mm (their weight is 370 g and 600 g per square meter, respectively). Typically, splen is used to cover the partition of the engine compartment and wheel arches.
What to use?
As you can see, there are a large number of materials available for sale. And choosing the most suitable one will be difficult for those who are doing soundproofing of the VAZ-2109 with their own hands for the first time.
To carry out the work, it is best to use the following materials:
- Vibration isolation - can be done with either Vizomat or Vibroplast. It must be glued directly to a metal surface. These materials will prevent extraneous noise from entering the cabin.
- Sound absorber - Accent or Splen can play its role. It must be glued on top of vibration-proofing material. With the help of Spleen you can muffle all the noise that comes into the cabin from the outside.
- Bitoplast can be used as an anti-squeak material. It must be glued to plastic parts that rub against each other or come into contact with metal surfaces.
There is no need to stick shielding material on top of all layers, since Spleen already has a foil coating.
Is it worth doing?
You can completely “make noise” of all the doors of the car with your own hands, there are no supernatural difficulties in this, just read this material. In addition to the main noise-absorbing effect, additional “advantages” should be noted after performing sound insulation:
- Your doors will slam quieter and more clearly due to the fact that their mass will increase
- Significantly improves the sound clarity of the built-in speaker system
- The downside here is the increase in weight, which can cause sagging over time; this usually happens when owners get carried away with the thickness of the vibration isolation
What materials and tools are needed
In order to carry out high-quality soundproofing work on the VAZ-2109 with your own hands, you will need the following set of tools:
- Construction hair dryer.
- Scissors (the sharper the better).
- Stationery knife.
- A roller or scraper will be needed to roll and level the material.
- The tape is double-sided and reinforced.
- Solvent or white spirit.
- Roulette.
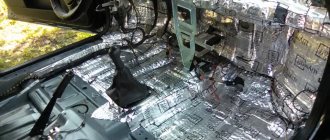
The first stage of the work is a complete disassembly of the entire interior. You will need to remove the seats, door panels, ceiling, and all trim elements. There should be bare metal left. It must be cleaned so that not even a small amount of dust remains.
How to paste over metal elements
Quite often, the factory sound insulation of the VAZ-2109 does not suit car owners. Yes, and it becomes unusable quite quickly. Once you have completely cleaned the interior, you can begin installing soundproofing materials. You need to start with the largest elements by area.
You need to perform the following manipulations:
- Vacuum the entire body, treat metal elements with solvent or acetone. If you find rust, the procedure becomes more complicated. First, all areas must be cleaned and treated with a rust converter. Then coat with primer and paint.
- Determine the area of the body from which you will begin gluing the material. After this, you can cut out a piece of Vibroplast that will correspond to the size of the area.
- Heat the material with a heat gun to about 40 degrees, remove the protective layer and apply Vibroplast to the body parts. Be sure to roll the material onto a metal surface.
- Please note that the larger the area of contact of the material with the surface, the stronger the contact will be. But you shouldn’t process the wheel arches in one piece - you need to cut out several.
- The sheets must be glued end-to-end, the gaps should be minimal. All contact lines must be taped using reinforced tape.
- When you complete the installation of the first layer, you can begin gluing the Splen or Accent. Such materials are also self-adhesive; the installation principle is the same as with Vibroplast.
Where to glue
Before you start work, be sure to familiarize yourself with the purpose of this or that material that will be involved in the soundproofing procedure of your car.
- Vibroplast will serve to cover exposed metal. The main function of a vibroplast is vibration damping.
- Izolon also has properties to dampen vibrations, but it is less effective compared to vibroplast. The structure of the material with closed cells will serve excellently as a second layer after vibroplast.
- Foam rubber is another layer that can be glued after vibroplast and isolon. The last layer will effectively absorb noise.
What should happen?
The result should be a completely covered floor and ceiling with two layers of insulation. If you have a limited amount of material, you can only cover the space between the stiffeners. Be sure to cover the wheel arches, the partition between the passenger compartment and the engine compartment, the tunnel under the muffler pipe, and the inside of the hood.
To soundproof the luggage compartment, it is best to use Decor rather than Spleen. This is almost the same material, only on top it is covered with a tougher leatherette. Therefore, such material can serve as interior trim for the trunk. All work is done in the same way as when finishing the ceiling. First, Vibroplast is glued on, then sound insulation.
Non-standard approach
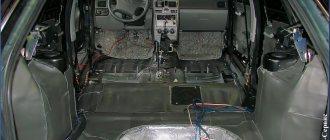
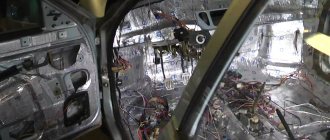
After completing all the work on vibration and noise insulation of the floor, body, arches, and rear side members of the luggage compartment, another useful opportunity presented itself when assembling the interior.
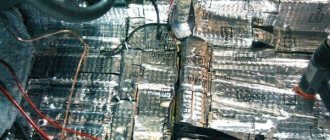
Without resorting to special measures, you can easily and simply additionally cover the entire floor of the luggage compartment with a single sheet of building reflective thermal insulation, previously used to insulate the house. Shown in the photo below.
Thermal insulation is simply laid on the trunk floor without the use of glue, in a single sheet cut to the shape and area of the trunk floor. I used reflective building thermal insulation of the Adgilin type with a thickness of 4 mm. The end result is shown in the photo below. If you lift the carpet, under it you can see a layer of thermal insulation, under which there is a layer of “felt mat + Accent”, and under them a layer of vibration insulation Vizomat MP. The design turned out to be compact, dense, multi-layered.
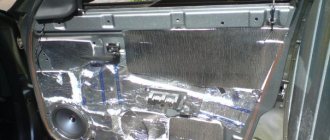
Soundproofing doors
Before soundproofing the doors, you need to completely remove the factory anti-corrosion coating. Otherwise, it will not be possible to properly glue the insulating materials. Start with the outer walls. You need to stick Vibroplast Gold on them (it has better elasticity). Try to cover as much area as possible. It is worth noting that it is inconvenient to work with, since everything is limited by the size of the technological hole.
If speakers are installed in the doors, then Vibroplast can be glued around them. This will only improve the quality of the speaker system. But you shouldn’t completely fill the holes between the door walls, since Vibroplast absorbs moisture quite well. Splen must be glued to a vibration insulation layer. Afterwards, you can install a sheet of material over the entire area of the door, after which you cut a hole for the speaker.
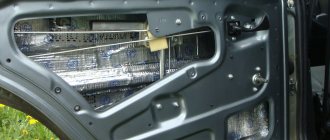
Vibration isolation of the rear side members of the body
Among the features, the following can be noted: since structurally the side members are located inside the cabin, the second layer of noise and heat insulation was not used. To give additional rigidity to the side members, I used Vizomat MP, which I used to cover the technological holes. The photo below shows the installation of vibration isolation on the rear side members of the car.
Why did you use Vizomat MP and not Vibroplast Gold? It is denser and more reliable. The essence of protecting the rear side members is to strengthen and give greater rigidity to their structure by “eliminating” technological holes.
How to work with plastic
Now that the soundproofing of the VAZ-2109 floor, ceiling and doors has been completed, you can begin processing the plastic elements. After all, it was because of them that the car received the nickname “rattle”. It is necessary to process the following elements at this stage:
- In the trunk, you need to glue the side shelves from below, the entire interior trim, as well as the entire contact area between the shelf and the body with Vizomat.
- To get rid of squeaking in the back seat, you need to use Litol-24. All guides and locks must be treated with this lubricant. Afterwards, lay strips of Bitoplast in the places where the back and saddle touch.
- It is recommended to cover the racks completely with Visomat.
- The instrument panel must be laid in those places where it is in contact with body elements. As you understand, the entire panel will need to be removed. All plastic elements that come into contact with each other must also be treated with soundproofing materials.
Comprehensive sound insulation of the “nine” is a rather painstaking process, it will take 2-3 days. But if you can do it yourself, you won't need to use any expensive equipment. All work is fully justified, the comfort of driving a car is significantly increased.
How to soundproof a car interior with your own hands
To isolate the cabin from unnecessary noise, the following simple instructions will help.
- The car is dismantled, metal parts that make unpleasant sounds when driving are removed. The lower part of the body, near the wheels, is especially subject to insulation.
- Spare parts are covered with vibration-damping material - foil covered with a resinous layer.
Using a special rolling tool, scissors or a knife, you need to cover the entire inner surface of the body with foil, that is, roll a layer of foil onto it. For better setting of the material, it is advisable to carry out the process in a warm and dry room. If the room is damp, you can heat the foil with a hairdryer and then roll it onto the body. To increase noise absorption it is better to apply several layers.
The further material for pasting will be “Spleen” on a sticky base. It will well cut off unnecessary noise entering the cabin from the street. To install sound insulation in the trunk, remove the lid, unscrew the nails and screws. All wires must be pulled out to isolate all exposed areas. The trunk is disassembled down to the bare metal. The material is glued to a dry, clean surface. After gluing, the wires are reconnected and all unnecessary holes are closed.
Next, the doors are insulated with polyurethane and ventilation holes are formed. It is advisable to insulate the front doors with a double layer. They need to be disassembled, the trim and the bald door edge glued. To avoid squeaking when driving, you need to roll up the shirt and tighten the door and lock holes. Then the roof is soundproofed. Everything is removed: mirrors, visor, seal, door handles and the upholstery itself.
The ceiling is insulated. The upholstery is installed in its original place and the trunk is assembled. To soundproof the floor, you need to disassemble it and remove the old insulation. It is also advisable to cover the insulating material on top with a layer of polyethylene. Then glue the plastic panel and the areas under the seats. Next, insulate the surface of the hood.