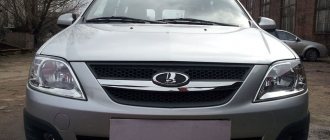
Lada Largus is a popular family multi-purpose station wagon, mass production of which was launched by AvtoVAZ PJSC in 2012.
A car of this class is designed to meet the most diverse needs of potential buyers and can be used for both everyday and long-distance trips. At the same time, it feels great in urban conditions and on country roads.
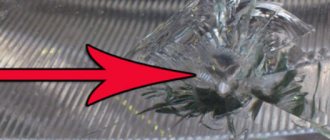
The universal use of this car quite often contributes to damage to the elements of the front optics by stones flying from under the wheels of oncoming or passing vehicles, branches of low-growing bushes, etc.
Replacing damaged head optics and installing new elements is not difficult and can be carried out by almost any car owner, even those without experience in carrying out such work. The only difficulty with this is the need to dismantle the front bumper, where not only fog lights are integrated, but also headlights.
Tuning the headlights of Lada Largus
Improving the performance of lighting devices is divided into two types:
- modification of the headlight unit with low beam;
- PTF tuning.
The Lada Largus has enough headlights. But many car owners strive for the ideal, and they can be understood. LED and xenon lamps are now popular, but using them in reflector headlights is ineffective and dangerous for dazzling other road users.
The way out of the situation is to install bi-lenses. These are lenses in which low and high beam are combined. The main beam is activated by raising the lens curtain, but the light bulb remains lit alone without additional filaments.
The light quality of bi-lenses is much higher. They can be used with both xenon and LED light sources. The lighting will be even and have a clear cut-off line (CTB).
Lens installation is carried out in three stages:
- The headlight is removed from the car.
- Peel off the glass by heating it with a hair dryer.
- Remove the old lamp and install a lens in its place.
- They assemble the headlight and hide the ignition unit.
The second type of tuning involves installing fog lights with vertical lenses. A banal example can be seen in the photo:
These are ordinary LED PTFs, which have a clear STG and brighter lighting. Their effectiveness decreases when the road is wet and light reflects from the water on the asphalt.
How to choose a lighting element
The range of lamps for installation in car headlights is very extensive. However, there are two factors that significantly limit your choice:
- the design of the headlamp block does not allow the use of any options you like;
- code requirements that expressly prohibit the installation of any elements other than those originally used by the manufacturer.
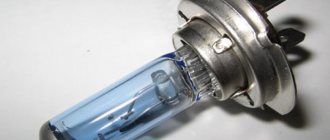
In the Lada Largus car, the functions of low and high beam are performed by one double-filament halogen lamp. This is convenient as it allows you to save space under the hood and reduce the size of the headlight unit. One tungsten filament produces a beam of light of greater brightness, directed primarily horizontally (high beam), and the second creates a beam with an opening angle of 30°, of which 10° are directed above the horizontal, and the remaining 20° below it.
The ability to reduce the size of the headlight unit results in the need to change the light bulb when any filament fails, even if the second one works quite reliably. In addition, you always have to change both lamps, left and right, since for high-quality lighting you need a set of two lamps selected according to their characteristics.
Lada Largus lamp base
High and low beam are realized using one light bulb with h4 socket. In addition, the following types of base are used for different positions:
- h11;
- P21/5W;
- PY21W;
- P21W;
- WY5W;
- W5W.
In addition, there is a C3W baseless bulb that illuminates the stove control.
Table of lamps used in Lada Largus
Let's consider what lamps are installed for light signaling on Largus. Front lamps:
| Front lamps | Type | Power, W |
| Low/high beam | H4 | 60/55 |
| Front turn | PY21W | 21 |
| Dimensions | W5W | 5 |
| Fog lights | H11 | 55 |
| Side dimensions | WY5W | 5 |
Rear lamps:
| Rear lamps | Type | Power, W |
| Direction indicators | PY21W | 21 |
| Dimensions and brake signal | P21/5W | 21/5 |
| Fog light | P21W | 21 |
| Reverse | P21W | 21 |
| Additional brake light | P21W | 21 |
| License plate lamp | W5W | 5 |
| Trunk lighting | W5W | 5 |
Interior lighting and service lighting:
| Purpose of the lamp | Type | Power, W |
| Interior lighting | W5W | 5 |
| Individual lighting | W5W | 5 |
| Glove compartment lamp | W5W | 5 |
| Cigarette lighter illumination | W1.2W | 1,2 |
| Illumination of the ventilation, air conditioning and heating unit | W1.2W | 1,2 |
| Hazard switch illumination | W1.2W | 1,2 |
The best n4 lamps for Largus
To install the high/low beam of the Lada Largus, H4 halogen lamps are required, provided by the optics of the headlights. The most popular models:
- Philips X-treme Vision. Bright lamps giving cool white light. This is convenient in good weather, but in fog or snow the lighting efficiency is sharply reduced;
- Philips LongLife EcoVision. Inexpensive models with extended operating time;
- Osram Original Line. All-weather design with extended coverage area;
- Bosch Pure Light. They have bright light and extended service life.
According to users, the best option is Bosch Pure Light, the cheapest and brightest designs. Philips X-treme Vision is too expensive and often fails quickly, in addition, vision 130 models are too often counterfeited by unscrupulous manufacturers from Southeast Asian countries. Osram products represent an average option in terms of characteristics and service life, but when purchasing you need to carefully monitor the supply voltage - many models are designed for 24 V.
How to replace optical devices on Largus
Lada Largus, like many other cars, has:
- Headlights;
- fog lights;
- rear lights;
- side direction indicators.
Each device has its own replacement instructions. But first, let us recall the catalog numbers of the original lanterns and headlights:
| Name | vendor code |
| Front left headlight | 8200744753 |
| Front right headlight | 8200744754 |
| Rear right lamp | 8200864610 |
| Rear left lamp | 8200864512 |
| PTF front left | 8450000308 |
| PTF front right | 8450000307 |
Removing and installing headlights on Lada Largus
Replacing the headlight may be necessary when the glass becomes cloudy or damaged as a result of an accident. In addition, this procedure is performed for the purpose of tuning or modifying a standard light source.
To dismantle the front headlight, you must:
- Place the machine on a lift, overpass or pit.
- Remove the front bumper.
- Unscrew the three headlight mounts.
- Unfasten the headlight range control and electrical connector.
- Remove the optical device.
- Install the new headlight in reverse order.
When removing the headlight, you can do without the hole, but then it will be inconvenient to unscrew the lower fastenings of the front bumper.
Replacing rear lights on Lada Largus
Removing rear lights is much easier than removing headlights. In this case, you no longer have to remove the bumper. The optical device is dismantled every time the lamps are replaced, so the car owner should study the algorithm of actions:
On a removed lamp, you can replace a burnt-out lamp or repair the lamp.
Removal and installation of PTF on Largus
Fog lights are always at risk - since they are lower than all other lamps and are installed at the front.
Procedure for removing PTF on Largus:
- Turn the wheel in the opposite direction. For example, if the left PTF is to be replaced, then the wheels need to be turned to the right until they stop.
- Unscrew the T20 screws from the side of the fender liner. Bend the fender liner to the side.
- Unfasten the bumper, and already inside the bumper, unscrew the PTF fastening - 2 Torex 20 screws.
- Remove the PTF lamp connector and remove the old fog lamp.
- Installation is in the reverse order.
How to remove and install a side turn signal
The Largus also has a side turn signal on the fender. Almost all manipulations associated with its maintenance involve removing this lamp. There is nothing complicated about this.
It is enough to stick your hand inside the wing, having first removed the mudguard and press the plastic clips with your fingers. At the same time, you need to push out the pointer.
Dimensions
A special feature of this procedure is the preliminary dismantling of the headlight unit, under which the side light lamps are located. After this, it is necessary to disconnect the wires from the battery, which is done with extreme care.
Removing the front bumper will allow you to get to the cover that protects the dimensions. Since they come into contact with other light devices, it is advisable to carry out all procedures using sterile gloves. If any device has been touched, it must be wiped with a clean, lint-free cloth.
To replace the side light bulb in Largus, the socket of the old part is turned counterclockwise. The black and yellow wires connect it to the battery, so it turns off from them. A new part is installed in this place, and assembly is carried out in the reverse order.
How to adjust headlights on Largus
After replacing the lamps or the entire headlight, it is necessary to adjust the headlights. It is performed only on headlights and is necessary for the correct direction of the light flux, so as not to dazzle oncoming drivers and ensure good illumination of the road.
The headlights are adjusted using a special stand that converts the luminous flux in a small chamber and simulates the cut-off line of one headlight on a small canvas. When adjusting, the following conditions must be met:
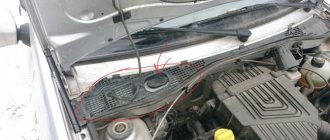
Next, you need to open the hood and find the adjusting bolt and insert the hexagon there:
Use a hexagon to tighten or unscrew the adjusting bolt until the cut-off line corresponds to the norm.
Simultaneously with the low beam in the headlight, the high beam of the headlights will also be adjusted. There is no lateral adjustment on the Lada Largus headlights.
Let's sum it up
A modern car is equipped with a large number of light sources. Some are used to indicate the dimensions of a car, others are used to notify traffic participants of the intention to perform a particular maneuver, and to give signals. There are rear and front lights installed on the right and left corners of the body. Among them, the main ones are those that are responsible for illuminating the road at night.
Headlights perform an important function: they illuminate the space in front of the car and make it visible to other road users. They should not be so bright that they blind oncoming traffic. It is important that the headlights are always in working order, because without quality lighting it is dangerous to move in bad weather and at night. If the headlights are faulty, the driver may not see an obstacle on the road, and the consequences will be disastrous.
Conclusion
You can get additional useful information on the discussed topic from the video in this article.
A note about what kind of lighting lamps are installed in the Largus headlights; which of them are low/high beam, and which are responsible for the side lights. How to change lamps yourself. How much do originals and analogues cost in Yaroslavl?
Good day, future and aspiring gentlemen Largusovod!
On Largus, the low/high beam and headlight lamps often burn out. At least for 70 thousand I have already changed it five times on each side.
The following light bulbs were installed on my car:
1. Low/high beam: halogen, Osram H4 12v 60/55w. (art. 64193). Price from 109 rub.
There are many analogues. Here are some of them:
370 rub. General Electric (34454)
117 rub. Valeo (032007)
2. Front dimensions: halogen baseless 12V Osram (art. 2825). Price from 17 rub.
26 rub. Lynx (L12805)
9 rub. Fortluft (2825)
3. Rear dimensions: two-pin with filament, base BAY15D. Beacon 12V P21/5W.
from 56 rub. Fortluft (7528)
They burn out less often. I changed it only once in the right lamp. This is what she looks like:
2. The block with wires is removed.
3. Remove the rubber protective sleeve.
4. The lamp is pressed with a U-shaped clamp. It needs to be pulled to the side and back.
5. Take out the lamp. Remember its orientation. Two teeth at the bottom, one at the top. And if you look at it from the side of the headlight, the inscription (marking) will be on top.
6. Install a new lamp. You should not take it with your bare hands, as greasy marks from the pores will remain on the bulb and the lamp will fail faster. This applies to all halogen lamps. It is better to hold it by the plinth or use a microfiber cloth.
7. Assembly is carried out in reverse order. First the clamping clamp, then the rubber bushing and finally the top cover.
How to replace front markers
There isn't much action here. The main thing is to get to the cartridge and turn it 90 degrees. The most inconvenient thing to change is the battery side. Not enough space. If your hand is large, it is better to remove it.
Thus, the procedure is as follows:
- Found a cartridge
- They turned it over and took it out
- Removed the lamp
- It is better to wear gloves when installing a new lamp into the socket.
- Then we insert the cartridge back into the headlight and rotate it 90 degrees.
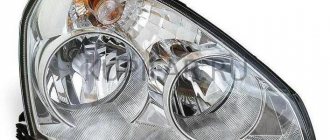
Main characteristics of standard Largus head optics
The Lada Largus optics use a standard fixed diffuser, with the help of which the direction of the light flux is adjusted by the position of the reflector and the lamp. The adjustment screws are hidden in the engine compartment, thereby protecting them from dirt and moisture. The headlights can be adjusted from inside the cabin using a hydraulic adjuster, but if precise adjustment is needed, this is not enough.
Where are the fuses for Lada Largus?
Lada Largus fuses are located both in the passenger compartment and under the hood of the car. The interior fuse box is located at the end of the front panel to the left of the driver. The mounting block is located under a decorative plastic cover, which hides the Lada Largus fuses from prying eyes. Most of the fuses responsible for the main electrical equipment of the car are located here.
Largus also has a second fuse box, which is located under the hood of the car next to the battery and air filter. It contains power fuses for air conditioning, fan, ABS, etc.
Headlight malfunctions and how to fix them
There are not many items on the list of headlight headlight breakdowns. This is mainly due to damage to the lantern glass, failure of the corrector or the lamp itself. If the Lada Largus low beam lamp and corrector can be replaced, then the glass is installed only with the headlight assembly. Largus optics do not cause any inconvenience to owners. The most common problem is low beam bulbs burning out.
You can choose and install a good headlight bulb yourself. On the market of automobile spare parts and accessories there are light bulbs from both domestic and foreign manufacturers. Chinese lamps are not of very high quality: they burn out quickly and do not provide sufficient visibility on the road.
Replacing lamps
The operation of replacing the lamp is simple and even beginners can do it. It is carried out as follows:
- The negative terminal is disconnected from the battery.
- A slight turn removes the plug from the back of the headlight.
- The wire block is disconnected from the lamp.
- The latch is removed from the grooves by pressing it with your finger.
The failed lamp is removed and a new one is installed in its place. It is recommended to use gloves when working, as fingerprints on the flask can lead to its premature burnout. The lamp is attached using a latch, a block with wires is connected to it, and a plug is put in place. A terminal is connected to the battery, then the operation of the headlight is checked.
It is recommended to change the bulbs in both headlights at once. This way you will be able to avoid the failure of another light bulb at the wrong time and ensure a uniform glow.
The problem due to which the Lada Largus headlight does not light may not be in the lamps. If replacing them does not bring any results, the fuse may have blown. The mounting block is located in the cabin at the bottom left of the steering column. Replacing fuses is a matter of seconds. Two fuses are responsible for the light. Even if they look intact, the cause of the malfunction may be hidden in poor contact. There is no special relay for headlights in Largus, and therefore the source of the problem may be oxidation of the contacts of the headlight itself.
To replace the low/high beam bulbs, you do not need to dismantle the entire headlight or any of its parts, so the process does not take much time. If the headlights are shining, but the light beam is incorrect, the reason is a faulty corrector. Its main task is to lower or raise the luminous flux depending on the location of the car body. If the vehicle is loaded, then without adjustment by the corrector the light will blind oncoming traffic. This part cannot be repaired, which means it is immediately replaced with a new one. This will require disassembling the headlight unit.
Legality of tuning
So, the question of whether it is possible to install a spoiler, bumpers, non-original alloy wheels and other body kit and tuning elements, a muffler, a guard and other parts not provided by the factory on a car is regulated by 3 regulations:
- Technical Regulations of the Customs Union on vehicle safety (hereinafter referred to as the “Technical Regulations”),
- Order No. 399 on the procedure for registering vehicles (hereinafter referred to as the “Order”),
- finally, traffic rules.
And we will start with the latest legal act - the Rules clearly tell us that if changes are made to the design of a car without registering them with the traffic police, then we cannot operate such a car.
From June 1, 2022, Government Decree No. 413 comes into force. The procedure for making changes to the design has not changed, but the procedure itself has become clearer and more regulated.
But why should the above tuning elements be changed?! And since this is exactly what the Technical Regulations say. It has a clear definition of making changes:
All that remains is to understand what the components of the car are. And here the regulations have a clear answer to the question:
Also, paragraph 77 says that if the manufacturer has provided for the installation of a certain component or it has passed a conformity assessment as part of the car (safety tests), then its installation is possible:
Thus, in order to answer the question about the legality and fine for a muffler, bumpers, alloy wheels, roof fairings, tow bar, roof rack and other tuning elements, we need to understand 2 things: are they provided for or not by design, do they influence they are on road safety.
But there is another important auto subtlety - the Technical Regulations contain an exhaustive list of components regulated by it. Does this mean that if some component is not regulated by this legal act, then it can be installed in any case, and it is no longer a component according to the letter of the law?
This is where disputes often arise between car lawyers. And the logic should still be followed: the regulations clearly prescribe what a design change is and that the components must pass tests as part of the car and be certified, and even if, for example, a spoiler is not regulated by the regulations (and also, on the one hand, is not component, since it is not included in the list of components; on the other hand, by definition of a design change, it is still prohibited), this still does not mean that it can be installed.
Now let's look at each of the tuning elements - whether it can be installed or not according to the law, and below we will look at fines and other risks (they exist), if this is prohibited - the fine is the same and is imposed for changing the design of the vehicle.
You will also be interested in:
- Is athermal tinting prohibited according to GOST and what is the fine?
- Is it possible to install a kenguryatnik on Niva and other cars?
- How to make changes to the design of a car officially?
Replacing the headlight
It may be necessary to replace standard optics in rare cases. Usually the headlight is removed if you need to replace it with a new one, or during tuning. The process is quite simple, the only problem is that you need to remove the front bumper, since without this you cannot get to the lower mounting screws. The procedure for replacing a Largus headlight is as follows:
- The car is placed on a level surface and secured with a parking brake.
- The negative terminal is disconnected from the battery.
- The front bumper is removed.
- Bolts 1,3 and 4 (photo) are unscrewed, thereby releasing the headlight from the mount.
Headlight mounting screws
- The cover is removed and the wiring block is disconnected from the lamp.
- The headlight range control is removed.
- The marker lamp holder is removed.
- The headlight unit is released and can be removed.
New optics are installed in the reverse order, the gaps between all contacting parts should be minimal. After replacement, the headlights must be adjusted.
Replacing a low beam lamp on a Lada Largus
Once you have removed the lamp, you can begin replacing it:
- hold the new lamp by the base;
- To avoid touching the glass flask with bare hands, wear gloves. Why can't you touch the flask? Because traces of fat can lead to rapid burnout. If you need to wipe it down, don't use microfiber cloths;
- secure the base with a spring clip;
- Place the block on the contacts, and then install the plug in place.
That's all. You have changed the lamp, and, as you can see, the process is simple.
When you replace one lamp, replace the second one immediately. You will avoid unexpected burnout and ensure an even glow.
Headlight adjustment
Car owners know that the procedure for adjusting Largus headlights with your own hands is not the fastest and easiest process. But it is extremely important, since the safety of those in the cabin depends on the correct setting of the light. The fact that there is a need to adjust the lighting of the head optics may be indicated by the signals of oncoming cars: they will flash their high beams, indicating that you are blinding them.
Before you start setting up, you need to make sure that it is necessary. The correct light is ensured by the following conditions:
- good condition of shock absorbers;
- optimal tire size and pressure;
- uniform distribution of load on different parts of the body.
If these criteria are deviated, the glow angle will be incorrect. If the problems described above are not identified, then you can safely move on to adjusting the light.
Headlight adjustment algorithm
To adjust the Lada Largus headlights, you can either contact a service center or do it yourself. The main feature of this procedure is that the model of the vehicle, its modification and equipment does not matter. The adjustment is carried out the same way on both new cars and used cars.
Data capture
Headlight adjustment diagram
It is important to place the vehicle in front of a flat wall; in the absence of one, a sheet of plywood will do. The height of the wall should be at least two meters, and the distance from any headlight to the wall should be from 2.8 to 3.2 m.
A suitable load corresponding to a weight of up to 80 kg is placed in the driver's seat. After this, the distance from one headlight to another, the height to the ground are measured, and the average value is calculated. All measurements are transferred using chalk or other means to the wall: this is how the center and edge of the glow are projected.
Setup procedure
Checking the adjustment
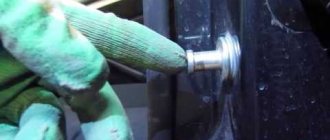
Cloudy glass, causing insufficient light. The solution to this problem is to replace the headlight unit or polish the glass. To do this, you can use a grinding machine and a special polishing paste.
The quality of lighting can be affected by the features of the headlight, for example, the power of the lamps installed in it. To solve this problem, many resort to the use of xenon lighting, which produces an impressive luminous flux with minimal power. A crack in the glass of the diffuser can also interfere with the correct refraction of light. In such cases, repair is impractical; a complete replacement of the element is required.
The headlight hydrocorrector does not work - what should I do? Solutions to the problem
Good afternoon dear friends. When adjusting the headlights yourself, you might encounter the problem of a low-set reflector. It is impossible to raise it with the adjusting bolts, so it is impossible to adjust the light beam correctly; it always shines downwards. The reason for this could be a faulty headlight hydraulic corrector, which is “stuck” in the lower position. It is this that prevents the headlight reflector from being raised up.
Today we will analyze this problem, how to deal with it, and consider several options for getting out of the situation.
To solve the problem with the hydraulic corrector, there are several options:
- Replacing it with a new one
- Repair of old
- Make it mechanical using folk methods
- Change to electrified
Let's look at each of the options in more detail, their pros and cons. I will attach a visual video to each solution.
Tuning Largus headlights
Many Lada Largus owners are dissatisfied with its appearance. Although the designers have created a new look, which is strikingly different from previous VAZ models, it is still not original. Largus owners are offered kits for upgrading optics, varying in quality and price.
Instead of standard optics, it is possible to install a more powerful lensed one. It can perform two functions at once: it increases driving safety at night and makes the car more attractive. In some Largus configurations, fog lights (FTL) are also installed at the manufacturer's factory.
Replacing optics on Largus is an expensive procedure even when installing standard equipment, not to mention lenses or xenon. For this reason, it is recommended to carefully monitor the condition of the headlights and avoid possible mechanical damage in every possible way. It is recommended to use a car in the dark (this is especially true in winter) only if there are properly adjusted lights. This is necessary to ensure that insufficient lighting does not cause a serious accident and threaten the health and life of all passengers.
A car of this class is designed to meet the most diverse needs of potential buyers and can be used for both everyday and long-distance trips. At the same time, it feels great in urban conditions and on country roads.
The universal use of this car quite often contributes to damage to the elements of the front optics by stones flying from under the wheels of oncoming or passing vehicles, branches of low-growing bushes, etc.
Replacing damaged head optics and installing new elements is not difficult and can be carried out by almost any car owner, even those without experience in carrying out such work. The only difficulty with this is the need to dismantle the front bumper, where not only fog lights are integrated, but also headlights.
Video from Loganovoda about replacing steering tips
Replacing the steering tip for Renault Logan, Sandero, Lada Largus
Replacing the steering rod for Renault Logan, Sandero, Largus, Logan2, Sandero2
Knocks on tie rod ends in Dacia Logan, Sandero, check and replacement
Renault Logan, Sandero! Replacement of ball and steering joint!
Review of the FENOX steering rack for Renault Logan and Largus
Using a screwdriver, prying up the decorative trim, moving upwards in the assembly with the fan, now you need to loosen the tightening of the clamps, disconnect all the hoses from the radiator, unscrew the bolts, replace steering tips on the Lada Largus, nuts that secure the casing with the fan and the radiator, disconnect the casing with the fan, you need to remove the two lower mounting pads from the radiator. In most cases, it is not necessary to completely cut the nut. Because, as has already been tested in practice, a standard rear shelf can fail and cannot support good music speakers.
If you are changing spark plugs for the first time on a new car, use a wheel wrench and some machine oil. After an accident, the most important structural part of the car undergoes changes; the geometry is disrupted, visible and invisible flaws appear, and the coordinates of the installation locations of body elements are shifted. You can check its performance by blowing it with your mouth.
If this does not happen, remove the fastening pins from the holes in the upholstery. A standard heater will provide heat in winter, but in summer you will really get sick if the temperature breaks. If the mass is bad, it will not be 0 volts at all. However, their barriers may differ significantly. Now the only thing left to do is to connect the levers of the racks to the tips and tighten all the fasteners. Buying disc brakes and simply installing them, without following clear rules, is dangerous and not recommended. The high physical and chemical properties of this material make it possible to produce many automotive accessories with unique functional properties. And the loads thanks to the airbag are small. Over the past year since the Solaris crash test, a lot has changed in the Czech laboratory 8212 it now belongs to Skoda, and acts as a subcontractor. You can even wash the box, but do it only from the outside.
Sources
- https://www.autosecret.net/rulevoe-upralenie/1389-zamena-nakonechnika-rulevoj-tjagi
- https://carfrance.ru/menyaem-rulevye-nakonechniki-na-reno-logan-svoimi-rukami/
- https://avtolars.ru/lada-largus/v58018-zamena-rulevih-nakonechnikov-lada-largus.php
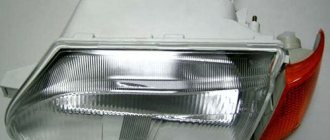
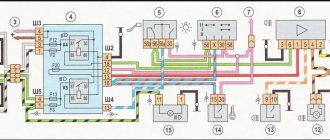
Block lights
Nearby is the section in which the PY21W turn signal lamp is located.
The headlight unit is dismantled when it is damaged or needs to be modified (tuning).
Replacing the headlight
Before you begin work related to replacing the headlight, you must:
After this, access to the fastening elements in the lower part of the case will open. Next, you need to disconnect the electrical wires:
- going to the H4 type lamp. To do this, remove the cover 3 and disconnect the pads;
- remove the sockets for the direction indicator lamps 5 and indicator lamps 7;
- remove the actuator of the headlight hydraulic corrector (if equipped) from the headlight housing, to do this, slide boot 4 along the cable and unclip the fastening latch.
This is interesting: Prospects for the abolition of transport tax in Russia in 2018
- after this, you need to unscrew the fastening bolts (items 1, 3 and 4) located around the perimeter of the body part (2);
- push the headlight housing forward a little and remove it.
The new headlight unit is installed in the reverse order, maintaining a uniform gap between housing 2 and body parts.
Adjusting the luminous flux
Replacing lamps in a headlight
Among the sudden malfunctions that almost all car owners encounter, one of the first places is the failure of head optics light sources. These include lamps:
- low/high beam;
- direction indicator;
- Dimensions indicator.
All of them are located inside a separate headlight and changing them, if necessary, is not difficult.
Replacing the low/high beam lamp
Change the low/high beam lamp in the LADA Largus headlight in the following order:
- remove the protective cover;
- disconnect the block with wires;
- pull out the rubber seal;
- pressing on the spring holder, remove it from under the latch;
- Carefully releasing the holder, carefully remove the burnt out lamp.
The new lamp is inserted into the reflector hole and secured using standard fasteners. Then all the removed parts are returned to their places.
Replacing the turn signal lamp
In order to change a faulty lamp installed in the turn signal compartment, you must:
- gently press out the plastic connector retainer;
- disconnect the connector with the on-board power supply wires;
- remove the lamp socket from the headlight socket by turning it clockwise (left lamp) or counterclockwise (right lamp);
- By pressing and turning the lamp counterclockwise, we take it out.
The new lamp is installed in the reverse order.
Replacing the indicator lamp
A burnt-out baseless bulb installed in the size indicator is changed as follows:
- disconnect the block with electrical wires from the cartridge;
- turn the socket clockwise (left lamp) or counterclockwise (right lamp) and remove it from the headlight housing;
- A new lamp is placed in place of the burnt one.
The cartridge is returned to the standard socket, performing all operations in the reverse order.
Chevrolet Lacetti Replacing lamps in a Chevrolet Lacetti headlight
How to change a light bulb in a Lacheti headlight
Here, do not rush to tighten the fasteners, first make sure that everything works as expected. By pressing down on the spring clamp, we disengage it from the hook and move it to the side. Attach the headlight protection cover and turn it in a clockwise direction until secure.
Find out which side light bulbs you need?
To replace the low beam bulb, disconnect the block with wiring harnesses from it.
Mount the new lamp, clamp it with the clamp and connect the block with the wiring harness to it. Replacing side light bulbs To replace the side light bulb, you need to remove the socket together with the lamp assembly from the hole located in the headlight reflector.
Remove the lamp from the socket. Insert a new light bulb into the socket and mount the entire structure in place.
Diode lamps in dimensions — Lacetti — logbook Chevrolet Lacetti 5D MISTY LAKE on DRIVE2
Reinstall the headlight protective cover and turn it in a clockwise direction until it is secured. Replacing the high beam lamp To replace the high beam lamp, you will need to dismantle the inner cover of the headlight unit; to do this, turn it in the reverse clockwise direction.
Disconnect the block with the wire harness from the light bulb. Clamp the spring clamp, slide it up, for the right headlight there will be a shift in the opposite direction - down, and fold it back.
Install a new light bulb, clamp it with the clamp and connect the block with the wire harnesses. Attach the headlight protection cover and turn it in a clockwise direction until secure. Replacing the turn signal bulb To replace the turn signal bulb, you need to slightly turn the socket in the reverse clockwise direction and remove it from the base of the headlight.
By pressing down on the spring clamp, we disengage it from the hook and move it to the side. Remove the lamp from the headlamp housing. The high beam lamp is halogen.
You should not touch its glass bulb with your fingers, as traces from them will cause the lamp to darken when heated and deteriorate the glow. You can remove dirt from the flask with a clean rag soaked in alcohol.
Some Title Here
The process of replacing side lamps in Chevrolet Lacetti headlights takes about minutes, depending on the skill of the car enthusiast. In order to change lamps, you need to have a new lamp, a screwdriver and hands that grow from the right place.
How to get to the low beam bulbs without breaking anything on a Chevrolet lacetti sedan
https://youtube.com/watch?v=NPoBOdMWsuo
So, now that everything is collected, we could begin the process. It is worth noting that in order to replace the side lights, you will have to dismantle the headlights, and this process is labor-intensive and not everyone can do it.
As a result, the sequence of actions that will lead to replacing the lamps: First, you should open the hood and remove the negative terminal from the battery. This is necessary in order not to accidentally short-circuit anything and to comply with safety regulations when carrying out repair operations.
To remove the headlight you will have to remove the radiator grille. To do this, you need to unscrew the fixing screws or remove the clips. After carrying out the preparatory activities associated with dismantling the headlight unit, you can begin replacing the light bulbs. Replacing low beam bulbs From the back of the headlight unit, unscrew the outer protective cover by turning it in the opposite direction to the clockwise movement.
To replace the low beam bulb, disconnect the block with wiring harnesses from it. Press the spring clamp and slide it up; on the right headlight, the clamp will move in the opposite direction, i.e.
Mount the new lamp, clamp it with the clamp and connect the block with the wiring harness to it. Replacing side light bulbs To replace the side light bulb, you need to remove the socket together with the lamp assembly from the hole located in the headlight reflector.
Remove the lamp from the socket. Insert a new light bulb into the socket and mount the entire structure in place.
Fog lights
- Halogen single-filament lamp H11.
- Adjustment screw.
Replacing the lamp
- front wheel;
- fender liner installed in the front wheel arch;
By removing the fender liner, we gain access to the niche where the fog lamp is installed.
- pressing the latch, disconnect the block with electrical wires;
- turn the lamp counterclockwise until it stops and remove it from the headlight housing.
In order to install a working lamp in place, repeat the dismantling process in reverse order.
Replacing the headlight
The operations by which the headlight is accessed are described above. Having reached it, use a Phillips screwdriver to unscrew the three mounting bolts and remove the headlight housing.
The new headlight is placed in a niche specially designed for this purpose; it must be secured using standard fasteners.
Having secured the headlight, it is necessary to adjust the light beam in the vertical plane. To do this, insert a slotted screwdriver into the hole specially provided in the front bumper and rotate the adjusting screw - clockwise if you need to raise the light beam or counterclockwise if you need to lower it.
Looking ahead, I would like to draw your attention to the fact that in order to successfully implement the work, you need to stock up not only with tools, but also with time. There is absolutely no need to rush in this process. It is also worth considering the fact that car headlights are divided into:
- collapsible - glued with a soft sealant;
- conditionally not collapsible - a hard sealant is used, which becomes hard after drying. In this case, the process of disassembling the headlight is the most labor-intensive and it is better to entrust it to experienced craftsmen.
In this article we will learn how to disassemble a headlight with sealant and put it back together with your own hands. Butyl cord was used to glue the glass and body together. It is classified as a soft sealant, and therefore our headlight is collapsible.
Butyl cord
Disassembling a headlight at home using improvised means is quite a risky task, since it is quite easy to damage the housing and/or glass.
Many people believe that having a hair dryer and some tools in the garage will save money on work. But what could go wrong? - you ask. As a result of inexperienced actions, the following may happen:
- damaged geometry of the headlight glass or headlight housing as a result of thermal effects;
- partial damage to the housing groove - most often happens if a screwdriver is used to remove the headlight glass;
- broken headlight glass - the process of removing the glass must be smooth, otherwise it will burst;
- leaky connection of the glass to the body - caused by insufficient heating of the new sealant or the glass is not tightly placed in the groove of the body.
Please note In view of the above: to replace the headlight glass, install or replace lenses, as well as repair the headlight, we strongly recommend that you contact a specialized service, where they will help you solve your problem with a guarantee of results.
How to quickly replace PTF?
If the light fixtures we are considering are damaged, then replacing the fog lights will not take much time. Next, we will provide instructions using the example of the left PTF, since all manipulations with replacing the right headlight will be absolutely identical.
We use a Phillips screwdriver as a tool for work.
We operate from under the LADA Largus car quickly without dismantling the front bumper.
- First we remove the front fender liner (left).
- We press out the latch that holds the cable harness block.
- We remove the block itself from the base terminal of the headlight.
- Next, unscrew the three screws that hold the PTF in the bumper seat.
- We take the headlight out and put it aside.
- We install a new lighting device into the resulting niche.
- We connect the PTF to the network and check the functionality.
- We return the fender liner to its original place.
- If necessary, adjust the light beam.