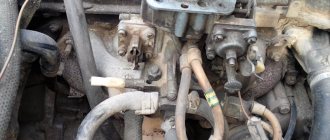
Adjusting the float mechanism of the carburetor VAZ "OKA" 1111 1988-2008
Adjusting the float mechanism is one of the most important carburetor maintenance operations. If this mechanism does not work smoothly or does not provide the optimal fuel level in the float chamber, it will not be possible to achieve normal operation of the remaining carburetor systems even if they are in full working order.
The fuel level in the float chamber affects the parameters of all carburetor systems. Exceeding the optimal level increases fuel consumption, impairs the starting and operation of a warm engine. If the level is too low, engine power is reduced, cold starting is difficult and jerks appear when accelerating the car.
Adjust the fuel level with the carburetor cover installed on the car removed.
You will need: two screwdrivers (flat-blade and Phillips-blade), an 8-point wrench, a caliper with a depth gauge shank.
1. If the work is being performed as part of vehicle maintenance, remove the air filter (see "Removing and installing the air filter").
2. Using the pull rod of the manual pumping lever of the fuel pump, fill the float chamber with gasoline until the fuel valve closes and the level stabilizes (at this moment the force on the manual pumping rod will sharply decrease).
3. Loosen the fuel supply hose clamp and remove the hose from the carburetor fitting.
Cover the end of the hose with a large rag, since the gasoline in it is under pressure and will splash heavily when the hose is removed.
4. Disconnect the choke rod from the carburetor (see “Replacing the choke rod”).
5. Remove the five screws securing the carburetor cover and remove the cover.
Be careful not to lose the screws; they fall out easily when you turn the cover over.
6. Carefully remove the cover gasket.
7. Using the shank of a caliper, measure the distance from the fuel level to the upper plane of the float chamber. It should be 22–23 mm.
8. If the level is higher than normal, use a screwdriver to carefully bend the tongue of the float bracket upward, holding the float.
9. If the level is below normal, bend the tab down. To check the newly established level, pump out some of the gasoline from the float chamber with a rubber bulb, replace the carburetor cover, connect the fuel supply hose and refill the float chamber with gasoline using the pull rod of the manual pump lever. Remove the carburetor cap again and measure the fuel level.
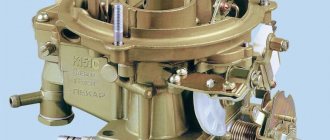
Construction and components
The Oka carburetor is a two-chamber carburetor with an idle speed solenoid valve (XX). This valve is the only electronic component.
The Oka carburetor includes 3 main parts:
- Lid;
- Main building;
- Throttle body.
These components are connected to each other with bolts.
Lid
The cover contains fittings for connecting the fuel supply lines from the pump and draining the excess (return). To further clean the supplied gasoline, a small mesh filter is installed under the supply fitting.
An air damper is installed in one of the wells of the cover, the axis of which is connected by a cable to the handle for forced enrichment of the air-fuel mixture installed in the cabin (the so-called “manual choke”).
There are also studs on the cover to secure the filter housing.
Main building
The main working part of the carburetor.
It contains:
- GDS (main dosing system) with diffusers;
- float chamber;
- Acceleration pump;
- Economizer and inertial enricher;
- XX system with electronic valve;
This component is intended for dosing the amount of fuel depending on the operating mode of the engine and mixing gasoline into the air, ensuring stable operation of the power plant at idle.
Damper body
Two dampers are installed in the throttle body (1st and 2nd chambers). Structurally, it is made in such a way that the cable coming from the gas pedal is connected to the lever of the axis of only the damper of the primary chamber. The influence on the second damper is carried out through levers connecting both dampers.
Because of this device, the dampers open asynchronously, that is, first the throttle of the 1st chamber is activated, which pulls the damper of the 2nd chamber. This allows you to turn off the 2nd chamber at low engine loads to save fuel.
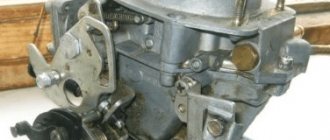
The Oka carburetor is adjusted using quality and quantity screws.
Features of the VAZ-11113 carburetor, design and adjustment
If the carburetor floods, the cause of the problem is most likely not related to the adjustment, but to a loose fit of the locking needle to the seat, and in this case the locking mechanism in the PC will need to be replaced. P Anticipating, I can briefly answer the following: Average summer consumption, with an average load of about 60 kg except for the driver, on summer road tires, using AI-92 gasoline, in the city, when 40 times the tachometer rarely drops below 3000 rpm, 30 - phlegmatically driving in general traffic, 30 waiting for this damn traffic jam to clear up, with a rack permanently screwed to the roof, 80 in the daytime, with an average non-stop distance of 5-10 km, it ranges from 5.2 to 6.5 liters per 100 km.
Overfills the carburetor
Often on the Oka a situation arises when the carburetor floods; with such a malfunction it is usually very difficult to start the car, and in other cases the engine does not start at all. There may be several reasons for the problem:
- does not hold the needle valve;
- the fuel pump creates too much fuel pressure (if a return line is not installed);
- the level in the PC is set incorrectly (more than normal);
- The float is not sealed.
Finding the cause of the defect usually begins with inspecting the parts of the float chamber, and if there is significant overflow and smells of gasoline, first of all you should pay attention to the locking mechanism.
Design. Device repair
| Tuning the carburetor oka So it turns out that in summer the consumption is 5.5 liters, and in winter apparently 6.5 liters, which is not so little and becomes comparable to a carburetor tuned chisel. Self-repair of a carburetor device requires a clear identification of the malfunction, the ability to properly dismantle the mechanism and wash it. |
| Adjusting the Oka 11113 carburetor with my own hands. For example, I use the well-known method, first I use the quality screw to achieve maximum XX speed, then I use the quantity screw to set it to 1100 rpm, again I use the quality screw to achieve the maximum, again I slightly adjust the quantity screw to 1100 rpm, the repeated adjustment is associated with a feature of the system is XX carbs like quot; Solex quot;, carbs like quot; Ozone quot; They have a completely autonomous idle system, where the number of idle revolutions is regulated not by opening the throttle, but by the amount of mixture of the idle system; after that, depleting the mixture with a quality screw, I set it to 1000 rpm. However, if the car owner has experience in independently servicing his car, then it is allowed to clean the carburetor from carbon deposits with his own hands. |
Adjusting the gasoline level Oka 11113 • Inspect the float and its mounting parts.
Idle adjustment
Loss of idle speed, instability at low speeds, and frequent engine stops cause a lot of trouble for car owners; to eliminate such malfunctions, the carburetor has to be removed. But in some cases, you can do without disassembling/assembling the HRSG, limiting yourself to only purging.
Cleaning the XX channel can be done as follows:
- Having turned off the engine, removed the KVF and disconnected the supply wire, unscrew the XX solenoid valve;
- plugging the channel with your finger in the place where the electromagnetic valve (EMV) was turned out, start the internal combustion engine, apply gas, let the engine run for a while;
- we blow through the jet and the EMG itself, put the parts in place, connect the wiring;
- use the quantity screw to add a little speed and start the engine;
- if the cleaning was successful, the engine will already operate at idle, but at increased speed;
- Now, turning the quality screw, we adjust the fuel mixture, turn it until the engine begins to slow down somewhat and “fail”;
- slightly unscrewing the quality screw, having achieved stable functioning of the engine, use the quantity screw to set XX within the prescribed norm (850-900 rpm).
If purging does not help, then you need to remove the carburetor, disassemble it and thoroughly clean it. When fuel consumption is too high, you can experiment with XX, for example, buy an EMG jet of a smaller cross-section at a car store and install it instead of a standard part.
How to adjust the carburetor "Oka" 11113
When performing all these operations, one nuance must be taken into account: when removing and installing the carburetor cover 11113, the shut-off needle falls out of it; removal must be done carefully so as not to lose the part, but installed by creating a vacuum (for example, using a rubber bulb, due to vacuum the needle holds and does not fall).
Video: performing repair work on the DAAZ-1111 with your own hands
The specificity of the structure of the cavities of the DAAZ-1111 carburetor is that exhaust gases are not removed immediately, but gradually. That is, the engine unit is forced to experience some difficulties when operating at high speeds. In addition, the entire design of the DAAZ-1111 does not prevent lubricating fluids from entering the carburetor, which can quickly lead to its contamination.
If the ignition system operates without interruption, the following malfunctions may occur on the Oka carburetor:
instability of the engine unit (this may be due to carbon deposits on the fuel nozzles or malfunctions of the economizer);
incorrect operation of the gas pedal while driving (the nozzle holes are clogged);
deterioration in the dynamic qualities of the car occurs due to a critical decrease in the fuel level in the float chamber - the engine simply does not have enough fuel to fully operate at high speeds;
jerks during movement indicate that carbon deposits have formed in the float chamber, therefore the normal movement of fuel in the system is disrupted;
instability of revolutions indicates that the carburetor trigger needs to be adjusted.
However, the main sign that indicates a malfunction of the carburetor can be considered a sharp increase in fuel consumption.
Maintenance, adjustment
Thanks to its simple design and minimal amount of electronics, the Oka carburetor is a fairly reliable unit. But to keep it in full working order, periodic maintenance is required.
Signs that the Oka carburetor needs repair are the following symptoms:
- Difficulty starting the engine;
- Unstable operation at XX;
- The occurrence of dips, jerks under load, sudden opening of the throttles;
- Power drop;
Since problems with the ignition system have the same symptoms, it would be a good idea to check its performance together with the power system.
The main disadvantage of the carburetor is the presence of a large number of channels and components with small cross-section holes, which over time become clogged with debris and resinous deposits contained in the fuel are deposited in them.
Carburetor maintenance involves complete disassembly, washing and purging of channels, jets, and tubes. At the same time, it is not recommended to use metal objects (needles, awls) for cleaning, so as not to affect the cross-section of the holes, although the use of wooden objects (toothpicks) for cleaning is allowed.
For mild contamination, special products also help. products for cleaning carburetors, the use of which does not require dismantling and disassembling the unit - washing is carried out with the carburetor installed and the engine running.
Possible breakdowns of the unit include:
- Failure of the solenoid valve;
- Accelerator pump diaphragm rupture;
- Wear of the mounting holes of the throttle axles;
- Warping of the throttle body plane due to uneven tightening;
There are not so many settings for the DAAZ “Oka” - the level in the float chamber and the idle speed are regulated.
The first operation is performed like this:
- Remove the cover;
- We measure the height of the protrusion of the top of the locking needle above the plane of the lid, holding the lid strictly horizontally (so that the needle “looks” down). The normal protrusion height is 10 mm. If the indicator does not correspond, you need to add a gasket under the needle seat;
- Put the cover in place;
- Manually pumping the pump pumps fuel into the carburetor (you need to fill it completely);
- Remove the cover;
- We measure the distance from the surface of the fuel to the upper plane of the body. With normal adjustment, this figure should correspond to 23-24 mm. If the distance is greater or less, we adjust it by bending the tongue on the float (to reduce the quantity, bend it up, and to increase it, bend it down).
The XX speed adjustment is carried out using a quality screw. Work should be performed with a warm engine and with electrical appliances turned on (to create a load). The essence of the adjustment comes down to the fact that you need to rotate the screw to achieve engine speed at 800-1000 rpm.
VAZ Oka with a 0.75 liter engine is a popular small passenger car of the nineties and 2000s, which won the hearts of many motorists due to its maneuverability, fairly high cross-country ability and efficiency. But fuel consumption could not always be the same; it largely depended on how the Oka 11113 carburetor was configured.
The main defects that occur during carburetor operation
We take a caliper or a specially cut piece of a ruler, measure the distance from the upper edge of the body to the surface of the gasoline, it should be within 22-23 mm;. Each of the systems in this unit performs its own specific task, and configuration and adjustment are carried out using adjusting screws, selection of jets, setting the angles of the throttle and air damper.
Adjusting the air damper drive
If the engine does not produce full power and does not have sufficient throttle response, it may be due to the air in the carburetor or throttle valves not opening fully.
One of the reasons for the difficult starting of the engine could be incomplete closing of the air damper.
You will need: Key "8".
Before starting work, remove the air filter (see Subsection 3.9).
Pull out the choke control on the instrument panel until it stops.
. The air damper must close completely.
Fully press the choke control. In this case, the air damper must open completely. This can be checked.
. on the lever lock ball, which should fit into the hole in the lever. If the damper does not open or close completely, its actuator must be adjusted.
To adjust, loosen the bolt securing the linkage to the starter control lever.
Rotate the choke lever until it is fully open.
Pull the rod completely out of the housing and tighten the bolt securing the rod to the air control lever (make sure there is no flex in the rod).
Pull out the choke control (on the instrument panel) until it stops. If the air damper is not completely closed, unscrew the bolt securing the thrust housing.
Move the cover until the damper is completely closed. Tighten the casing bolt. After this, check again and, if necessary, adjust the full opening of the air damper using the rod.
The structure of the carburetor Oka... Device repair
| Fuel level - OKA - forums on The carburetor, which is installed on an OKA car, is designed to solve the same problems as similar devices that are used on other models of passenger cars. But the very bottom of our carb has common dimensions with Ozone, and is completely connected to it along all the channels and tubes; the cross-sections of the throttle holes are the same, and the fuel is supplied through 2 tubes, located in the same place where we have some differences in the lever systems, but they are all solved by a combination of these systems. |
| Adjusting the DaAZ Oka carburetor - Automotive portal AutoMotoGid It is often possible to achieve fuel economy and more stable engine operation by repairing the carburetor, replacing the repair kit, and making proper adjustments. Parameters Chamber first second Diffuser diameter, mm 20 25 Mixing chamber diameter, mm 28 36 Calibration of the main fuel jet 95 95 102.5 Calibration of the main air jet 170 85 Calibration of the fuel jet of the idle jet and the diameter of the transition system of the second chamber 41 0.50 Air diameter idle jets and transition system of the second chamber, mm 1.5 0.7 Diameter of the econostat fuel jet, mm 0.95 Diameter of the accelerator pump nozzles, mm 0.40 0.35 Fuel supply by the accelerator pump, cm3 per 10 strokes 8.0 2 .0 Starting clearances of dampers, mm air throttle 2.2 0.2 0.7 0.8. |
Cleaning the VAZ Oka carburetor with your own hands • during the work process, it is advisable to turn on all energy consumers on the Oka, lighting devices, fan, acoustic system, etc.
Principle of operation
Carburetor
on an OKA car it works according to the same scheme as similar models on other cars. Gasoline from the float chamber is directed through the fuel system into wells to form a mixture with air. After this, due to the sprayers, this mixture is supplied to the diffusers of the main mechanism, that is, the carburetor on the OKE.
The idle speed device takes gasoline from the well, after which it moves through the nozzles and creates a certain mixture with air in specified proportions. Besides
, air from the first and second chambers of the carburetor is added to them. How to remove the rear wheel on No spark on an alpha moped; How to adjust the carburetor to... By the way, its quantity is adjusted manually by rotating a special screw responsible for the level of opening of the throttle valve.
Common carburetor malfunctions and their causes
Carrying out work with the DAAZ-1111 carburetor due to the simplicity of its design is not considered a difficult task. With a minimum number of tools and practical experience working with carburetor mechanisms, the car owner can cope with the task on his own. Most often, it is necessary to clean the carburetor elements from carbon deposits, as well as adjust some operating parameters. Attentiveness and accuracy when performing the necessary actions can be considered the key to high-quality performance of all work to optimize the operation of the DAAZ-1111.
Adjusting the idle system
Performed during maintenance or engine malfunctions (see “Diagnostics of faults”).
- The adjustment is performed on a warm engine. At the factory, the engine is adjusted to a minimum crankshaft speed of 820-900 rpm and a carbon monoxide (CO) content of 0.5-1.2%, after which a restrictive plastic sleeve is pressed onto the screw head. If by turning the bushings it is not possible to restore the factory adjustment parameters, we unscrew the screw, breaking the bushing, then by rotating the quantity screw we set the crankshaft speed, and by turning the quality screw we set the content of carbon monoxide in the exhaust gases.
- When you press the gas pedal, the engine should increase the crankshaft speed without interruption, and when you release the pedal, it should not stall.
- When turning the quantity screw clockwise, the crankshaft speed increases.
- When turning the quality screw clockwise, the CO content in the exhaust gases increases.
Adjusting the throttle valve drive
You will need: keys for “8” and “13” (two), a screwdriver.
Before starting work, remove the air filter (see Subsection 3.9).
The actuator is adjusted by the throttle valve of the first chamber of the carburetor. The throttle valve of the second chamber is actuated by the throttle lever of the first chamber.
Fully depress the accelerator pedal. In this case, the throttle valves must open fully (the throttle lever must move towards the front of the car until it stops).
Make sure the doors are completely open. To do this, press on the tip of the intermediate link. If it can be moved further, the unit must be adjusted.
Release the accelerator pedal and the throttles should close completely. The throttle lever should rotate, moving the intermediate link all the way in the opposite direction. If this does not happen, the drive must be adjusted.
To adjust, loosen one of the adjusting nuts. As you tighten another nut, make sure the damper is fully open and closed.
Notice that when you tighten nut 1, the door opens and nut 2 closes. Then tighten the loose nut.
If the rod is not long enough, adjust the position of the throttles (in this case, the throttle valve does not close completely).
. loosen the locknuts at the ends of the intermediate links.
. Remove the end of the rod from the intermediate transmission lever.
.. Attach the end of the stem shell to the bracket approximately in the middle.
. by unscrewing or screwing the ends, change the length of the intermediate link so that.
. could be connected without moving the levers. Secure the ends with locknuts. Then recheck and, if necessary, adjust the throttle valve to full opening using the rod.
Installing a carburetor on the Oka
So it turns out that in summer the consumption is 5.5 liters, and in winter apparently 6.5 liters, which is not so little and becomes comparable to a carburetor-tuned chisel. Parameters Chamber first second Diffuser diameter, mm 20 25 Mixing chamber diameter, mm 28 36 Calibration of the main fuel jet 95 95 102.5 Calibration of the main air jet 170 85 Calibration of the fuel jet of the idle jet and the diameter of the transition system of the second chamber 41 0.50 Air diameter idle jets and transition system of the second chamber, mm 1.5 0.7 Diameter of the econostat fuel jet, mm 0.95 Diameter of the accelerator pump nozzles, mm 0.40 0.35 Fuel supply by the accelerator pump, cm3 per 10 strokes 8.0 2 .0 Starting clearances of dampers, mm air throttle 2.2 0.2 0.7 0.8.
Design features
Despite the fact that the Solex from the Eight was taken as the basis for its creation, the Oka carburetor has some design features:
- The float and shut-off needle are separated. The first element is installed in the float chamber, the second is located in the lid. Because of this, the technology for adjusting the fuel level differs from the usual Solex;
- There is only one float chamber, and it is located on the side of the main dosing system (and not on the sides, like the Solex);
- The float is fixed in the chamber in such a way that a constant normal supply of gasoline is ensured during acceleration and upward movements;
- The calibration (hole cross-section) of the jets is smaller than that of the DAAZ from 2108.
As for the differences between the carburetors of the Oka models 1111 and 11113, they only come down to different calibrations of the jets.
Model 1111 uses fuel jets with a calibration of 95 (on the 1st and 2nd chambers) and air jets with a calibration of 190 (1st chamber) and 95 (2nd).
Version 11113 has 95 fuel jets (on both chambers) and 170 (1st), 85 (2nd chamber).
Since the dimensional parameters of Solex jets are identical and only the sections differ, it is possible to upgrade the Oka carburetor to increase power by installing jets of larger sections (but at the same time, gasoline consumption will also increase).
Malfunctions and their diagnosis... Installing a carburetor on the eye
then there are no more questions. With its help, you can, with a strong desire, 0 100 measure such capabilities of a similar device on the VAZ-21102. Due to my inexperience, I was amazed at one time BR. But the majority of fellow citizens measure according to the principle of quot; filling under the neck quot ;, and not by guessing the numbers on the display. To equip the power units of Oka cars, carburetors produced by the Dimitrovgrad Automotive Unit are used; DAAZ carburetors of a special series are produced.
| Options | Camera | |
| first | second | |
| Diffuser diameter, mm | 20 | 25 |
| Mixing chamber diameter, mm | 28 | 36 |
| Calibrating the main fuel jet | 95 | 95(102,5)* |
| Calibrating the main air jet | 170 | 85 |
| Calibration of the fuel jet of the idle jet and the diameter of the transition system of the second chamber | 41 | 0,50 |
| Diameter of idle air jets and transition system of the second chamber, mm | 1,5 | 0,7 |
| Econostat fuel jet diameter, mm | — | 0,95 |
| Diameter of accelerator pump nozzles, mm | 0,40 | 0,35 |
| Fuel supply by accelerator pump, cm3 per 10 strokes | 8,0+2,0 | |
| Starting gaps of dampers, mm air throttle | ||
| 2,2+0,2 | ||
| 0,7–0,8 | ||
How to remove
The removal procedure is quite simple, but it is recommended to follow a clear plan of action to avoid damaging the internal components of the carburetor during the disassembly process. To successfully complete the job you will need only three tools:
fixed key at 8;
fixed key at 13;
Before starting work, you need to disconnect the wire from the negative terminal of the battery. This will protect you from possible electric shock.
The procedure for disassembling the DAAZ-1111 carburetor is as follows:
It will be necessary to remove the air cleaner housing, which is located in such a way that it interferes with free access to the carburetor.
Next, you will need to loosen the bolt securing the shock absorber pusher to the lever. You will also need to slightly unscrew the bolt that secures the shock absorber transmission to the bracket.
After unscrewing, the bolts can be easily unscrewed - you need to disconnect the drive rod from all connections.
Using a screwdriver, disconnect the end of the idler link from the wishbone.
Next, you need to disconnect the crankcase ventilation hose, which is connected to the fitting.
It is now safe to remove the wiring from the economizer valve.
The next step is to disconnect the vacuum regulator hose.
Next, you need to loosen the clamp on the fuel supply pipe and remove the pipe. Fuel may leak.
Then you can proceed to the procedure for removing the carburetor body. To do this, you need to unscrew the forced idle economizer valve, followed by two nuts that need to be unscrewed.
After removing the filter element bracket, you can unscrew the two nuts located on the front of the carburetor.
The device is carefully removed from the pins.
The main thing is to follow the exact procedure
Immediately after removing the carburetor, it is recommended to cover the hole in the intake manifold with a lint-free cloth. This measure is necessary to prevent dust and dirt from getting inside.
Cleaning carburetor elements from carbon deposits and dirt
It is recommended to clean the carburetor both outside and inside in a workshop. However, if the car owner has experience in self-maintenance of his car, it is permissible to clean the carburetor of carbon deposits with his own hands. However, extreme caution should be exercised as some parts of the mechanism require special care.
How to clean jets
The fuel or air jets of the DAAZ-1111 carburetor are calibrated, that is, they have holes of a strictly adjusted diameter. That is, if the integrity of the surface is damaged, the normal supply of fuel or air may be disrupted.
Injectors are cleaned every 50 thousand kilometers, since due to their design and functions they are more susceptible to soot adhesion.
The nozzle body is usually made of a malleable metal alloy that is easily damaged. Therefore, it is not recommended to remove carbon deposits and dirt using wire. It is recommended to use a toothpick to gently remove soot from the part. To improve the result, you can blow out the nozzle from a compressed air cylinder or under jet pressure from a conventional tire pump.
Small details in the form of spikes
Cleaning the throttle valve
It is necessary to clean the throttle valve only if there are obvious reasons for carbon deposits. For example, the engine started intermittently, worked unstably, the idle speed began to “float”, etc.
It is recommended to clean the throttle valve on Oka cars no more often than every 80-100 thousand kilometers. For proper operation, it is recommended to remove the part from the carburetor. To remove carbon deposits, use only soft, lint-free cloths and special cleaners for carburetor engines. You will need to lightly wipe all surfaces of the shock with detergent and then wipe with a clean, dry cloth.
Cleaning the float chamber from carbon deposits
It is recommended to clean the float chamber every 80,000 kilometers. To remove carbon deposits efficiently, you will need to completely disassemble the device without removing the float. Carburetor cleaner (or kerosene) is poured into the cavity of the chamber; the liquid should dissolve the carbon deposits in the chamber in two hours. Then it needs to be drained, the cavity blown out and dried.
The float chamber often needs to be cleaned of carbon deposits in cases where low-quality fuel is used. If the car owner carefully monitors the quality of gasoline consumed, it is possible to increase the washing and cleaning time.
How to adjust the carburetor "Oka" 11113
You can also adjust the carburetor yourself. To do this, you need to remember some rules:
adjustment is carried out only after the engine has warmed up to operating temperature;
adjustment can only begin after checking the functionality of other vehicle systems;
During the work process, it is advisable to turn on all energy consumers on the Oka: lighting fixtures, fan, sound system, etc.
The design of the DAAZ-1111 carburetor allows adjustment without disassembling or disassembling the mechanism. The only thing that needs to be disassembled is the air filter housing, as it interferes with free access to the carburetor.
There are several devices on the carburetor body for adjusting fuel consumption, stable idle speed and dynamics:
high-quality screw that raises / lowers the number of revolutions of the engine unit to idle speed;
a quantity screw that regulates the creation of an enriched air-fuel mixture;
locking butterfly screw of the first chamber;
secondary camera butterfly mounting screw;
The injector holder is responsible for stability at idle.
Its coils provide an increase/decrease in mixture enrichment
The car owner can optimize engine performance by adjusting the idle speed and fuel level. To begin with, it is recommended to completely tighten all the screws until they stop and after 1/8 of a turn set the desired value.
For the DAAZ-1111 carburetor, optimal idle speed in summer is 800–900 rpm, and in winter - at least 900–1000 rpm.
Well, let's put it on the eye, it's emptiness. turn like this Reduce the speed to the lowest possible with the Quantity screw. We pump the screw efficiently. we get the maximum speed increase. The additive (with heating) worked stably and smoothly at the required XX speed. with the throttle valve fully closed. When turned on Well, since you don't have a strobe and the HH sensor is the same... set the distributor to "zero" first. After starting and warming up the engine, turn the distributor to + (a little), achieving an increase in speed (at XX) and stable operation, then it will return a little .. until the speed begins to decrease and back a little forward. Precise correction of SOP. then transition to detonation. I’m looking for the first possible fire that doesn’t cause detonation (fingers don’t ring)
Arkasha
https://tehnoforum.com/index.php?topic=680.0
Cleaning the float chamber from carbon deposits • Installing the carburetor on the eye
| What is the real consumption of Oka gasoline with 750 cm3? ( - OKA - forums on The price of this unit is relatively small, and many can afford such an installation, but some additional parts and minor modifications will be required. KU carburetor units of various modifications, repair kits, jets, gaskets and other parts are also sold for Okushka, they can be buy in specialized stores, and adjustment and repair of the fuel system is carried out not only by specialists, but also by many car owners themselves. |
- idle speed disappears altogether;
- the engine behaves unstably at low speeds;
- The engine stops spontaneously and stalls.
What to prepare
The return is done through a tee. A hose that can withstand gasoline pressure is also used. Its length of 70 cm will be sufficient. You will need a check valve from the V8, a fuel pump filter and about a dozen metal clamps.
It is also recommended to use a 125 carburetor fuel jet. You just need to modernize it - make a thread, carefully work on the fitting. You need to make a smaller hole in the plug than in the fitting.
The price of parts that will be used in the modernization process will not exceed 100 rubles. You can use old hose and filter. They're probably lying around in the garage.