Carburetor cleaning
As you know, the VAZ-21213 was equipped with either a Solex 21073-1107010 or Ozone carburetor. Both of them require periodic cleaning. The first one seems to be technically more advanced, advanced and gentle. Ozone is for mud climbers. I also have a Niva for dirt, but with Solex, and I will only change it to an injector if it comes to that. Recently, my carburetor began to act up in the classic way for a VAZ Solex - it stopped running on the first chamber, and only when the throttle was fully pressed. Those. when the second chamber opened. The reason for this phenomenon is discussed in Nail Poroshin’s video “The Eternal Solex Carburetor,” and how I solved it is discussed below.
We carry out the adjustment ourselves
Niva 21213 can be subject to adjustment of the starting system by the gap at the edges of the valves, if the carburetor is removed, or by the crankshaft speed directly on the car. In the first case, the gap at the location of the lower edge (in the direction of air movement) from the throttle valve is set to a width of 1.1 mm. It is adjusted with a screw that has a 0.7 cm hexagon on the head and a slot from the shank. This operation is carried out with the cam lever turned counterclockwise from the starting system control (all the way). In the same position, the gap at the lower edge of the air damper is set to 3 mm using a screw in the cover from the diaphragm mechanism in the starting system (you need to loosen the lock nut). At the same time, the rod from the diaphragm must be forcibly recessed completely into the adjusting screw. After adjustment, the screw is fixed with a locknut.
The principle of powering a carburetor engine
Adjusting the Niva starting system directly in the car saves time:
- You need to remove the air filter from the engine, pull the control lever away from the air damper, and start the engine.
- When the air damper is forcibly opened (by touching a flat screwdriver to a third of its full angle of rotation) using a screw (next to the lever on the axis from the throttle valve from the first chamber), the initial rotation speed is set to 2.08.mar.0 thousand rpm (on a warm engine).
- Remove the screwdriver, lower the air damper and, using the screw stop (next to the diaphragm), set the frequency to be 100 rpm lower than the original one (you need to select the appropriate position of the air damper).
- The screw can then be secured using a locknut.
Cleaning the carburetor. Preparation
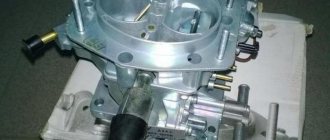
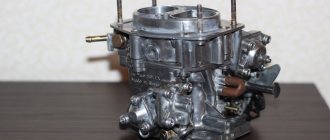
First of all, in the field, when I touch the carburetor with my hands at all, I first photograph it from all sides in working condition. So that later, if something doesn’t start or doesn’t work, you can always look at a photo of your working carburetor. I photograph it from all sides. So that everything can be seen in detail, where which pipes are, what is screwed on and how. Life experience forced me, it was funny not to go because of sheer nonsense.
True, when you can’t leave a couple of times due to nonsense, you very quickly take a book or the Internet, and start wondering how this Solex works. Usually it helps. Learning is light, without it with a carburetor there is darkness.
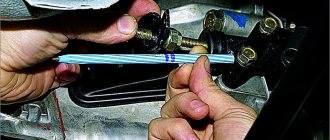
Under the hood is relatively clean for a dirty all-terrain vehicle. Electrical tape on the pipe shows which way is up. Having prepared for the subsequent easy and relaxed assembly, I remove the carburetor.
Oh yes, we’ll take a photo of this place too.
Causes of malfunctions of carburetors on the VAZ 2121 Niva and self-repair
All-terrain vehicles VAZ 2121 "Niva" already have reliable and durable equipment from the factory. The Niva uses a carburetor engine as its power unit, which allows for uninterrupted loads under any operating conditions. Repairing and adjusting the carburetor on a VAZ 2121 is a much simpler matter than it might seem at first.
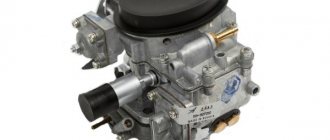
Models of carburetors on VAZ 2121 Niva cars
The 2121 is equipped with Ozone carburetors. These mechanisms are divided into only two types:
2107–110–7010–10 (equipped with an old-style breaker, does not have a vacuum corrector);
2107–110–7010–20 (a more modern model, however, due to the absence of a microswitch from the economizer, it has increased fuel consumption).
“Ozones” have a structure and operating principle that is traditional for carburetor units.
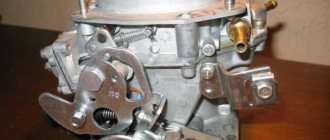
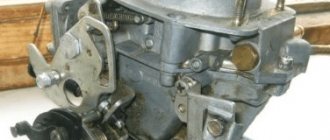
So, cleaning the Solex carburetor
The method is simple, accessible to everyone. The only thing needed is a compressor. This wonderful tool is available in almost every service. If you remove the carburetor and ask them to poke it, they won’t charge much for it. Indeed, spraying a couple of times with a blow gun cannot be expensive.
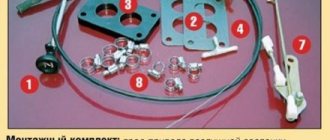
I was luckier, I have my own compressor, an HVLP gun, I used it to paint the fields, and again it helps out. In general, I’m talking about the topic, you don’t need a lot of brains here, knowledge of the structure of the carburetor is desirable, but also not necessary. We remove the top cover of the removed carb, and the gasoline must be drained from it. We take out the jets, elephant or spout. In general, we take out what is taken out.
And then the simplest part. These two parts of the carburetor, and the jets with the spray gun, are flushed with 6-8 atmospheres. We stupidly blow into each hole several times. We rejoice at the flying dirt and protect our eyes from the remnants of flying gasoline. This simple procedure transformed my carburetor. The engine started running smoothly and made quite a rustling noise. Pressing the gas pleases with pleasant traction. It’s clear that he’ll quit again soon, maybe in a month, maybe in six months. Depends on wet weather and temperature. In cold weather, dirt does not fly around like clothes under the hood. And don’t listen to the “acetone people.” Instead of looking for the cause and eliminating it, they engage in shamanic soaking. Drive them in the neck. A good carburetor specialist will not suggest this. All my mud climbers have been riding without any acetone for years.
How to carry out regulation using the example of a domestic carburetor
No idle speed for VAZ 2107 carburetor reasons. Idle speed of VAZ 2107 carb disappeared
The domestic “Zhiguli” carburetor “Ozone” is regulated by the supply of gasoline. At the same time, in the middle part of the designer they installed an “over-the-air” adjustment screw, this greatly expanded the range for settings of the machine unit. Before you begin the carburetor adjustment procedure, you need to make sure that the throttle adjustment drive is working properly and is not sticking. To do this, simply press the gas pedal. Then you need to set the ignition timing and adjust the gas distribution. These are complex engine tuning operations; each deserves its own article. Carburetor adjustment, so to speak, is the “finishing touch” to the final tuning of your car’s engine.
How is the idle speed of a VAZ adjusted?
- First screw in the “quality” screw all the way to the limit.
- Then carefully turn it back one and a half or 2 turns. This way your fuel mixture will be as enriched as possible with gasoline.
- Now turn the “quantity” screw. It must be turned 2 turns from the point where the throttle valve turns. This will be enough to start the engine.
- Then get into the car and start it.
- After this, start turning the screw so that the amount of gasoline-air mixture with the throttle closed is sufficient for stable operation of the engine.
- Using the same quality screw, achieve the composition of the mixture when the engine, when idling, begins to show the maximum number of revolutions. Carefully turn the adjusting screw and slowly reduce the speed to 900 rpm.
Experienced drivers perform this operation by ear. If the damper drive is adjusted properly, then at idle it will be completely closed, and when the gas pedal is pressed to the floor, it will open as much as possible. When the “quality” screw is screwed in as much as possible, the engine should stall. If this does not happen, you need to adjust the throttle valve (it is too open).
These are actually all the operations that are performed when adjusting the carburetor. If you were unable to do this the first time and the engine stalled, simply repeat the operation. You can check the setting this way: press the gas pedal all the way and lower it sharply. If the engine does not stall after this, but still produces the required speed, then everything is in order.
When adjusting using a gas analyzer, you need to rotate the mixture quality screw, observing the amount of CO. This is a rather complicated setting and is usually done in workshops, because it is necessary to ensure that the carbon monoxide content complies with GOST standards. However, it should be noted that in this way it is possible to adjust CO only at idle speed - the first measurement when passing a technical inspection at the traffic police. The second measurement, which is performed at engine speeds of 2000-3000 per minute, is slightly affected by this adjustment. The CO content at high speeds is determined not by the carburetor setting, but by the general condition of the engine and the quality of the fuel.
As you can see from the text above, adjusting the idle speed is not difficult, but it will require time, special tools and some skill if you want the carburetor to work really well.
At a minimum, you will have to open the hood and get your hands dirty. If you don't want to do this, then a great option is Uremont.com. This is a special aggregator of car services where you can place a request for the required operation, namely “carburetor idle adjustment.” Within a few minutes, you will begin to receive offers from service stations registered on this site, which received your application. All you have to do is choose the most profitable and convenient offer and take the car. All services of the Uremont.com website are free.
Other washing methods
Sometimes it happens that there is no special means for cleaning the working unit nearby. In such cases, solvent No. 646 can help. Although you shouldn’t rely too much on it. The effectiveness of this cleaning method is quite low, and it only allows for a short period of time to remove contaminants from the surface of the carburetor.
The proper operation of this part depends not only on the frequency of its cleaning, but also on the product used. In order not to make a mistake in choosing this product, you need to carefully familiarize yourself with its composition and properties in the store. It is imperative to take into account the activity of using the cleaning agent. We should also not forget that all elements of the fuel system require regular cleaning. To ensure proper operation of the carburetor, it is recommended to clean it of dirt every 10-15 thousand km.
Trouble-free operation of a vehicle depends on many components, not least of which is the carburetor. Every car owner should regularly check its condition. This is especially true for those who use low-quality fuel. This factor increases the likelihood of clogging by an order of magnitude. But you can avoid the negative consequences caused by a dirty carburetor if you clean it regularly.
Every car owner can handle this task with his own hands, so you don’t even have to turn to specialists for help. When disassembling this power unit, it is only necessary to remember the location of the main parts. But first you need to understand what is the best way to flush the carburetor.
This must be a special composition designed to remove contaminants from the internal and external surfaces of the working unit. It is not recommended to save on the purchase of cleaning fluid, otherwise this may soon result in new, even more serious problems for the car owner, the elimination of which will require not only more time, but also financial costs.
Is it possible to wash it at home without special products?
If you do not have the opportunity to use special products to flush the carburetor, you can do it without them. To do this, simply soak the necessary parts in kerosene (gasoline, acetone) overnight, and in the morning start cleaning and blowing them. With the right approach, the effect will be no worse. But under no circumstances follow the advice of “experts” who recommend pouring a little acetone into the tank or carburetor to clean the fuel system! Yes, acetone perfectly dissolves and removes dirt, carbon deposits, paint residues and even water. But it also dissolves seals, gaskets, and valves made of plastic and rubber!
As you can see, cleaning the carburetor with your own hands is not at all difficult. The main thing is to have a good cleaning product, the necessary tools and a few hours of free time. And to prevent this process from becoming a habit, fill only high-quality fuel into the tank of your car.
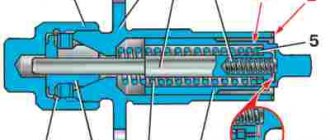
Adjusting the fuel level in the float chamber
Performed when replacing a needle valve or float. Remove the carburetor cover (see Disassembling the carburetor).
Having placed the carburetor cover horizontally with the floats up, we use a caliper to measure the distance from the cover gasket to the farthest point of each float.
It should be between 34–35 mm for both floats.
The gap is adjusted by bending the tongue or float arms
The bearing surface of the tongue must be perpendicular to the axis of the needle valve and must not have any dents or nicks.
When installing the cover in place, check whether the floats are touching the walls of the float chamber; if necessary, bend the float arms.
Advantages and disadvantages
Solex has certain inevitable disadvantages, but there are also positive qualities for which owners of domestic cars love them:
- High quality build. This includes everything related to materials and the precision of manufacturing of all parts. There is no need to “finish with a file” what is already well done;
- Better fuel mixing performance. Since the design of the diffusers is much better thought out than in OZONE carburetors, with proper tuning you can achieve better power output with lower fuel consumption;
- The ability to modify and adjust the carburetor, achieving optimal operating parameters;
- Maintainability and low cost of spare parts. Compared to modern injection engines, repairing a Solex carburetor is much easier and cheaper;
Well, the main drawback is sensitivity to blockages, which is inevitable for any precisely fitted device. The dirt comes from gasoline, which, as we know, is not of the highest quality. And dust can be pumped from the air bypassing the air filter if there is deformation and cracks in the housing, as well as through holes in the float chamber.
Today you can hear that carburetor cars are a thing of the past. This is partly true, because new standards, including environmental ones, and progress have long dictated a new perception of convenience and comfort. Injectors operate more economically, adapt more accurately to external conditions, and meet new requirements.
How long will the Solex carburetor remain relevant? Given its reliability and convenience, cars with this fuel supply system will be in use for a long time. So far, the interest in servicing and repairing the Solex has not waned, since there are quite a lot of cars with it.
Idle system
The device is equipped with an idle system. It is designed to allow the engine to operate at low speeds. At this moment, the vacuum in the diffusers is very small. Fuel cannot enter the main metering system. At idle speed of the engine, fuel is supplied under the throttle valve of the first chamber of the carburetor. There the vacuum is strong enough to form a stable combustible mixture.
Air is supplied through the main jet and the emulsion well of the first chamber. The fuel will then flow to the idle fuel jet. After this, it is mixed with air supplied from the XX air jet. Oxygen is supplied to this element through a special channel. This operating scheme allows the engine to ensure a smooth transition from load to idle and prevents fuel from leaking out of the float chamber.