We change valve stem seals on a VAZ-2110 with an 8-valve engine
Many car enthusiasts were faced with the fact that the time had come to change valve seals on a VAZ-2110. These seals are also popularly called caps. The change process itself is quite simple, but it will require some knowledge of car design, as well as the availability of tools.
Video material
Video material about replacing valve stem seals, as well as the subtleties and nuances of the procedure.
Necessary tool
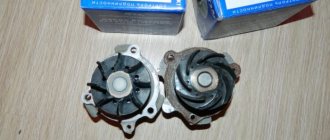
The tool we need is a desiccant, it is sold on any auto market and looks like this.
Desiccant.
We will also need pliers for removing valve seals, finding them at any car market is not a problem, and any rod with a diameter of 5-7 millimeters.
Pliers for removing oil seals.
Product selection
The choice of valve stem seals should be taken seriously, since the normal operation of the power unit will depend on this.
A visual inspection is required before installation.
Typically, the manufacturer recommends installing only original (factory-produced) parts. As for AvtoVAZ, for 2110 it will be under catalog number 2112-1007026 . The average cost will be 700 rubles.
Motorists recommend paying attention to analogues!
But, as practice shows, most car engine repair specialists do not recommend using original caps. Valve seals manufactured by Elring with catalog number 825.050 . Their price will be 700 rubles , the same as the original ones, but the quality is much higher.
In addition to the presented companies, there are a number of analogues that can be used for installation on the VAZ-2110.
Additional Notes
Repairing your car yourself is largely a hobby. Over time, motorists gain skills in the repair process - starting from the simplest and moving to the most complex. In this case, you can count on gaining your own skills to quickly replace certain functional components of your machine.
We invite you to start repairing your car yourself. This will help significantly reduce the costs that motorists typically pay. Do-it-yourself work has always been advantageous, and it can also be carried out taking into account other requirements. The proposed instructions will help you understand in practice the replacement process quickly enough and from now on do this work yourself.
Reasons for replacement
There are direct and indirect reasons that indicate that the valve stem seals are worn out and need to be replaced. So, let's look at the signs of wear on valve seals:
- The engine consumes a lot of oil, more than 1 liter per 1000 km .
- Blue smoke from the exhaust pipe.
- The threaded part of the spark plugs is coated with oil.
- Black carbon deposits on candles.
- Increased smoke when over-gassing.
- New oil quickly becomes contaminated.
- Power drops, engine failures.
- The car doesn't start well when it's hot.
- Worn guide bushings and valves. Characteristic knocking of valves .
Any car enthusiast can change the valve stem seals of a VAZ-2110. To do this, it is worth getting hold of the necessary tools and devices.
The choice of oil seals should be taken very seriously, since the operation of the motor, as well as its service life, will depend on this.
Purpose and design of valve seals
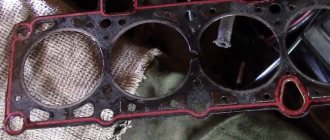
A worn oil seal allows oil to enter the cylinder along the valve stem, causing it to burn along with the mixture, forming carbon deposits on the valve plates, as well as on the rings and cylinder walls. In advanced cases, coking leads to a drop in compression due to stuck rings and loose valve closure. It is generally accepted that the cost of timely replacement of oil scraper bushings is incommensurate with the repair of the piston group.
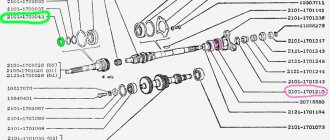
The design of the oil seal is quite elementary, it consists of only three basic elements:
- The base is a steel bushing, which represents the frame of the oil seal and gives it strength.
- Spring – ensures the tightest possible fit of the edge of the rubber seal to the valve stem.
- Oil seal - made of rubber or secondary rubber and serves to remove excess lubricant from the valve stem.
It is important to take into account that to replace valve stem seals on a VAZ 2110 8-valve car, it is better to buy appropriate high-quality consumables. First of all, this will affect the service life of the parts; they will not have to be changed ahead of time.
Preparatory operations
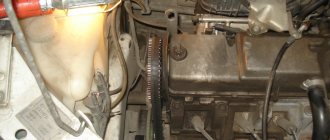
We unscrew the candles. We remove the timing belt and camshaft, then remove the cups, they are also valve pushers along with adjusting washers.
Be sure to arrange them in order or mark them with numbers so as not to confuse them during assembly.
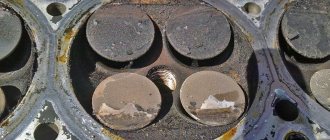
The picture should look like this. It’s unclear how the previous “masters” did the repairs, everything is dirty, so if they removed it, what should be washed?
cylinder head.
Causes and signs of wear of rubber seals
During engine operation, oil removal seals are subjected to serious loads, because the valve performs more than 1000 operating strokes per minute. If we add to this the factor of the chemical effects of hot oil and exhaust gases, then it is not at all surprising that the rubber does not withstand and wears out. And the point here is not the quality of the product, although this is important, it’s just that the seal is a consumable material that should be changed after a run of about 100,000 km.
If you detect the wear of valve seals in time and replace them at an early stage of the malfunction, you will be able to avoid problems with the internal combustion engine. The primary signs of failure of rubber seals include the following symptoms:
- The candle thread is coated with oil.
- Smoke from the oil filler neck.
- Smoke coming from the exhaust pipe.
- The electrodes of the spark plug are covered with carbon deposits.
- Increased fuel consumption.
- Rapid oil contamination.
The presence of oil on the threaded part of the spark plugs does not always indicate the need to urgently change the seals. It happens that the thread is still dry, because a small amount of lubricant still gets into the chamber, and it has time to burn.
Maintenance frequency
The manufacturer of these cars hoped to offer consumers a reliable and inexpensive car. Therefore, even if you have a good automobile platform, the rest of the VAZ car’s equipment leaves much to be desired and does not meet accepted standards, and this significantly reduces the level of complexity of all repair work, if required.
Maintenance is performed regularly, depending on the manufacturer's recommendations for replacement. In this case, the oil seal is a component that is susceptible to technical wear and requires regular replacement. Usually they are changed every 10-15 km. Such frequent replacement allows you to avoid failure of functional units in time.
Oil seals are sensitive to leaks; if present, they fail faster and do not meet operating requirements. Untimely replacement of gaskets may require more serious and inexpensive repair of the machine, and the structural simplicity of the oil seals allows these skills to cope with the replacement without outside help.
How to organize the replacement of valve stem seals for a VAZ 2110 8-valve car in a garage?
Even an ordinary motorist can easily install new valve seals. If we consider that dismantling the cylinder head is not included in the technological list, then the repair does not present any difficulties at all.
When purchasing spare parts, it is important to pay attention to the internal profile of the seals. Quite often, parts that are not equipped with a reinforcing sleeve have an annular protrusion on the landing plane in their design. During installation it may be damaged, but otherwise the process is no more complicated than changing the damper support on a “ten”.
Preparatory stage
First of all, it is worth noting that replacing valve stem seals on a VAZ 2110 with an 8-valve engine uses the same technology for both carburetor and injection engines. Therefore, the tool set is similar in both cases:
- Set of wrenches and socket wrenches.
- Device for pressing valve springs.
- Mandrel and puller for valve seals.
- Tin rod with a cross section of 7-9 mm.
- Tweezers, hammer, screwdrivers and pliers.
Before starting work, it is advisable to clean the cylinder head with kerosene, after which the air filter, fuel pump and ignition distribution device should be removed. Next, use a No. 5 hexagon to unscrew the screw that secures the auxiliary device drive housing. Be sure to remove the negative terminal from the battery, as well as the toothed pulley from the camshaft.
Preparatory dismantling stage
- Unscrew the nuts securing the cylinder head cover and remove it.
- Unscrew the two nuts securing the ground wires and remove them from the studs.
- Unscrew the two nuts and bolt of the rear cylinder head cover and remove it from the head.
- Alternately loosen the four nuts securing the front camshaft bearing housing and the six rear ones. Remove both housings.
- The key should be removed from the camshaft groove immediately so as not to be lost.
- Dismantle the camshaft and remove the seals from it.
Removing the old seal
This stage of replacing deformed valve stem seals for VAZ 2110 8 valves includes installing the piston where the work is being done to the TDC position. Further actions are performed according to the following scheme:
- Remove the appropriate spark plug and insert a tin rod into the hole to prevent the valve from falling through.
- Using a special tool, compress the valve spring.
- Use tweezers to remove two crackers and remove the device.
- Install a collet to remove the caps and hit the fixture bushing with a hammer. This will allow the seal to be pressed off the bushing.
- Remove the oil seal from the collet. If you don't have a collet, you can use pliers. Do not rotate the seal; this will damage the valve guide.
Installation of a new seal
- Place the cap in the oil and install it in the mandrel.
- Carefully press the oil seal into the lower plate until it stops.
- Install the spring onto the seal. Carry out similar actions with the remaining parts.
- Install the crackers and hit the ends of the valve with a hammer through a metal rod. So the crackers will return to their normal place.
- Lubricate the camshaft cams and journals with oil, and treat the bearing surfaces under the journals in the same way.
- Place the shaft in the supports so that the cams of the first cylinder are directed away from the pushers.
- Treat the area of the outer shaft supports with sealant.
- Install the camshaft bearing housings, then put the washers on the studs and screw the nuts. They need to be tightened in two stages - first until they touch the bearing housings. Then check whether the guide bushings fit into the corresponding holes in the bearing housings. Only then finally tighten the nuts in order.
Final stage
The replacement of oil seals on a VAZ 2110 8-valve car is completed by installing camshaft seals. Be sure to check the clearances in the valve drive assembly. At the end of the process, all hoses and wires are installed in the reverse order.
If there is a suspicion that the car has been driven on faulty seals for quite a long time, then the experts recommend making repairs by dismantling the cylinder head. This will allow you to perform a full repair with thorough cleaning of engine components from carbon deposits.
Removing the cuff
- the cylinder head cover is removed;
Note. In order for the replacement of camshaft seals on a VAZ 2110 to be successful, it is not necessary to dismantle the engine or the VAZ camshaft.
Camshaft oil seal VAZ 2110 16 valves
The cuff itself is located behind the toothed pulley. To dismantle it, you should arm yourself with a special tool - 2085. If this is not available, a regular hook can help remove the oil seal. So, let's start removing:
- first of all, loosen the clamps of the poly V-belt tensioner;
- remove the belt;
- now you need to dismantle the damper;
- we reach the safety shields - upper and lower;
- disconnect them from the end of the engine;
- Now you need to turn the crankshaft until the cylinder piston reaches top dead center.
Note. When performing the above operation, it is recommended to use the ignition timing mark.
- loosen the toothed belt tensioner;
- we remove it.
Note. This belt can of course be secured accordingly rather than removed. But, as you know, the belt cannot be tightened, otherwise it will become deformed. Therefore, it is still better to remove it.
Camshaft oil seal VAZ 2110 8 valves
From this point on, the crankshaft cannot be turned either, since one of the pistons is already at top dead center. Let's continue:
- block the camshaft pulley accordingly;
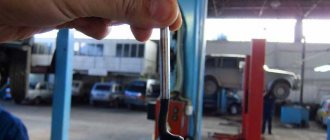
- First, use a wrench to unscrew the bolt, and use a pry bar to keep the shaft from turning.
You can also ask an assistant, if you have one, to hold the shaft from turning. In addition, to prevent the shaft from turning, you can pass a 10-mm head with an extension through the hole in the pulley, and then put it on the nut that secures the rear timing belt cover.
- The camshaft pulley is removed.
Note. In order not to lose the key, you should remove it from the camshaft groove.
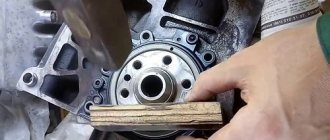
- Now we should start removing the oil seal that will appear before us;
- take a screwdriver and remove the cuff.
The puller is screwed into the oil seal as far as possible. At the same time, press the slip ratchet.
- you need to loosen the knurled screw and rotate the inner part in the direction of the camshaft until the oil seal comes out.
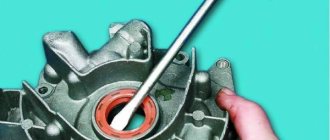
Installing a new cuff on the camshaft
VAZ 2110 camshaft oil seal
Note. It is recommended to lubricate the new cuff with machine oil. In addition, the threaded head of the tool, which we use along the shaft, is lubricated. Only after this is the cuff pressed inside using a rubber hammer.
To easily install a new cuff, it is recommended to use a bushing of a suitable size instead of a handy tool. You also need to take a long bolt and a large washer.
Note. The bolt that is selected must be the same diameter as the camshaft pulley.
- install the bushing on the outer diameter of the oil seal;
- install them together using a bolt and washer;
- tighten the bolt until the cuff is in place (that is, flush with the cover).
Note. If you don’t have a bushing at hand, the cuff can be pressed in with hammer blows through the bit. We remember that you cannot press the cuff in completely, because this can block the hole from which the oil drains.
Replacing valve stem seals
Detailed procedure for removing and reinstalling valve stem seals on a car engine.
In this article you will find useful information on how you can replace the valve stem seal without removing the head from the cylinder block. All you need for this is a small tin rod, the diameter of which is approximately 8 mm; you can use solder.
This replacement example is carried out on a model 2111 engine (the procedure is identical for the 2110). When installing caps on a carburetor engine, these instructions are followed in the same way, but before replacing, additionally remove the air filter, fuel pump and ignition distributor and unscrew the bolt securing the auxiliary drive housing with a hexagon to “5” (see photo below).
Next, the step-by-step steps for performing the operation will be described in detail.
Preparatory work
Before replacing the VAZ-2110 valve seals (8 valves), you need to perform a few simple manipulations to prepare the car for repair:
- Disconnect the negative terminal from the battery.
- Remove the air filter housing.
- Remove the cover that covers the timing drive mechanism.
- Disconnect the air suction cable (on carburetor models).
- Unscrew the two nuts that secure the cover covering the camshaft.
- Install the camshaft and crankshaft pulleys according to the marks.
- Secure the camshaft pulley by installing a piece of tube into the slot. It is necessary that it fits onto the stud in the cylinder head.
- Loosen the bolt that secures the camshaft pulley using a 17mm spanner.
That's it, now the entire valve mechanism is before your eyes. If the work is carried out on a carburetor engine, you will need to remove the pump (fuel) and the ignition distributor. Work is carried out similarly to replace valve guides.
Replacing valve stem seals, step-by-step procedure:
1. Disconnect the wire from the “–” terminal of the battery.
2. Next, disconnect the toothed pulley from the camshaft.
3. Remove the block head cover.
4. Then unscrew the 2 nuts securing the ground wires and remove the wire ends from all studs. Unscrew the 2 nuts of the second and third fastenings of the rear cylinder head cover. Important: There is an O-ring under the bolt head. Remove the back cover from the block head.
5. Equally unscrew the 4 nuts of the first front and 6 nuts of the second rear camshaft bearing housing. Remove the washers. After all the above steps, remove both housings.
6. If the key in the groove of the camshaft does not fit tightly, it should be removed in order to save this part.
7. Remove the camshaft from the cylinder head.
8. Remove the oil seal from the camshaft.
9. Next, you will need to rotate the crankshaft to such an extent that the piston is located at the very top dead center. It is important that the piston fully matches the caps being replaced. Unscrew the spark plug and insert a tin rod through the hole provided for the spark plug between the valve and the piston. Make sure that the valve does not fall down.
11. Using tweezers, remove two crackers, then remove the entire installation.
12. Next, remove the outer and inner springs from the valve, and the upper spring plate.
13. Squeeze the valve guide valve stem seal as far as possible.
14. To perform step 13, install the collet of the device for removing the oil seal on the cap itself.
15. Apply a sharp blow to the installation bushing. After the previous manipulations, hit the striker of the device handle. This way you will press the cap off the bushing.
16. Next, remove the cap from the installation collet. If you do not have a tool to remove the cap, you can use pliers. But in this case, in order to avoid damage to the cap, you should apply force straight up, without turning the cap to the sides.
17. We strongly recommend that you remove the springs from the caps before installing them, otherwise there is a possibility that you will damage them while passing through the grooves for the crackers on the valve.
18. The next step is to dip the valve stem seal in engine oil and insert it into the mandrel.
19. Carefully push the cap as far as it will go into the bottom plate.
20. If you removed the spring, then it should be reinstalled. In the same way, replace all remaining valve stem seals.
21. Reinstall all springs and plate in the same order as you removed them. Then install the crackers using the installation so that they become in the grooves of the valve stems and remove the tin rod from the hole intended for the spark plugs.
22. After you install the cotters, strike the ends of the valve with a hammer through the metal rod. This way the crackers will fall into place.
23. The next step is to lubricate the camshaft cams and journals with engine oil. It is also worth lubricating the surface under the camshaft journal in the cylinder head and bearing housings with the same engine oil.
24. The cams of the first cylinder should be directed away from the valve tappets. To do this, you need to install the camshaft in the cylinder head supports.
25. To secure the work done, apply sealant to the area of the outer camshaft support on the head.
26. Replace the camshaft bearing housings. Secure the studs with nuts; securing them takes place in two stages: first, tighten the nuts until the bearing housings touch the surface of the block head.
27. When performing step “26”, be careful and make sure that the guide bushings fit into the holes located in the bearing housing, and then tighten the nuts until the end.
28. Install the camshaft oil seal.
29. And the last point in our work will be checking and, if necessary, adjusting the gaps in the valve drive, and installing all other parts in the reverse order of removal.
Putting parts in place
First, the cap is dipped in engine oil, installed in the mandrel and carefully hammered into the lower plate. The spring is returned to its place. All existing caps must be installed in the same way. In the same order as was done during removal, return all the springs and upper plates to their places. Then install the crackers back so that they fit exactly into the grooves for the rods on the valve.
A tin rod is removed from the hole from which the candles were removed. After installing the crackers, you need to hit the ends of the valve with a hammer or heavy object using a steel rod. They should fall into place. Lubricate the distribution shaft journals, cams and the places under them in the heads on the cylinder block with engine oil.
Install the camshaft into the head supports. In this case, it is necessary to install the cams of the 1st cylinder in the opposite direction in relation to the valve tappets. The area of the last support of the distribution roller is covered with sealant. The housings of its bearings are returned to their place and the studs are fixed in two stages with nuts, which are first tightened until the bearings touch the head.
It is necessary that the bushings fit exactly into the holes on the housings, and only then tighten the nuts until they stop. An oil seal is installed on the camshaft. At the last stage of work, the valve clearances are checked and adjusted. After this, the previously removed parts and devices are returned to their place. If everything described above seems difficult to perform, then you need to contact a car service center - where this work will be done by professionals.
It's easy to replace the caps yourself. The main thing is not to deviate from the above recommendations and follow the order of operations to replace parts. With timely prevention, the car will serve its owner for a long time.
Replacing valve stem seals on a VAZ 2110 8 valves
The latest releases of VAZ "tens" engines included rubber valve seals. The kit consisted of an expander spring and a steel bushing. The manufacturer recommends replacing the oil removal part after the car has run 150 thousand kilometers. Many car owners do this within the walls of a car service center. At the same time, they are completely unaware that in a VAZ 2110, replacing the oil seals of 8 valves can be completely done independently.
The main purpose of the valve stem seal is to seal the joint between the rods. This circumstance ensures that engine oil will not flow into the gap.
The engine will operate efficiently only when the components in the gas distribution mechanism are continuously operating. Engine parts are constantly subject to friction. To minimize their wear, they should be lubricated with oil. But it should not enter the combustion chamber. For this purpose, seals are installed.
When they wear out, the oil will end up in the engine cylinders. This will cause a circumstance to arise in which the oil will begin to burn and form carbon deposits on the walls of various elements. The result will be a drop in compression and the valve will not close tightly.
Design of valve stem seals
The valve stem seal has a simple design consisting of three basic elements:
- base . It is represented by a steel bushing. This is a kind of frame to give strength;
- spring _ Thanks to this element, maximum adherence of the edge of the rubber seal to the valve stem is ensured;
- stuffing box . It is made from rubber or recycled rubber. This element removes excess lubricant.
Why do rubber seals wear out?
When the engine is running, heavy loads occur.
This is understandable, since the valve performs over 1000 strokes in one minute. Additionally, it should be noted the effect of the chemical factor, which is caused by heated oil and exhaust gases. The following signs may indicate that the oil seal has worn out:
- The candle thread becomes coated with oil.
- Smoke appears from the neck where the oil is poured.
- The car's exhaust pipe itself smokes heavily.
- Soot appears on the spark plug electrodes.
- Fuel consumption increases noticeably.
- The recently filled oil is contaminated.
If such manifestations occur, it is necessary to replace the valve stem seals of the VAZ 2110.
Important! It is recommended to change the caps to those intended for this car model.
However, there are exceptions:
- the price of “original” caps is much higher than those offered to the buyer in the nearest specialized store;
- If the cap is damaged, there is simply no time to search for and purchase exactly the same part. This forces you to use some other options.
Procedure for replacement
If you need to replace VAZ 2110 8 valve stem seals intended for other cars, then the following points must be taken into account:
- The diameters of the valve stem and the guide bushing, the location of which is the seat belt, must match.
- In comparison with the “original” valve, the height should not be exceeded by more than 0.5 millimeters. Otherwise, the valve stroke will be very large and the spring retainer may be damaged.
- The cap should not have a diameter that is too large. This will ensure freedom of passage inside the valve spring. This is most important for those engines whose valve has two springs. In this case, the outer diameter of the cap will be limited by the internal spring.
- The length of the seat on the cap and the guide sleeve should be close in size. If the belt is short, it may be damaged by the edge of the sleeve.
- Pay attention to the internal profile that the surface of the cap has.
- When replacing VAZ 2110 valve stem seals, the year it was produced is taken into account.
Algorithm of actions for replacing valve stem seals on a VAZ 2110
Of course, to carry out such actions you will need certain tools.
First, the caps must be removed:
- The wire should be disconnected from the minus terminal of the power source.
- The camshaft has a pulley with teeth. It needs to be removed.
- The block head is released from the cover.
- The mass must be removed from the studs. To do this, you need to unscrew the two fastening nuts.
- The back cover is removed from the block head. It is secured with a bolt and two nuts.
- The cylinder head is closed with a cover. It along with the sealing ring should be removed.
- The nuts that secure the front and rear bearing housings must be unscrewed evenly.
- Both housings must be removed.
Important! The camshaft key must be removed immediately. Otherwise, you can simply lose it, since it does not fit quite tightly.
- The next step is to remove the camshaft from the cylinder head.
- It is necessary to remove the oil seal from it.
- The crankshaft should be turned. But this must be done so that the location of the piston is at top dead center.
- Next, you need to unscrew the spark plug. To prevent the valve from falling through, a metal rod must be inserted into the resulting hole.
- Then a device is installed that will compress the valve spring. You will need a nut that does not have a toothed collar.
- When the spring is compressed and two crackers are removed, the device is removed.
Advice. When removing the caps, they should not be turned, otherwise this will damage the guide sleeve.
Then you need to install the caps:
- The cap must be inserted into the mandrel, but it must first be “bathed” in engine oil.
- The part is pressed all the way into the lower plate.
- After this, the spring is installed.
Install all remaining valve stem seals in a similar manner.
It is easy to see that replacing the oil seals on a VAZ 2110 8 valves without removing the head can be done completely independently, without resorting to the services of a car service. But it must be said that such actions are carried out only if the model is VAZ 2110. If there are other models, such procedures will not be required.
And one moment. Of course, independent work on changing valve stem seals is only possible if the car owner is knowledgeable about technology and is familiar with the tool. Otherwise, there is nothing left to do but seek help from a car service center. Qualified specialists will provide active assistance in this.
Completion of work
Once all the new oil deflectors have been installed, you can begin assembly. It is quite possible to replace valve seals without removing the head. After all, dismantling the cylinder head is a labor-intensive process that will require replacing the gasket and draining the antifreeze. Motor assembly:
- Install the cover using only a new gasket.
- Install the camshaft pulley and tighten the bolt.
- Install the camshaft and crankshaft pulleys, install the timing belt and tension it.
- Install all attachments.
Replacing valve stem seals for Lada 2110 (VAZ 2110)
Valve seals, otherwise known as valve seals, are designed to prevent excess engine oil from leaking through. They should fit snugly against the valve and allow only the small amount of oil through that is necessary to lubricate it. In this article we will look at how to change valve stem seals with your own hands
Valve seals (VSC) are made of special rubber, which ages over time, begins to deteriorate and peel off from the base. All this leads to the fact that the cap begins to leak more oil, and therefore there is a high consumption of engine oil. Other symptoms of replacing oil seals may be the presence of blue smoke during over-gassing and low compression in the cylinders.
Oil seal replacement tool:
Replacing valve seals on a VAZ 2110 8V. Replacing MSCs is shown using the example of engine 2111 (8kl). To do this, you do not need to remove the heads from the cylinder block, but you will need a tin rod with a diameter of about 8mm (for example, solder).
We begin the procedure by removing the air filter, fuel pump, ignition distributor and auxiliary drive housing, unscrewing the bolt securing it with a 5" hexagon and disconnecting the negative terminal from the battery. Remove the timing pulley from the camshaft, and then the cylinder head cover.
Install the camshaft oil seal. Check the clearances in the valve drive and adjust them if necessary. Reassembly follows in reverse order.
Replacing oil seals on a carburetor is no different from injection engines. Replacing valve stem seals VAZ 2110 16V
Features of the process when performing work on VAZ 2112 (16kl) engines:
I will not describe the further process, because... it is similar to the instructions for 8kl. motor. Now you know how to replace valve stem seals yourself .
Video on replacing valve stem seals using the example of a BMW M54 internal combustion engine. I would like to note that the tool used is exactly the same as the actual process in the video and is no different from VAZ engines.
By the way, service stations charge from 2,500 to 5,000 rubles for this work.
In total, the entire work takes from 8 hours to 2 working days, depending on the experience of the specialist. The price of valve stem seals is 200 rubles/set. Catalog number, 2112-1007026. You can buy them in online stores (section 'Spare parts'). By the way, low compression, oil burns and other engine ailments can be due to wear on the piston rings, which are also replaced independently.
Today we’ll talk about replacing valve stem seals for VAZ 2110-2111 . To begin with, you will need to remove the camshaft, after which you need to install the crankshaft to the TDC position of the pistons of the first and fourth cylinders. In this position of the crankshaft, we change the oil seals of the valves of the first and fourth cylinders.
1. The next thing we need to do is remove the pusher with the adjusting washer from the cylinder head socket. Then unscrew the spark plug of the first cylinder.
2. Through the hole for the spark plugs, insert a tube with a diameter of approximately 8 mm, which is made of soft metal, between the upper edge of the piston and the valve plate on which we will change the cap.
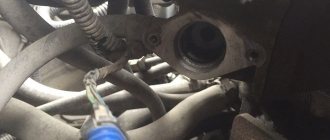
3. Now we install special devices for desiccation of the valves. The thrust bearing of our desiccant needs to be rested against the valve plate, and we place the hook lever behind the nut screwed onto the stud for securing the camshaft bearing housing.
4. Using a desiccant, you need to compress the valve springs and remove two crackers with tweezers.
5. In the fifth step, remove the spring plate.
6. At the same time, we remove the springs themselves.
7. Use special pliers to remove the oil seal ...
8. ...together with the valve guide.
9. At the final step, lubricate the new cap with engine oil and press it onto the guide bushing with a special mandrel. To complete the work, it is necessary to assemble the valve mechanism of the first cylinder in reverse order; we perform the same procedure for the fourth cylinder. Next, we rotate the crankshaft 180 degrees (this will be TDC in the second and third cylinders) and replace the oil seals in the second and third cylinders in a similar way. We reassemble everything that we took apart in the reverse order of removal.
What to do when you need to replace the valve stem seals on a 16-valve cylinder head, but the car service requires a lot of money? There is a way out - to do everything yourself. Of course, to carry out the operation you will need some knowledge of the structure of the engine, as well as its design. But, it is possible to carry out this operation on your own, while spending pennies on the purchase of the caps themselves.
Video on replacing valve stem seals on a 16-valve cylinder head without removing the head:
The video material will tell you how to replace valve stem seals without removing and completely disassembling the cylinder head, and will give some recommendations and tips on the process.
Changing valve stem seals with your own hands
Before jumping into the actual process, it is worth noting that there are some factors that indicate that these parts have worn out and need to be replaced. Also, it is worth preparing the appropriate tool for replacement. If the motorist is not confident in his abilities or does not know the design of the engine, then it is not recommended to begin work. It is best to contact a car service.
Signs of replacement
There are factors that directly or indirectly indicate that the valve stem seals on the VAZ-2112 need to be replaced. Let's consider all the options:
- Any motorist, at home or with another colleague, has observed such a thing as blue smoke . It is he who signals that it is time to change this part.
- Engine braking occurs for quite a long time , even jerkily in some cases.
- Oil contamination of spark plugs may also indicate that the caps need to be replaced.
- The VAZ-2112 has the property of consuming a large amount of oil .
Having considered all the signs, you can proceed directly to the process of preparing and replacing the part.
Tools
To replace valve stem seals you will need the following tools:
- Key for 12.
- Magnetic tweezers or screwdriver.
- Special tool for compressing valve springs.
- Inertia puller.
- Rags.
When all the tools are prepared, you can proceed directly to the replacement process.
Replacement process on a 16-valve VAZ-2112 engine
Of course, it is best to change valve stem seals with the cylinder head removed, but not every car owner can do this. Therefore, we will consider a step-by-step replacement process without dismantling the cylinder head. It is worth warning that this procedure is not quick and can take quite a lot of time, so you should plan your time in advance.
Another important nuance is that you will need to install a new valve cover gasket; you should worry about this part right away, so as not to run around later and look for where to buy it.
So, let's go directly to the process itself:
- We remove the “minus terminal” from the battery.
- We remove the high-voltage wires and unscrew the spark plugs.
- Using a special tool, it is necessary to clamp the 1st piston so that the valve timing does not go astray. In a word, we carry out the procedure that is associated with replacing the belt - we set the TTM.
- Now it is necessary to dismantle the valve cover; to do this, we will perform a number of operations written below. When reassembling, remember that the cover must be tightened to a certain torque and order of bolts.
- Disconnect all the wires that go to the pads.
- After unscrewing the mounting screws, remove the ignition coil. About checking the operation of the ignition coil here.
- Now, you need to remove the throttle. Of course, you can simplify the procedure and dismantle only the drive cable. If you remove the throttle assembly, pay attention to its condition; most likely, it will need cleaning.
- Unscrew the screws and move the power steering fixing hose aside.
- Now, unscrew the mounting screws and remove the valve cover.
- We unscrew the screws securing the rocker arms and dismantle them.
- Next, you need to use a special tool to compress the springs, which will allow you to remove the crackers.
- The last step is to repress the valve stem seals.
- When the operation is completed, it is necessary to reassemble in reverse order.
Now the new caps are installed, and the signs of malfunction should disappear. It is worth noting that experienced car mechanics carry out replacements on average in 8-12 hours, depending on the condition of the car’s engine. The pricing policy ranges from 3,500 to 5,000 rubles.
Choice of caps
The choice of valve stem seals for the VAZ 2112 should be taken quite seriously, since the normal functioning of the cylinder head and the main power unit will depend on them.
- 2112-1007026 — original set of valve stem seals produced by AvtoVAZ. So, they are ideal for the car, since they are produced directly by the manufacturer. The price of the set is 200 rubles.
- Also, there are a number of analogues that can be used: Master-sport (825-050-FPM-SET/16/-MS), Trialli (CV057), Herzog (HL2 7026). They are also easy to install and have the required factory service life indicated in the repair manuals. The average cost is 180 - 250 rubles.
But, as practice shows, auto mechanics opt for valve stem seals manufactured by Goetze (24-30667-01/0) . This is because their structure not only makes them easier to install, but they also have an increased service life and are less likely to fail than even the original ones.
As practice shows, you can actually do it yourself by replacing the valve stem seals on a 16-valve VAZ-2112 without removing the cylinder head . Of course, the procedure will take a sufficient amount of time and effort. So, usually inexperienced car enthusiasts go to a car service center and pay 4,500 rubles. for a replacement, but those who are braver save this amount of money.